Certainly every child’s bedroom should have a space where they can study and do their homework. Today we’ll share how to build a desk with wood and pipe.
With just a few materials and some basic tools, you can create an industrial-style desk that not only is a great workspace, but has loads of storage.
This step-by-step tutorial will show you how to build the perfect desk with plenty of shelves for storage and display.
In addition, you’ll learn how to stain the desk dark for a modern look, assemble the frame, and secure it to the wall!
Clearly one of the elements Aiden loved about this room was the built-in desk area, so we modernized it for only $40.
As you know in this minimal themed Star Wars bedroom makeover we are going to the dark side.
We’ve already painted the ceiling and light medallion black and installed LED lights.
Since we originally built and installed this industrial desk long before we began our blog, we thought we’d walk you through the steps of building a desk like this for yourself.
Welcome to Week 5 of the ORC
Welcome to Week 5 of the One Room Challenge!
As a reminder you can easily navigate through each week of this room makeover, by clicking on the links below.
Week 1 | Week 2 | Week 3 | Week 4 | Week 5 you are here! | Week 6 | Week 7 | Week 8
If you’re new here, we’re Michelle and Steph, a mom and daughter team.
WELCOME! You can learn more about us here.
Be sure to join our DIY community of doers so you won’t miss any of our DIY projects and ideas for your home.
In addition, you’ll want to follow us on Instagram for behind the scenes progress and updates!
And don’t forget on the One Room Challenge website, you’ll find lots of ideas for updating any space in your home.

Is It Cheaper to Build Your Own Desk?
So, is it really cheaper to build a desk on your own?
Usually when you build something yourself you’ll definitely save the cost of labor by doing it yourself.
And if you like to create, you’ll find projects like this to be so rewarding.
While I don’t remember the exact amount we spent building this desk, with today’s prices it would cost around $275 to build.
FYI, I saw a similar desk on Etsy for $1200 and you still need to install it yourself.
So in my book that’s about a $900 savings, totally worth it to build the desk myself.
Supplies to Build a Desk with Wood and Pipe
This project only requires a couple of tools, first you’ll need a drill to create holes in the boards and also for installing the flanges to the floor and wall.
The only other tool you’ll need is a saw to cut your boards to length.
If you don’t have a saw, you can get your wood cut at the home improvement store.
We do this all the time, which makes it easier to get our supplies home.
You’ll also need 3/4″ black pipe cut to these lengths:
- 3 28″ 3/4″ pipes
- 1 26″ 3/4″ pipe
- 2 13″ 3/4″ pipes
- 8 10 1/4″ 3/4″ pipes
- 3 6 1/4″ 3/4″ pipes
- 14 5″ 3/4″ pipes
- 3 8″ 3/4″ pipes
- 6 3/4″ flanges
- 17 3/4″ elbows
- 14 3/4″ T-connectors
Pine project wood was used for our desktop to get it wide enough. We found this at Lowes.
- 1 pine board 3/4″ x 20″ x 74″ or longer if you wanter your desk wider.
- 3 pine boards 3/4″ x 10″ x 74″ (shelves)
- 1 pine board 3/4″ x 10″ x 31″ (shelf)
And to keep the back of the desktop secure, we also added L-brackets to the bottom of the desktop.

Disclosure: This post contains affiliate links or referral links for your convenience. It is a way for this site to earn advertising commissions by advertising or linking to specific products and/or services. Click here to read my full disclosure policy.
Prepare Pipe and Fitting
Once you’ve gathered all of your supplies, you’ll need to do a bit of prep work before building an industrial pipe desk.
The pipe can be purchased in shorter lengths, but may be difficult to find in the exact length you need.
This black pipe can be cut at Home Depot or Lowes.
That’s just what we did, not only will they cut it for you, but also thread the ends of the pipe.
This black pipe has an oily film on it so first you’ll need to clean it with with a degreaser like Dawn dish soap.
You can install it as is, or paint the pipes.
We chose to paint the pipes, flanges, elbows and t-connectors with a satin nickel finish.
Are you enjoying this post?! Please pin it, save it for later and share it with a friend.
Sharing is caring!
Prep Desk Top and Shelves
Before you begin adding your stain to your wood, you’ll want to drill the necessary holes for the pipes.
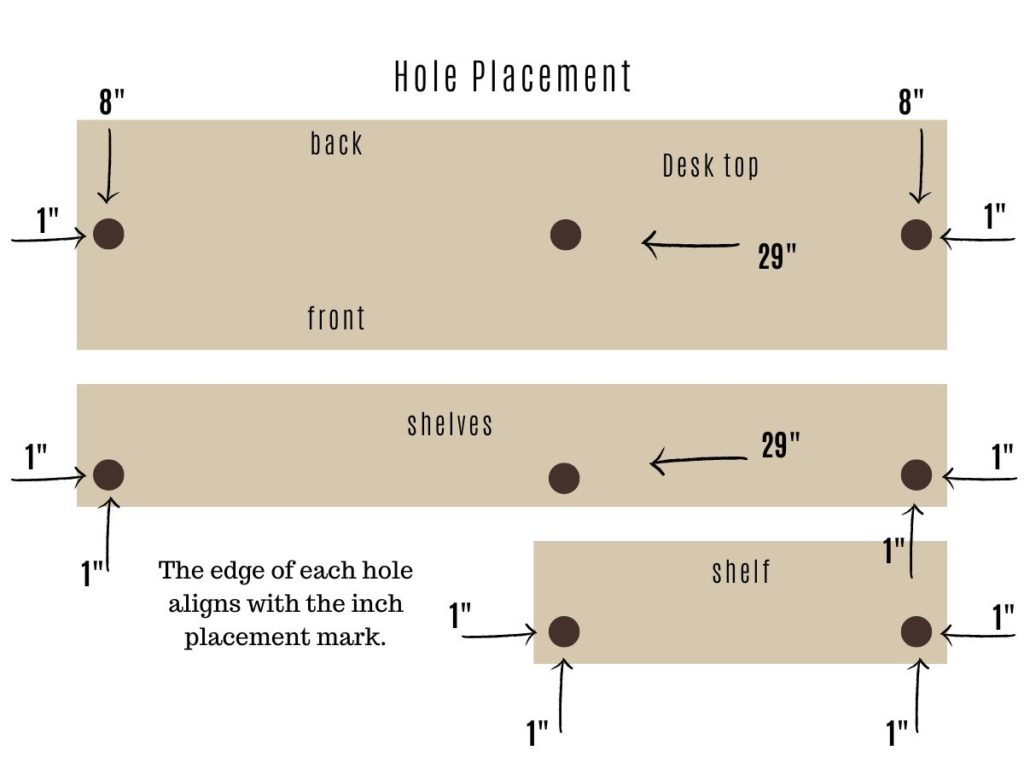
You’ll use a 1 1/4″ hole saw bit to drill each hole.
Align the edge of the drill bit with the inch placement mark in the diagram.
Once you have all the holes drilled, sand each piece with fine grit sandpaper and prepare it for stain.
To modernize the look of these shelves we used a true black stain.
And if you’ve stained pine wood before you know how difficult it can be to get even coverage.
You’ll find our tips for staining pine wood here.
In the staining post, you’ll also find tips for applying a topcoat.
For our desktop we applied three layers for added durability.
Then each of the shelves received two coats of topcoat.

Allow to dry and cure, then we are ready to build an industrial desk with wood and pipe.

[mailerlite_form form_id=2]
Build a Desk with Wood and Pipe

To get a visual of how the pipes go together, we found it helpful to place them out on the floor.
We connected the elbow and T-connector to the 5″ pipes.
This will be the horizontal braces for the desktop and each of the shelves.
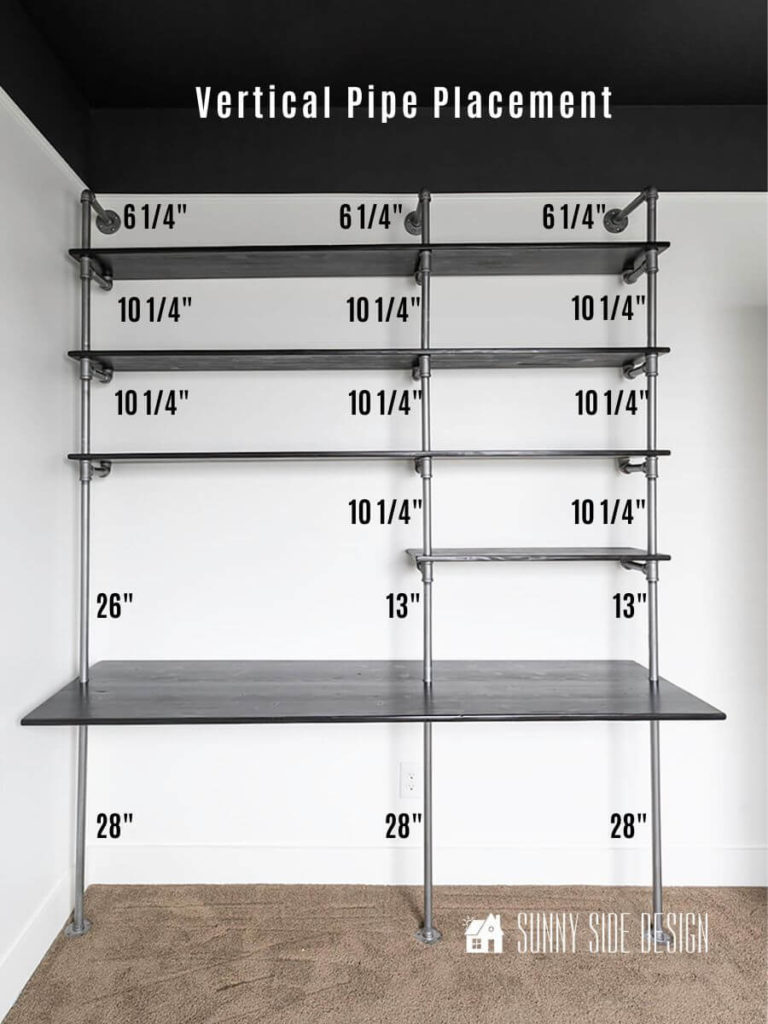
Hopefully this view of the placement of each pipe will be helpful for you.
Build Desk

First you’ll want to secure the flanges to the floor, the edge of the pipe is 8″ from the wall.
You can also lay the desktop surface down on the floor for each pipe placement.
Then attach the 28″ pipes to the flanges, followed by the 5″ horizontal braces and then the 26″ pipe on the left and the two 13″ pipes on the right.
At this time we marked the placement of the desktop and attached 4 L-brackets to the wall at the studs.

Now you can slide the desktop through the holes onto the three pipes.

At this time, we placed screws through the L-brackets into the desktop.
This will prevent the desktop from lifting up in the back if someone presses down on the front.
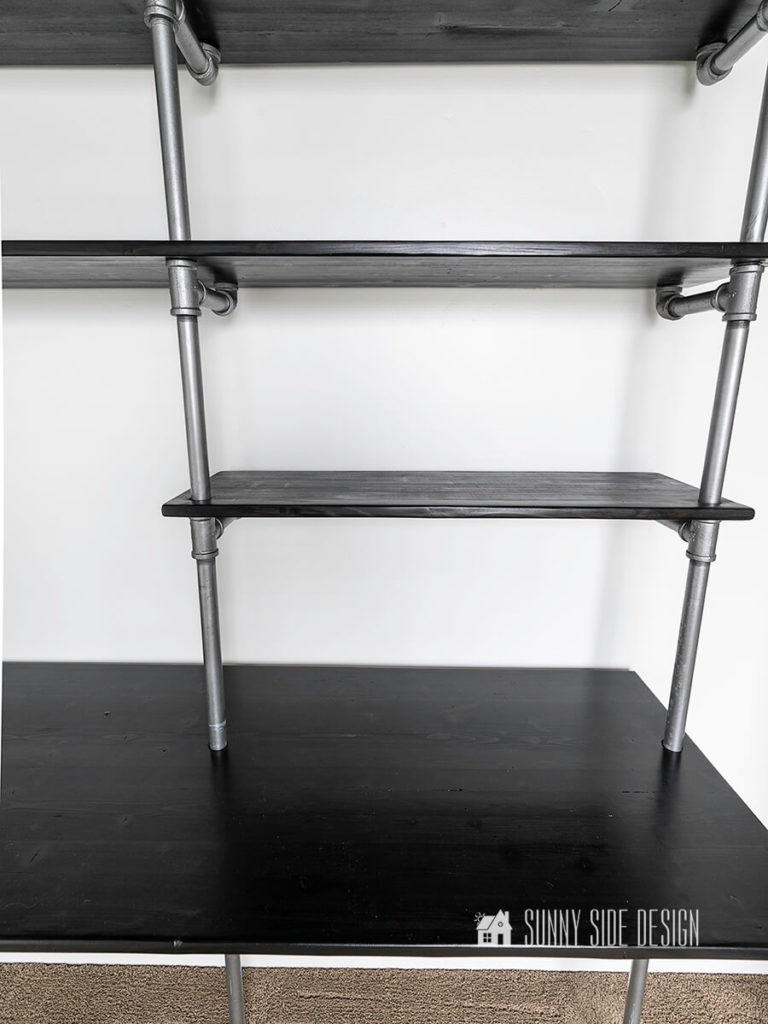
Build Shelves

Next attach the two T-connectors to the two 13″ pipes.
And then attach the two 10 1/4″ pipes.

Finally add the small shelf.
Next attach the T-connector shelf brace pieces and then three of the 10 1/4″ pipes.
Then add the long shelf and repeat with the final shelf.
The pipe that the top shelf threads through is the 6 1/4″ pipe.
Secure Desk and Shelves to Wall
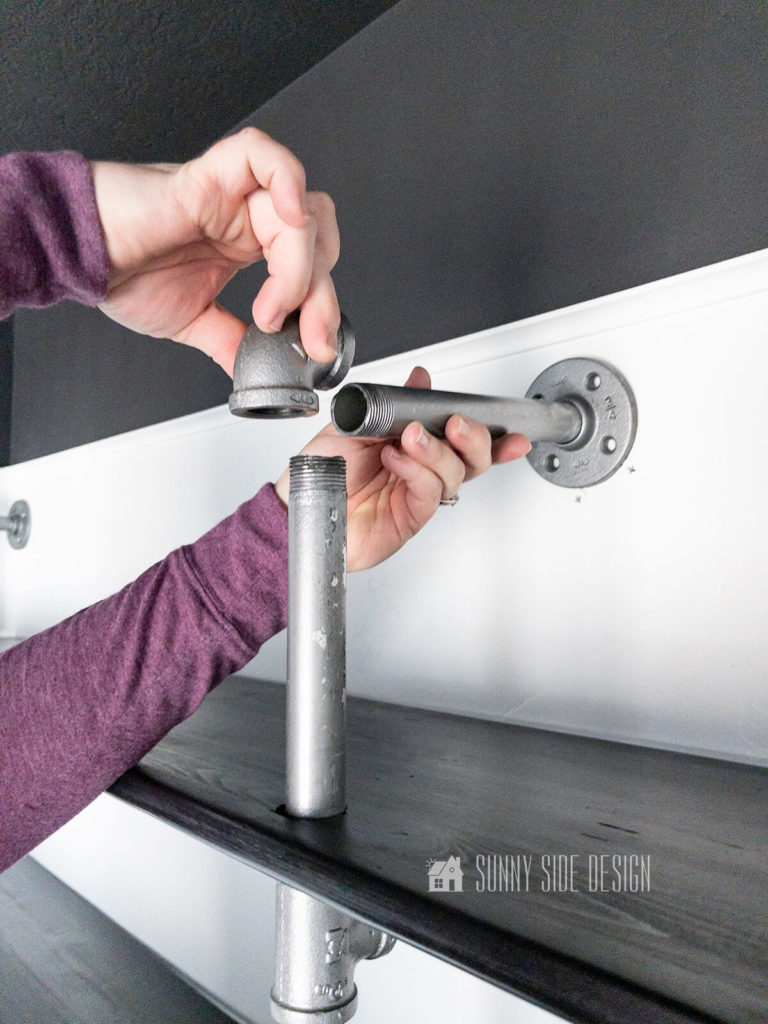
Once all the shelves are attached to the desk unit, you’ll attach the final elbows on each pipe and the 8″ pipe that will connect to the flange.
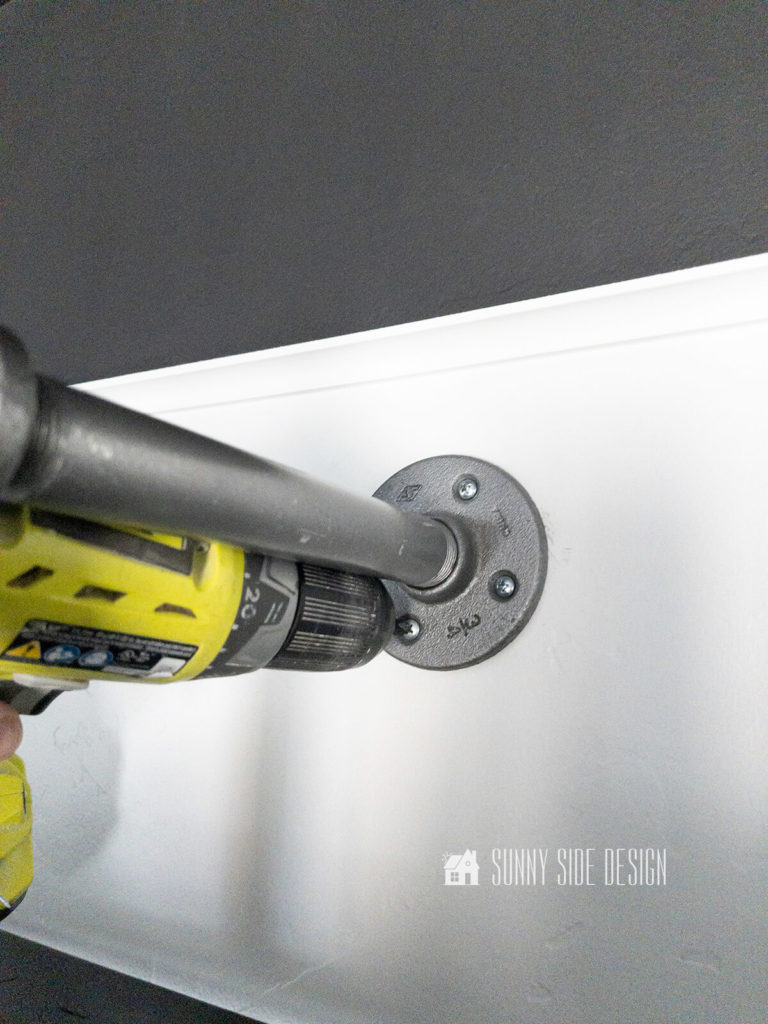
Finally attach the three flanges to the wall with screws.
If you find that you don’t have studs at these locations, insert drywall anchors.
Let’s stay connected! Follow us on social media!

And there it is! As you can see, the assembly of this desk goes together rather quickly.
In fact, it took us less than an hour to reassemble it and attach it to the wall.
Let’s take a look at what the rustic industrial desk looked at when we began the ORC.

Do you think that we made it look less rustic and more modern with our update?
As you can see it’s the perfect addition to any workspace or small bedroom.
Now we have a functional desk with plenty of shelves for display and storage.
Plus, by adding the dark black stain, this desk has a modern vibe that will be the envy of all who see it.
So start building your own masterpiece today!
Here are a couple other desk projects you may like:
- Desk Makeover with a Modern Vibe
- Built-In Desk | Upcycling at It’s Best
- Thrift Store Desk Makeover with Chalk Paint
And for more homework station ideas click here.
Shop Modern Desks
We hope you found some inspiration here today! Please pin this post, save it for later and share it with a friend.
Sharing is caring!
Is this desk project something you can envision in your home?
Next week for the One Room Challenge we’ll show you how to update curtain panels for less than $25.
If you’re new here, WELCOME! We love having new readers and friends!
You can learn more about us here.
Let’s stay connected! Join our DIY community of doers and you won’t miss any updates on the One Room Challenge.
Please PIN and save for later, and share with your friends! Sharing helps grow our following!
Thanks for stopping by and as always here at Sunny Side Design
WE HOPE TO BRING YOUR HOME TO THE SUNNY SIDE OF THE STREET!

Retailers We Love
- Anthropologie
- Birch Lane
- Crate & Barrel
- Joss and Main
- Lampsplus
- Mark & Graham
- One Kings Lane
- Pottery Barn
- Rejuvenation
- Serena & Lily
- Wayfair
- West Elm
- Williams Sonoma
- World Market
Be sure to follow us on Pinterest for even more home decor and DIY ideas.
To see what we are working on before it’s on our blog, follow us on Instagram.
You will also find our video tutorials on our YouTube channel.
- Creating a Cozy Outdoor Living Room with Thrifted Finds

- The Best ‘Berry in Love’ Bridal Shower Ideas
- Paint an Old World Texture Finish on a Vase
- Easy Strawberry Chicken Salad with Lime Maple Balsamic Vinaigrette


You two are amazing! Such a great idea. Hugs to you.
Thank you Renae for your support and kindness. Have a wonderful day!