For years I’ve dreamed of making a built in reading nook in my home.
And while designing the function and practicality of our basement, I really wanted to find a way to incorporate a reading nook into our family room.
Over the years of I’ve saved many creative ideas for building a reading nook from magazines, Instagram, Pinterest and from visiting the Parade of Homes.
And I knew exactly what I wanted to include in our reading nook.
First of all, I wanted a cozy spot to relax with a good book.
Along with adequate lighting and bookshelves was next on my list.
Finally, I wanted to add additional storage into this space with drawers.
While we have made built in bookshelves before, drawers would be a new skill we would have to learn.
Luckily, we are always willing to learn something new.
Welcome to week 6 of the One Room Challenge!
Clearly, we are excited with the progress we are making in our ultimate family hangout room!
While it’s a lot of hard work, we feel good about our progress.
And our to do list is GROWING before the final reveal in just 2 weeks!
If you’re new here, WELCOME! You can learn more about us here.
Be sure to subscribe to our FREE newsletter so you don’t miss any of the projects in this basement family room.
Also you’ll want to follow us on Instagram for behind the scenes progress and updates!
Be sure to join us each week to check our progress!
And for more ideas to add value to your home, take a look at 10 Sensational Home Improvement Ideas on a Budget.
Also on the One Room Challenge website, you’ll find lots of ideas for updating any space in your home.

Projects in Our One Room Challenge
You can easily navigate through each week of this ultimate modern coastal family room project below.
- Week 1 – How to Make a Built In Entertainment Center
- Week 2 – How to Make a Simple Cabinet Box
- Week 3 – How to DIY an Epoxy Countertop to Look Like Marble!
- Week 4 – How to Easily Install a Laminate Floor Over Concrete
- Week 5 – Add Old World Charm with a Simple Brick Backsplash
- Week 6 – You are here!
- Week 7 – How to Make a Simple Upcycled DIY Sofa Table
- Week 8 – Reveal Day! Basement Family Room Ideas on a Budget
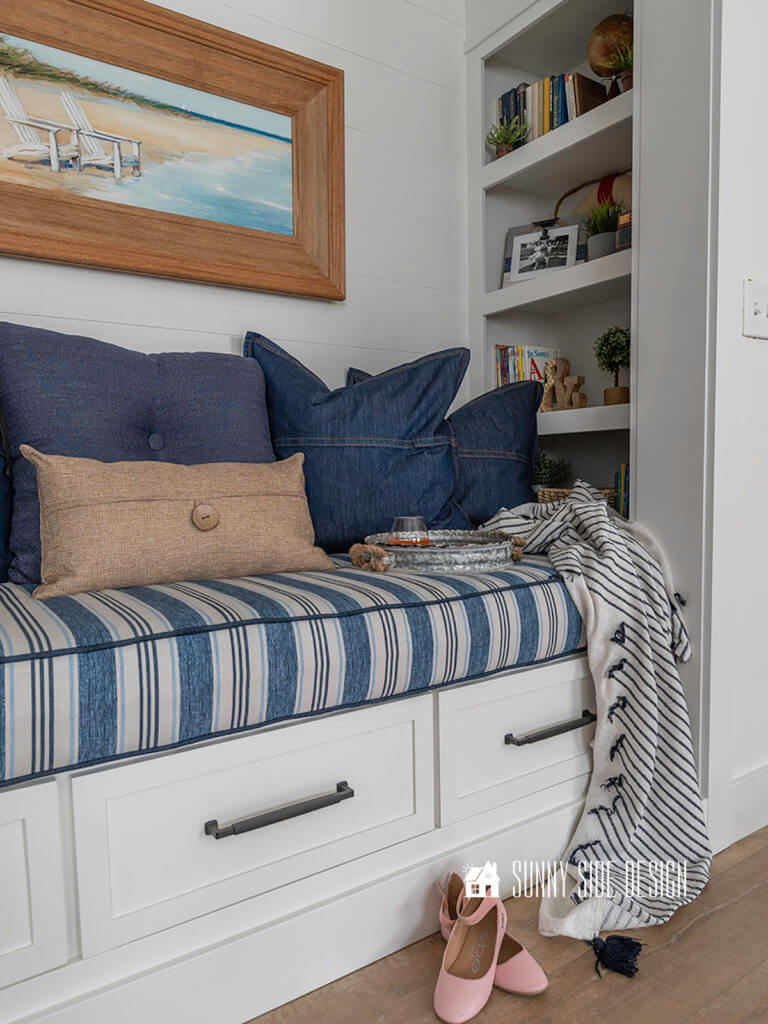
- Built In Reading Nook Plan
- Supplies Needed
- Video Tutorial
- Install Shiplap Wall
- Base for Built In Reading Nook
- Build Face Frame for Drawers
- Mount Drawer Slides
- Add Bookshelves
- Add Bookshelf Header & Molding
- Caulk and Putty
- Prime and Paint Built In Reading Nook
- Drawers
- Add Header, Casing and Baseboard
- Built In Reading Nook Reveal
Built In Reading Nook Plan

Before we begin a project like this, we like to create a measured drawing using the free version of SketchUp.
This is a great way to bring a project to life, before you actually start the construction.
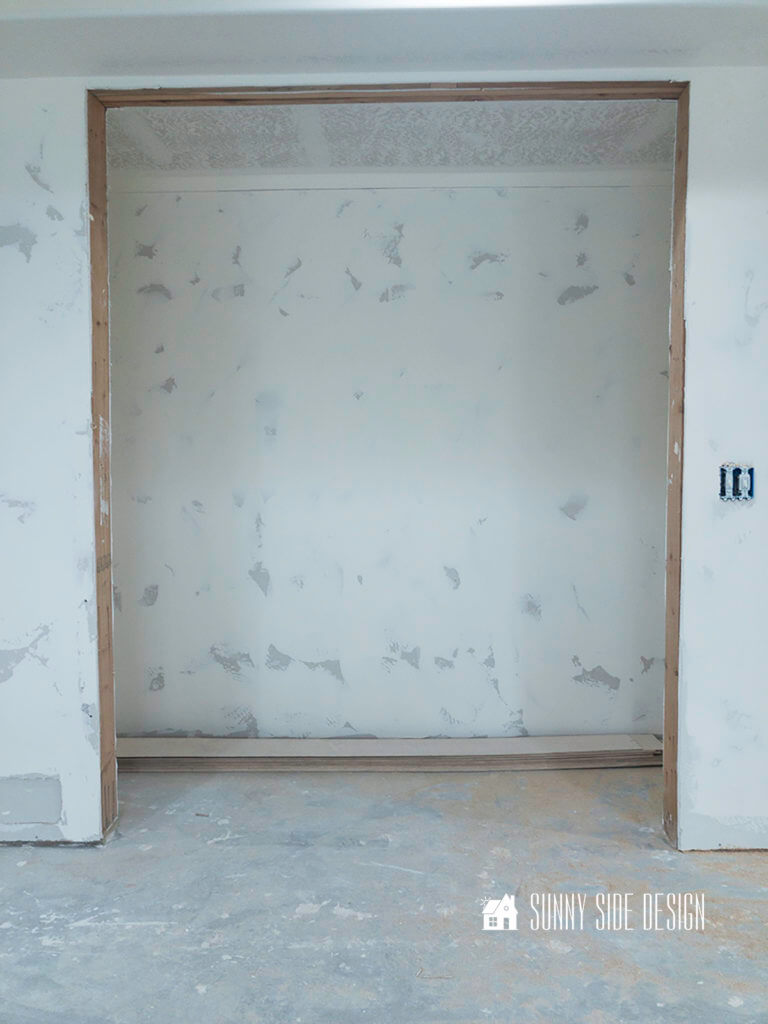
In the original builders plan for our basement, there was space for two large storage closets.
And I felt that one of these closet spaces would make the perfect built in reading nook.
Using the footprint of the closet space, we made a plan for the base to accommodate three drawers and on the recessed sides of the closet, we would create two built in bookshelves.
With our measured drawing in hand, we could then purchase the supplies needed to make our built in reading nook come to life.
Supplies Needed
- shiplap (we made our own from utility plywood)
- 2×8 lumber
- 2×4 lumber
- 4×8 OSB lumber
- 1×6 poplar board
- 3/4″ 4×8 MDF panel
- 1×3 primed MDF board
- hardboard tempered panel
- 5″ craftsman base molding
- crown molding
- craftsman door casing
- craftsman door header
- drawer slides
- Amerock drawer pulls
- caulk
- wood putty
- wood glue
- brad nailer
- caulk gun
- chop saw
- Wagner paint sprayer
- drill
- Kreg pocket hole jig
Video Tutorial
If you’d like to see our video tutorial, head over to our YouTube channel.
Install Shiplap Wall
After completing the shiplap ceiling in the family room, we found we had extra shiplap.
Of course we can’t let it go to waste, so we decided to install it on the wall in the reading nook.
Personally, I think shiplap adds character and interest to any space.
For example, I love the character it added to our Jack and Jill bathroom.

To begin we first marked where the studs were in the wall.
Then we installed 8″ strips of utility plywood.
Before you install the plywood, sand the edges so they are nice and smooth.

Then fill in all of the nail holes with wood putty, sand smooth when dry.
And finally, we applied primer and 2 coats of white paint.
Are you enjoying this post?!
Please pin it for later and share it with a friend.
Base for Built In Reading Nook
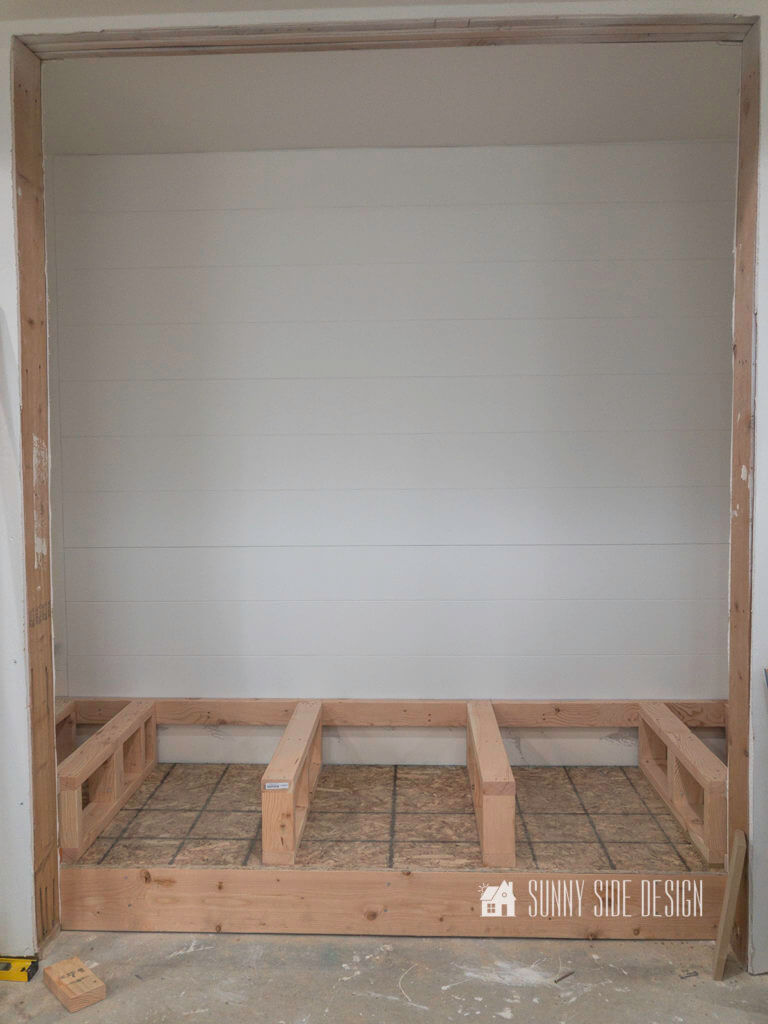
Once the back wall was finished, we began to create the base for our built in reading nook.
First we created a base out of 2×8″ lumber that we ripped down to 7″ wide.
The 2″x7″ lumber goes around the perimeter of the space, with supports going across every 18″.
Then we topped it with a piece of OSB board, which was leftover from another project.
Of course, you can always use plywood to top the base.
Next we secured a 2×4 board 12 1/2 ” from the floor on the back and side walls into the studs.
This will be the height of the platform for our built in reading nook, allowing for a 6″ cushion.
And will make the seat of our built in reading nook 19″ high.
If you choose to use a thinner cushion, you may want to raise your platform height.

Next we constructed supports from 2×4 boards.
Not only are these supports necessary for the strength of the platform, but they also serve as dividers for our drawers.
Also notice that the supports are 3/4″ shorter than the depth of the base.
This will accommodate the thickness of the poplar face frame we will add.
Finally these supports are attached to the base.
Build Face Frame for Drawers

Next, we will need a face frame for the front of the drawers.
This face frame is constructed just like the frames we made for the cabinet boxes.
They too are made out of 1″ poplar (actual size 3/4″), but with cross pieces between each drawer.
Then the face frame is attached to the front of the 2×4 supports with wood glue and brads.
Also the face frame is installed 3/4″ above the top of the 2×4 supports.
This will accommodate the MDF board that will form the top of the reading nook platform.
Mount Drawer Slides

Now we are ready to install the undermount full extension drawer slides.
They are mounted to the 2×4’s on each side with screws.
I feel that the undermount drawer slides are more durable and we also get that soft close feature.
No doubt, with kids we need to make sure it’s durable!
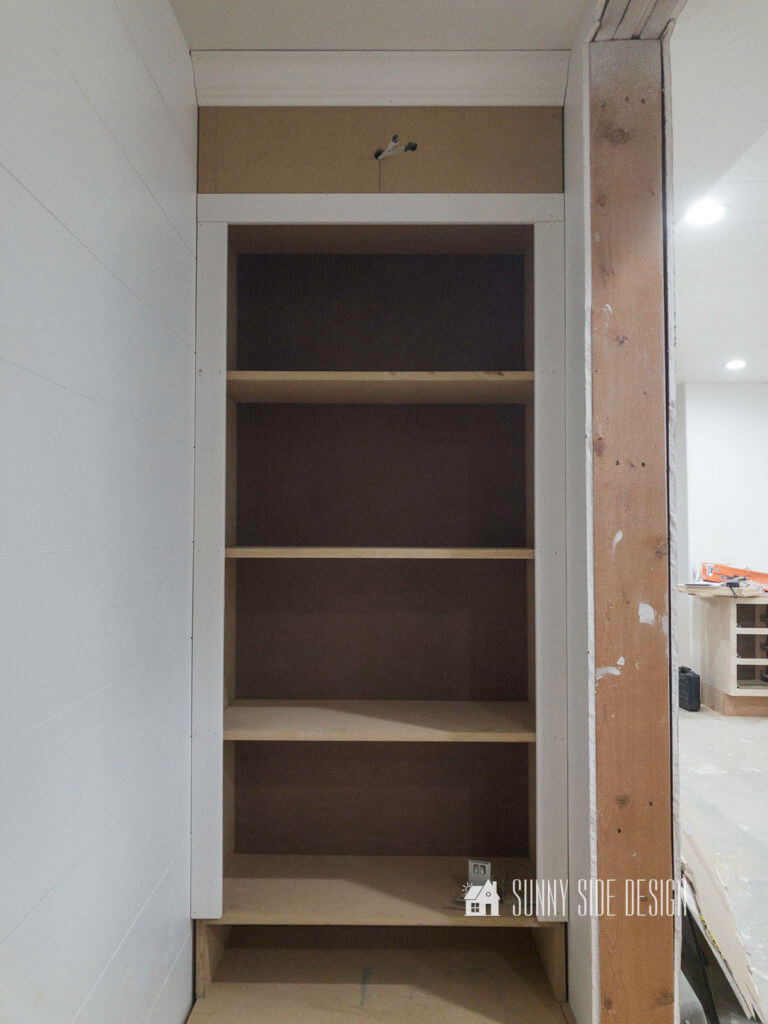
Add Bookshelves

Before we add the bookshelves a piece of MDF board is cut to fit the top of reading nook platform and it’s secured to the supports with brads.
Certainly in our built in reading nook, I wanted to have plenty of storage for books.
With that in mind, we built two bookshelves, one for each side.
And you’ll find how we built the bookshelves here.

Just like the bookshelves in the built in entertainment center, we added a backing of hardboard tempered panel.
Add Bookshelf Header & Molding
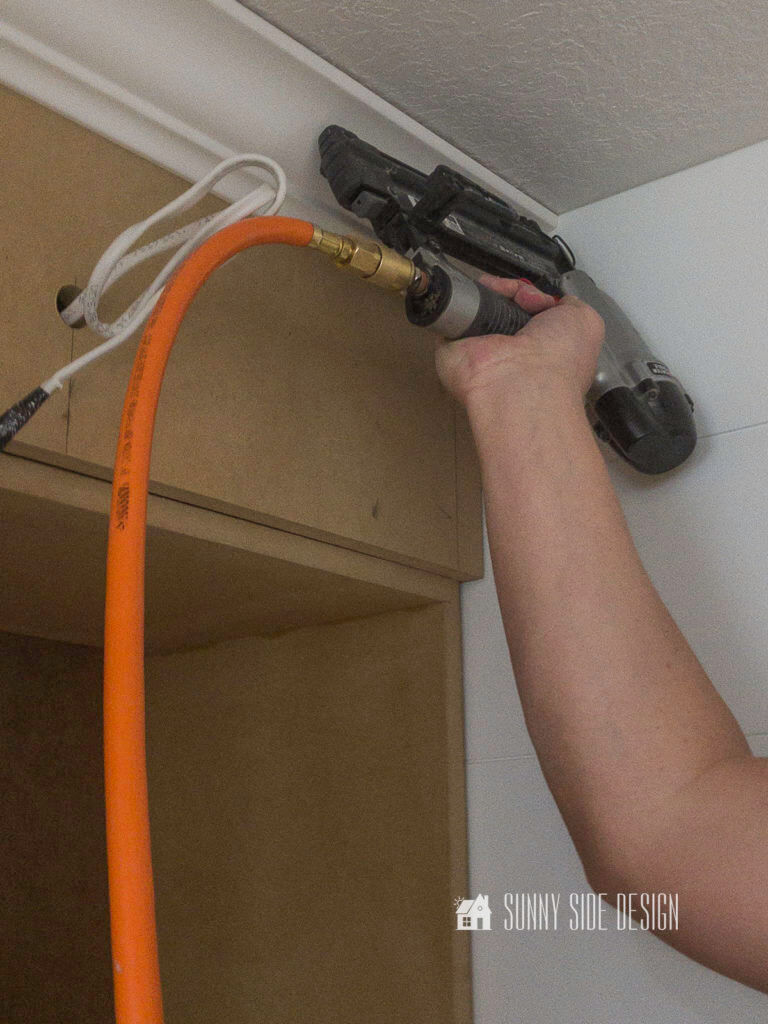
I believe adding the details like the molding are what make the built in look professional.
Clearly, it’s the details, like a piece of crown molding that take it over the top!
However, before we start to install the molding, we used a scrap piece of MDF board to make the header and footer.
In addition, in the header piece we drilled a hole for the lighting.

Finally, we trimmed out the sides and shelves with flat primed MDF molding.
And along the back of the platform area, we also installed a 1×5 MDF molding to finish off the back edge.
You will see that in the photo below.
Let’s stay connected! Follow us on social media!
Caulk and Putty
Certainly the built in reading nook is really starting to take shape.
Before we can prime and paint, all of the nail holes are filled in with wood putty and sanded smooth.
And all of the seams in the bookshelves and the molding is caulked too.
Prime and Paint Built In Reading Nook

Finally we are ready to prime and paint the built in reading nook.

Clearly when we have a big project like this, we like to use our Wagner
Flexio 5000 paint sprayer to get the job done fast with professional results.
Without a doubt, we have made good use of the paint sprayer in this One Room Challenge.
Drawers

If you choose to add drawers to your reading nook like we did, you’ll find the complete tutorial here.
For the drawers we used a sanded plywood and our Kreg pocket jig to construct them.
This was our first time building drawers and we were surprised how simple they are to make.
And to learn how to make the drawer fronts click here.
Add Header, Casing and Baseboard

Last but not least is installing a door casing and header around the opening for our built in reading nook.
A scrap of MDF is also installed over the base along with the base molding to finish off the space.
Are you enjoying this post?!
Please Pin it to save it for later and share it with your friends.
Built In Reading Nook Reveal

To see 25 more reading nook ideas, click here.
We hope you found a little inspiration here today.
So tell me, are you ready to make a built in reading nook for your home?
Also remember to check back each week as we continue the One Room Challenge as we share a new DIY project.
And next week we’ll share how to upcycle an old dining table into a long sofa table for our sectional.
What are your favorite elements in this room so far?
We’d love to hear from you!
Please share your thoughts and questions with us.
If you’re new here, WELCOME! We love having new readers and friends!
You can learn more about us here.
Let’s stay connected!
Subscribe to our free newsletter so you don’t miss any inspiration for your home.
Please PIN and save for later, and share with your friends!
Sharing helps grow our following!

Thanks for stopping by Sunnyside Home. Empowering you to create a home you love.
Be sure to follow us on Pinterest for even more home decor and DIY ideas.
To see what we are working on before it’s on our blog, follow us on Instagram.
You will also find our video tutorials on our YouTube channel.


Where did you find the cushion?
Hi Jen, we purchased the foam at Home Depot and glued two pieces together with glue for foam padding. We stitched the cushion ourselves
We love that you’re a mom & daughter duo and share so much detail into your projects. We are building a reading nook following this post and would love to know where you found the cushion. Thanks!
That make my heart so happy to hear you are making this project yourself. We planned on have the cushion custom made, but with a lead time of 5 weeks we decided to make it ourselves. Here is the link: https://www.2thesunnyside.com/how-to-make-box-cushion/ We recently just finished a home office library with built in and a window seat and had the cushion made by The Hearth and Home Store
Y’all have accomplished so much in a short time. I love the built-in. Ready for the reveal!
Thank you Maggie, we got a head start on this one. It was more than we could possible handle in just 8 weeks! We are frantically trying to get the finishing touches done in the room.
This is such a great, detailed tutorial!!! It looks so good too!
Thank you so much! The kids already love this space and started using it before it was finished.