Built In Shelves In Wall
Does your home lack storage? Are you tight on space? Perhaps you don’t even know where you could even place additional storage.
This was the case for one of our clients.
She spends a good part of her day in the salon, whether it’s working with her own clients or instructing her students. The space itself is small and simply overcrowded.
She was in need of ample storage space for products to sell, coloring supplies, etc. Certainly, this alone would give her students more room to observe and learn.
Several years ago she resolved that the only solution would be to add this much needed storage space directly in the walls.
Her husband began by opening up the wall, and prepping the space for shelves. And this is exactly how it sat for several years. Clearly, we were happy to help with this problem!
You’ll be inspired today as we share how to construct custom built in shelves in a wall with our step by step guide.
Please see our video tutorial for instruction as well. The reaction of our client alone to these completed shelves is PRICELESS!
Sunny Side Design is a participant in the Amazon Services LLC Associates Program, an affiliate advertising program designed to provide a means for sites to earn advertising fees by advertising and linking to Amazon.com. As an Amazon Associate, this blog earns from qualifying purchases with no additional cost to you. Click here to read our full disclosure policy.
- before and after built in shelves in wall
- complete video step by step tutorial
- plans for built in shelves in wall
- Supplies needed
- Step 1: how to construct built in shelves in wall
- Step 2: Create grooves with router
- how to use the router
- Step 3: How to build the shelving unit
- Step 4: Placing the shelves into vertical boards
- Step 5: Secure with pneumatic brad nailer
- Step 6: placing the end boards of shelving unit
- Step 7: Apply molding
- Step 8: Apply caulk
- Step 9: Attach back of shelving unit
- how to install built in shelves in wall
- complete custom built in shelves in wall
before and after built in shelves in wall


Here you see the before and after.
As mentioned before her husband opened the wall and framed an opening for the shelving. Then it sat this way for several years, because her husband had no clue how to build the shelves.
NOTE: Take precautions when opening up a wall for additional storage space. If it’s a structural supporting wall, framing will need to include a header for the wall to maintain stability. If you’re not sure, ask for help. You don’t want to compromise the structure of your home.
complete video step by step tutorial
plans for built in shelves in wall
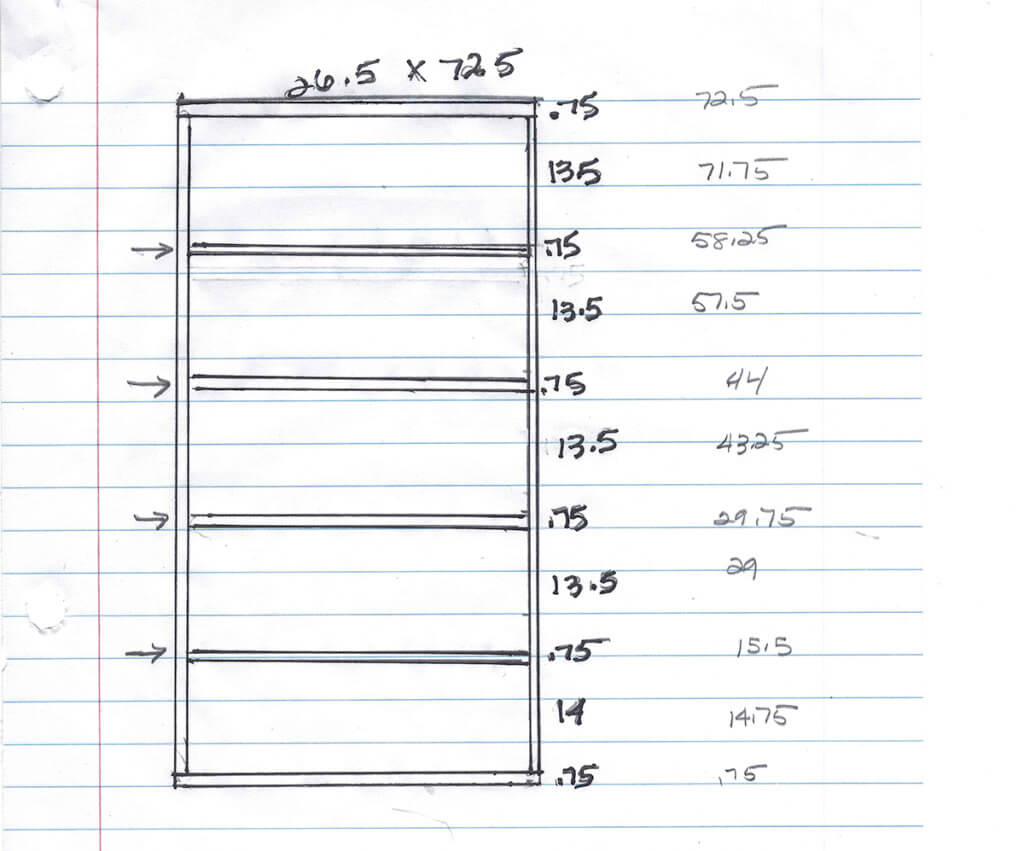
The first thing you’ll need to do is have a plan. Start with the open dimensions framed in the wall.
The opening in our clients wall was 72.75″ H x 26.75″ W. x 7.5″ D.
Then sketch out the design.
Per consulting with our client we agreed on making each section of the shelving unit roughly 14″ H. With this in mind, we were able to sketch out the complete design of the shelves.
We planned to construct them using .75″ thick MDF. So we accounted for the thickness of each shelf in our design.
And if you need some basic storage shelves in your home, take a look at these two ideas:
- melamine shelves in a closet
- storage room organization shelves
- How to Build Simple Basement Storage Shelves That Last
Supplies needed


With our sketch in hand, we headed to The Home Depot to purchase supplies.
We had a 4′ x 8′ (.75″ thick) board of MDF cut into 7″ strips.
This not only allowed us to get the wood home easier, but saved us from the work of cutting the wood to size at home.
Additional supplies used to construct these custom built in shelves in wall are as follows:
- chop saw
- measuring tape
- framing square
- level
- router with 3/4″ cutting bit
- jig
- palm sander
- wood glue
- pneumatic nail gun
- air compressor
- brads
- rubber mallet
- finish molding
- caulk
- putty
- putty knife
- paint
- paint brush
- paint sprayer (optional)
- shims
- frog tape
- wet washcloth

Step 1: how to construct built in shelves in wall


The first step to constructing custom built in shelves in a wall is to cut the side boards to the desired length. Then place a pencil mark on the 2 side boards where each shelf will be placed.
Next use a framing square, draw a line across the surface of the side boards at each pencil mark. This will give you a visual guide where dados will be cut for each shelf.
Are you enjoying this project? Please Pin It, save it for later and share it with a friend.
Sharing is caring!
Step 2: Create grooves with router

The next step is to create grooves or dados in each vertical board for the shelves to slide into.
To do this we used a router with a 3/4″ straight cutting bit and set the depth of the bit to 3/8″, which is half of the depth of the wood.
For ease in making straight cuts in each vertical board we also used a jig my Dad built.
The jig is basically made with 2 pieces of wood screwed together perpendicular to one another. A groove or notch has also been cut in the wood to create a channel for the router to follow.


To begin cutting the grooves in each of the vertical side boards, lay them parallel to one another.
Then place the jig next to the side board. Position the groove in the jig next to the pencil mark indicating where the groove will be cut.
With the bit placed in the groove, it will allow the router to run along the edge of the top piece of wood of the jig thus making a straight edge for the router to follow.


Before you begin to use the router to create the grooves be sure to check that each side board are flush to one another and the jig is lined up where it needs to be.
In order to keep the side boards and jig from moving you’ll also need a second set of hands (or in this case feet). Having someone step on the side boards and the jig will hold each board into place while the grooves are being cut.
You could also use a large clamp to secure the boards together.
how to use the router

To use the router, first place the bit into the groove in the jig. The edge of the router will be lined up with the top edge of the jig.
Then turn the router on and allow it to come up to full speed.
At this time begin to slowly guide the router along the edge of the jig to create a perfectly straight groove in each vertical side board.


Repeat this process at each remaining pencil mark placed for the grooves.

Here’s a better look at the grooves created with the router.
Step 3: How to build the shelving unit

After the vertical side boards have all the grooves cut, you can proceed to cut each shelve piece to length for these custom built in shelves in a wall.
Each of these shelf pieces were cut to 26.5″.


After each shelf piece is cut, take a palm sander to ease off a little bit of the wood where it will slide into the groove.
We’ve used this method to build several other built in shelving units. Sanding the edges allows the shelves to slide into the grooves in the vertical side boards a little easier.
If you’re new here, welcome! We’re so glad you’re here.
Let us introduce ourselves, we’re Michelle and Steph, a mom and daughter team who love to DIY and decorate our homes.
Not only are we passionate about making our homes warm, comfortable and unique, but it’s our mission to help you create that same feeling in your own home.
You’ll find ideas for repurposing, creating, decorating and making your home truly yours, while always mindful of a tight budget.
Undoubtedly we love finding ways to make your home look high-end on a small budget.
Plus you’ll also find a recipe or two as we share our family favorites with you.
We’d love it if you’d join our community of doers so you won’t miss any inspiration for your home.
We love new friends.

[mailerlite_form form_id=2]
Step 4: Placing the shelves into vertical boards


First apply a liberal amount of wood glue into the groove.


Next place a shelf piece into the groove.
Then use a rubber mallet to tap the shelf down into the groove. Be sure that the shelf is flush with the front and back of the side board.
Continue with this process for each shelf piece.
Let’s stay connected! Follow us on social media!
Step 5: Secure with pneumatic brad nailer

After each shelf piece has been tamped into place with the rubber mallet, carefully rotate the wood onto its side.
Next, use the framing square and pencil to place a mark in the center of each shelf piece.
This will give a visual guide where the brads will be placed.

Then using a pneumatic brad nailer drive 3 brads directly into each shelf piece. One on each end and one in the center.
The combination of the shelves being fitted into the grooves with wood glue in addition to being secured with brads will ensure a sturdy shelving system.

After the shelves have been secured to the first vertical side board, carefully rotate the wood with the opposite end of the shelves facing up.
Apply a liberal amount of wood glue to each of the shelve edges.
Then place the other vertical side board on top of the shelve pieces. Be sure to line the shelves up with all of the grooves.

At this time, use the rubber mallet to ensure the shelf pieces are completely in the vertical side board. Again be sure to keep the boards flush with the front and back.

Then using the framing square, again place pencil marks in the center of each shelf piece.

Finally, secure each shelf piece in place with the pneumatic brad nailer.
Step 6: placing the end boards of shelving unit


To finish off the base construction of the shelving unit, place a board at the top and bottom, perpendicular to the vertical side boards. Secure into place with wood glue and brads.
Step 7: Apply molding

To create a more custom finish look for the built in shelves in wall, we like to add molding. This will conceal the rough edges of the MDF along with the shelf seams.
This not only gives it a more professional look, but it also gives the illusion that the shelves are thicker than they actually are.
Molding sizes we used are as follows:
- 1″ x 2″ x 8″ primed MDF board; front of shelves
- 1″ x 3″ x 8″ primed MDF board; sides and bottom edge of shelving unit
- 1″ x 4″ x 8″ primed MDF board; top header piece of shelving unit

At this point, we measured the length of each shelf in between the two vertical side boards. The 1″ x 2″ x 8″ board was cut to size for each of the four shelves.
Then use wood glue on the front edge of each shelf and secured the molding into place with the pneumatic brad nailer.

The top edge of the molding is placed flush to the surface of each shelf.
The molding will hang past the bottom edge of the shelf.
All remaining molding pieces were cut to size and installed in our clients home.
Step 8: Apply caulk


After the molding has been applied to each shelf, use caulk in each seem to conceal each of the joints.
Allow to dry per instructions before painting.
The shelves were then painted before installation. This can be done with a brush and/or roller. We used our paint sprayer to achieve a nice smooth finish without any brush strokes.
All remaining molding pieces were also painted prior to installation.
Step 9: Attach back of shelving unit

Finally paint and secure the back of the shelving unit with the pneumatic brad nailer before installation.
We used the piece of bead board that was placed in the wall cutout as seen in the before photo. It hadn’t been secured to the wall. So we were easily able to remove it and attach it to the shelving unit.
how to install built in shelves in wall


Finally, the shelving unit is ready for installation!
Place the unit inside the wall cutout. Use a level and adjust the shelving unit with shims where necessary to ensure it’s level.
At this point, use the pneumatic brad nailer to secure the shelving unit directly into the studs. Then drive brads into the top header piece as well as each side stud.
Once it has been secured into place the remaining molding pieces can be added.
The 1″ x 3″ x 8″ was cut to the width of the bottom shelf and secured into place.
While the other 1″ x 3″ x 8″ boards were cut to the length of the shelving unit and secured into place.
Finally, for the header a 1″ x 4″ x 8″ board was cut 1/4″ beyond the width of the vertical molding pieces and secured into place.
Now use putty to fill in the brad holes and caulk around the outside edges of the shelving unit where it meets the wall.
Once the putty and caulk are dry, use a small paint brush to touch up these areas.
Allow to dry before adding any items to the custom built in shelves in wall.

complete custom built in shelves in wall
Without a doubt, our client was beyond thrilled to finally have this custom built in shelves in the wall installed! Be sure to see her reaction in the video tutorial.

Once this shelving unit was installed, she invited us back to install another shelving unit in the other wall!
Now she has plenty of storage for the products to sell, as well as her coloring and other hair care supplies!


Does this method for creating additional storage space in your home appeal to you? Are your wheels turning as to where you can install something like this?
We loved this idea so much, we added something very similar to our master bathroom.
We hope you’ve been inspired by this tutorial and can follow the step by step guide of constructing and incorporating custom built in shelves in a wall in your own home.
This same technique is also used as we constructed a built in entertainment center in our basement.
Not only does it provide architectural interest into our family room, but it also provides so much storage.
We hope you found some inspiration for your home today.
Please share your tips and ideas with us.
We love hearing from you!
If you’re new here, WELCOME! We love having new readers and friends!
You can learn more about us here.
Let’s stay connected! Join our DIY community of doers and you won’t miss the weekly updates and more inspiration for you always on a budget.
Sharing is caring!

Thanks for stopping by Sunnyhome. Empowering you to create a home you love!
Retailers We Love
- Anthropologie
- Birch Lane
- Crate & Barrel
- Joss and Main
- Lampsplus
- Mark & Graham
- One Kings Lane
- Pottery Barn
- Rejuvenation
- Serena & Lily
- Wayfair
- West Elm
- Williams Sonoma
- World Market
Be sure to follow us on Pinterest for even more home decor and DIY ideas.
To see what we are working on before it’s on our blog, follow us on Instagram.
You will also find our video tutorials on our YouTube channel.
- Creating a Cozy Outdoor Living Room with Thrifted Finds

- The Best ‘Berry in Love’ Bridal Shower Ideas
- Paint an Old World Texture Finish on a Vase
- Easy Strawberry Chicken Salad with Lime Maple Balsamic Vinaigrette