If you’re looking to add a personal touch to your home décor without breaking the bank, making cardboard picture frames using Saltwash is the perfect project for you.
Here at Sunny Side Design, we’re all about creating beautiful spaces in our homes on a budget!
You can’t get any more budget-friendly than creating a gallery wall for FREE! It’s likely that we all have empty cardboard boxes at home.
Don’t throw them out just yet. We’re so excited to show you how to create cardboard picture frames using Saltwash!
Not only is this project cost effective, but it’s a great activity to let the kids help with. Heaven knows all of us Mommas need some creative ideas to keep the kids entertained this summer!
Sunny Side Design is a participant in the Amazon Services LLC Associates Program, an affiliate advertising program designed to provide a means for sites to earn advertising fees by advertising and linking to Amazon.com. As an Amazon Associate, this blog earns from qualifying purchases with no additional cost to you. Click here to read our full disclosure policy.
Creating Cardboard Picture Frames

Before creating cardboard picture frames, think where you’ll be displaying them to get accurate measurements.
I’d been planning to create a gallery wall of all the cute art my kids make for sometime.
Using a large roll of paper we sketched out each frame and cut them to size.
Then we were able to arrange them on the wall with painters tape to see if we liked the layout before we stuck any nails in the wall.
Click the video link below to see how to make these cardboard picture frames in action.
Cutting Cardboard Picture Frames
The benefit to creating your own picture frames is that you can customize them to any space in your home!
Having free cardboard lying around doesn’t hurt either!
Who doesn’t like a cost effective home decor project?
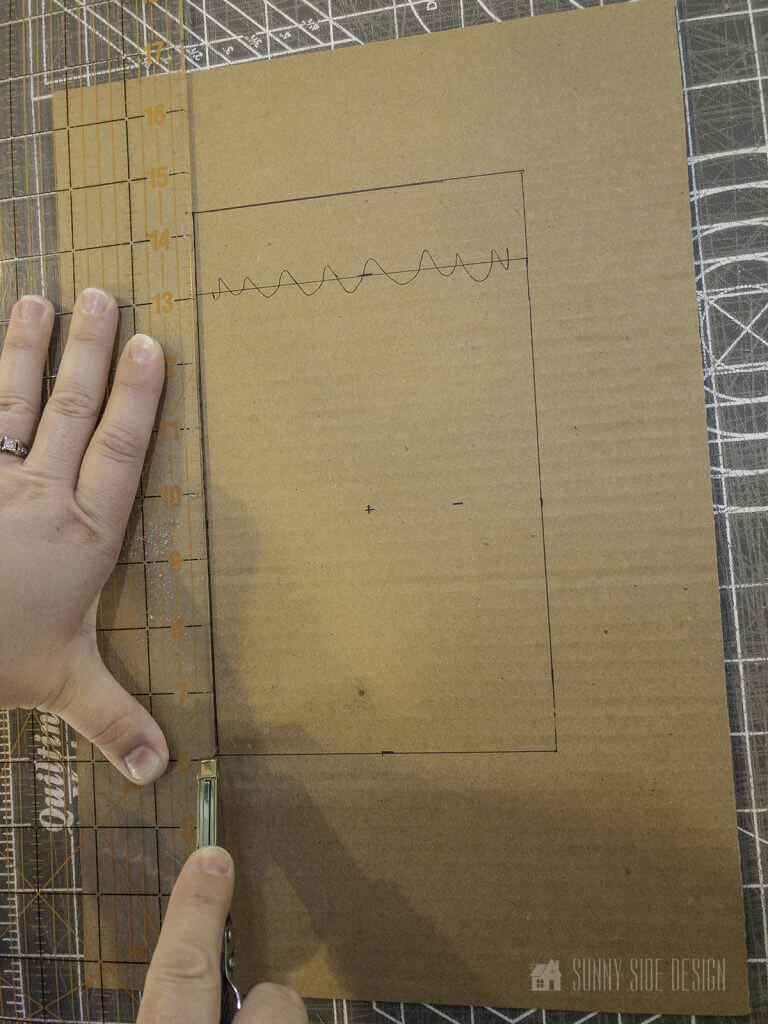
After the cardboard picture frames have been measured and sketched onto scraps of cardboard, begin cutting out each frame.
To make easy work of this, we used a quilting ruler.
This made it really easy to create straight edges and perfect angles.
A utility knife works great for cutting through the cardboard, although it works even better if you begin with a new blade!
(For safety, we made all of the cuts so the kids wouldn’t get hurt.)
Sharing is caring!
Are you enjoying this project? Please Pin It, save it for later and share it with a friend.
Assembling Picture Frames

Cut a minimum of two pieces of cardboard to size per each frame. Each layer will be held together using hot glue.
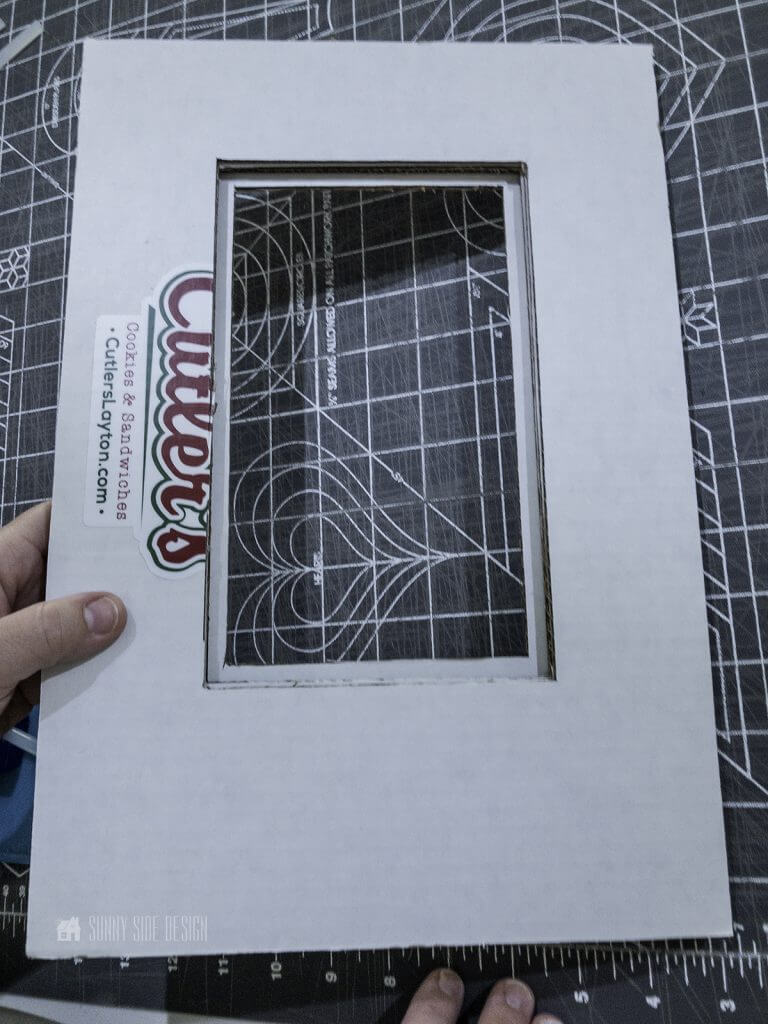
For the above cardboard picture frame we glued four layers together.
The first three layers were all cut to the same size, with the same opening in the middle.
The fourth layer (the top layer) of the cardboard picture frame was cut to the same dimensions of the outer edges of the frame.
The inside edge was cut 1/4″ smaller than the other layers.
This was done to create a lip for the artwork to rest on.
*Be sure to save the cardboard pieces cut from the middle of the frames.
These will be used as the backing for the artwork.
Transform Cardboard Frames with Saltwash
Although it’s pretty unique to be making picture frames using cardboard, Saltwash is the secret to creating picture frames that don’t look like cardboard at all!
Saltwash is a paint additive primarily designed to create a weathered and worn paint finish on furniture.
We’ve used Saltwash on many projects around our homes, mainly on furniture.
However, we’re starting to push the limits and see what other projects we can use Saltwash for to create unique home decor items.
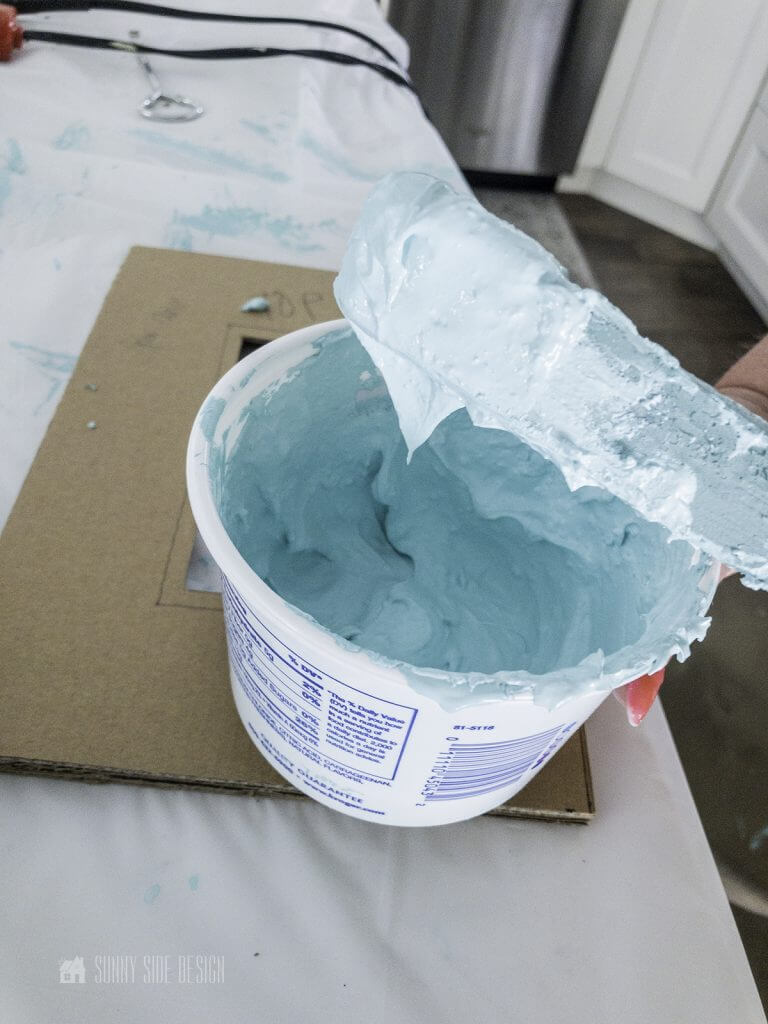
The key to using Saltwash correctly to make these cardboard picture frames, is to mix the correct consistency.
The general ratio is a 1:1 mixture of paint and Saltwash.
A little more paint additive may be needed for this project.
The paint mixture should be thick enough that it won’t fall off the stir stick when held up.
If you’re new here, welcome! We’re so glad you’re here.
Let us introduce ourselves, we’re Michelle and Steph, a mom and daughter team who love to DIY and decorate our homes.
Not only are we passionate about making our homes warm, comfortable and unique, but it’s our mission to help you create that same feeling in your own home.
You’ll find ideas for repurposing, creating, decorating and making your home truly yours, while always mindful of a tight budget.
Undoubtedly we love finding ways to make your home look high-end on a small budget.
Plus you’ll also find a recipe or two as we share our family favorites with you.
We’d love it if you’d join our community of doers so you won’t miss any inspiration for your home.
We love new friends.
How To Apply Saltwash
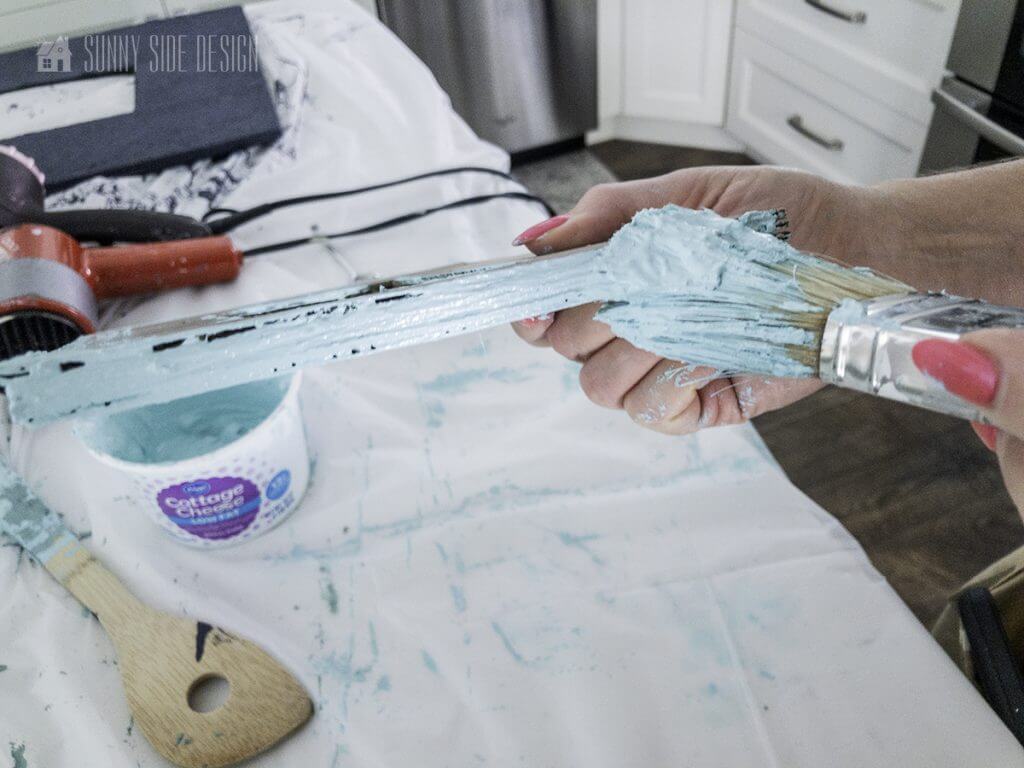
Typically when painting anything we use long even brush strokes.
When applying Saltwash use a dabbing motion.
This will create high peaks and ridges in the paint.
While applying paint to the cardboard picture frames, we found it easiest to dab the paint along the inner edges of the picture frames first.
Then repeat the same process for the outer edges of the frames.

After all of the inner and outer edges of the picture frames have been painted, lay the frame on a flat surface.
Repeat this paint application by dabbing onto the front surface of the picture frame.

Allow paint to partially dry.
When the paint becomes a little bit tacky to the touch gently pull the brush over the high peaks and ridges.
We’re still going for a fair amount of texture here, we’re just knocking the ridges down a little.


A second coat of paint was applied to the outer edges of each frame.
The edges had a lot of texture and as the paint dried it soaked into the cardboard leaving some deep grooves that needed to be filled.
The second layer allowed us to cover all remaining cardboard that was visible, creating a smooth surface on each of the outer edges of the frame.
Allow the paint to completely dry.

Once the base coat of Saltwash paint mixture has completely dried, the top coat of paint can be applied.
For this final coat of paint, we used white paint and applied it using long even brush strokes.
This layer of paint does not have any Saltwash mixed into it.
Again, allow to completely dry.
Let’s stay connected! Follow us on social media!
Creating the Weathered and Worn Patina

Sanding is the key step to creating this weathered and worn finish!
After the final layer of paint has completely dried, take a piece of medium grit sandpaper and distress any areas of the frame you wish.
The base coat of paint will be seen through the texture as the top layer of paint is sanded off.
The finish will then appear to have been weathered and worn exposing multiple layers of paint through the years.

Place artwork into the cardboard picture frames and secure into place with a piece of cardboard that was cut out for the frame opening.
The cardboard fits nice and snug without the need of inserting any fasteners to keep it into place.


To hang these cardboard picture frames on the wall, we used nail-less saw tooth picture hangers.
Another option for hanging these light-weight frames are command picture hanging strips.
Measure and mark the middle of the frame about 1/2″ down from the top, then press the saw tooth hanger into place.
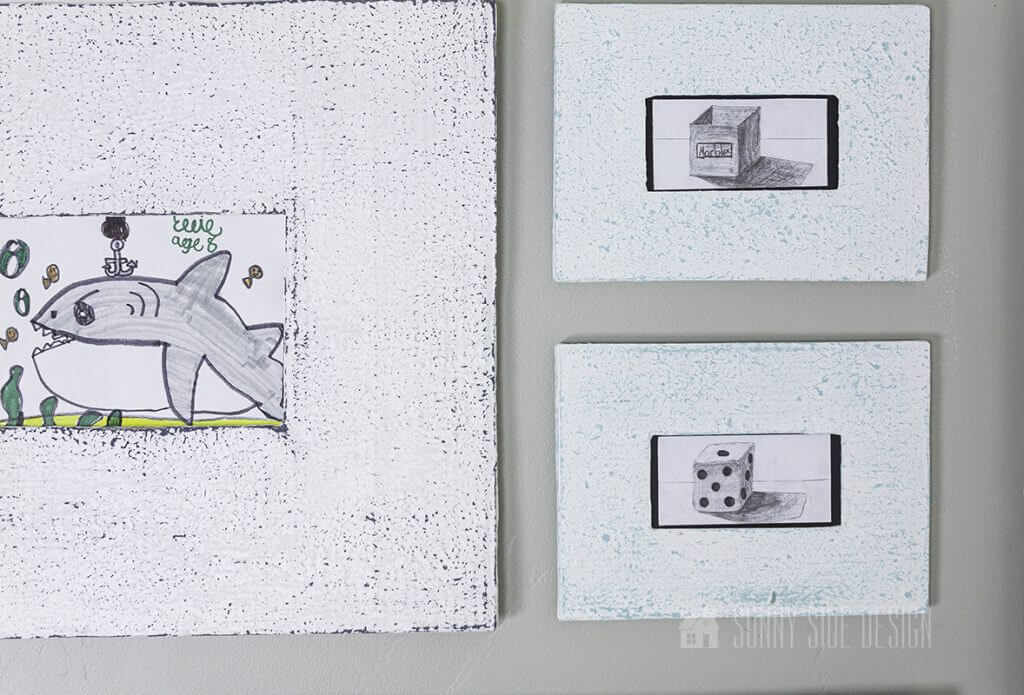
Cardboard Picture Frame Gallery Wall

And here’s a look at the completed cardboard picture frame gallery wall.

I love the fact that we were able to create these frames to the exact dimensions we wanted.
And why be limited to just one picture in a frame?
Why not make a frame with multiple photo openings?

I couldn’t be happier with the finished result of these cardboard picture frames!
They have the appearance of an old weathered tin.
They definitely don’t look like they were created with cardboard!

The largest frame hanging on the bottom is even large enough to hold a canvas painting.
What do you think?
Would you have ever thought to create picture frames using cardboard?
More Ideas Using SaltWash
- Paint an Old World Texture Finish on a Vase
- SaltWash for an Amazing Worn & Weathered Finish on Furniture
- Saltwash Tutorial
We hope you found some inspiration for your home today.
Please share your tips and ideas with us.
We love hearing from you!
If you’re new here, WELCOME! We love having new readers and friends!
You can learn more about us here.
Let’s stay connected! Join our DIY community of doers and you won’t miss the weekly updates and more inspiration for you always on a budget.
Sharing is caring!

Thanks for stopping by Sunnyside Home. Empowering you to create a home you love!
Retailers We Love
- Anthropologie
- Birch Lane
- Crate & Barrel
- Joss and Main
- Lampsplus
- Mark & Graham
- One Kings Lane
- Pottery Barn
- Rejuvenation
- Serena & Lily
- Wayfair
- West Elm
- Williams Sonoma
- World Market
Be sure to follow us on Pinterest for even more home decor and DIY ideas.
To see what we are working on before it’s on our blog, follow us on Instagram.
You will also find our video tutorials on our YouTube channel.
- Creating a Cozy Outdoor Living Room with Thrifted Finds

- The Best ‘Berry in Love’ Bridal Shower Ideas
- Paint an Old World Texture Finish on a Vase
- Easy Strawberry Chicken Salad with Lime Maple Balsamic Vinaigrette