As I sit here today in my kitchen beginning to write my post, I look across the island and there sits todays mail, a couple of receipts and a catalog I would like to look at later and my day planner. Our lives are completely bombarded with STUFF! And if I had children living in my home there would be backpacks, school papers, lesson books, etc. It seems that the paper never ends! No matter how hard I try, it is still a challenge!
Today our focus is counter clutter, the endless piles that seem to continuously multiply. Every flat surface in our home seems to be a dumping ground for stuff, endless stuff. Even I can struggle with the paper that comes into my home, even with strategies that are already in place, so what are we to do? I have worked hard over the years to combat paper clutter. I’d like to share some strategies that I have implemented that have helped me and also some tools that we have implemented in Stephanie’s home as well.
Sunny Side Design is a participant in the Amazon Services LLC Associates Program, an affiliate advertising program designed to provide a means for sites to earn advertising fees by advertising and linking to Amazon.com. As an Amazon Associate, this blog earns from qualifying purchases with no additional cost to you. Click here to read our full disclosure policy.


It is hard to let the world see our own clutter, but we are human and struggle too. This is Stephanie’s kitchen counter. I am grateful she was willing to share her struggles and then show how we conquered the clutter! Mine will be coming later…
To conquer the piles of paper, we first need to sort it into 3 categories.
1- Items that you need to save. These may be items that need to be kept for a long period. These items will need to be sorted and filed away.
2- Items that need to be shredded. Any documents that contain sensitive information that you do not need to save.
3- Items you no longer need that need to be thrown away or recycled. This may be old magazines, catalogs, newspapers, junk mail and school papers.
This may be an overwhelming job. I would suggest that you conquer one area at a time. Maybe start with the kitchen counter. Sort it into the 3 categories, then focus on what needs be saved. Then move on to another area on another day. It’s important to file, shred or dispose of the items you have sorted.


Items that need to be saved for long term storage like birth certificates, passports, bank statements, tax returns, medical information, etc. should be filed in some sort of filing box or cabinet. If you don’t have a lot of paper to file, a file box will work great!
When filing items in long term storage, it’s a good idea to look and see if some of the items can now be disposed of. Tax records, for instance, need to only be kept for 7 years. So when I file away my current tax return, I pull out the oldest one and shred it. I keep my items in the filing cabinet in alphabetical order for easy access, banking, credit cards, taxes, utilities, etc.

Do you wonder how long to keep certain paperwork? I came across this handy chart at Clean Mama. This chart is a great reference for all sorts of documents.


Some items that you may be saving for long term storage may be school papers or art work from your children. Now we can’t save everything, but save a few of their best pieces of school work and art work and save them in a storage container. I like to use the Iris portable project case, that I have found at Michael’s. They are sturdy and large enough to hold large pieces of art and are a great price too.
Now that we have conquered the existing paper clutter, let’s talk about the day to day strategies to use to keep it under control. Each home needs some sort of command center. An area where we put papers we need to take action on, or will need in the near future.


In Stephanie’s home we have placed a command center in her mudroom. This area everyone goes through when they enter or leave the house. In the command center we have individual files there for each person. A place for school papers, receipts, filing, an action folder for items that need to be taken care of in the near future. We even have a folder for fun family activities that they would like to do. And aren’t these file folders to die for! I found them at Office Max.
Are you enjoying this project? Please Pin It, save it for later and share it with a friend.
Sharing is caring!


As we sorted through Stephanie’s counter clutter, she opened the cupboard above where the majority of their paper gets dumped. This cabinet originally was to be her command center, with a file folder system in place. It really didn’t work here. There was all sorts of stuff shoved into the cupboard to get it out of site. After cleaning out the items that didn’t belong in a kitchen, it was practically empty! Now this cupboard has just a few dishes and recipe books, just as it should be.
To make Stephanie’s new command center work, we have separate folders that need to be gone through at least once a month. Toss out anything that is outdated, take care of the receipts that have accumulated there as well as anything that needs to be placed in the filing cabinet. That is the most important thing to do! It must be sorted and gone through on a regular basis, at least once a month.

In my home I prefer the binder method. I call it my home binder. Anything that relates to our home and family is in this binder. I use pocket dividers for each section. And if you have been following our blog, Monday we talked about the “10 Minutes a Day to a Deep Clean Home.” At the back of this binder is where I keep my list of cleaning zonesin sheet protectors, along with cleaning tips for my home.


Let’s take a look at what I put in my home binder. The first section I call “info.” This is where I place recent information I need to access, pamphlets from the doctor, things I need to act on. Just behind this pocket divider I place in sheet protectors my address lists that I access for Christmas cards, etc. and phone numbers.
The second section is “to pay.” This is where I keep my checkbook and place my bills when they come in the mail.
The third section is “home & garden.” This is where I place ideas I would like to implement in my home or garden and also warranties for plants (they are only for 1 year, so they are tossed in the garbage when the year is up.)
The fourth section is “computer info.” This is where I store tips for my computer, document master copies, etc. In back of this section in sheet protectors I also keep a list of all my fonts. This way I can easily look and see what font I would like to use on projects.
The last section is called “fun.” This is where I place info on events I would like to attend, hikes I would like to go on and fun things to do as a family.
If you’re new here, welcome! We’re so glad you’re here.
Let us introduce ourselves, we’re Michelle and Steph, a mom and daughter team who love to DIY and decorate our homes.
Not only are we passionate about making our homes warm, comfortable and unique, but it’s our mission to help you create that same feeling in your own home.
You’ll find ideas for repurposing, creating, decorating and making your home truly yours, while always mindful of a tight budget.
Undoubtedly we love finding ways to make your home look high-end on a small budget.
Plus you’ll also find a recipe or two as we share our family favorites with you.
We’d love it if you’d join our community of doers so you won’t miss any inspiration for your home.
We love new friends.

[mailerlite_form form_id=2]
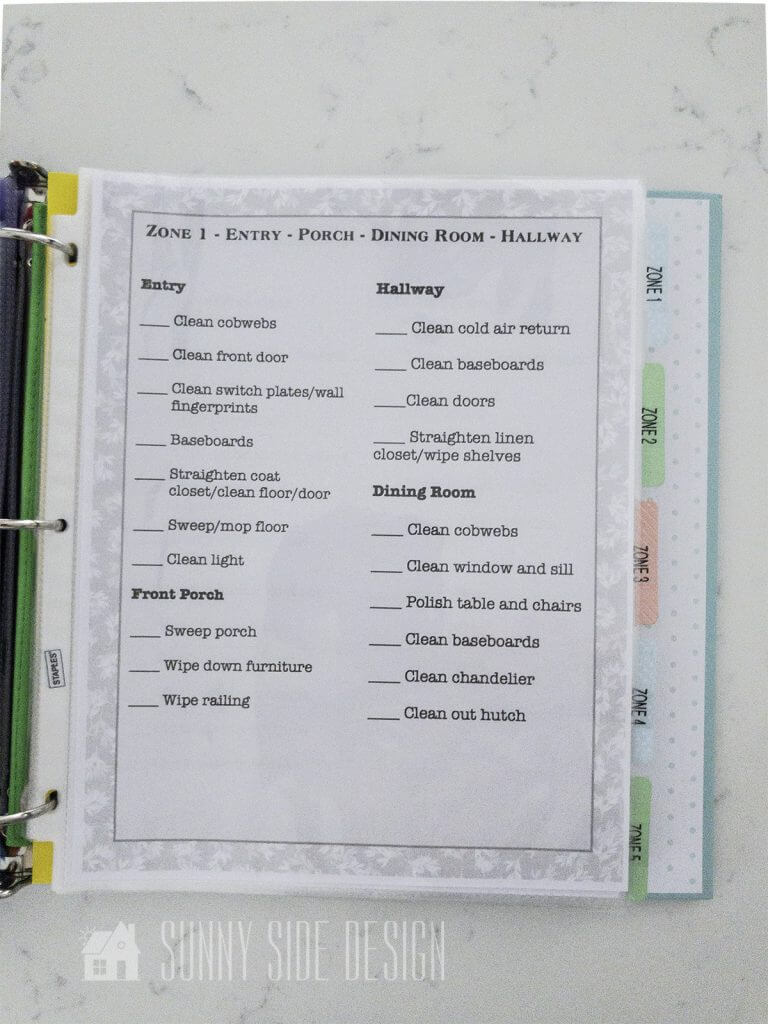
Finally, at the back of my binder I keep the list of my 5 cleaning zones and information. These are stored in sheet protectors so I can mark off my completed tasks with a dry erase marker. I find the binder method works very well for me.


Another area that becomes cluttered and a dumping ground is the “junk drawer.” We all have one! We had put organizers in Stephanie’s junk drawer about a year ago. It helped, but it could use some improving.


I emptied the drawer, brought back the main organizer for pens, pencils, markers, etc. then added smaller plastic drawer organizers. They were 3 for $1 at Walmart.

I labeled each area. Now there is no question where items are stored.
Let’s stay connected! Follow us on social media!


I love to use these recycled tape storage boxes. My husband works in IT and brings them home to me when they install new backup tapes. They make great organizing boxes. If you know anyone who works in IT, ask them to bring some home for you. After all, they just get thrown out.
We used small ones to store staples, rubber bands and super glue. In the larger boxes, we stored command hooks and felt pads. Notice that they are all labeled too.

We used a small plastic storage box with a lid to corral the batteries.

Hopefully, with all the labeled and smaller containers this space will stay organized a little better. Every cupboard and drawer will need a little cleaning and organizing to keep it this way, but it should stay organized much better.

One other storage strategy that I use is one for my receipts. I learned early on in my marriage that I should keep receipts. I used to just throw everything away. I don’t like clutter. I’ve been know to throw away items that we needed. I now keep every receipt for 1 year, unless the item has a warranty for longer than 1 year. I keep a small accordion file by my computer and when I empty receipts out of my purse they go directly into this file. They are sorted by month. As I start a new month, I throw out the receipts from the previous year. This has worked really well for me. For items that have longer warranties and owner’s manuals, I keep them in a sheet protector in a large binder. This is very easy to flip through to access if I need something. I keep this binderin my filing cabinet.


I too sometimes let paper clutter get the best of me. The business receipts and paperwork sometimes pile up on my desk. I have now started using an accordion filebox for all my business receipts. I have labeled them for the business expenses, blogging expenses, banking and clients information. Now all the business information is in one location and easy to take care of. There is no reason to have clutter on my workspace any more.
We hope you found some inspiration for your home today.
Please share your tips and ideas with us.
We love hearing from you!
If you’re new here, WELCOME! We love having new readers and friends!
You can learn more about us here.
Let’s stay connected! Join our DIY community of doers and you won’t miss the weekly updates and more inspiration for you always on a budget.
Sharing is caring!

Thanks for stopping by Sunnyside Home. Empowering you to create a home you love!
Retailers We Love
- Anthropologie
- Birch Lane
- Crate & Barrel
- Joss and Main
- Lampsplus
- Mark & Graham
- One Kings Lane
- Pottery Barn
- Rejuvenation
- Serena & Lily
- Wayfair
- West Elm
- Williams Sonoma
- World Market
Be sure to follow us on Pinterest for even more home decor and DIY ideas.
To see what we are working on before it’s on our blog, follow us on Instagram.
You will also find our video tutorials on our YouTube channel.
- Paint an Old World Texture Finish on a Vase

- Easy Strawberry Chicken Salad with Lime Maple Balsamic Vinaigrette
- How to Fix Chipped Kitchen Cabinets with a Pen
- Easy 4th of July Door Decor You Can Make in Minutes


