It’s that time of year for fun DIY Christmas decorations and we’re so excited to share an Easy Finger Knit Christmas Tree Decor!
We love this time of year.
In fact, we’ve been dreaming about what we want Christmas to look like this year.
Certainly, with the way 2020 has been, we wanted our homes to feel festive, cozy and comfortable.
In fact, my theme this year is “Home for the Holidays.”
With this in mind, one of our DIY projects this year is a cozy finger knit Christmas tree decor.
I believe, it goes so well with my collection of Christmas tree decor.
Not only is this an easy Christmas craft, but it’s also so affordable.
We’ll even show you how to create your own cone and save the cost of purchasing a paper mâchè cone.
And for another easy DIY Christmas decor idea, you need to see what we made with toilet paper rolls!
You won’t believe the transformation!
DIY Christmas Tree Decor Supply List
For this project you need:
Disclosure: This post contains affiliate links or referral links for your convenience. It is a way for this site to earn advertising commissions by advertising or linking to specific products and/or services. Click here to read my full disclosure policy.
How to Make a Paper Cone
As a rule, we are frugal!
Why spend money on something you can make yourself?
While you can buy paper mâché cones as a base for this finger knit tree, we decided to make our own cones out of poster board.
I planned on making quite a few variations of this cone shaped tree and spending a couple of dollars on poster board would save me quite a bit overall.
In addition, making the cones is rather quick and easy.
First, tie a string to a pencil.
Next, hold the end of the string at the corner of the poster board and draw an arc.
Finally, once the arc is sketched, cut out with scissors.
Now roll the poster board into a cone shape.
Determine how wide you want the base of the cone to be and trim off the excess.

Now, roll the poster board into the cone shape and secure with tape.
It’s a good idea at this point to check and make sure the cone stands straight. If not, trim off a little from the bottom edge.
Are you enjoying this post?! Please pin it, save it for later and share it with a friend.
Sharing is caring!

Do you always feel that you’re running around with your head cut off during the holiday season?
There’s always so much to do!
Not only are there gifts to buy, parties to plan, and Christmas baking on your to do list, but you also want to enjoy the season.
After all it is the most wonderful time of the year.
To help you stay organized this Christmas we’ve put together a FREE printable Christmas planner.
Just click on the button below to download your planner today!
And if you’re looking for more ideas to reduce Christmas stress, click here for 10 ways to prepare for Christmas early.
Looking for a few gift ideas, then take a look at our latest gift guide.
How to Finger Knit Christmas Tree Decor
For this Finger Knit Christmas Tree decor, we are using the same technique that we used on the pumpkins for fall.

This finger knitting technique makes a fairly loose stitch, with this in mind, you’ll want to use a chunky weight yarn.
I used Lion Brand Wool-Ease yarn for my tree.


First, place the end of the yarn between your index and middle fingers, with the tail on the top of your hand.
Next, wrap the yarn around the backside of your middle finger around to the top.
Then continue to wrap the yarn around your index finger around the backside to the top, forming a figure 8.

Repeat this figure 8 pattern.
You will now have 2 loops on each finger.
Now pull the back loop over the front loop on the index finger and the middle finger.

Then pull the tail tight.

For the 2nd stitch, wrap the yarn around your fingers in a figure 8 pattern.
Then, pull the back loop over the front loops on each finger.
Once 2 stitches have been made, the tail can be pulled towards your palm.
Just be sure to keep it pulled tight after each stitch.

[mailerlite_form form_id=2]

Continue finger knitting until the strip measures the height of your cone.


Once you’ve reached your desired length, cut the yarn, leaving a 3-4″ tail.
Carefully remove the 2 loops from your fingers.
Place the loop from your index finger through the middle finger loop.
Finally place the tail through the loop and pull tight to knot.
Let’s stay connected! Follow us on social media!
Attach Knitted Strips to Cone

To begin, I knitted 4 strips that were the length of my cone.
Then to adhere them to the cone, I ran a bead of hot glue along one side of the cone and pressed the knitted strip to secure it in place.
Flip the cone over to the opposite side and run another bead of glue, then attach another knitted strip.
Repeat this process, centered between the two previous strips.
These 4 strips should basically be evenly spaced around the cone.
While working on this Christmas Tree Decor project there is a lot of mindless repetitive work.
So it’s a great time to sit back and put on your favorite Christmas movie while you finger knit.
Don’t you just love to watch those feel good Halllmark movies this time of year?
I think these feel-good movies are perfect to watch while making your Christmas tree decor.

Continue to knit strips to fill in the areas between the 4 strips.
Each strip will vary in length, so keep your cone close by as your knit.


Once the entire cone is covered with the finger knit strips, check to see that all of the ends are well secured to the cone.
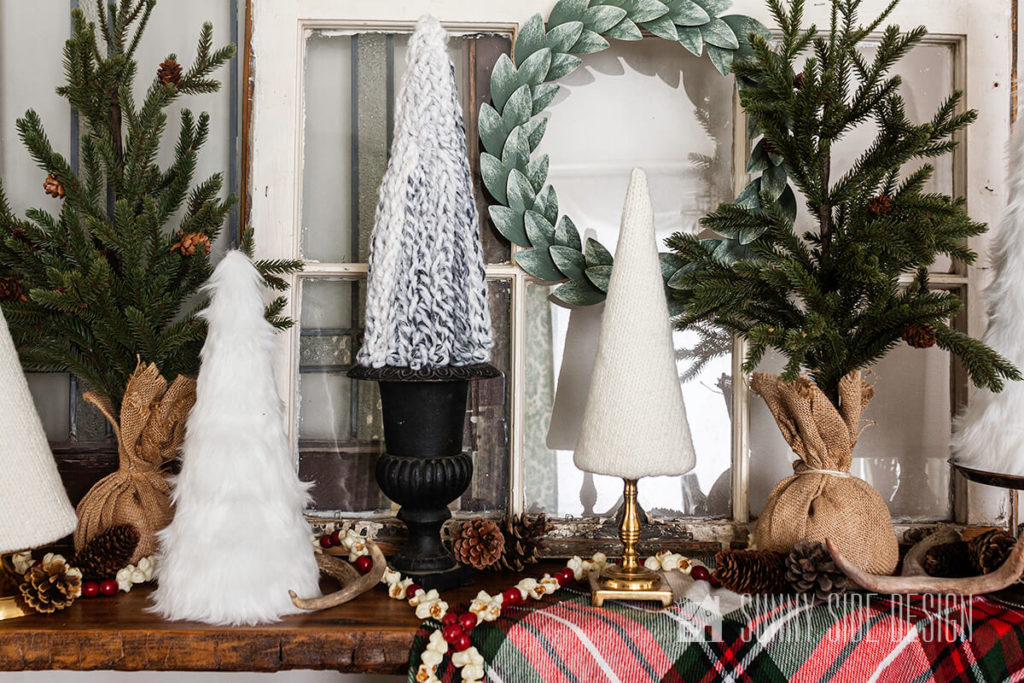
Last but not least, cut off the tails and now you can enjoy your cozy beautiful Christmas tree decor!

Not only do I love the texture of this cozy Christmas Decor, but it also reminds me of a cuddling up in a warm chunky throw blanket.

Clearly, it creates that feeling I wanted this holiday season.
Are you enjoying this post?! Please Pin it, save it for later and share it with a friend.
Sharing is caring!
Shop This Post
More Christmas Crafting Ideas for a Cozy Traditional Christmas
- Unique Homemade Christmas Ornaments
- Cozy Tree Christmas Decor
- Christmas Ornaments using Vintage jewelry
- Cozy Chunky Yarn Wreath
- Christmas Pillow Covers in less than 30 Minutes
- Fresh Evergreen Christmas Wreath
- Christmas Tiered Tray Decor
Are you ready to make finger knit Christmas tree decor?
This project is really easy and I bet once you make one, you’ll want to make your own little Christmas tree forest.
I’m loving the way it looks with my other Christmas Decor.
We hope you found some inspiration here today.
Please share your thoughts and questions with us.
Thanks for spending some time with us!
If you’re new here, WELCOME! We love having new readers and friends!
You can learn more about us here.
We love to hear from you!
Let’s stay connected! Join our free community of doers and you won’t miss any inspiration for your home.
Please PIN and save for later, and share with your friends! Sharing helps grow our following!
Wishing you and your family a Merry Christmas Season a few months early!
Thanks for stopping by and as always here at Sunny Side Design
WE HOPE TO BRING YOUR HOME TO THE SUNNY SIDE OF THE STREET!

Retailers We Love
- Anthropologie
- Birch Lane
- Crate & Barrel
- Joss and Main
- Lampsplus
- Mark & Graham
- One Kings Lane
- Pottery Barn
- Rejuvenation
- Serena & Lily
- Wayfair
- West Elm
- Williams Sonoma
- World Market
Be sure to follow us on Pinterest for even more home decor and DIY ideas.
To see what we are working on before it’s on our blog, follow us on Instagram.
You will also find our video tutorials on our YouTube channel.
- Creating a Cozy Outdoor Living Room with Thrifted Finds

- The Best ‘Berry in Love’ Bridal Shower Ideas
- Paint an Old World Texture Finish on a Vase
- Easy Strawberry Chicken Salad with Lime Maple Balsamic Vinaigrette


