Welcome to week 3 of the One Room Challenge!
This past week our focus has been the DIY epoxy countertop for the kitchenette or bar area.
Not only has this been a project we’ve been looking forward to, but there has also been a little anxiety.
We’ve never taken on a project like this before, so we did a ton a research before we began.
Have you been thinking about installing an epoxy countertop but put off by the price?
Well, why not make one yourself, then?
While it seems like a challenging process, if you follow our steps you too can create a unique countertop for your home.
We’ll walk you through everything you need to know to successfully pour an epoxy countertop.
And for more ideas that will add value to your home, take a look at 10 Sensational Home Improvement Ideas on a Budget.
If you’re new here, WELCOME! You can learn more about us here.
For the next 5 weeks we will be transforming an unfinished basement room into the ultimate family hangout room!
Make sure you’re subscribed to our newsletter so you don’t miss any of the projects in this basement family room.
And be sure to follow us on Instagram for behind the scenes progress and updates!
Be sure to join us each week to check our progress!

Projects in Our One Room Challenge
You can easily navigate through each week of this ultimate modern coastal family room project below.
- Week 1 – How to Make a Built In Entertainment Center
- Week 2 – How to Make a Simple Cabinet Box
- Week 3 – You are here!
- Week 4 – How to Install Laminate Floor Over Concrete
- Week 5 – Add Old World Charm with a Simple Brick Backsplash
- Week 6 – How to Make a Built In Reading Nook in a Closet
- Week 7 – How to Make a Simple Upcycled DIY Sofa Table
- Week 8 – Reveal Day! Basement Family Room Ideas on a Budget
Let me also say we want to provide you with all the information you’ll need for making your own epoxy countertop, so this post is long.
Easily Navigate This Post
You can jump to any section, by clicking on the links below.
- Projects in Our One Room Challenge
- Frequently Asked Epoxy Countertop Questions
- Prepare Base for an Epoxy Countertop
- Materials Needed for a DIY Epoxy Countertop
- Tools Needed for a DIY Epoxy Countertop
- Practice Your Epoxy Technique
- Practice Make Progress
- Build a Tape Dam
- Protect Cabinets and Floor
- Calculating How Much Epoxy You’ll Need for a DIY Epoxy Countertop
- Mix the Epoxy
- How To Make a Dirty Pour for a DIY Epoxy Countertop
- Pour the Epoxy
- Ease the Tension DIY Epoxy Countertop
- Meld Colors With a Heat Gun
- Removing The Tape Dam
- Final Clear Epoxy Coat
- Tips For Creating an Epoxy Countertop
- The Reveal DIY Epoxy Countertop
- Conclusion
Frequently Asked Epoxy Countertop Questions
How Much Does It Cost To Make an Epoxy Countertop?
Before considering a project like this you’ll want to know what the cost will be.
For an epoxy countertop that is produced by professionals you can expect to pay between $100 to $200 per square foot.
Which may seem like a lot of money, but this process is very labor intensive.
So if you’re a DIYer like ourselves, you can do this yourself.
In fact, a DIY epoxy countertop can save you a lot of money!
And by doing it yourself, we mean you’ll also need a few other sets of hands.
With the size of a large countertop, it’s not a job for a single person.
There is a limited working time for the epoxy and for a successful epoxy pour we suggest you have all hands on deck!
So we recruited our husbands to help us out!
Let me share what our epoxy countertop cost.
In our case the countertop surface is 39 square feet, our epoxy resin and supplies came to $1070.
So to DIY an epoxy countertop you are looking at around $28 a square foot.
Not bad for a beautiful marble look countertop.
Enjoying this post?!
Please pin it for later and share it with your friends.
Sharing is caring!
Does Epoxy Make a Good Countertop?

Epoxy is considered a solid-surface countertop like Corian and cultured marble.
It’s clearly a popular choice for refinishing countertops due to the durability of the epoxy resin.
It can resist scratches and provide years of use before the surface dulls.
It also provides a glossy, long-lasting shine that doesn’t need additional coatings to keep it looking fresh.
You won’t see fading or dullness with epoxy when compared to varnishes or other coatings.
Plus it almost never cracks or develops other forms of damage either.
Will Epoxy Countertops Scratch?
Epoxy is a highly durable product that should last a long time!
Because it is moisture resistant, it’s a good choice for a kitchen or bathroom environment.
It is also scratch resistant, which is awesome!
However, you need to be smart and not use abrasive materials on your countertop.
How Do You Maintain Epoxy Countertops?
Proper care and maintenance are essential for your epoxy countertop to look good for years to come.
First, wipe up spills or stains immediately!
The longer a spill sits on your countertop, the harder it may be to remove.
Use soft cloths, such as a microfiber cloth to remove spills.
In fact, mild dish soap mixed with water is ideal for keeping your epoxy counters looking good.
Another product that is recommended to clean epoxy countertops is Multisurface Windex.
It’s safe on epoxy and it’s also a disinfectant.
To maintain an epoxy countertops shine, mineral oil or Murphy’s oil soap can be used conservatively for a weekly or monthly cleaning.
Avoid using too much of it however, or it may result in a hazy or dull finish on your epoxy countertops.
If you do get a stain that you can not remove with dish soap or Windex, you can apply acetone and wipe dry with a clean cloth.
In addition, baking soda mixed with a little water, at a ratio of 2 T. water to 1/2 c baking soda can also be used to remove stains.
Apply the paste to the stain, let sit for 5 minutes and wipe it off with a wash cloth.
Steam cleaning is also an approved method for cleaning epoxy countertops.
You’ll want to avoid any abrasive pads, powders or liquids like a soft scrub.
These products may dull the surface.
Do not cut, chop or drag items across your epoxy countertops.
Also do not use alcohol or bleach to clean or disinfect an epoxy countertop.
In addition, do not use wax or polishes containing wax on your epoxy countertop.
How Thick Should Epoxy Countertop Be?
This is dependent on the type of resin you choose to work with.
Each epoxy pour is about 1/8″.
Per the Makerpoxy we chose to work with, recommended pour depths are between 1/8″-1/4″ thick.
Due to the minimal pour depth recommended we opted to pour 3 layers each at 1/8″ thick, using the step-pouring method.
In all the finished depth of our countertop is 3/8″.
You’ll most likely apply 2 or 3 layers to achieve your desired epoxy countertop if using the step-pouring method.
Prepare Base for an Epoxy Countertop
Build Your Own Countertop Base

Since our room is new construction, we didn’t have an existing countertop to cover.
Our countertop base is built out of MDF lumber and 1 1/2″ wide flat molding.
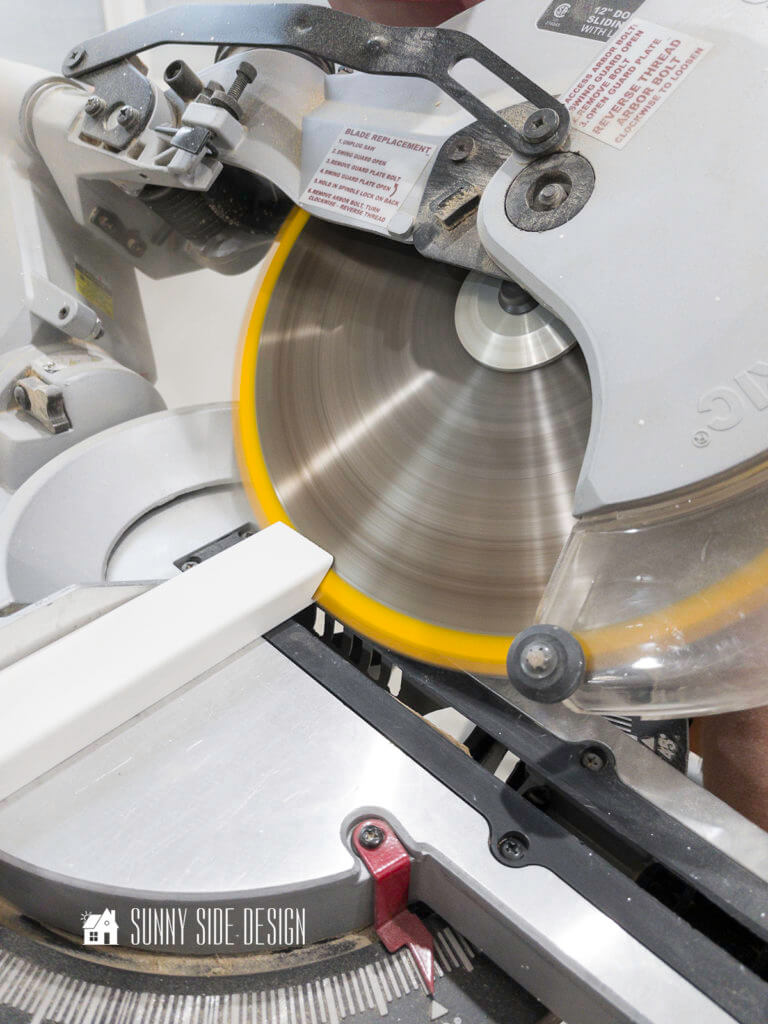
First, we had our MDF lumber cut down to the depth of our countertop at Home Depot.

Next we needed to cut out the template for the sink.
We chose an undermount sink and used the enclosed template to mark the wood for the cut out.

We began by drilling 4 holes in each corner of the sink cut area.
This will help in getting a nice rounded corner.
To ensure that we get a straight cut, we clamped a cutting guide for the saw to follow.
A jigsaw was used to round the corners as well.

Once the sink hole was cut, we sanded the edges smooth, slightly rounding over the top edge.
Next, we made sure that the countertop was level and added shims where needed.
Then we secured it to the base cabinets with 2″ brads.
To make our countertop appear thicker, we cut 1 1/2″ flat moulding for the edge of our countertop.

We mitered all of the corners and applied Bondo wood putty to all of the nail holes, seams and the edge against the wall.
We chose Bondo wood putty to fill in all our nail holes and fill in the seams.
It’s a great choice because it dries to a super hard finish in about 15 minutes and sands so smooth that you’ll never see a seam.
Bondo has become our favorite wood putty.

Once all of the wood putty has dried, sand it until smooth, first using a coarse grit of 80 and moving up to a fine grit of 220.

Prime and Paint Base

And finally we applied a primer and 2 coats of paint.
This will form a seal coat and prepare it for the epoxy coating.
A seal coat is necessary because air will rise up through the wood into the epoxy causing air bubbles.
You can also form a seal coat with a thin coat of epoxy applied with a roller or brush.
How To Prep Laminate Countertop For Epoxy
If you already have an existing laminate countertop it can be the base for DIY epoxy countertop.
First, you’ll want to sand your countertop with a 60 to 80 grit sandpaper.
Next clean the entire surface with a TSP to remove grease and dust.
Then apply a good bonding primer and a coat of paint.
How To Prep Granite or Stone Countertop for Epoxy
Granite or stone countertops are prepared the same way as laminate countertops.
First, you’ll want to sand your countertop with a 60 to 80 grit sandpaper.
Remove any dirt or dust with a degreasing cleaner.
Then apply a good bonding primer and a coat of paint.

[mailerlite_form form_id=2]
Materials Needed for a DIY Epoxy Countertop
- 2 gallon buckets
- 2 quart buckets
- 2 cup buckets
- stir sticks
- plastic sheeting
- sandpaper
- masking tape
- gloves
- 2 part epoxy resign
- mica powder
- pigment dispersion white
Tools Needed for a DIY Epoxy Countertop
Practice Your Epoxy Technique
Without a doubt, if you’ve never worked with epoxy before, practice, practice, practice!
Epoxy needs precise measurements in order for it to cure properly.
Follow the directions exactly that come with your resin.
Also the temperature of your surface and room needs to be between 70-80 degrees.
For our DIY epoxy countertop pour we kept the room at 72 degrees a few days before the epoxy pour and for a week afterwards,while the epoxy cured.
Not only does the room need to be between 70-80 degrees, but the substrate and epoxy also need to be within that temperature range as well.

You want to get the feel of mixing colors and manipulating the colors with a heat gun.
While I had taken a class using epoxy, when I practiced at home my room was too cool for the epoxy.
Which led to frustrations with my design and drying time.
Also, get the feel of using a heat gun.
You’ll want to make sure you keep it moving over the epoxy so you don’t scorch it.
We had an old heat gun that we had used for years to strip paint, but we were not getting the result we wanted with it.
So we got a new Wagner heat gun with a variable heat setting for our epoxy countertop pour.
It worked much better.
Practice Make Progress

While we had practiced, there’s nothing quite like doing the real project.
The overall size of the project made judging how much color to add to the white difficult to figure out.
We were planning on 3 coats of epoxy for our countertop.
Our first pour for our countertop was not exactly what we were looking for.
First of all we used too much gray and it made for a busy look that I didn’t love.
We are not sharing how we did our first pour, because we made improvements that made it not only look better, but also made it a lot easier.

One of the problems from our first pour was the epoxy was thicker on one side of the sink and because of exotherm it began to cure faster.
So when we pulled off the tape dam it didn’t flow over the edge, resulting in a raised and rough area.
But we were able to sand it down with 60 grit sandpaper, gradually using a finer sandpaper until it was smooth.
When we did this, it did expose the MDF underneath in a couple of spots.
So, I needed to apply primer again.
And in that process, since I wasn’t happy with the first pour I decided to paint the entire surface and just start over.
By doing this, we discovered that we could get the look of Carrara marble in 2 coats of epoxy.
Build a Tape Dam

Building a tape dam will keep the epoxy mainly on the surface of the countertop until it starts to gel.
Then you can remove the dam and let the epoxy flow over the edge.
To create a tape dam apply painters tape around the edge of the countertop with about 1″ of the tape above the top of the countertop.

Next apply another strip of tape placing the 2 adhesive sides together.
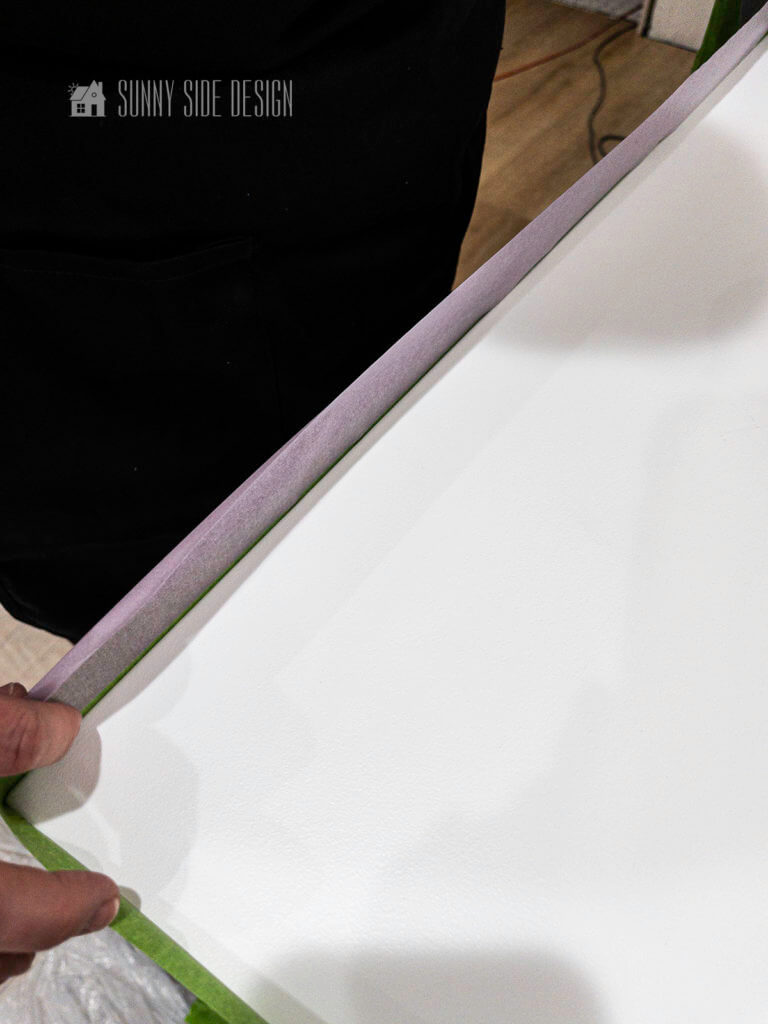
Then fold over the tape and secure to the backside of the first tape.
In essence you are creating 3 layers of tape above the countertop for the dam.

We applied the dam around the entire perimeter of the countertop and around the sink cut out as well.
Also make sure that the tape dam is secured to the walls at the corners.
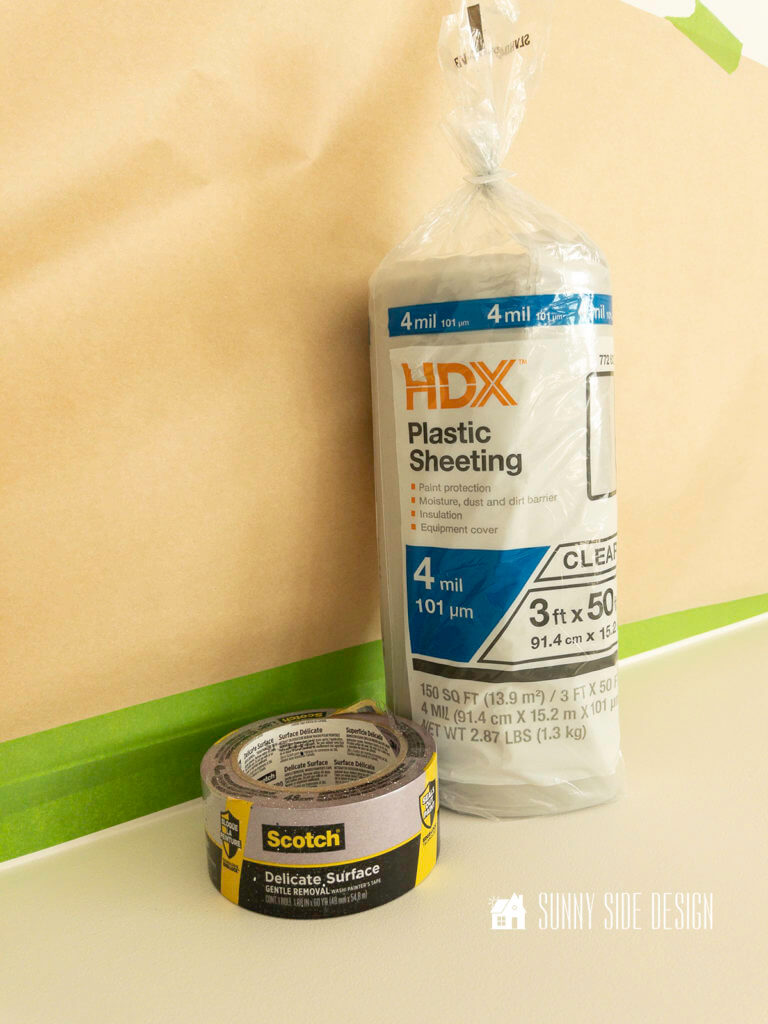
Protect Cabinets and Floor
There’s no way around it, working with epoxy is messy!
So you’ll want to cover everything that you don’t want covered in epoxy.
First we began by taping off the backsplash area.
The painters tape was applied about 1/4″ above the countertop to account for the thickness of the layers of epoxy.
Even though we will be tiling this area later, we don’t want clumps of epoxy on the wall.

Then we applied delicate surface painters tape around the top of the cabinets since they had recently been painted.

Then we covered the cabinet fronts with plastic as well as the floor area.
I promise you’ll want EVERY surface covered.
Don’t forget to tape plastic in the opening for the sink as well.
You don’t want epoxy dripping inside your cabinet!
Also set up a table or work surface for mixing the epoxy.
We used a folding table and covered it with plastic too.
You’ll want to have everything you may need close by.
Due to the limited working time with the resin, you don’t want be running to the garage to get something you’ve forgotten.
Plan and have everything ready and close by.
Calculating How Much Epoxy You’ll Need for a DIY Epoxy Countertop
To determine how much epoxy you will need for your countertop, multiply the length x width x depth in inches.
Our length was 209″ x 26.5″ x 1/8″ or .125
You’ll find an easy calculator to determine how much epoxy you’ll need at Totalboat.
For our epoxy countertop we determined we would need 3.11 gallons for each pour.
And just to be on a safe side we purchased 10 gallons of epoxy.
Clearly we didn’t want to run short on the epoxy in the middle of our project.
But we learned that we were able to achieve the look we wanted with just 2 pours, so we could have gotten by with 6.22 gallons.
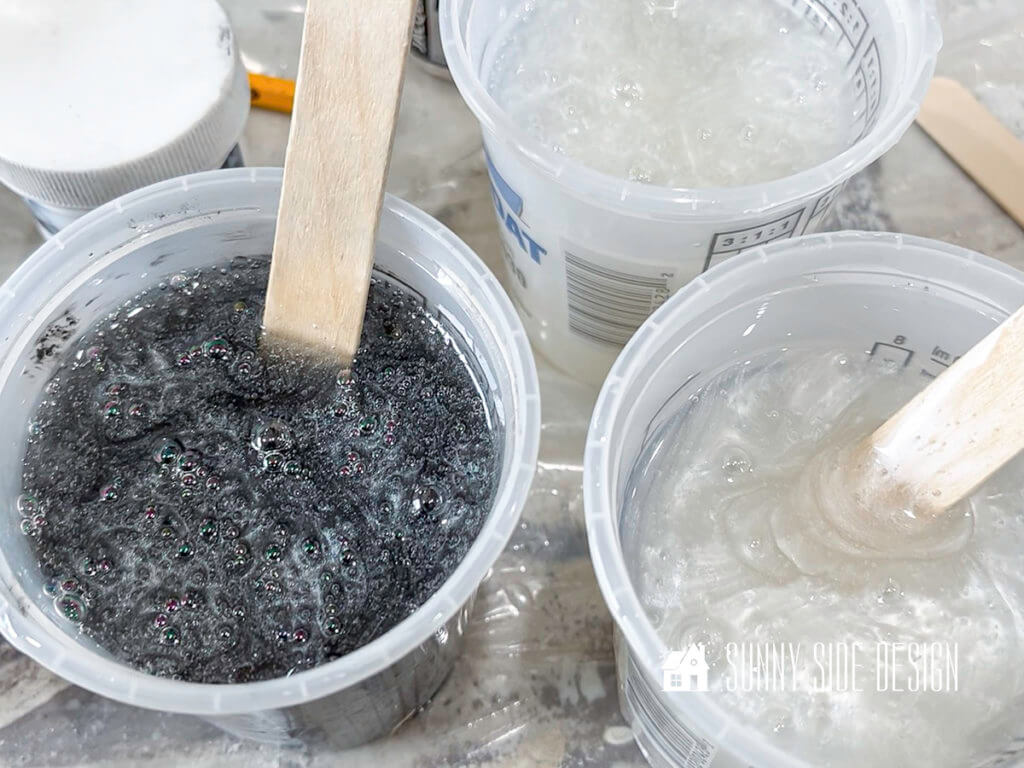
Mix the Epoxy
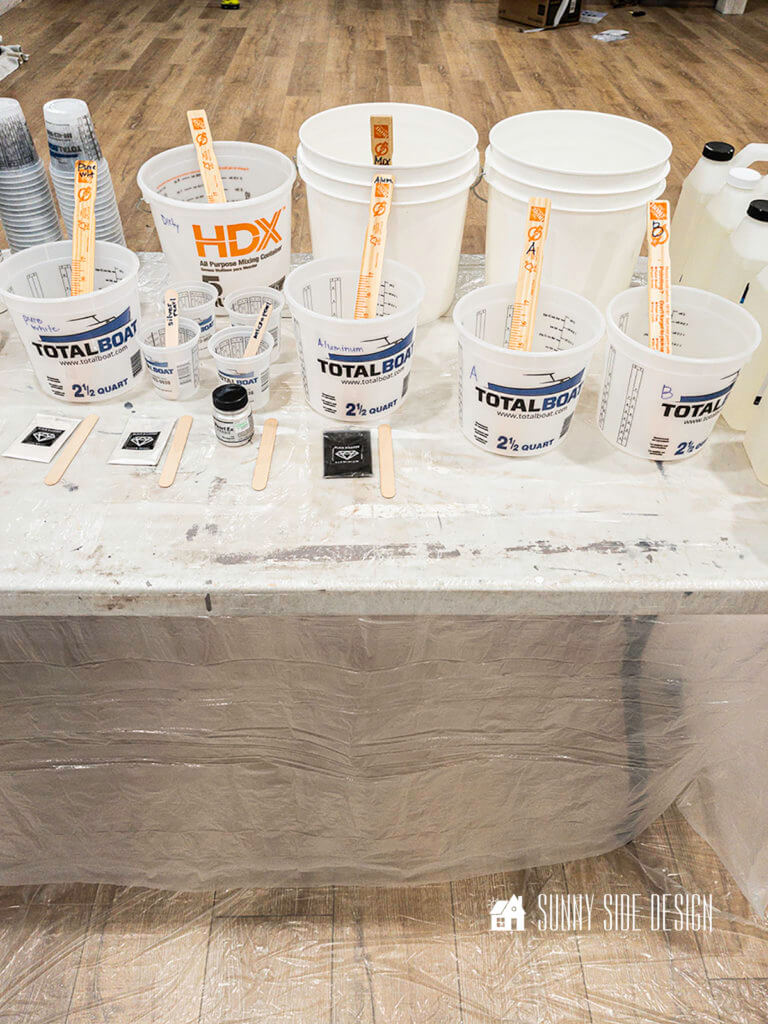
On our mixing table we have placed all of the buckets for mixing, plus smaller buckets for each color we will mix.
Mark each stir stick with the color name, so there is no confusion.

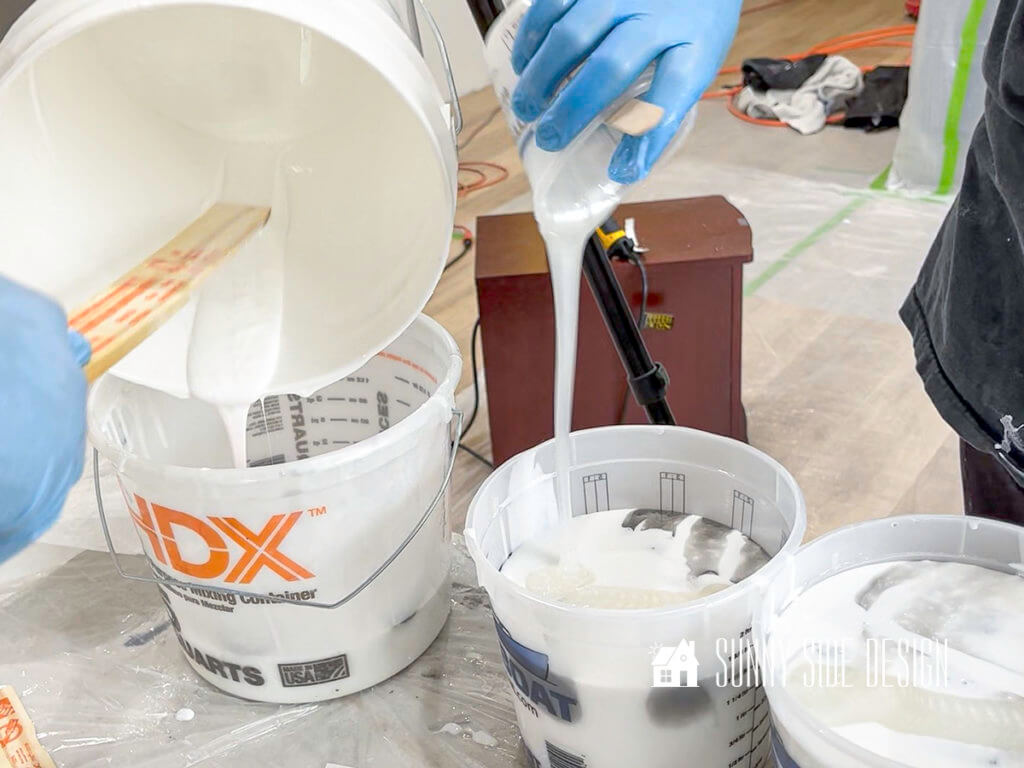
To mix parts A and B of resin for our countertop we used a 2 gallon bucket for each gallon we mixed.
After our first pour not turning out the way we would’ve liked, we decided to mix all three gallons at once.

This is where extra hands are important, so we asked our husbands to help.
Time Epoxy Mixing
Epoxy needs to be mixed for 3 to 5 minutes, then poured into a second bucket and mixed again for another 2-3 minutes.
This will ensure that it is thoroughly mixed.
You’ll also want to make sure as you stir that you scrape the bottom and sides of the bucket periodically.
Tips When Mixing Epoxy
As you mix part A and part B together air bubbles can get incorporated into the epoxy if you you stir too vigorously.
Another item to note about epoxy, is the deeper the container the greater the chance of exotherm, which will cause it to cure too fast.
With the Makerpoxy we used from Totalboat, we had about 1 hour of work time from the time we began mixing part A and part B.
Be sure to check on the cure time when choosing an epoxy, it can vary with different types of epoxy.
We chose this resin for a longer work time to add our veining and manipulate the design with a heat gun.
Do your own research when choosing epoxy and also see different methods others use.
Find something you are comfortable with.
And also check out our YouTube video as well.
For me it’s always good to see a project like this in action.
Add Color to Epoxy
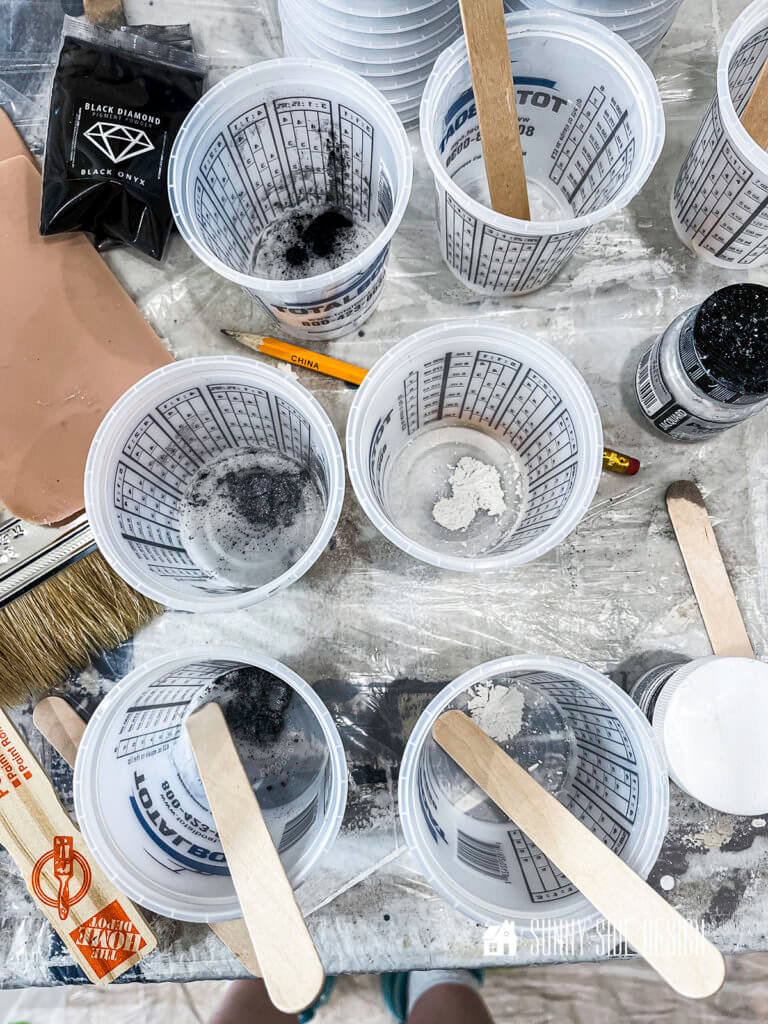
Once part A and part B are thoroughly mixed you can pour it into containers to mix your colors.
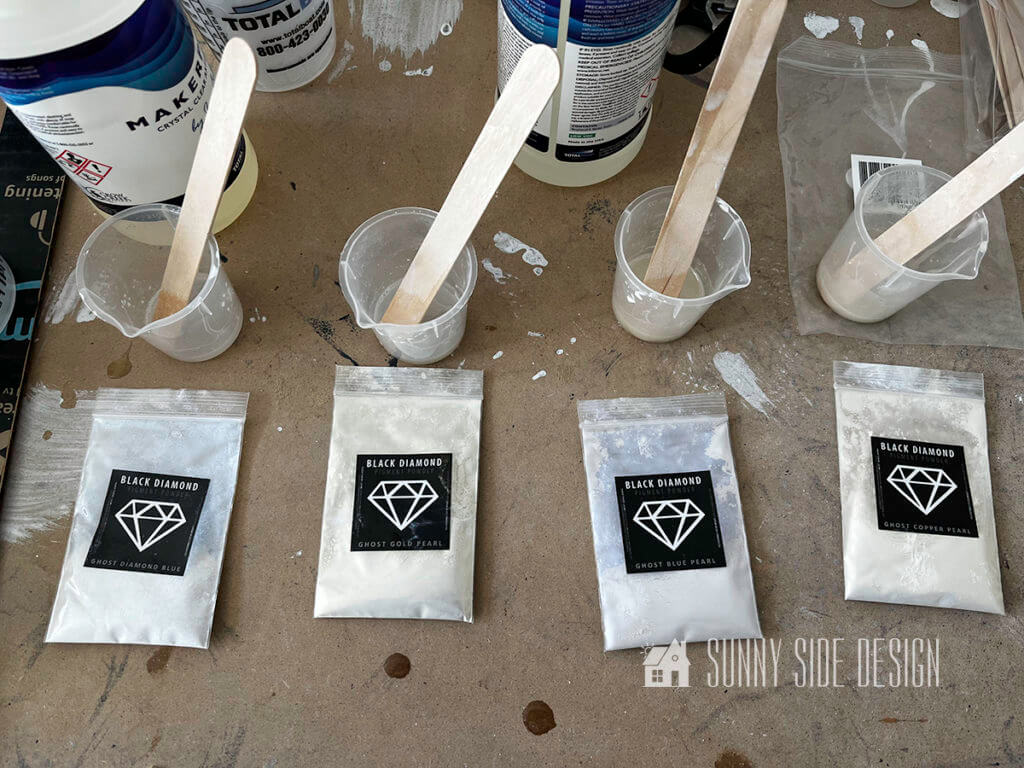
We used the following mica powders for our colors:
- Black Diamond aluminum mica powder
- Black Diamond black onyx mica powder
- Total Boat pigment dispersion white
- Jacquard Pearl Ex pigment micro pearl
For our dirty pour we used 2 cups of micro pearl, 2 cups of aluminum and 1/2 cup of black onyx.
The remaining epoxy was tinted opaque white.
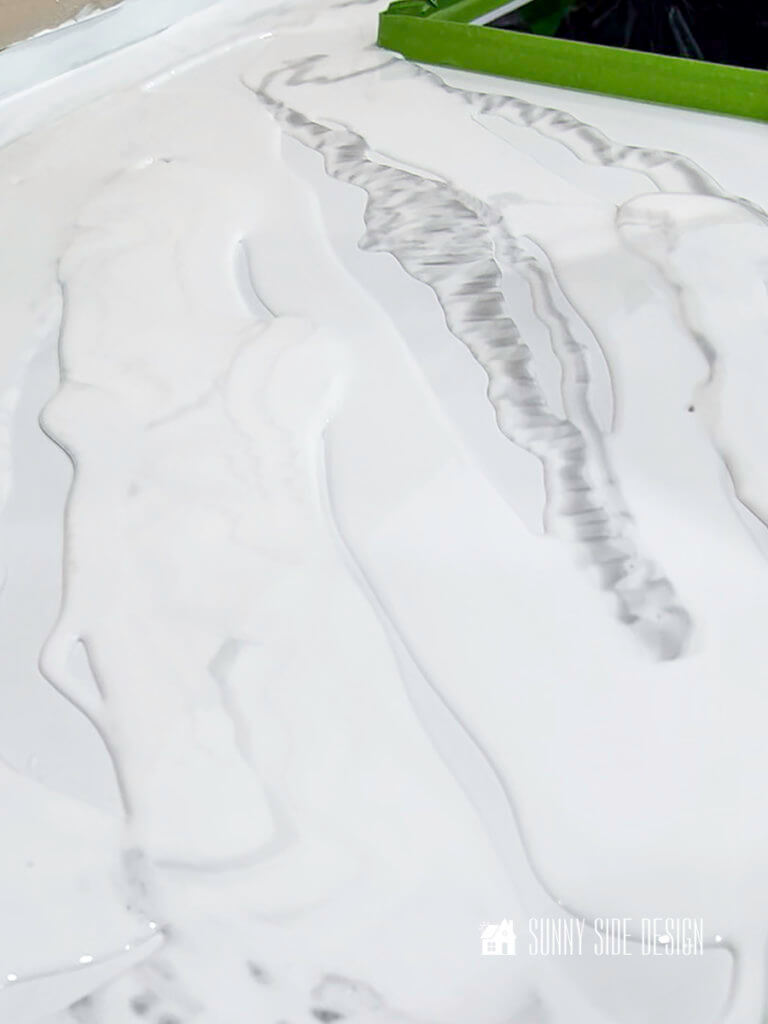
How To Make a Dirty Pour for a DIY Epoxy Countertop
For our epoxy countertops we chose to do a dirty pour method.
We felt that this gave us the most realistic marble look while creating depth and dimension to the countertop.

To begin we lined up six 2 quart buckets in a row on our mixing table.
And then we started to layer in our epoxy colors.
Three of the buckets, alternating every other bucket, we first placed in a little of the aluminum colored epoxy.
Next we added the white epoxy to all of the buckets, filling it about half full.

Then we added more of the aluminum epoxy in each of the six buckets.
Followed by more white in each of the six buckets.
This time as we added the white, we poured from right to the left side of the bucket and then back to the right.
In the process of doing this it slightly mixes the different colors.
Finally we added the micro pearl to each of the six buckets.

Do not stir the epoxy.
Pour each bucket without mixing and you will get a very natural looking marble veining.
Pour the Epoxy

The epoxy is poured one bucket at a time in a zigzag pattern, beginning with the bucket on the left.
Each bucket is poured to get some of the epoxy from that bucket over the entire countertop.

Once it’s all poured, set the bucket upside down on the countertop and let the remaining epoxy work its way out.

Next, take bucket number two and begin pouring in between the zigzag pattern, once again making sure that all of the epoxy from this bucket is over the entire countertop surface.
Repeat with each subsequent bucket until all six epoxy buckets are poured on the countertop.
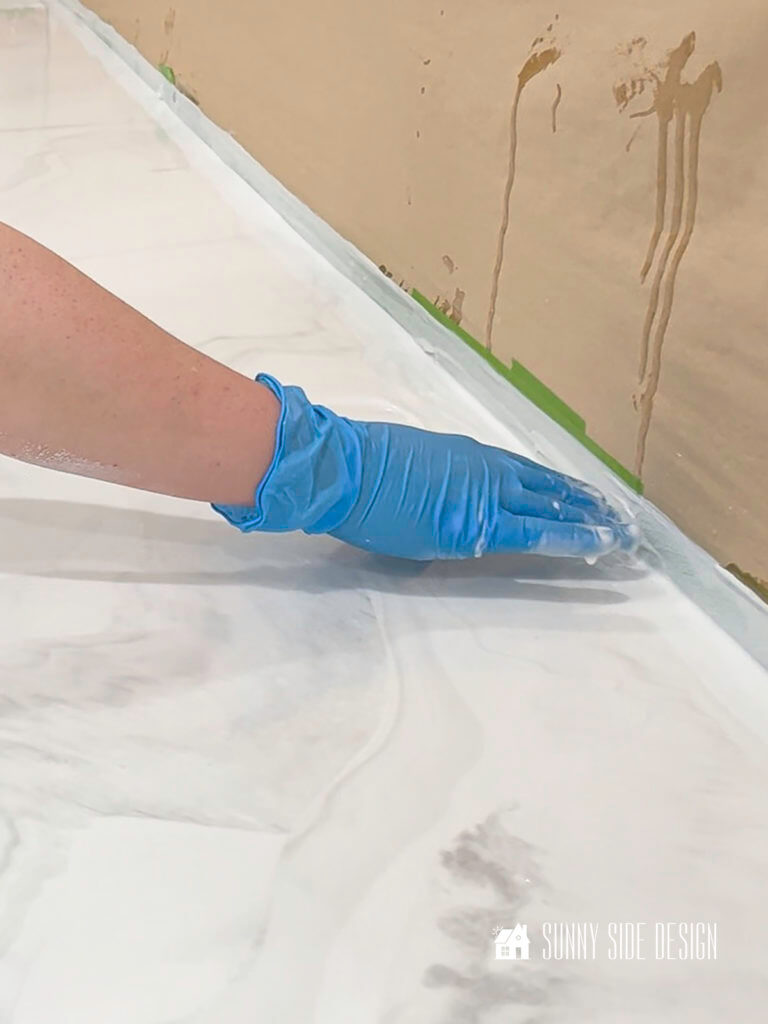
Ease the Tension DIY Epoxy Countertop

While the epoxy is self leveling, you can ease the surface tension by rubbing the dry surface with a gloved finger allowing the epoxy to flow easier.

This is particularly important along the wall and the tape dam area.
Meld Colors With a Heat Gun
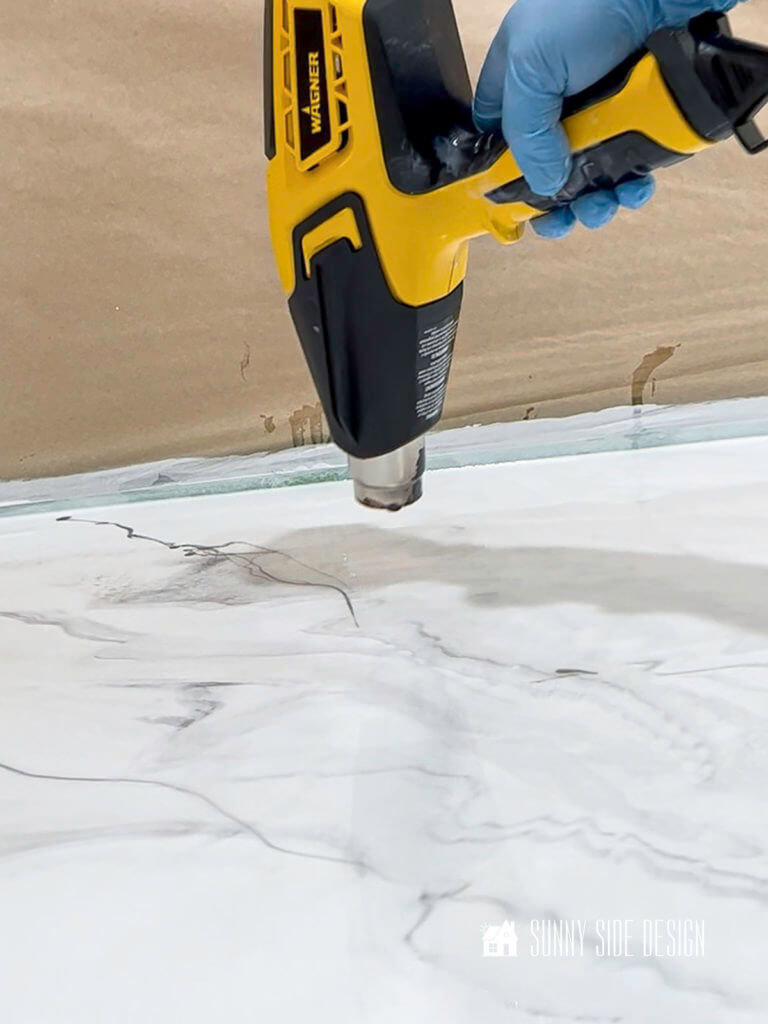
To make the epoxy countertop look realistic you’ll want to meld or blend the veining.
While you can use a chip brush and tap the area, we chose to just use the heat gun.
Wave the heat gun over a workable area you would like to meld to heat it up.

Then angle the gun back and forth and the epoxy colors will move and blend nicely together.
This is really the fun part in creating your epoxy countertop.
Just make sure that the gun is always moving, you do not want to scorch the epoxy.
You’ll also want to move the heat gun across the entire epoxy countertop, this will remove any air bubbles in the epoxy.
We also found it helpful to get level with the countertop to look for dimples or air bubbles.
Sometimes they are difficult to see.
We also added a few thin veining lines by dipping a stir stick into the black onyx and dripping the epoxy across in a few places.
Let’s stay connected! Follow us on social media!
Removing The Tape Dam

When the epoxy begins to gel it’s time to remove the tape dam.
You’ll have to test it, by pulling on the tape and see if it’s gelled.
You can see here that it’s gelled and doesn’t immediately run off the edge of the countertop.

With a gloved hand, once again you’ll want to break the surface tension by rubbing the surface.
This will allow the epoxy to flow over the edges more fluidly.
I even dipped my hand in a bucket with a little left over epoxy and rubbed it on all the edges of the countertop.
Now it’s time to just let it drip.
It will continue to drip for a couple of hours.
Once the dripping slows you can run a putty knife under the edge of the countertop to scrape off the drips.
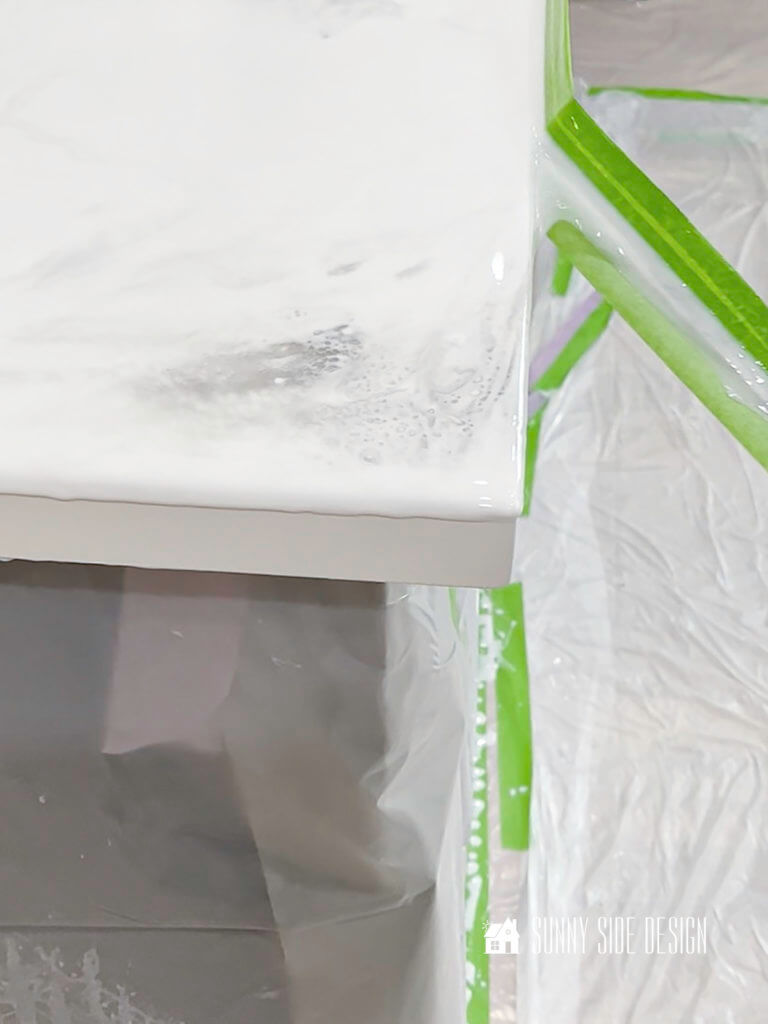
Final Clear Epoxy Coat
Somehow we didn’t take any photos of the final pour of the clear epoxy coat.
The countertop is not food safe until a clear layer of epoxy is applied.
Before the clear epoxy pour, we first did a light sanding with a 220 grit sandpaper and cleaned up the dust with rubbing alcohol on a soft cloth.
We again made the tape dam to help keep most of the epoxy on the surface of the countertop.
Then once again, we enlisted our husbands for help in mixing so we could mix all three gallons at the same time.
Then each bucket of the clear epoxy was poured over the countertop.
This time you’ll only use the heat gun to pop air bubbles.
Then wait until the epoxy starts to gel and remove the tape dam as before, breaking surface tension with a gloved hand.

Let the epoxy drip and you can scrape the epoxy from the bottom of the countertop with a putty knife if desired.
We opted to let ours epoxy drips dry and used the orbital sander to remove them.
Tips For Creating an Epoxy Countertop
If you are looking to pour a DIY epoxy countertop you will find these tips helpful:
- Enlist others to help. It’s a large job and with the limited time many hand make the job less stressful!
- Make sure your room, substrate and epoxy is between 70-80 degrees.
- Measure the epoxy accurately. Precise proportions is required for a proper cure.
- Be aware of exotherm if the epoxy is too thick or the mix is too deep in a bucket.
- Follow directions to ensure proper mixing.
- Do not stir to vigorously, or you’ll get air bubbles.
- Calculate how much epoxy you’ll need accurately. It better to have to much than run short!
- Make sure your surface is prepared properly
The Reveal DIY Epoxy Countertop

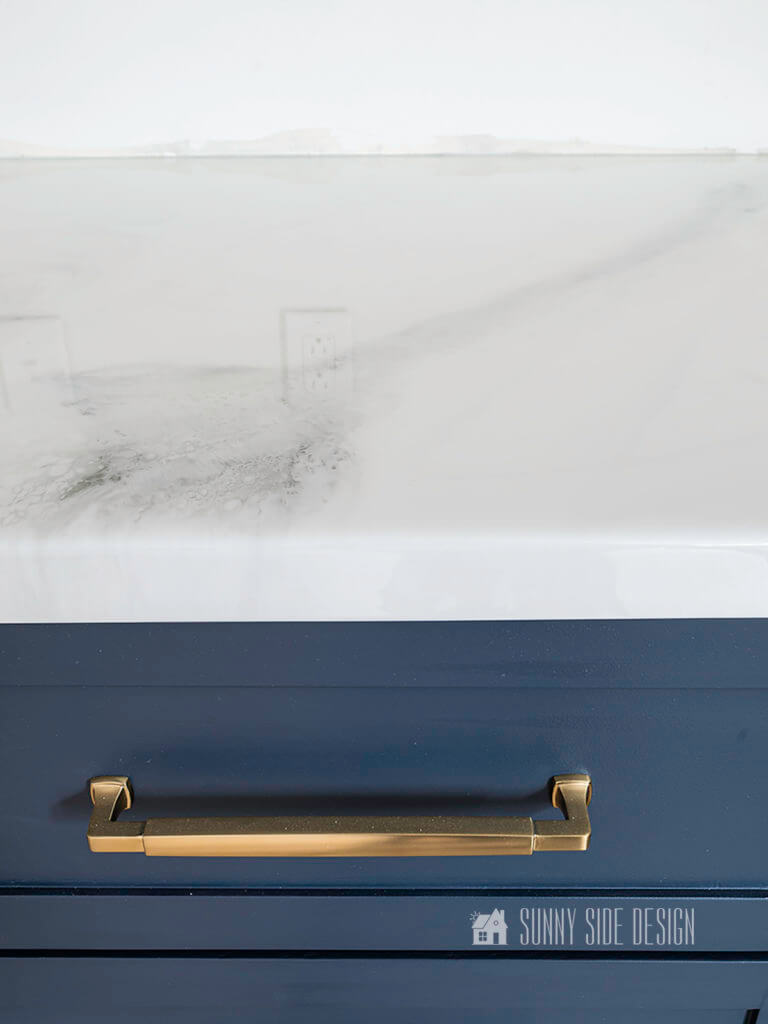
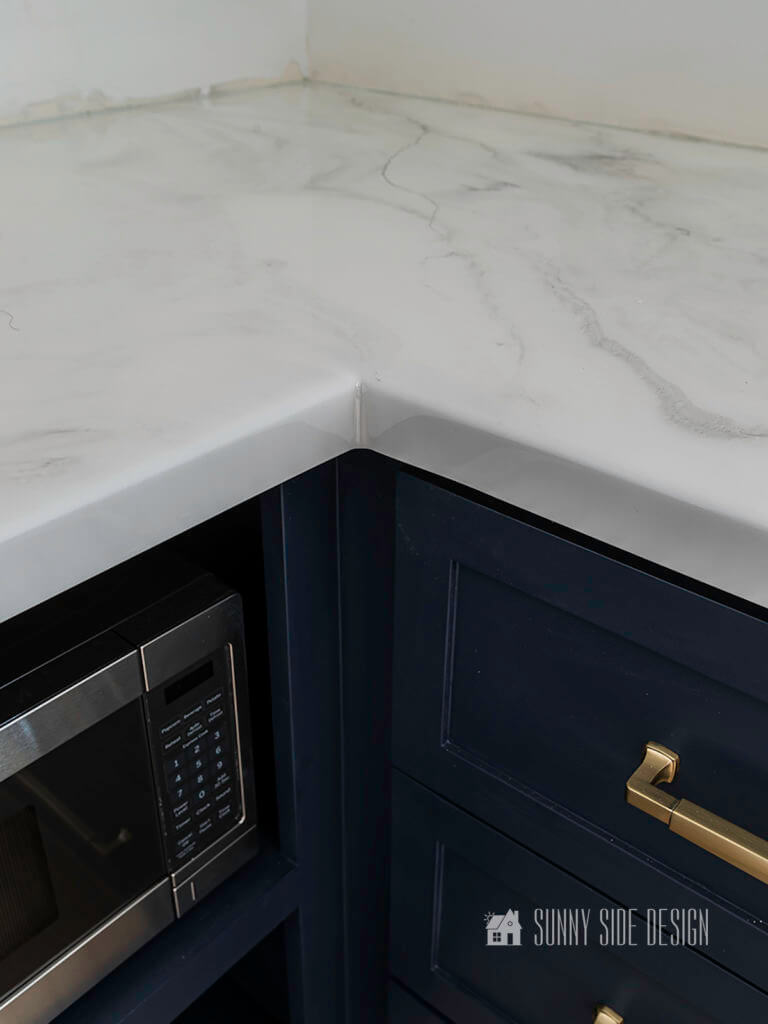
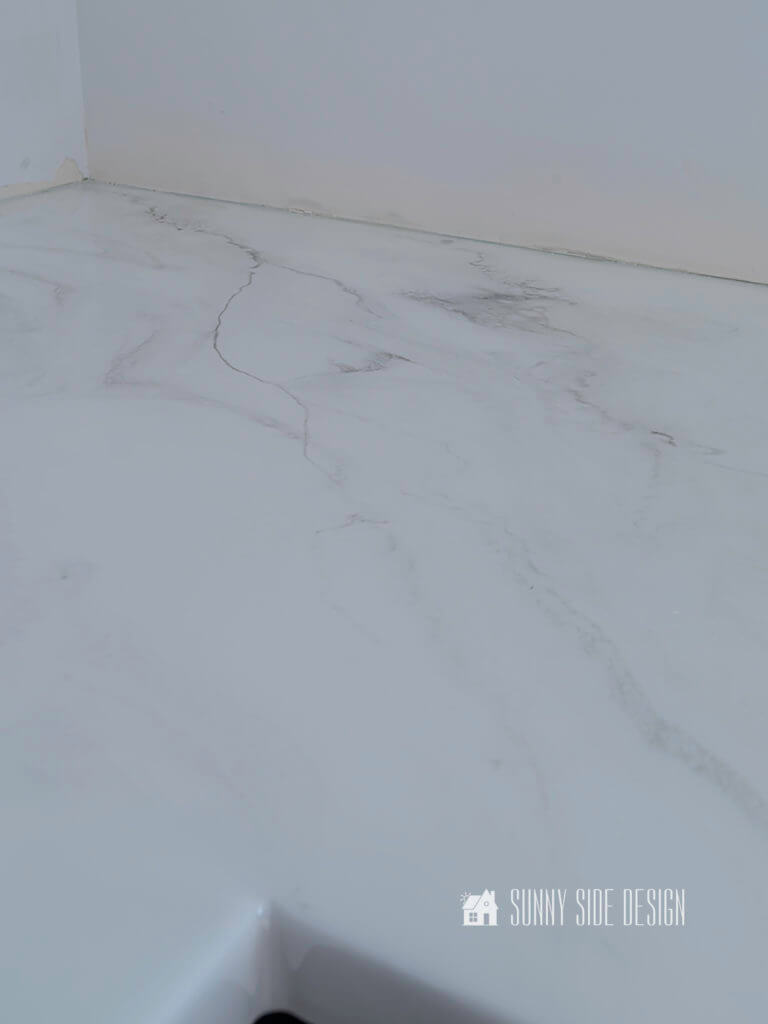
I absolutely love how realistic our marble epoxy countertop turned out.
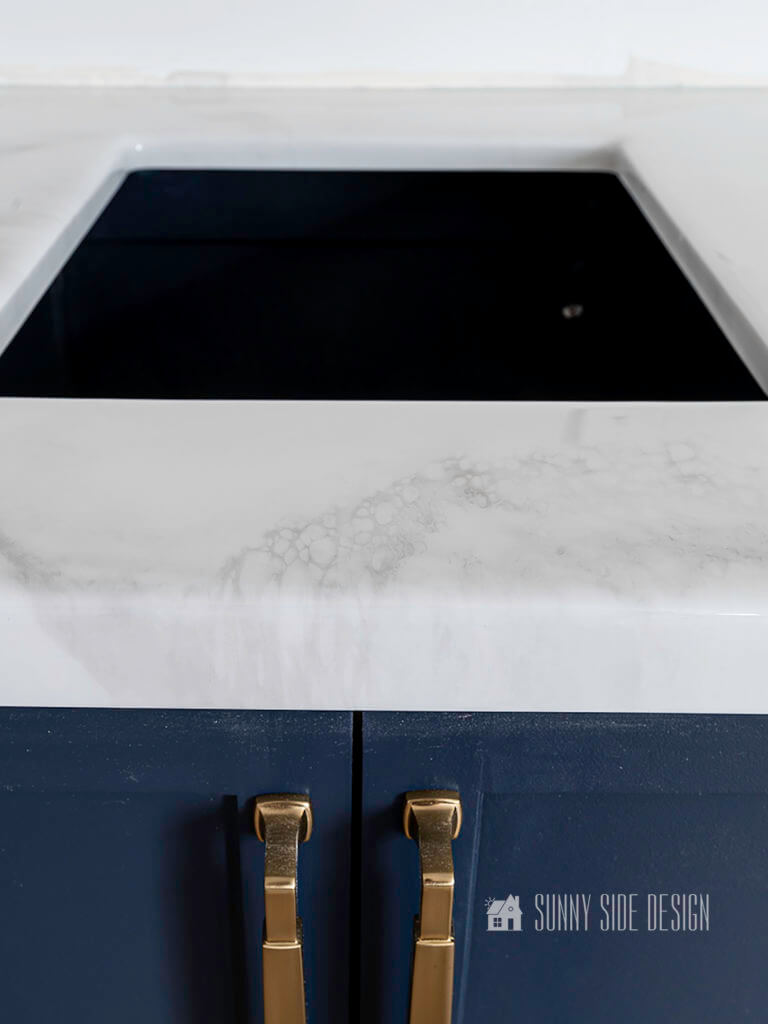
You can see even on the edge, how the gray epoxy pattern flowed off the edge creating more depth and dimension.
The dirty pour gave us such a realistic marble veining.
I just can’t believe how beautiful it turned out.
And it’s so glossy that the electrical outlets reflect on the surface.

Did you enjoy this post?
Pin it and save it for later and share it with a friend.
Sharing is caring!

Conclusion
We hope you found a little inspiration here today.
Are you ready to try your hand at a DIY epoxy countertop?
Does it seem like too much work? Or are you up for the challenge?
Remember to check back each week as we continue the One Room Challenge.
Each week we’ll share a new DIY project.
Next week we’ll share our waterproof flooring we installed.
You are going to want to see this!
It’s absolutely gorgeous!
What are your favorite elements in this room so far?
We’d love to hear from you!
Please share your thoughts and questions with us.
If you’re new here, WELCOME! We love having new readers and friends!
You can learn more about us here.
Let’s stay connected!
Subscribe to our free newsletter so you don’t miss any inspiration for your home.
Please PIN and save for later, and share with your friends!
Sharing helps grow our following!
Thanks for stopping by and as always here at Sunny Side Design…
WE HOPE TO BRING YOUR HOME TO THE SUNNY SIDE OF THE STREET.

Be sure to follow us on Pinterest for even more home decor and DIY ideas.
To see what we are working on before it’s on our blog, follow us on Instagram.
You will also find our video tutorials on our YouTube channel.


