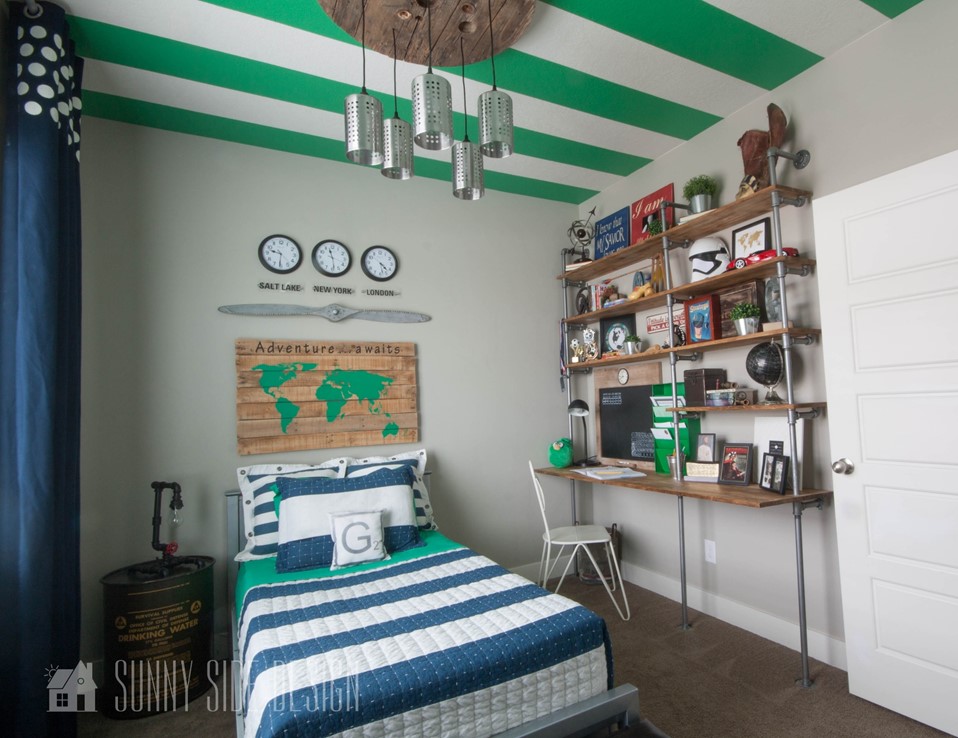
Hey there! Often I feel that when a space is designed the importance of the light fixture may be overlooked. Each fixture in our home was the basic builders grade, in other words BORING! This was no exception in this cool industrial teen bedroom. I mean, I guess if you wanna be nitpicky about it, the existing light did serve its purpose, it did provide the space with ample lighting, it was just an eyesore. But in my home, looks are pretty much as important to me as functionality, (insert my Hubby rolling his eyes at me!) so this room was screaming for a new light! See for yourselves.
Sunny Side Design is a participant in the Amazon Services LLC Associates Program, an affiliate advertising program designed to provide a means for sites to earn advertising fees by advertising and linking to Amazon.com. As an Amazon Associate, this blog earns from qualifying purchases with no additional cost to you. Click here to read our full disclosure policy.

Some designers refer to these as boob lights…I’ll leave that to your own imagination.

Many of my ideas spark from Pinterest. This was the inspiration light, and with a bit of tweaking we came up with a look to compliment this room. This Pin directed me to an Etsy sell, this was sold for $300! (It probably didn’t cost that much to make, depending on how much each of their pendant lights were.) My take on the light cost roughly $40!

First things first, I had the electrical spool, now onto the hunt for the perfect pendant shade! My Mom and I began scouring local thrift stores for anything stainless steel that would fit a light bulb and look really awesome in this space. I’d like to express my thanks to the unknown person who kindly donated their unwanted IKEA utensil holder to the Layton Goodwill! You may think I’m being funny (or weird) but after looking at several stores and leaving empty handed, with a more expensive alternative, we decided to stop at one last store, Goodwill. There it was, sitting on the shelf with a heavenly glow surrounding it. I knew this was the exact element to make this an amazing light fixture! It was only marked at $1.99, but there was only 1. Could I really find more of these exact utensil holders at different thrift stores? I did look for them a bit, but then I decided it would be better worth my while to make the long drive to IKEA myself and get 4 more.

Our trip to IKEA was successful. Not only did I get the additional utensil holders I needed, but I also picked up the actual electrical fixtures there as well! They are packaged for about $7 a piece, but my Mom found 4 in the As-Is section as we were about to check out. So, I did end up purchasing one at full price and the others ranged from $1-$3 a piece. One was white, but I was all about saving money so after I got it home, I just used a bit of black spray paint so it would match the others. Bet you can’t tell which one it is.
Are you enjoying this project? Please Pin It, save it for later and share it with a friend.
Sharing is caring!


My Dad used his trusty ol’ drill press using a hole saw to drill holes in the bottom of the utensil holders large enough to allow the new fixture to screw into place. He put the utensil holder on top of a piece of scrap wood to give a little support while drilling the hole. Then we inserted the electrical fixture through the hole in the utensil holder and tighten the ring to hold in place. Voila!

Then we marked where we wanted the 5 fixtures to hang from the electrical spoolpiece. We used a piece of rope to wrap around the circumference of the spool to get an exact measurement, then divided that by 5 (this gave equal spacing for each fixture). Once we had that measurement, a pencil mark was placed at the edge of the spool piece. Using a ruler we were able to line up the middle of the spool with the mark that was placed on the outer edge of the spool. We then measured up from the outside of each mark the same distance and made a mark for the hole. Once all 5 positions were marked we chose a drill bit that was a little larger than the electrical cord and drilled each hole.
If you’re new here, welcome! We’re so glad you’re here.
Let us introduce ourselves, we’re Michelle and Steph, a mom and daughter team who love to DIY and decorate our homes.
Not only are we passionate about making our homes warm, comfortable and unique, but it’s our mission to help you create that same feeling in your own home.
You’ll find ideas for repurposing, creating, decorating and making your home truly yours, while always mindful of a tight budget.
Undoubtedly we love finding ways to make your home look high-end on a small budget.
Plus you’ll also find a recipe or two as we share our family favorites with you.
We’d love it if you’d join our community of doers so you won’t miss any inspiration for your home.
We love new friends.

[mailerlite_form form_id=2]


Once the holes had all been drilled, we set the spool piece on top of a small tablemaking sure that the side of the spool that would be facing the ceiling was face down. With the right side of the spool up (or the side that would be showing once the fixture was hanging) we could string each light fixture through the holes.

Then we were able to tie knots on each cord (on the top side of the spool, the side that would face the ceiling) to secure them to the spool piece. We hung them at random lengths so it wouldn’t be too symmetrical.

Now to hang this creation! We used a stud finder to locate the nearest ceiling rafter to the light box. You can see where the existing light was hanging. We shifted the new light to the left a little bit so it would be centered over the bed, instead of being centered directly in the middle of the room. Two cleats were then attached to the ceiling with drywall screws.
Let’s stay connected! Follow us on social media!

Then the light was positioned into place, and secured to the cleats with 3 screws into each cleat. (This thing is heavy, we didn’t want it going anywhere!) My Dad then connected all the wiring and tucked the wires on top of the spool out of sight. Behold the finished product!
Looking for more DIY lighting ideas?
Then see how we transformed a pair of large vintage brass lamps with spray paint and wax.
And you need to see this lamp makeover, it’s a Pottery Barn dupe!


I hope you enjoyed this tutorial! See ya, until my next crazy idea. Thanks for stopping by.
We hope you found some inspiration for your home today.
Please share your tips and ideas with us.
We love hearing from you!
If you’re new here, WELCOME! We love having new readers and friends!
You can learn more about us here.
Let’s stay connected! Join our DIY community of doers and you won’t miss the weekly updates and more inspiration for you always on a budget.
Sharing is caring!
Thanks for stopping by Sunny Side Design. Empowering you to create a home you love!
DISCLAIMER
This blog’s content is for entertainment purposes only and is not professional advice. By reading this blog and attempting to recreate a project, you assume all responsibility for any injuries or damages incurred. Read my full disclaimer here.
PHOTO USE AND CONTENT SHARING
All of the photographs you see here are the property of Sunny Side Design unless otherwise credited.
We love for others to share our work, so please feel free to use one photo with a link back to our website.
Pinning and sharing is always encouraged!
Please do not reproduce other Sunny Side Design content without permission.
Retailers We Love
- Anthropologie
- Birch Lane
- Crate & Barrel
- Joss and Main
- Lampsplus
- Mark & Graham
- One Kings Lane
- Pottery Barn
- Rejuvenation
- Serena & Lily
- Wayfair
- West Elm
- Williams Sonoma
- World Market
Be sure to follow us on Pinterest for even more home decor and DIY ideas.
To see what we are working on before it’s on our blog, follow us on Instagram.
You will also find our video tutorials on our YouTube channel.
- Creating a Cozy Outdoor Living Room with Thrifted Finds

- The Best ‘Berry in Love’ Bridal Shower Ideas
- Paint an Old World Texture Finish on a Vase
- Easy Strawberry Chicken Salad with Lime Maple Balsamic Vinaigrette


