Looking for Valentine’s Day decor ideas?
Then try this glam Valentine’s Day decor using gold leaf!
You’ll be surprised at how easy it is to apply gilding!
After this project you’ll want to apply gold leaf to everything because it is so easy and gorgeous!
Sunny Side Design is a participant in the Amazon Services LLC Associates Program, an affiliate advertising program designed to provide a means for sites to earn advertising fees by advertising and linking to Amazon.com. As an Amazon Associate, this blog earns from qualifying purchases with no additional cost to you. Click here to read our full disclosure policy.
Valentine’s Day Decor Supplies

This entire project was created using supplies we already had on hand, except the wood heart.
We picked that up at our favorite local craft store.
- wood heart
- scrap wood for backgroung
- 3/4″ masking tape
- 1/4″ painters tape
- blush paint (Ceramcoat) Normandy Rose
- white paint
- black paint
- gold leaf or foil
- craft glue
Paint Background


To begin, cut scrap wood to 11″x 11″.
Then apply blush paint (Ceramcoat Normandy Rose). Once the paint is dry to the touch.
Use a ruler to make a small pencil mark at both the top and bottom edges to determine the center of the wood.
PRO TIP: Use a hairdryer on medium heat to speed up the drying time of paint.
Are you enjoying this project? Please Pin It, save it for later and share it with a friend.
Sharing is caring!
Tape Pinstripe


Once the center of the wood has been marked, take a piece of masking tape and apply it to the center of the wood.
I was able to see the pencil mark through the tape, so I was able to see that the mark was in the center of the tape.
Then place a strip of the 1/4″ painters tape next to the masking tape.


Repeat these steps to create the pinstripe pattern over the entire piece of wood.


Once all of the tape has been applied, simply remove the 3/4″ masking tape.
As a result, you will have a perfectly aligned pinstripe pattern.
Firmly rub your fingers across each strip of the painters tape to ensure that it is adhered well.
Paint Pinstripe


Next apply another coat of blush paint on top of the painters tape.
This will ensure no bleeding under the tape!
Once the blush paint is dry to the touch apply a couple of coats of white paint to create an opaque finish.
PRO TIP: This technique will ensure a perfect crisp line everytime!
We’ve also used this technique while painting stripes on a very textured ceiling and they were perfectly crisp and clean.
This technique is not limited to creating stripes alone!
See how we used this technique in our master bedroom makeover.


In our case, we applied 3 coats of white paint to achieve an opaque finish.
If you’re new here, welcome! We’re so glad you’re here.
Let us introduce ourselves, we’re Michelle and Steph, a mom and daughter team who love to DIY and decorate our homes.
Not only are we passionate about making our homes warm, comfortable and unique, but it’s our mission to help you create that same feeling in your own home.
You’ll find ideas for repurposing, creating, decorating and making your home truly yours, while always mindful of a tight budget.
Undoubtedly we love finding ways to make your home look high-end on a small budget.
Plus you’ll also find a recipe or two as we share our family favorites with you.
We’d love it if you’d join our community of doers so you won’t miss any inspiration for your home.
We love new friends.

[mailerlite_form form_id=2]
Remove Tape


While the paint is still wet remove all the painters tape.
Voila, you’ve created the perfect pinstripe pattern!
If painting the stripes seems to tedious, you can always use a patterned paper as the background.
Let’s stay connected! Follow us on social media!
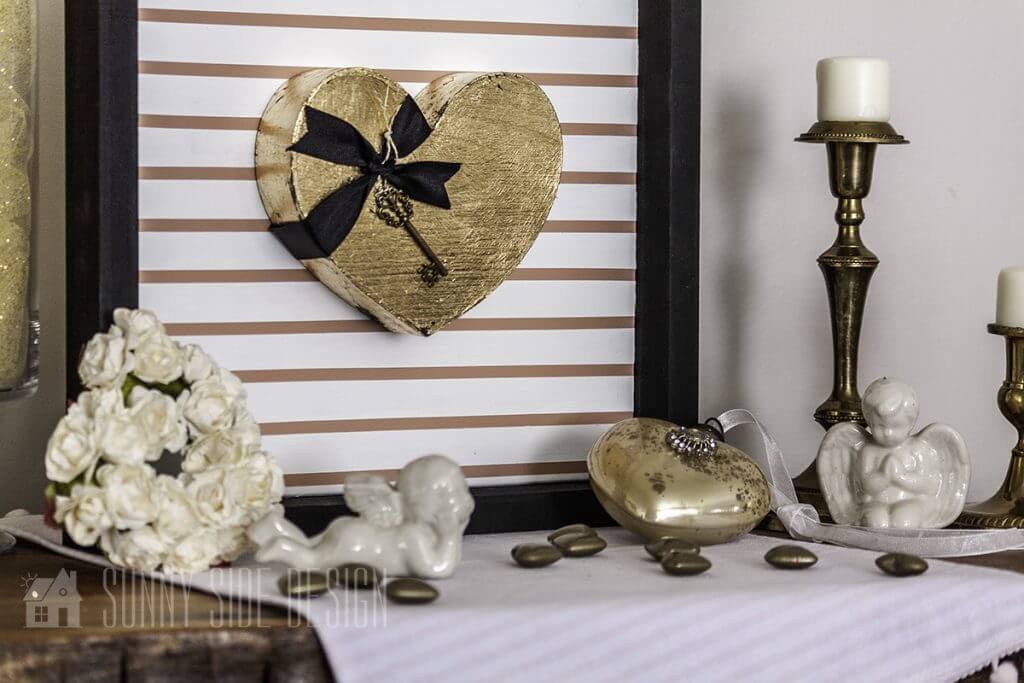
Apply Gold Leaf

Begin by applying a coat of black paint to the wood heart and allow to dry.

First, watered down the glue a little so it isn’t to thick.
It should be the consistency of cream.
This will allow you to get a smooth even coat of glue.
Once the paint on the heart is dry apply the water-based glue to the sides and top of the heart.
Allow the glue to air dry until it’s tacky.
To test, dab your finger on the glue, if any comes off on your finger it’s still too wet.

When the glue is tacky you’re ready to start applying the gold leaf.
Although this may seem a little intimidating if you’ve never done it before, it’s really simple and fun!
The gold leaf directions suggest wearing gloves so it doesn’t stick to your hands.
Gently lift up a sheet of gold leaf while it’s still on the tissue paper backing.
Carefully place the gold leaf onto the heart and lift the tissue paper off.
Let’s stay connected! Follow us on social media!

Use a soft bristle brush gently dab the gold leaf onto the heart.
The gold leaf will not stick to itself, only to the tacky glue.
Once finished dabbing the gold leaf into place, simply brush away the loose pieces.

Be sure to apply the gold leaf on the sides of the heart as well.
Attach Heart
After the gold leaf is applied, embellished the heart with a black ribbon and a gold key.
Apply wood glue to the back side of the heart, position in the center of the board, and press into place.
To create the frame for this project we used the same technique as our Reversible Holiday Signs tutorial last Spring.
For even more Valentine ideas check out these posts.
Valentine Craft for your Mantle
DIY Valentine Decoration Ideas
Easy Decorating with FREE Valentine Printables
Elegant Valentine’s Day Decor

Don’t you just love the way this glam Valentine’s Day decor turned out?
Are you excited to give gold leafing a try?
Without at doubt, this really is a lot of fun!
After just one project you will be wanting to apply gold leaf to everything!
More Valentine’s Day Ideas
- Simple Valentine Heart Decor Using Vintage Linens & Lace
- Quick & Easy Valentine Yarn Wreath
- Simple Faux Brass Embossed Tile DIY Hearts
- Easy DIY Valentine Wreath with a Little Sparkle
- Make Unique Valentines Decor with Confetti
- No Sew Valentine Pillow Cover
- How to Make a Simple Neutral Valentine Garland
- Easy 30 Minute Valentine’s Day Craft Idea for Your Mantle
- Easy Valentine’s Day Decor Using Gold Leaf
- 30+ Easy DIY Valentine’s Day Decoration Ideas
We hope you found some inspiration for your home today.
Please share your tips and ideas with us.
We love hearing from you!
If you’re new here, WELCOME! We love having new readers and friends!
You can learn more about us here.
Let’s stay connected! Join our DIY community of doers and you won’t miss the weekly updates and more inspiration for you always on a budget.
Sharing is caring!

Thanks for stopping by Sunnyside Home. Empowering you to create a home you love!
Retailers We Love
- Anthropologie
- Birch Lane
- Crate & Barrel
- Joss and Main
- Lampsplus
- Mark & Graham
- One Kings Lane
- Pottery Barn
- Rejuvenation
- Serena & Lily
- Wayfair
- West Elm
- Williams Sonoma
- World Market
Be sure to follow us on Pinterest for even more home decor and DIY ideas.
To see what we are working on before it’s on our blog, follow us on Instagram.
You will also find our video tutorials on our YouTube channel.
- How to Fix Chipped Kitchen Cabinets with a Pen

- Easy 4th of July Door Decor You Can Make in Minutes
- 35 Easy Decorating Ideas for Summer to Welcome the Season
- Fourth of July Decorating Ideas You’ll Love This Summer