Did you enjoy our previous post on transforming ready made curtains into custom drapery? Isn’t it crazy to think that by adding just a couple of simple elements to a ready made curtain panel can make such a dramatic difference? Today I want to share another way to transform ready made curtains from IKEA into something a little more playful.
Sunny Side Design is a participant in the Amazon Services LLC Associates Program, an affiliate advertising program designed to provide a means for sites to earn advertising fees by advertising and linking to Amazon.com. As an Amazon Associate, this blog earns from qualifying purchases with no additional cost to you. Click here to read our full disclosure policy.
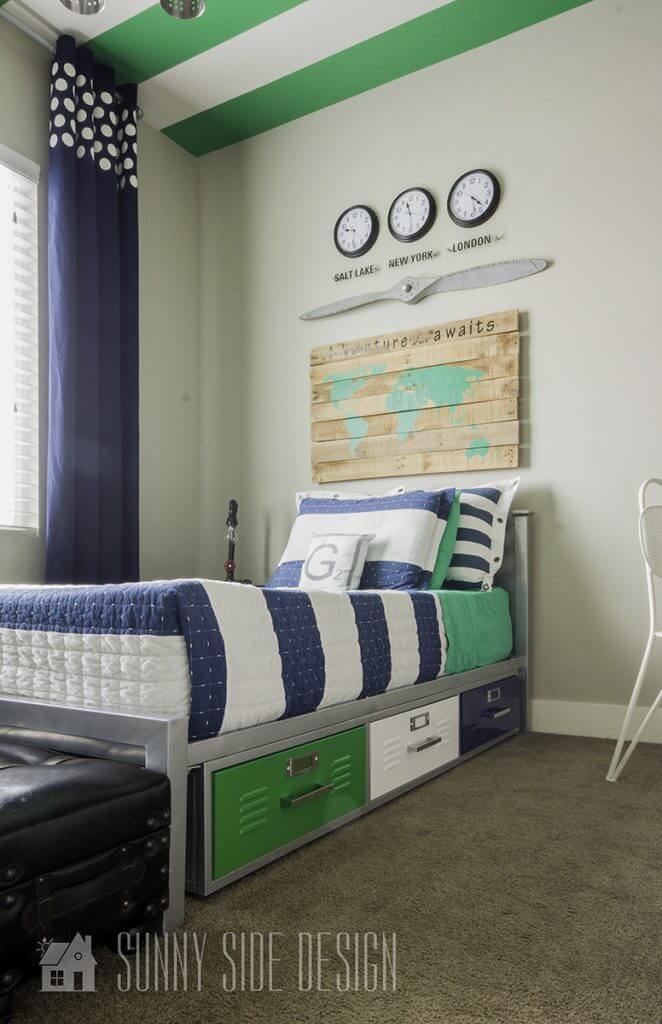
In this tutorial we used the MERETE curtain panels from IKEA. These also come un-hemmed in varying lengths. I like to hang my curtains to the top of the ceiling, this gives the illusion that the ceiling is higher than it actually is. Since my ceilings are 9′ I purchased the 57″x118″ panels. These panels also come ready to hang, with silver grommets attached.

I chose to use a polka dot pattern for these curtains to continue the pattern throughout the room. It can be seen on the headboard, back of the chair, the DIY light fixture and now on these curtains.


For this project we needed to create a stencil for the polka dots to make sure each dot would be evenly spaced and also be lined up straight. To create the stencil we used a Silhouette machine to cut out enough vinyl to cover the width of each curtain panel. The vinyl pieces we had on hand were only 2′ long by about 8″ wide, so for this project we needed 12 vinyl stencils. Each polka dot is about 2″ in size. Once all of the vinylstencils had been cut, we then weeded the stencils with the picker tool to remove the dots.


After each of the stencils have been weeded, we continued to prepare the vinyl with the standard steps to applying vinyl.
Are you enjoying this project? Please Pin It, save it for later and share it with a friend.
Sharing is caring!


First we trimmed the transfer paper to fit the vinyl, then we carefully lined the vinyl and transfer paper up so we could apply the transfer paper to the front of the vinyl. Carefully attach one edge of the transfer paper and press firmly to make sure it is securely applied. Then slowly pull the transfer paper towards the opposite end of the vinyl to finish applying the transfer paper to the entire piece of vinyl. Once the transfer paper has been applied, take the pressing tool and firmly rub the entire surface to make sure the entire surface of transfer paper is applied to the vinyl, this step will also help remove any bubbles.

Using a ruler we located the center of the curtain panel and decided where we wanted to apply the first stencil. We decided to work from the middle outward. We secured the stencil with green frog tape to keep it in position so we could remove the backing of the vinyl and apply it to the curtain.

Once the stencil was taped into place we flipped it upside down to remove the vinylbacking. To do this start from one corner and slowly pull in a diagonal direction until it has all been removed. Then you can carefully bring the vinyl piece forward into place again, this time firmly pressing it into place with your hands, and then again using the pressing tool.

Up until this point we had been following the typical guidelines for working with vinyl. We’ve used these steps on many projects in the past with great results, however using vinyl as a stencil on fabric was a first for us…and…we learned a valuable lesson! Vinyl doesn’t really stick to fabric that well. Yes, even we learn from our mistakes! Keep reading to see how we finally got it to stay put!

The next step is to remove the transfer paper leaving you with your vinyl stencil in place where you have firmly secured it. To remove the transfer paper it’s easiest to begin by pulling away from one corner and pulling in a diagonal direction again. The transfer paper was actually sticking to the fabric better than the vinyl through the polka dots and was pulling up the entire stencil the whole time we were trying to remove the transfer paper. (You can see in this picture, once we finally had the transfer paperremoved how “bubbly” the vinyl is. The vinyl did have an initial bond to the fabric, but after it had been lifted up with the transfer paper it seemed to have lost most of it’s “stickiness”) Gah! I was getting very frustrated. After a lot of re-positioning and rubbing the stencil back into place, my Mom suggested that we forgo using the transfer paper on the next stencil and see if that would help us get the vinyl to adhere to the fabric better.

So on this next stencil piece we attempted to apply the vinyl without using the transfer paper. It was a little bit tricky to get the pattern to line up, but once we had the first edge of dots lined up we slowly removed the vinyl backing and applied the remaining portion of the stencil. (This is where its normally beneficial using the transfer paperbecause the backing would have already been removed and you can see exactly where you are positioning the vinyl.) This method did prove to be a bit trickier lining up the pattern from stencil to stencil, however we got a much better bond of vinyl to fabric with this method.

Once all six vinyl stencils had been applied to each curtain panel, we masked off the remaining portion of the curtains to prevent from any paint over-spray. (Notice my choice of words here? My clever idea will backfire on me, but I’ll get to that in a minute.)
If you’re new here, welcome! We’re so glad you’re here.
Let us introduce ourselves, we’re Michelle and Steph, a mom and daughter team who love to DIY and decorate our homes.
Not only are we passionate about making our homes warm, comfortable and unique, but it’s our mission to help you create that same feeling in your own home.
You’ll find ideas for repurposing, creating, decorating and making your home truly yours, while always mindful of a tight budget.
Undoubtedly we love finding ways to make your home look high-end on a small budget.
Plus you’ll also find a recipe or two as we share our family favorites with you.
We’d love it if you’d join our community of doers so you won’t miss any inspiration for your home.
We love new friends.

[mailerlite_form form_id=2]

Here you can see we have applied all of the stencil pieces to both curtain panels, 3 stencils wide by 2 rows each. We have also folded the tarp up over the bottom portion of the curtains and masked that section off with tape. We also masked off the top portion of the curtains using the vinyl backing pieces, and for an extra precautionary measure, we also applied a small strip of frog tape down the center of each stencil where the 2 rows of stencils meet just to make sure everything was securely in place and safe from over-spray.

Well, here it is, my biggest ever DIY Epic Fail! See, I had this brilliant idea to use spray paint for this project, I thought it would give me nice crisp lines, with reduced potential for paint bleeding under the stencil as it might using a paint brush, not to mention it would be a lot quicker than painting each dot by hand! Hey I had even found a can of spray chalk paint! Everything from this point on would be easy peasy, especially since we had a bit of trial and error even getting the vinyl stencil pieces to adhere and line up correctly.

Well here we are after using the entire can of spray paint. Not what I had envisioned at all!

I carefully peeled up a small corner of the stencil to see what it was beginning to look like. Not only was there some paint bleeding or over-spray, but the dots were very faint, a far cry from a solid, opaque dot I had envisioned. (Insert emoji smacking myself in the forehead!) Why was this not turning out like I had planned?


Have you ever caught yourself working on a project for a long amount of time and you just wanted to be done?! By this point I wanted to be done so badly! I knew I could get those dots to be a nice opaque white, I just didn’t want to do what it was going to take, painting them by hand! My Angel Mother helped me paint each of these dots, which took 2 coats of paint to get the right amount of coverage! When hand painting with a stencil, use a small amount of paint on your brush and make sure to start with the brush on the stencil and pull the brush onto the fabric. This will help prevent possible bleeding under the stencil.
Voila! After some trial and error and a lot of work, they were finally finished, well the painting part anyway. The dots don’t have perfectly crisp lines or shape for that matter, but when they are hanging 9′ high and I stand a measly 5’3″ they look pretty darn good!
Once the paint had dried we laid a cotton towel on top of the dots and ironed using the hottest setting to set the paint into the fabric. Then we ironed the remaining portion of the curtains so they could be hung.


A quick tidbit about the curtain rod. I purchased the same electrical conduit that we used to build the DIY desk and shelving unit on the opposite wall in this bedroom. I spray painted it silver to match the shelving unit, and mounted the flanges to the wall into studs to make pilot holes. Then because of how each of these parts screw together, we had to thread the curtains onto the rod with one elbow and flange removed. Once both panels were on the rod we screwed the elbow and flange back on and then we were able to secure the rod to the wall.
Let’s stay connected! Follow us on social media!

Remember how ready I was to be finished with this project after all the trial and error with the vinyl and painting? After the curtains had been hung, the very last thing I needed to do was to hem them. But I couldn’t bring myself to do it right away. I thought I’d give myself a day or two…or ten! HA! I really don’t even remember how long it took me to finally get around to hemming them! Which is pretty silly if you think about it because it only took maybe 20 minutes to do.

The best way to hem curtains to the perfect length is to pin them up about 1/2″-1″ from the bottom of the floor. Since the curtains are already hanging you can take a step back and see if you like the length and make adjustments where needed. (Since these were my 21st and 22nd MERETE curtain panels I’ve hemmed I’ll let ya in on a little secret. All curtain panels are not created equally. By that I mean, even though you’ve purchased them at a given length, you’d assume that they are cut straight on the bottom edge. Fair assumption right? Not so my friends.


From this curtain project, the striped curtains, quatrefoil curtains, to the curtains I stitched upholstery webbing onto, each panel was cut so different. Either one panel was longer than the other, or one or both bottom edges were cut at an angle. No 2 panels I’ve purchased together have been cut equally and have had to be hemmed slightly different. Don’t get me wrong, I obviously enjoy having these curtains in my home especially since I’m now on the 21st and 22nd panels, it’s just important to pin them to the appropriate hem length while they’re hanging since you’ll likely be hemming them differently anyway.
(Please subscribe so you can see how these other MERETE curtains were made…tutorials to come soon)


Once you have pressed the bottom edge of the curtain panel to give it a nice crisp crease, you can take the pins out and fold the extra fabric back, pulling the bottom edge down to the crease you have just made. Then take the iron where you have just folded the fabric behind and make a crease along that edge. This will give the curtains a nice finished look.
Now, since the curtains are already hanging, I just brought in a little makeshift sewing table and hemmed them right at the window. First time I’ve done that, but it worked out great! It helped keep the excess fabric up and out of the way. I may just have to use that trick from now on.
We hope you found some inspiration for your home today.
Please share your tips and ideas with us.
We love hearing from you!
If you’re new here, WELCOME! We love having new readers and friends!
You can learn more about us here.
Let’s stay connected! Join our DIY community of doers and you won’t miss the weekly updates and more inspiration for you always on a budget.
Sharing is caring!

Thanks for stopping by Sunny Side Design. Empowering you to create a home you love!
DISCLAIMER
This blog’s content is for entertainment purposes only and is not professional advice. By reading this blog and attempting to recreate a project, you assume all responsibility for any injuries or damages incurred. Read my full disclaimer here.
PHOTO USE AND CONTENT SHARING
All of the photographs you see here are the property of Sunny Side Design unless otherwise credited.
We love for others to share our work, so please feel free to use one photo with a link back to our website.
Pinning and sharing is always encouraged!
Please do not reproduce other Sunny Side Design content without permission.
Retailers We Love
- Anthropologie
- Birch Lane
- Crate & Barrel
- Joss and Main
- Lampsplus
- Mark & Graham
- One Kings Lane
- Pottery Barn
- Rejuvenation
- Serena & Lily
- Wayfair
- West Elm
- Williams Sonoma
- World Market
Be sure to follow us on Pinterest for even more home decor and DIY ideas.
To see what we are working on before it’s on our blog, follow us on Instagram.
You will also find our video tutorials on our YouTube channel.
- Easy Strawberry Chicken Salad with Lime Maple Balsamic Vinaigrette

- How to Fix Chipped Kitchen Cabinets with a Pen
- Easy 4th of July Door Decor You Can Make in Minutes
- 35 Easy Decorating Ideas for Summer to Welcome the Season