Today in this post you’ll learn the basic steps to build a drawer with undermount slides.
At first the thought of building drawers was extremely intimidating, but when there’s a will there’s a way.
And as first time drawer builders, we are so pleased with the results!
So let me tell you, if we can learn to build a drawer, you can too!
Of course, we’ll walk you through each step with detailed photos and instructions so you can feel confident building your own drawers too.
And at the end of this post, we have a link to the video tutorial that was extremely helpful to us.
As we completed the basement family room One Room Challenge, we found we had so many DIY projects, we couldn’t fit them all in the 8 week time frame.
So for the next few weeks we will share more of the projects from the family room.
Not all of these projects are construction projects, we also have DIY furniture pieces as well as accessories that we are excited to share with you.
So be sure to check back each week as we share more from the ultimate family hangout room.
- What Type of Wood is Used to Build a Drawer
- Supplies to Build a Drawer
- Why Choose Undermount Slides
- Install Undermount Drawer Slides
- Determine Drawer Box Size
- Cut Pieces for Drawer
- How to Build a Drawer
- Attach Undermount Drawer Slide Latch
- Edge Banding
- Seal Drawer Boxes
- Attach Drawer Front to Drawer Box
- The Results
What Type of Wood is Used to Build a Drawer
Most drawer boxes are built out of plywood.
On the higher end a baltic birch plywood, and on the lower end a sanded plywood.
In order to save money, we built our drawer boxes out of sanded plywood.
Plywood makes a great drawer box because with seasonal changes in humidity and temperature, there is less warping than with solid wood.
And warping and twisting can cause issues with drawer alignment.
Plus is looks super clean when it’s finished.
Supplies to Build a Drawer
Why Choose Undermount Slides
When I was remodeling my kitchen, I learned quite a bit about undermount drawer slides.
Undermount slides offer two benefits that side-mount slides do not:
They are totally concealed beneath the drawer, which means they don’t require as much space on the sides for clearance, they offer slightly more storage area inside the drawer.
Also undermount drawer glides hold more weight and provide more support than side mount drawer slides.
And they are more sanitary, less dust and spills can accumulate on the slide.
Installation of the undermount slides is super easy too.
Install Undermount Drawer Slides
When using undemount drawer slides, the very first step to building a drawer box is to install the drawer slides.
The position of the undermount drawer slides will determine the size of your drawer box.

First you’ll want to cut a piece of scrap plywood that is the inside height of the cabinet box.
It can be anywhere from 3 1/2″ to 4″ wide.
Place this piece of plywood inside of the cabinet box against the face frame and the side of the cabinet box and mark a line.
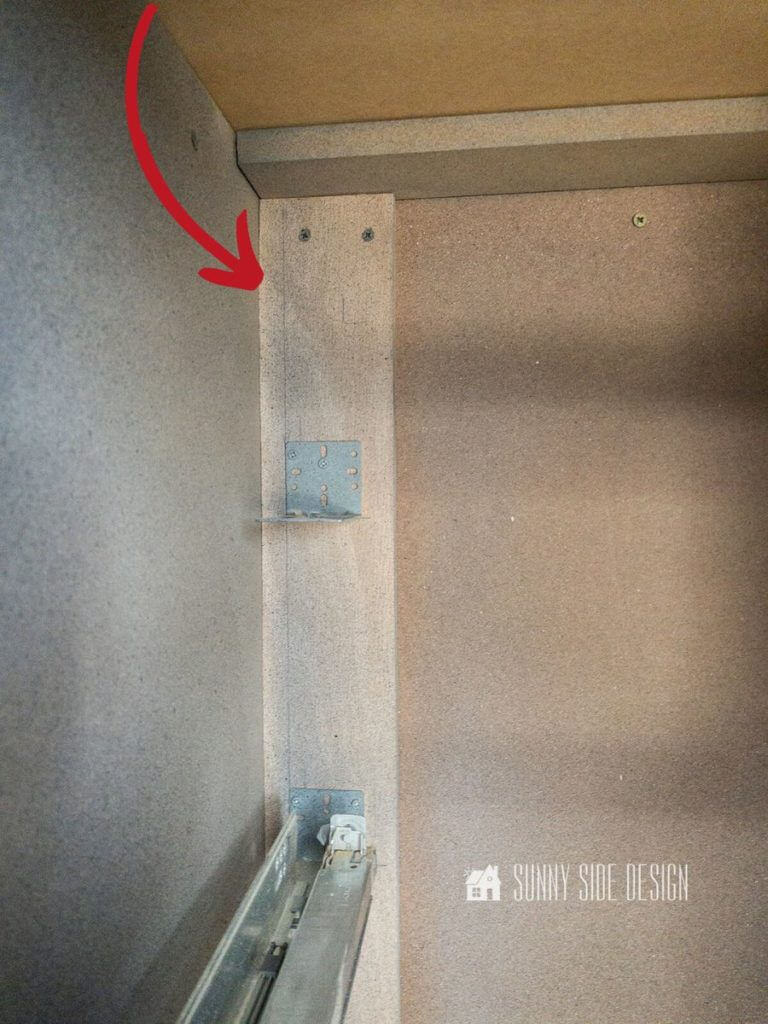
Then mark each cross bar in the cabinet face frame.

Then make a mark 3/8″ to the left of the vertical face frame mark.
This is the placement line for the bracket for the undermount slide on the left side.
In addition, the bracket is aligned at the same height as the cross bar face frame.

The bracket for each of the undermount slides is mounted to scrap plywood and then attached to the back of the cabinet box with screws to the back nailer strips.
Then the undermount drawer slides simply slide into the bracket.
Repeat for the right side of the undermount drawer slide.

The front edge of the undermount slide sits on the face frame.
And the front of the undermount slide it attached to the side of the face frame with a screw.
It’s really that simple!
Determine Drawer Box Size
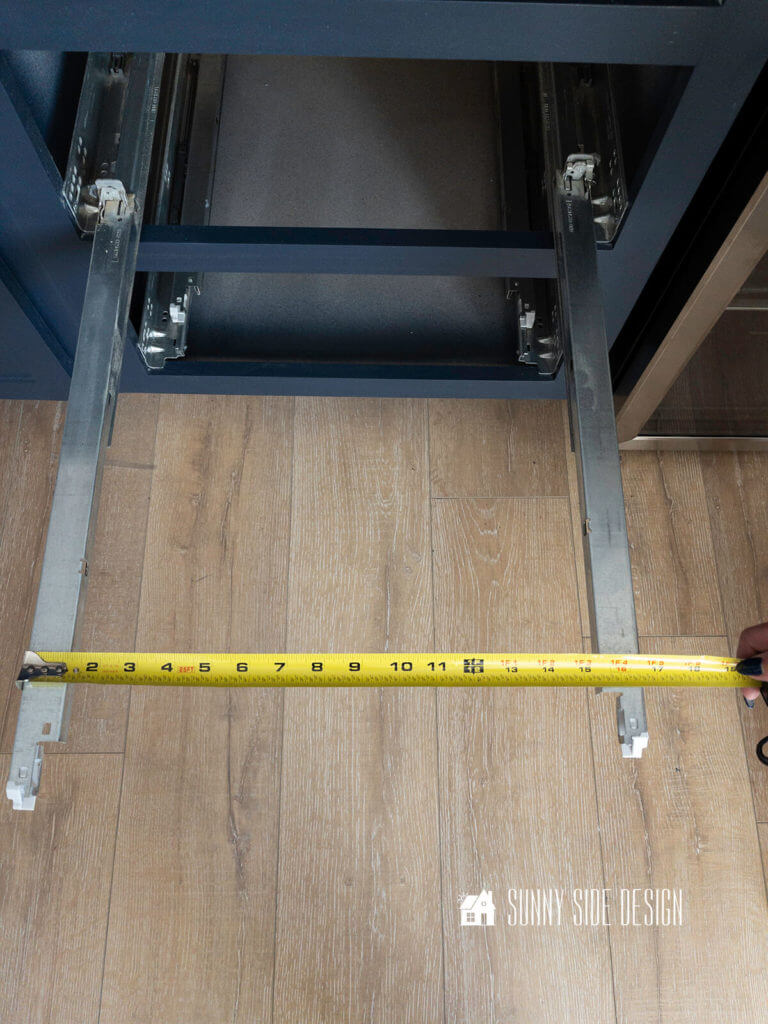
When using undermount drawer slides, determining your drawer box size is super easy.
The depth of the drawer box will be the length of the slide.
And the width of the inside of your drawer box is the total distance from the outside edge to outside edge of the drawer slides.
For instance in our case, we are using 21″ drawer slides so we’ll cut 2 pieces at 21″ long for our sides.
And the distance from slide to slide is 16 1/2″.
So we will cut 2 pieces at 16 1/2″ for the front and back of our drawer box.
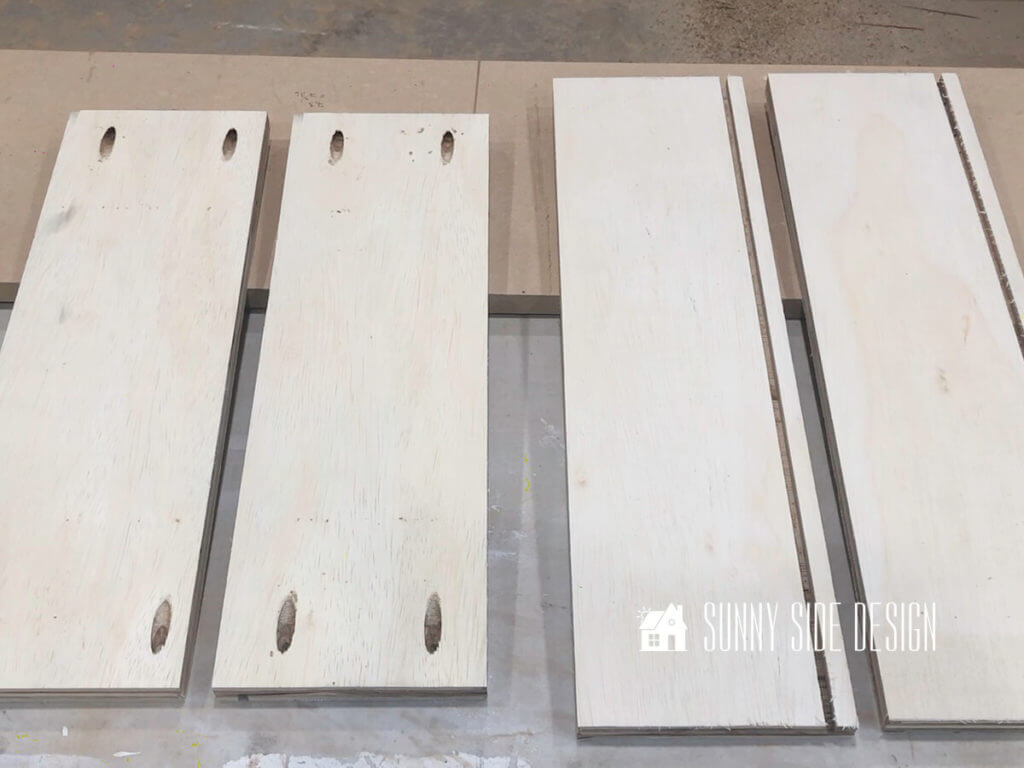
Cut Pieces for Drawer
Each drawer box requires 5 pieces.
You’ll need a bottom panel, two sides, along with a front and back piece.
And remember, the front and back pieces will be determined by the width of the installed drawer slides and the length of the drawer box is the length of the slide.
A good rule of thumb, is the height of your drawer box will be about 1″ smaller than the drawer face frame.
The bottom panel piece needs to be 1/2″ longer and wider than the inside dimension of each drawer box.
This will allow for the panel to fit inside the 1/4″ groove on all four sides.
For example the inside dimensions of our drawer box is 16 1/2″ x 19 1/2″, so we cut the 1/4″ plywood bottom panel to 17″ x 20″
How to Build a Drawer
Cut Dado for Bottom Panel
First we need to make a dado groove on all four drawer pieces.
You’ll make this dado 1/2″ from the bottom edge of the drawer pieces.
This is the perfect distance for the undermount slide to sit in.
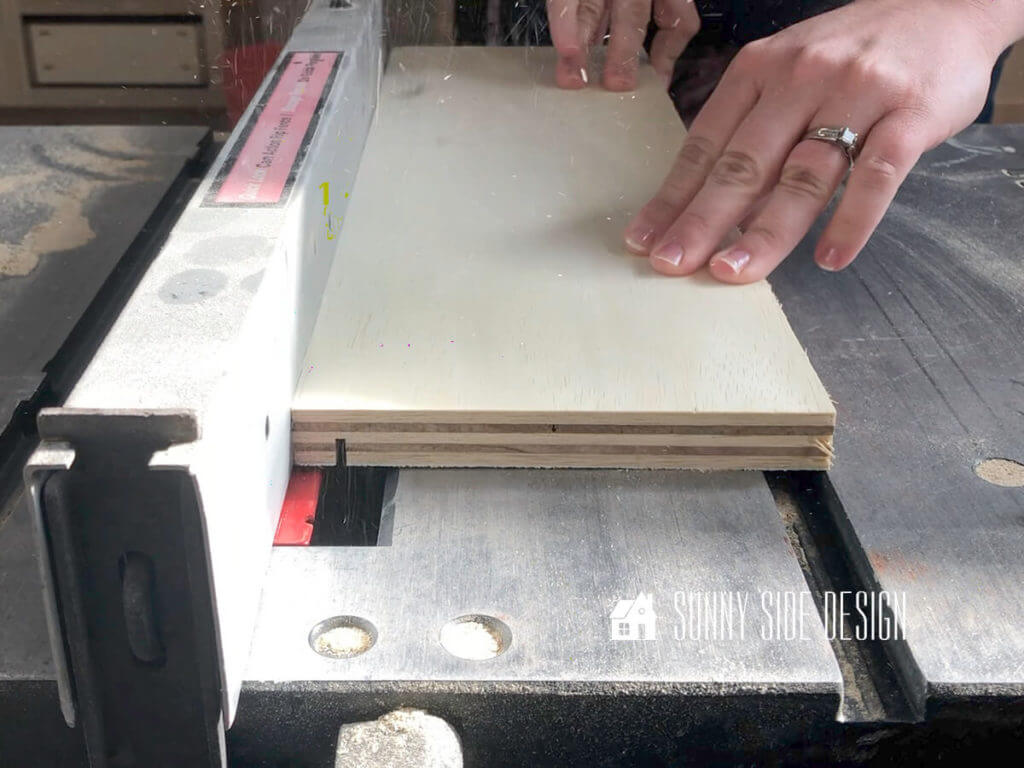
Now since we don’t have a dado blade, we will make a couple of passes with the table saw until it’s 1/4″ wide.
The first pass through the table saw, the fence is set 1/2″ from the blade.
Then run ALL of the pieces for all of the drawers with the fence set at this postition.
This will make the job much quicker, because you will not be adjusting the fence as many times.

Next, adjust the fence a blade width wider, giving you a 1/4″ dado groove.
Test this dado groove on a scrap piece of plywood first and make sure your 1/4″ plywood panel fits snuggly into the groove.
Then run all of the drawer pieces through the saw a second time.
Pocket Holes
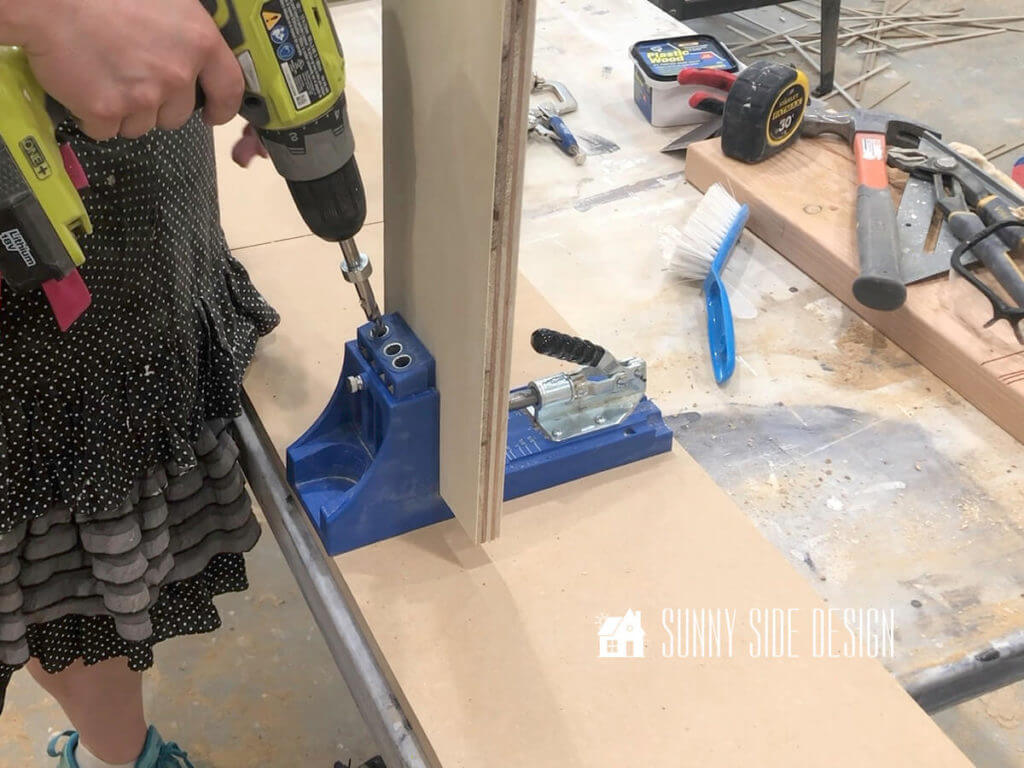
We assembled our drawers with pocket screws.
However, if you’d like to assemble your drawers with wood glue and brads, you can absolutely do it that way too.
If you use brads, you’ll also need to putty in the nail holes on the sides.
On the outside of the front and back drawer piece make 2 pocket holes on each end.
These pocket holes will never show because they will be on the back of the drawer and covered with the drawer face at the front.
Enjoying this post?! Please Pin it for later and share it with your friends.
Sharing is caring!
Cut Notch for Undermount Drawer Slide

Before we build the drawer, we need to cut a notch in the back drawer piece to accommodate our undermount drawer slides.
This will allow the drawer slides to sit flush on the bottom of the drawer.

This notch is cut 1/2″ up from the bottom edge and 1 1/2″ in on each side on the back drawer piece.
Sand Drawer Box Pieces
It’s a good idea to sand all of your pieces before you build the drawer.
Clearly, it’s a lot easier to sand them before the drawer is assembled.
An orbital sander or palm sander will make quick work of this step.
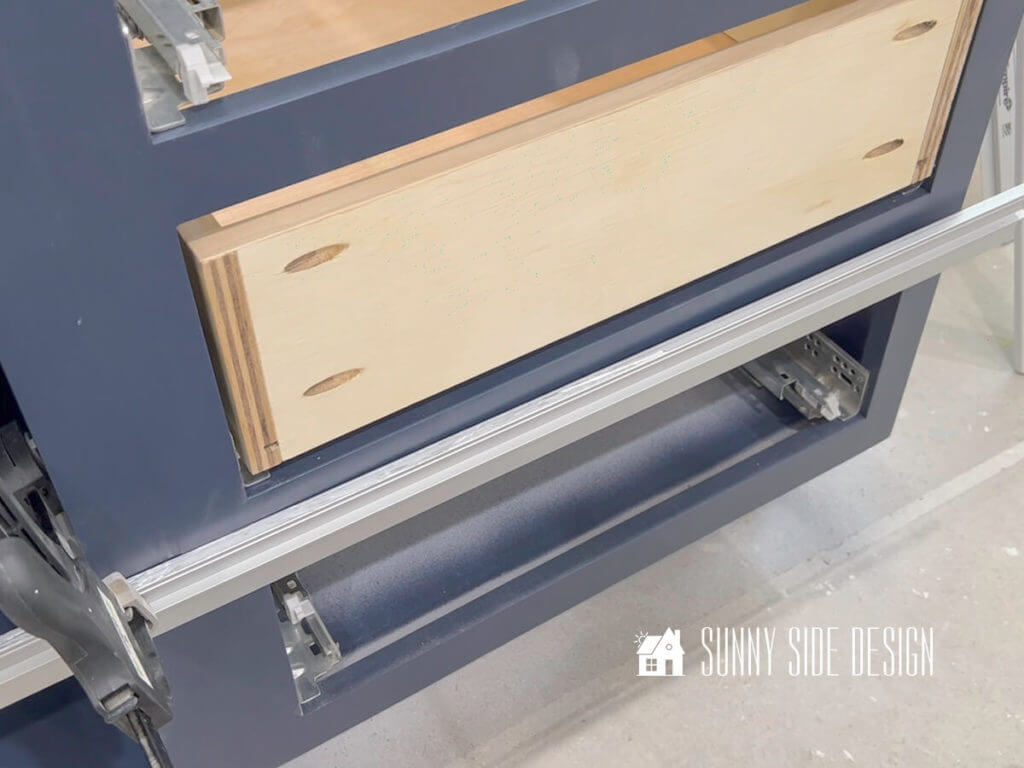
Assemble Drawer Box
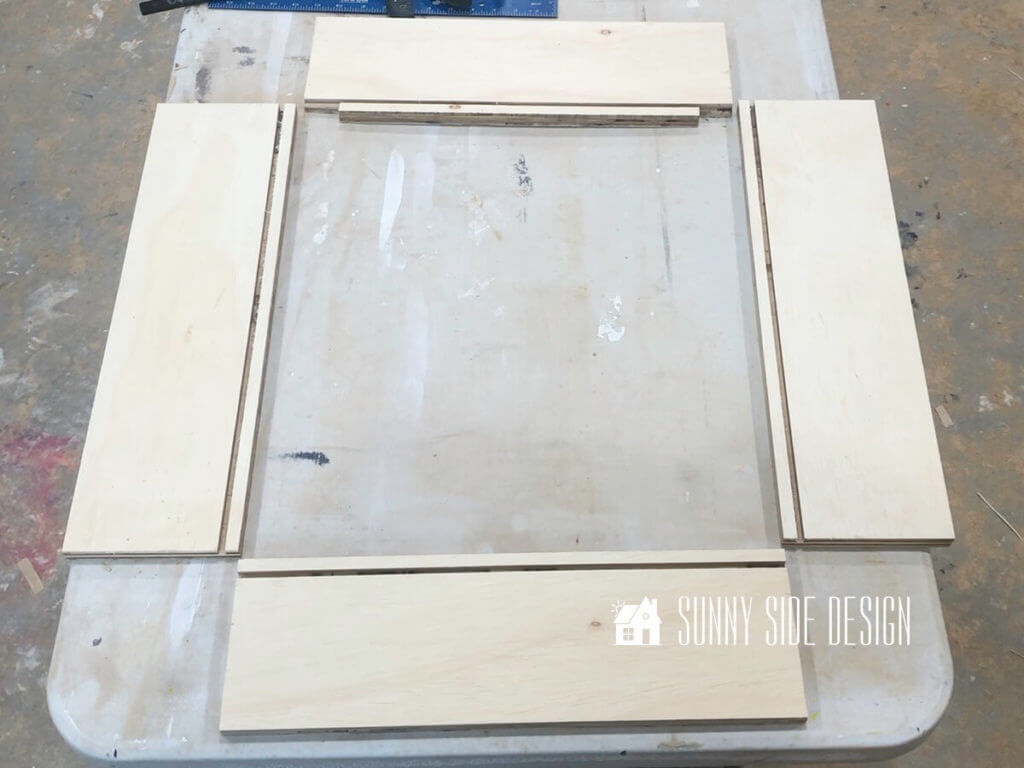
For each drawer you build you should have four pieces like this, plus a 1/4″ plywood piece for the bottom drawer panel.

First, run a bead of glue along the edge of a side piece.

Then secure the back piece to the side with pocket screws.
Repeat for the other side of the drawer box.

Then slide in the bottom drawer panel.

Add glue to the front drawer piece.
And then secure the front to the side pieces with the pocket screws.

When the drawer build is complete, it will look like this.
Notice the notches in the back of the drawer to accommodate for the undermount drawer slides.

[mailerlite_form form_id=2]
Attach Undermount Drawer Slide Latch

When you purchase your undermount drawer slides, they will come with these two orange latch pieces.
They are simply mounted to the bottom of the drawer against the front piece with a couple of screws.
This is the piece that the slides will connect to.
The latches squeeze together and allow you to completely remove the drawer.

To install the drawer, place the drawer on top of the slides.

And push closed until the latches click into place.
Let’s stay connected! Follow us on social media!
In addition to the orange latches that secure the drawer to the slide in the front, there is a tab on each drawer slide on the back.
To mark the location of the tab, close the drawer a few times.
This will leave a small indentation on the back of the drawer.

Once the position of the tab is marked, drill a 1/4″ hole, 1/2″ deep into the back of the drawer on each side.

And when you place the drawer in and latch it, the tab will fit into the drilled hole.
Edge Banding

The final step to make your drawer box look professional it to add edge banding.
Edge banding is a thin strip of wood veneer that is applied to the edge of plywood.
Edge banding is made of real wood, so you can match it to the wood you’re working with.
The edge banding was an after thought for us, so we applied our banding after the drawers were built.
But it would be much easier to apply the edge banding to the top edge of the four drawer pieces before you assemble it.
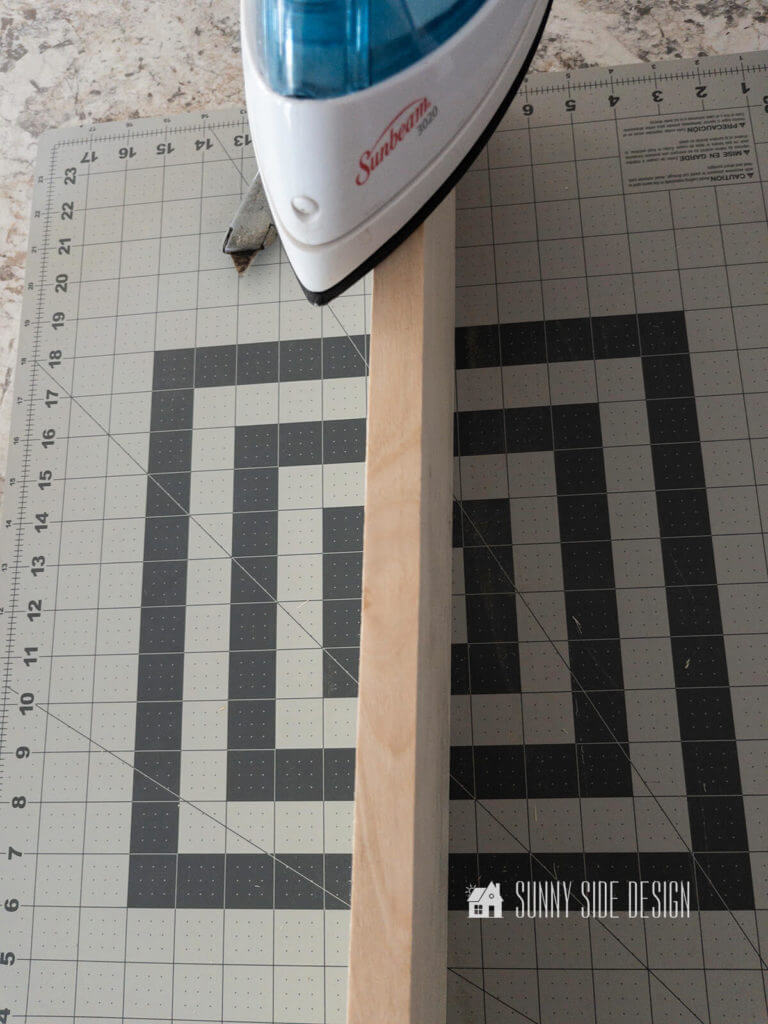
The edge banding is applied with heat.
First set your iron to the highest setting.
Place a piece of edging along the edge of the plywood with it hanging over the edge a little on both sides, and a little excess at each end.
Then glue the banding by running the hot iron back and forth along the edge banding until it’s well adhered.
When you remove the iron, the wood will be very hot, too hot to touch.
Then allow the banding to cool.
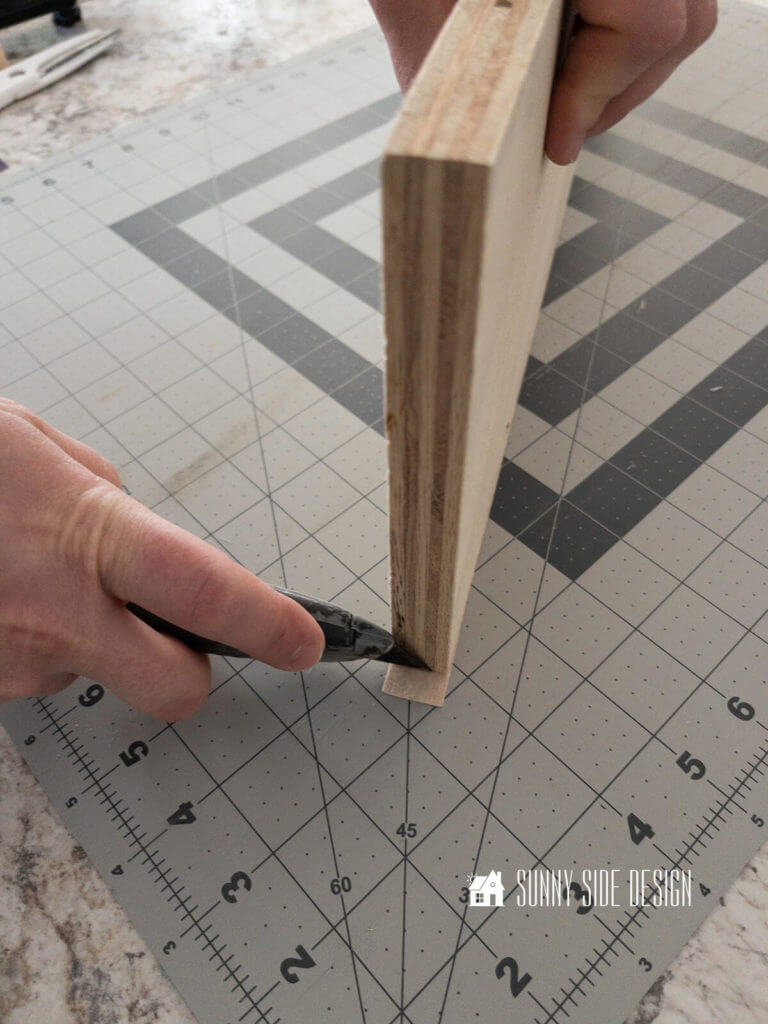
Using the edge of the plywood as a straight edge, score the excess edge banding with a utility knife and then break off the excess.

While there are tools you can buy to remove the lip from the edge banding, we used a sanding block.
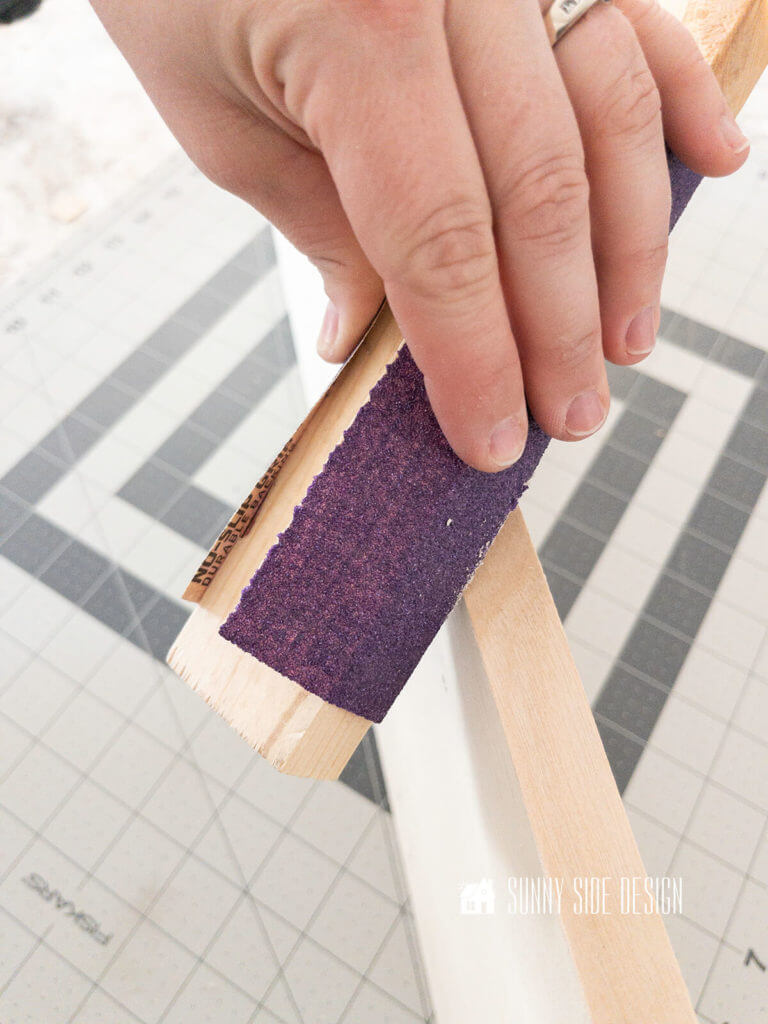
First place 80 grit sandpaper on a sanding block and gently remove the excess banding from each side.
Then sand on an angle and work from the center to the corner edges.
This will ensure that you don’t pull up the corner of your edge banding.
Just be sure you don’t sand too hard through the veneer.

Once you apply edge banding, your plywood will look like it’s solid wood.
Seal Drawer Boxes
At this time, it’s a good idea to seal the raw wood.
For our drawers we used our favorite wipe on polyurethane.
It’s a great protection for the wood and it’s so easy to use.
If you don’t want to use a polyurethane, you can apply a linseed oil for protection instead.
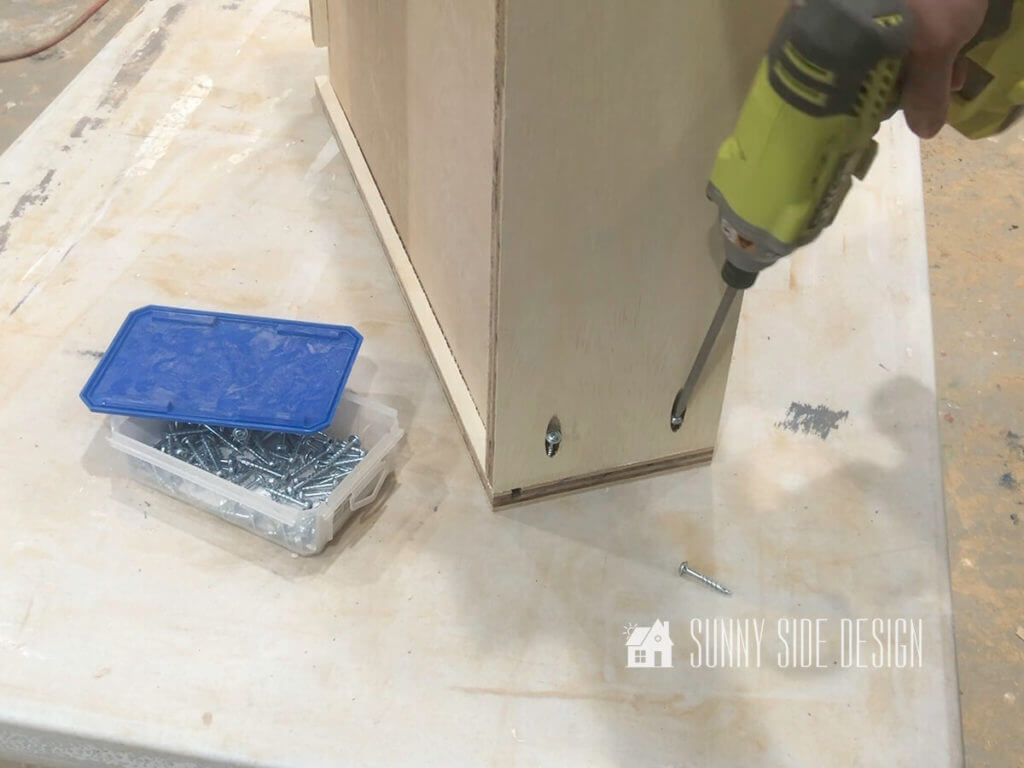
Attach Drawer Front to Drawer Box
To ensure that we mounted our drawer fronts straight, we clamped a straight edge to the cabinet box.

Then we drilled pilot holes in the box and attached the drawer face with four wood screws.
Somehow in all of the craziness of finishing this one room challenge we did not take any photos or video of making our drawer faces.
But we will share the tutorial we used to learn how to make faces for our drawer boxes.
After looking at many tutorials on how to build cabinets and drawers our favorite by far is Jason at Bourbon Moth Woodworking.
His tutorials are excellent and you’ll love his humor too.
Check out his video for building drawer faces
Also you’ll find Jason’s video for building drawers entertaining.
But of course we have plans for more built-ins and will share how we made our drawer faces and cabinet door with the rattan soon.

Are you enjoying this post?!
Please Pin it and save it for later. And please share it with your friends.
Sharing is caring!
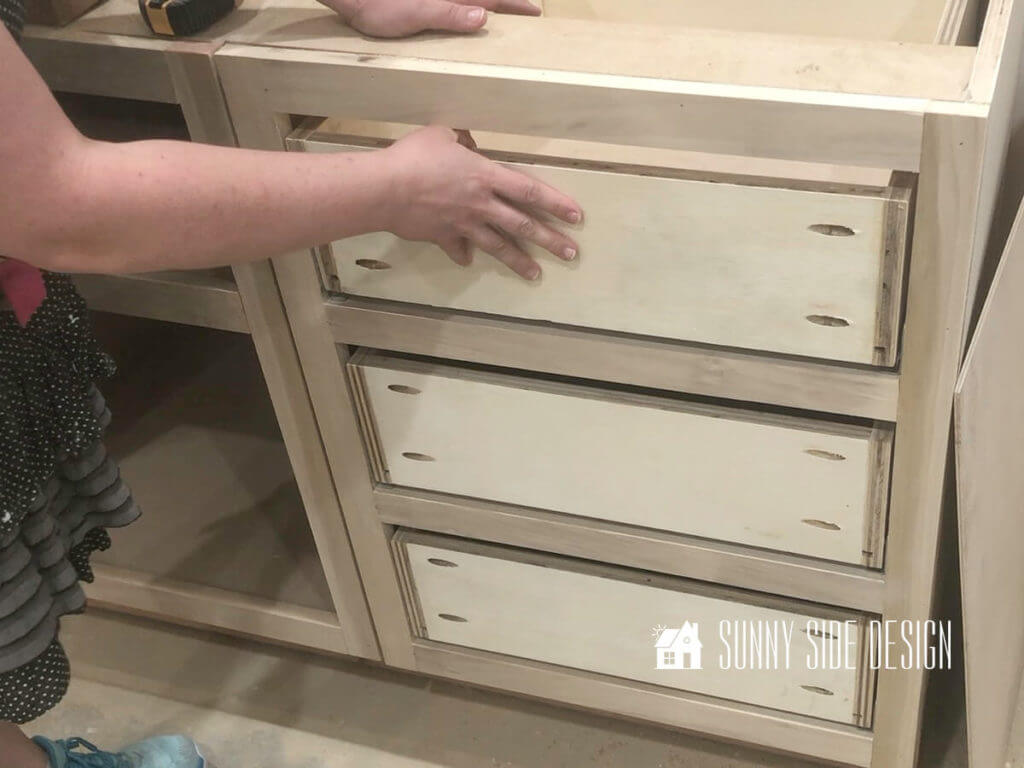
The Results

Certainly at first, building drawers can seem overwhelming, but after watching tutorials we felt confident to give it a try.
And let me tell you, it feels so good to accomplish a project like this.

Clearly, we are not professionals, but we are so pleased with the way our kitchenette area in the basement family room turned out, especially the marble look epoxy countertop.
In addition, we also built drawers for the reading nook, all using this method.
And I also need to give another thanks to Amerock Hardware for the beautiful drawer pulls.
The really finish off the cabinets with that beautiful champagne gold finish.
We hope you found a little inspiration here today.
Are you inspired to build a drawer box?
If so, where in your home would you like to add drawers?
Even if, this is not a project you’d like to tackle, we’d love to hear your thoughts!
Do you have a favorite part of our basement family room project?
Please share your thoughts and questions with us.
Also don’t forget to check back next week, we still have a few more DIY projects from our family room we’d love to share with you.
If you’re new here, WELCOME! We love having new readers and friends!
You can learn more about us here.

Be sure to follow us on Pinterest for even more home decor and DIY ideas.
To see what we are working on before it’s on our blog, follow us on Instagram.
You will also find our video tutorials on our YouTube channel.


I’m really impressed with your talent. I have a few things I am going to make from your tutorials.
Thank you Valerie! we are so please you’ve been inspired to try our tutorials. If you have any questions, please feel free to reach out to us. Please let us know how your projects turn out.