How To Install a Tile Shower Like a Pro (even when you’re not.) Welcome to week 3 of the Spring 2021 One Room Challenge! If you’re new here, WELCOME! You can learn more about us here. As a reminder you can easily navigate through each week of this coastal inspired bathroom project.
-1st week: The Design Plan
-2nd week: How To Install Shiplap the Easy Way
-3rd week: you’re here
-4th week: How To Grout Tile stress free!
-5th week: How to install a hexagon bathroom floor tile
-6th week: How To Make an Affordable Barn Door
-7th week: How To Confidently Choose Bathroom Vanities-8th week: Modern Coastal Bathroom REVEAL!
Have you ever wondered how to tile a shower? Keep reading to get our 5 tips to install tile like a pro!

Now, if you’re anything like me, you’ve always got big beautiful plans for your home. T H E R E ‘ S J U S T O N E C A T C H. I can’t ever justify the expense of hiring any work out! Of course this was the case when I planned to incorporate tile into the shower design! Labor costs for tile work can be astronomical! Surely I could learn how to do this myself right?
Consequently our DIY project list is frequently longer than our kids Christmas wish lists combined! Often times this leaves me feeling like our projects will never get finished!
Thankfully, as a result of joining this round of the One Room Challenge, I can rest assured that many of the projects on our list will be completed in at least one room in our home!
And for more ideas to add value to your home, take a look at 10 Sensational Home Improvement Ideas on a Budget.
How to tile a shower (in action)
The Inspiration Tile Samples

When it comes to selecting tile choices for our home, I’m naturally drawn to the simplicity and classic look of subway tile. Add in my obsession with navy and I knew I didn’t have to look any further. Paired with this beautiful Newport Scale Beach tile by Elysium Tiles, our shower would definitely make a dramatic statement!
Select several tiles you’re drawn to and bring samples home. Place them in your space to get a better visual before committing to any given tile. It’s also a good idea to view the sample in different lighting situations throughout the day to get a more accurate idea how the color will appear.
Once the decision has been made, carefully measure your space. Add an additional 10% to allow for waste.
Are you enjoying this project? Please Pin It, save it for later and share it with a friend.
Sharing is caring!
Sunny Side Design is a participant in the Amazon Services LLC Associates Program, an affiliate advertising program designed to provide a means for sites to earn advertising fees by advertising and linking to Amazon.com. As an Amazon Associate, this blog earns from qualifying purchases with no additional cost to you. Click here to read our full disclosure policy.
How to tile a shower, what supplies do I need?
When considering how to tile a shower, it’s natural to wonder what supplies you’ll need. Here is a list of the basic supplies needed for this project. Be sure to have all the supplies on hand before beginning this project. (Supplies needed to grout will be discussed in week 4.)
- Tile saw or tile cutter
- Tile hole saw
- Notched trowel
- Tile adhesive (mastic)
- Waterproofing membrane
- Paint brush
- 3/8″ nap roller
- Tile spacers
- Schleuter OR bull-nose tile
- Hack saw (to cut schleuter)
- Measuring Tape
- Pencil
- Tile of choice
- Frog tape

5 tips to install a tile shower like a pro

1. Apply waterproof membrane
When researching how to tile a shower myself, I stumbled upon some very important information regarding the need for waterproofing.
According to Custom Building Products, ceramic tile and grout by themselves are not waterproof. Water can still penetrate through cement-based grout and eventually into the substrate.
So, if you’re an avid DIYer like myself, contrary to popular belief, you must install a waterproof membrane prior to installing tile in a shower.
Select a material of your choice and follow the directions. I used Aqua Defense by Mapei. Similar to other brands I looked at, this “liquid rubber” is applied to all the joints using a paint brush, while the remaining surface areas are covered using a 3/8″ nap roller. Apply two coats and allow to dry before installing any tile.
2. Plan the layout for the tile
Another crucial step is to plan the layout for the tile. This will especially be helpful if you’re installing a pattern.
Arrange the tiles on the floor to get an idea how the tile will look. Don’t be afraid to mark the walls with a pencil or sharpie.
We chose to start with the first tile centered in the middle of the wall, leaving us equal sized cuts on both sides of the wall. Ultimately the pattern is completely up to you, although if you don’t take the time to plan prior to installation, you may end up with a skiff of tile at the ceiling or corners.
3. Find center and measure accurately
This next step goes hand in hand with planning the layout. Be sure to measure accurately and mark center on the wall.
Use a level to make a plumb line on the entire surface of the wall. You’ll also want to place a level line across the width of the wall. These will act as guides during installation to ensure the tile is being installed square.
We also placed a piece of frog tape on the center of the tub to help maintain that visual once the tile started to cover the pencil mark on the wall.
The surface of our tub itself is level, so we used paint stir sticks as spacers to install the bottom row.
Alternately, you may want to hang a temporary cleat on the wall in a level position. The first several rows can be installed directly above the cleat. Once those tiles are secure, remove the cleat and continue to install tile below those rows.

4. Use premixed mastic for ease of use
Although a premixed bucket of tile adhesive is more expensive, you’ll definitely want to buy this instead of a bag of powdered mastic, especially if you’re a beginner!
First, there’s no guess work to using a premixed mastic. You can install tile with ease of mind knowing it’s mixed properly to the right consistency.
Secondly, If you’re new to tiling, this whole process will take longer than you might originally think. Using premixed mortar allows more working time and the bucket can be sealed from air by replacing the lid in-between work days.
Mixing powdered mastic from the bag on the other hand has the tendency to dry out quicker and harden before all the tile has been installed. Mixing directions also state to mix the whole bag at a time which makes way more than you could use before it hardens. (That is of course unless you ARE a professional and have the experience and know how to work quickly.)
In short, if you’re a newbie like myself, fork out the extra money to use a premixed mastic, you’ll thank yourself in the end!
5. Keep grout joints small, between 1/8″-1/16″
Another key point to take into consideration is to keep grout joints small, around 1/8″ – 1/16″. Not only will small grout joints keep cleaning maintenance low but they’re also likely to expand, so using smaller joints will look better.
Use spacers to maintain equal spacing between each tile to achieve a quality and professional appearance.
If you’re new here, welcome! We’re so glad you’re here.
Let us introduce ourselves, we’re Michelle and Steph, a mom and daughter team who love to DIY and decorate our homes.
Not only are we passionate about making our homes warm, comfortable and unique, but it’s our mission to help you create that same feeling in your own home.
You’ll find ideas for repurposing, creating, decorating and making your home truly yours, while always mindful of a tight budget.
Undoubtedly we love finding ways to make your home look high-end on a small budget.
Plus you’ll also find a recipe or two as we share our family favorites with you.
We’d love it if you’d join our community of doers so you won’t miss any inspiration for your home.
We love new friends.

[mailerlite_form form_id=2]
How to Install the tile

Before we had our basement sheetrocked, by hubby framed out for our shower niche.
I don’t have any photos or instructions for how he did it, but if you want to frame out one see our tutorial how to build a simple and affordable shower niche.
Now that we’ve covered the preliminary info, let’s get into the nitty gritty on how to install a tile shower.
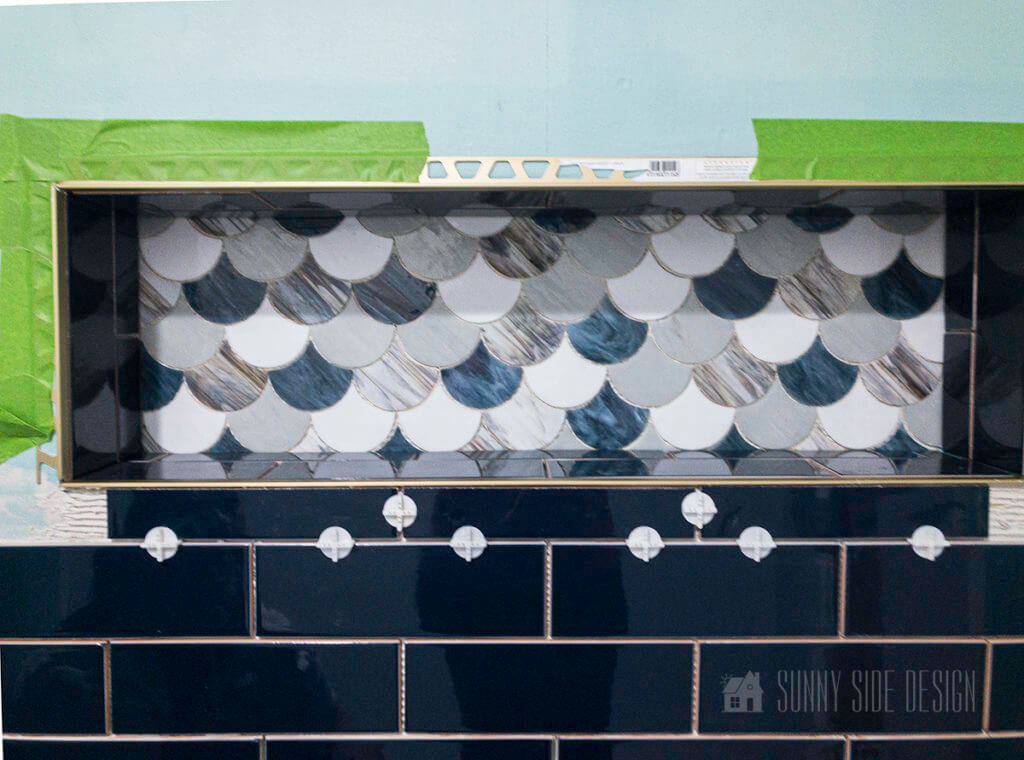
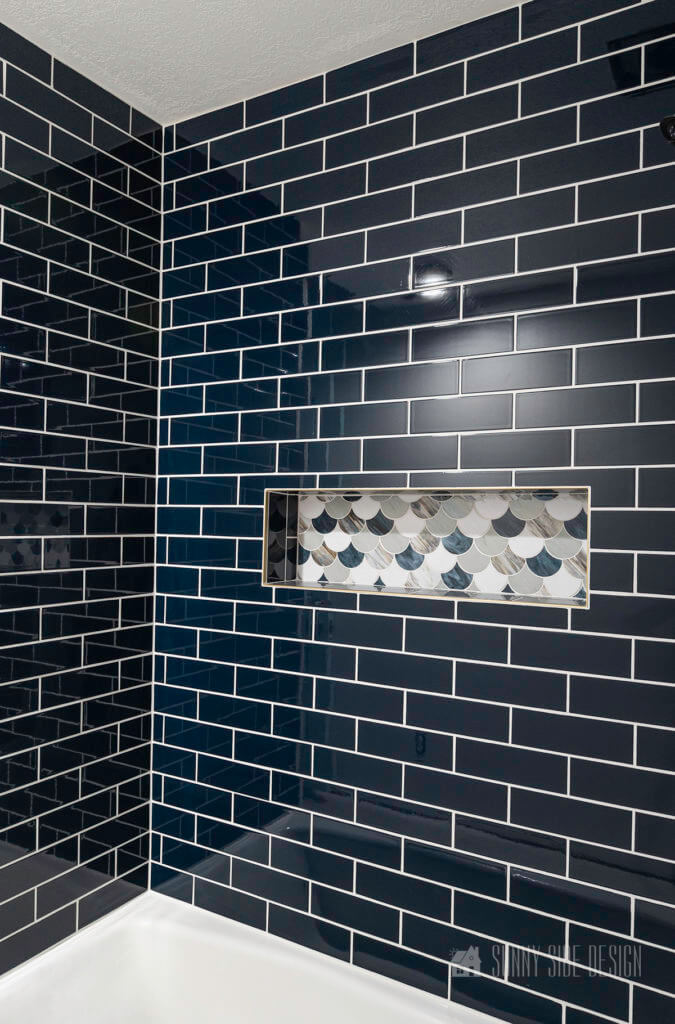
We opted to install the tile in the back of the niche first, not only to get it out of the way, but the subway tile will form a border around this accent tile.
(This tile was also a special order item. If we messed this part up we wouldn’t be able to order replacement tile in time to stay on top of our schedule for the One Room Challenge. Luckily installation went well, and we didn’t even break any or need to use either of the two extra tiles!)


To begin, we again marked center on the wall and worked our way out on both sides. To ensure we placed the first tile into position correctly, we traced the tile with pencil.
Use a 1/8″ notched trowel tool to apply the mortar. Spread the mortar beyond the pencil marks (or a couple inches beyond the size of the tile). Then use the notched end to drag through all of the mortar. This will create an even amount of mortar behind each tile.
Next firmly press the tile into position. Use spacers between each tile to maintain consistent grout joints throughout the whole shower.
Repeat this process to install each remaining tile.
The first piece of subway tile was installed on the center mark we placed on the wall. To ensure the tile is accurately positioned in the center you can do two things.
First, measure and mark center on the edge of the tile. Line this up to the mark on the wall when positioning into place.
Second, after the tile is in place, use a measuring tape to check center.
Let’s stay connected! Follow us on social media!
How to install the schleuder for a tile shower
What is Schluter anyway?
Not all tiles are created equally. Many tiles are available with a bull-nose edge (a rounded edge) that would be used at the edge of the niche and outside edges of the tile.
Because the tile I chose didn’t come with this option, I needed to use schleuter to go around the edges of the niche and outside edges of the tile.
Schuter comes in many different materials and colors. I chose a brushed gold in metal. This color tied the two tile choices together and the navy subway tile pops off the gold.
Do your homework before buying Schluter. If using this material around a niche, corner pieces are available. But again because we are on a time crunch I wasn’t able to get them in time as this color was a special order item.
However if the Schluter you choose doesn’t come with corner pieces, don’t let this deter you! After taking a trip back to the store to look into getting corner pieces, we noticed several of the tile displays didn’t use the corner pieces either. In spite of this option, the Schluter was cut at a 45º angle, and filled in with grout.

Use schluter as a guide
Install the border tiles in the niche prior to the schleuter. Leave a small gap between the tile and the schleuter for grout.


After the border tile is installed measure and mark the schlueter from the inside of the angle. Dry fit each piece of schleuter into place with frog tape before installing.
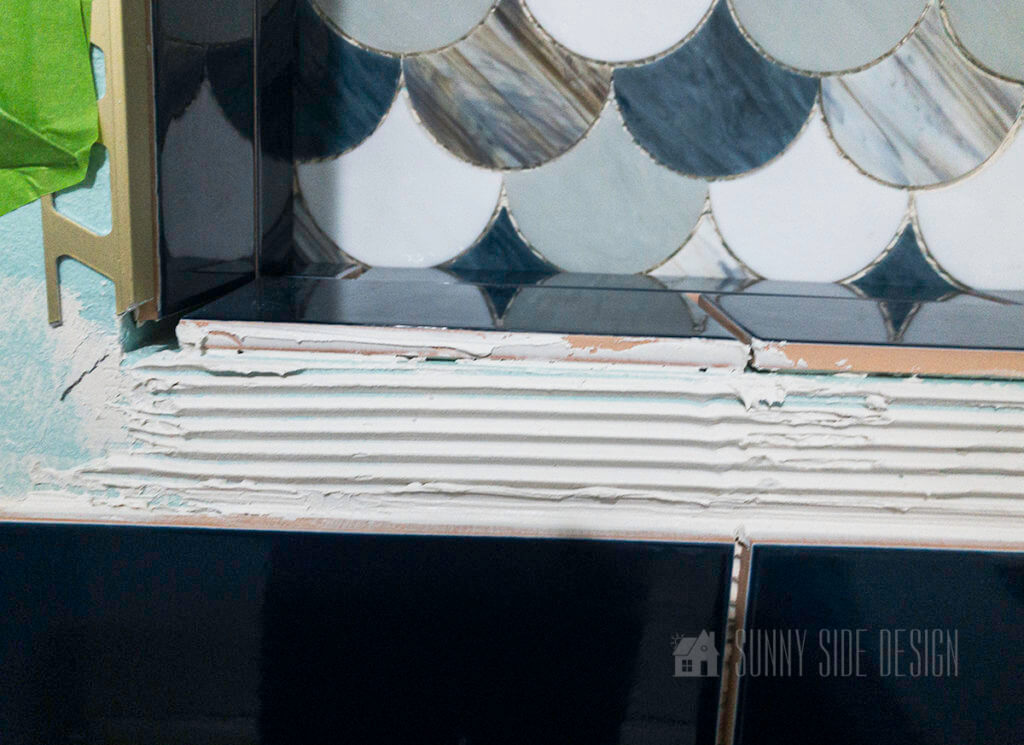
To install the first piece of schleuter into place we left all remaining pieces in place with the frog tape. This will let you accurately place it into position creating equal spaces on each side for the grout joint.
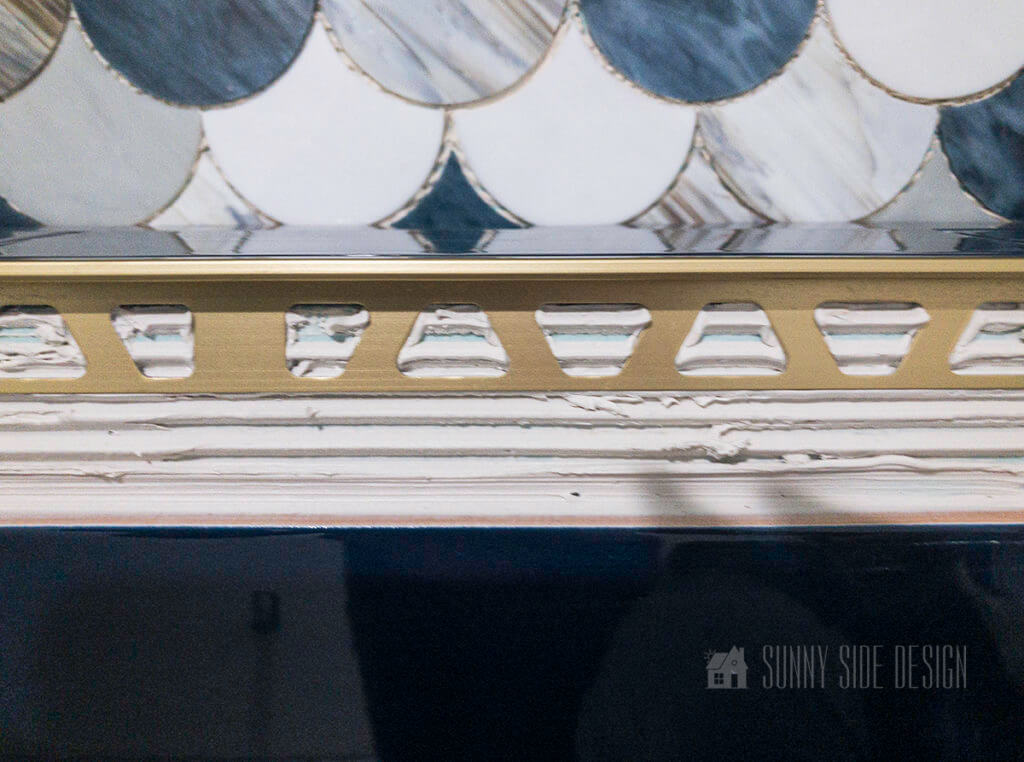
First, apply and trowel the mastic into place.
Second, center the schleuter into position and use the edge of a small putty knife to firmly press into place. The mortar should squish out of the triangle shapes.
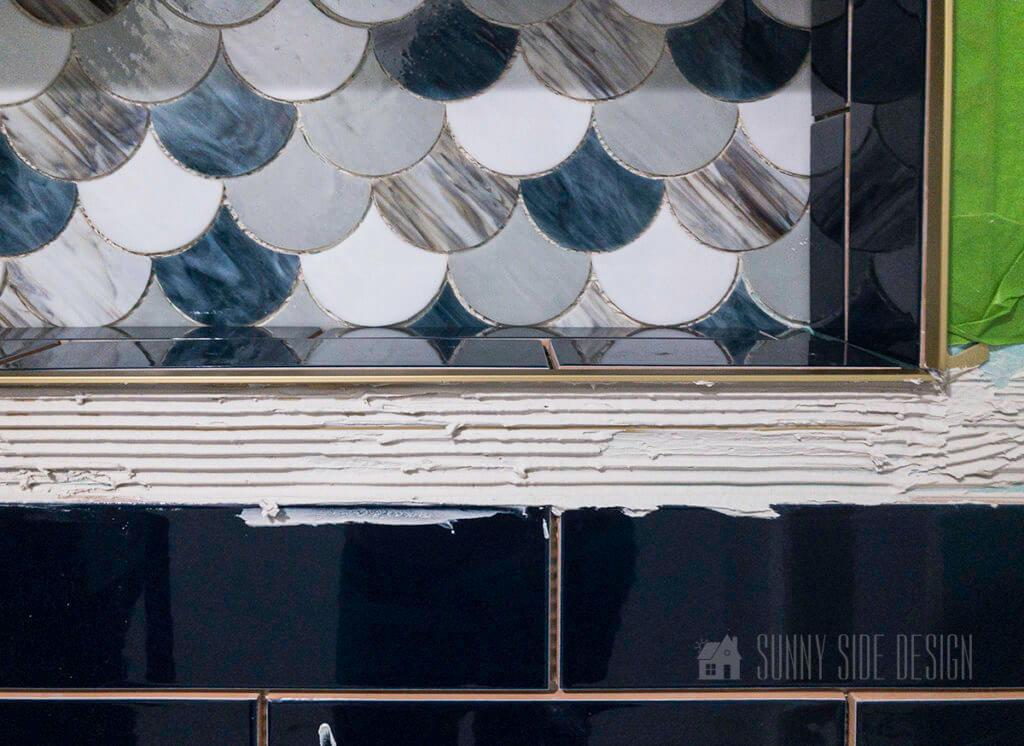
Third, apply another layer of mortar on top of the scheuter and trowel for tile placement.

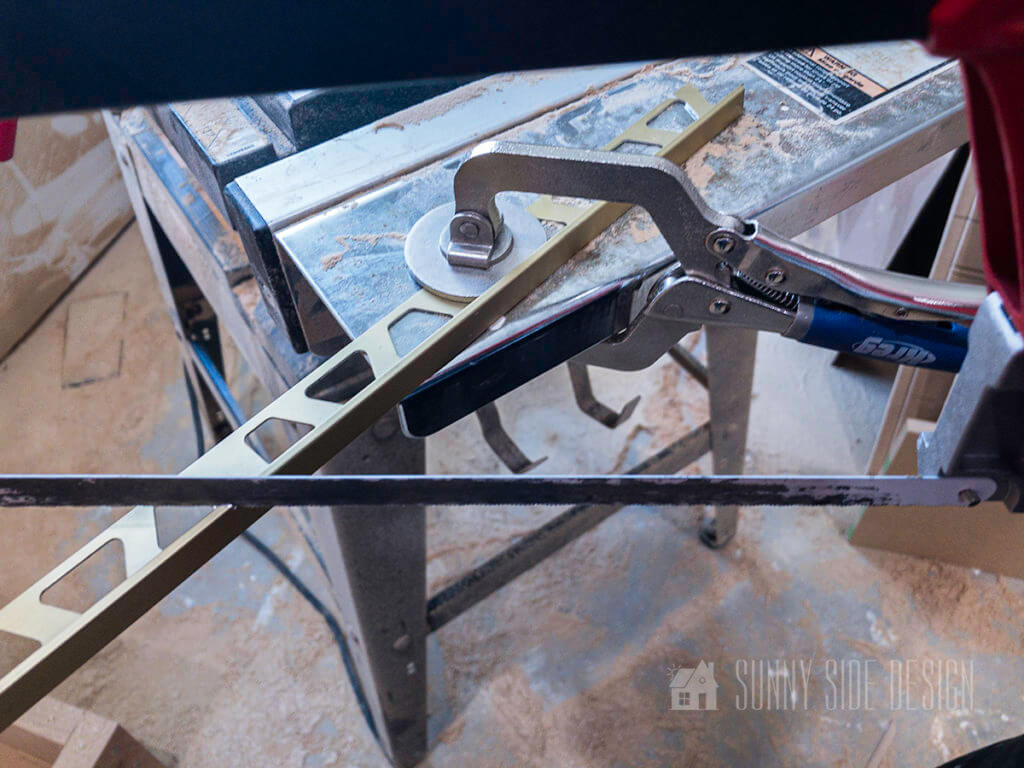
How to cut tiles

I don’t know of a single tile job that can be completed without cutting tile, so it’s necessary to have the right tools on hand.

A wet saw is great for making straight and angled cuts. However as newbies we learned that angled cuts need to be made with the tile facing up.

In our first attempt at cutting the angled piece to go around the corner of the niche, we had the tile face down. You can see in top tile that the blade left little notches at the corner.
Because of this, for our second attempt, we marked the tile using frog tape on the front surface. Cutting the tile face up resulted in a perfect cut angle.
Using a hole saw
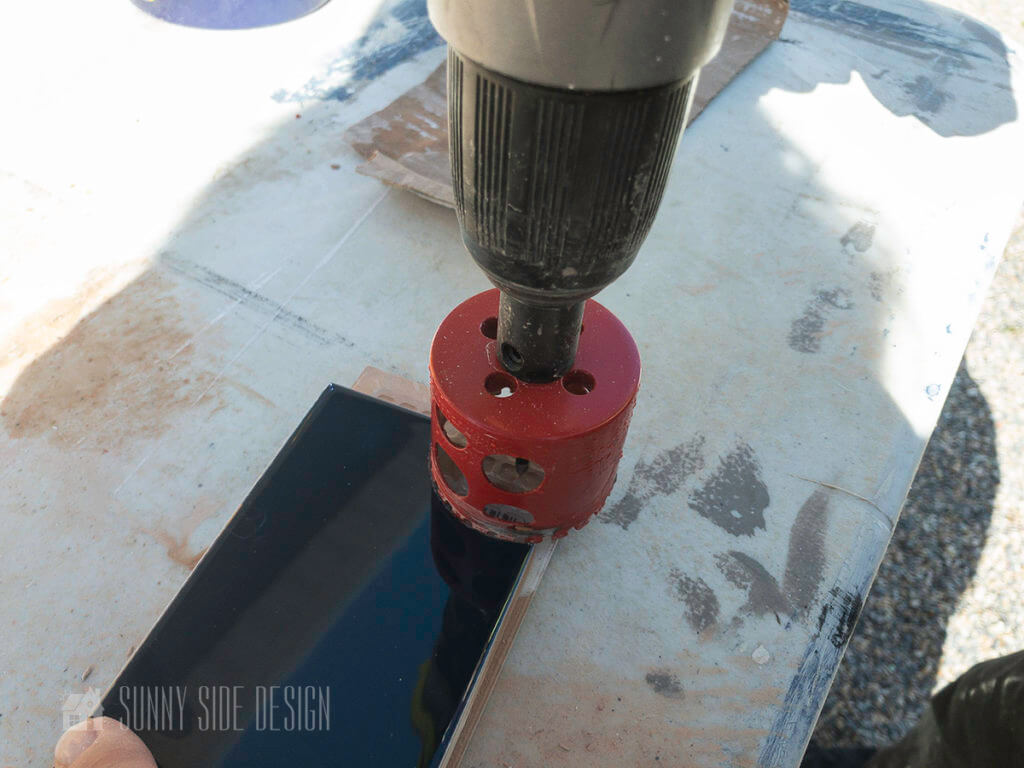
You’ll need a diamond bit hole saw to cut tiles to fit around the plumbing fixtures. As a first time user of this tool, it was easy to use, and it very well my be my new favorite tool!

To extend the life of the bit, use a spray bottle of water to keep the tile wet while cutting.
How to install a tile shower progress pic . . .

Although any beginner can tackle this project, it’s not for the faint at heart.

Plan several days to completely install tile in the shower. This is a progress shot of day 2 for us. Installing the Schluter and tile around the niche was the most challenging. In all it took about a week for us to complete the shower.
I’m sure professionals are much quicker. However if you take your time as you’re going about this process you’ll be less likely to make mistakes which will give professional results.

For more tiling tips check out our post How to Tile a Shower Wall: Tips for Beginners.
We hope you found some inspiration for your home today.
If you’re new here, WELCOME! We love having new readers and friends!
You can learn more about us here.
Let’s stay connected! Join our DIY community of doers and you won’t miss the weekly updates and more inspiration for you always on a budget.
Sharing is caring!

Thanks for stopping by Sunny Side Design. Empowering you to create a home you love!
DISCLAIMER
This blog’s content is for entertainment purposes only and is not professional advice. By reading this blog and attempting to recreate a project, you assume all responsibility for any injuries or damages incurred. Read my full disclaimer here.
PHOTO USE AND CONTENT SHARING
All of the photographs you see here are the property of Sunny Side Design unless otherwise credited.
We love for others to share our work, so please feel free to use one photo with a link back to our website.
Pinning and sharing is always encouraged!
Please do not reproduce other Sunny Side Design content without permission.
Retailers We Love
- Anthropologie
- Birch Lane
- Crate & Barrel
- Joss and Main
- Lampsplus
- Mark & Graham
- One Kings Lane
- Pottery Barn
- Rejuvenation
- Serena & Lily
- Wayfair
- West Elm
- Williams Sonoma
- World Market
Be sure to follow us on Pinterest for even more home decor and DIY ideas.
To see what we are working on before it’s on our blog, follow us on Instagram.
You will also find our video tutorials on our YouTube channel.
- Paint an Old World Texture Finish on a Vase

- Easy Strawberry Chicken Salad with Lime Maple Balsamic Vinaigrette
- How to Fix Chipped Kitchen Cabinets with a Pen
- Easy 4th of July Door Decor You Can Make in Minutes


