Have you tried staining pine wood and were disappointed with the results?! Then you’re in luck, because today we’re sharing how to stain pine wood with pro results.
Staining pine wood can be a tricky business. If you don’t know the right techniques, it can be hard to achieve an even and consistent finish.
But with the right steps and the help of a good quality wood conditioner, you can make sure your stained pine project looks professional and beautiful.
Read on to find out how to stain pine wood with the help of a wood conditioner.
Welcome to Week 4 of the One Room Challenge!
As a reminder you can easily navigate through each week of this room makeover, by clicking on the links below.
Week 1 | Week 2 | Week 3 | Week 4 you are here! | Week 5 | Week 6 | Week 7 | Week 8
If you’re new here, we’re Michelle and Steph, a mom and daughter team.
WELCOME! You can learn more about us here.
Be sure to join our DIY community of doers and you won’t miss any of our DIY projects and ideas for your home.
In addition, you’ll want to follow us on Instagram for behind the scenes progress and updates!
And don’t forget on the One Room Challenge website, you’ll find lots of ideas for updating any space in your home.

Staying on Budget
As you may know, we are on a tight budget with this room makeover and plan to stay under $500, so that means refinishing and repurposing many of the elements that are already in the room.
In fact, Aiden loves the desk and shelves, so we just need to make them feel more modern.
With that in mind, we needed to update the rustic industrial desk and shelves.
The desk and shelves are made with pine which has a very rustic feel.
So to make them feel more modern and sleek we are staining them ebony to go along with the monochromatic color scheme of the room.
Now if you’ve ever tried to stain pine before you know it can be a challenge to get a consistent color.
So scroll on down and learn how to stain pine wood with pro results.
Why is it Hard to Stain Pine Wood?
If you’re tackling a staining project with pine wood, you’ll want to know the ins and outs before you begin.
Pine has an uneven grain which makes getting consistent stain coverage challenging.
Plus its softer earlywood soaks up more stains than denser latewood, resulting in blotchy patches!
Have no fear though, with careful preparation you can achieve beautiful and professional results.
Are you enjoying this post?! Please pin it, save it for later and share it with a friend.
Sharing is caring!
How to Stain Pine Wood
To achieve the best results when staining pine wood you’ll want to follow a few steps.
Sand Wood
Before you stain any wood project you’ll want to sand your surface first.
Since we are reusing the pine that was already in the room, we sanded off old wax finish.
With a soft wood like pine, we used a medium grit first, followed by a fine grit sandpaper .
Once the pine boards are sanded smooth, remove any debris and dust with a tack cloth.
Using a tack clock is the best way to prep your pine wood before stain.
It’s tacky surface grabs the dust and will not raise the grain like a damp cloth.
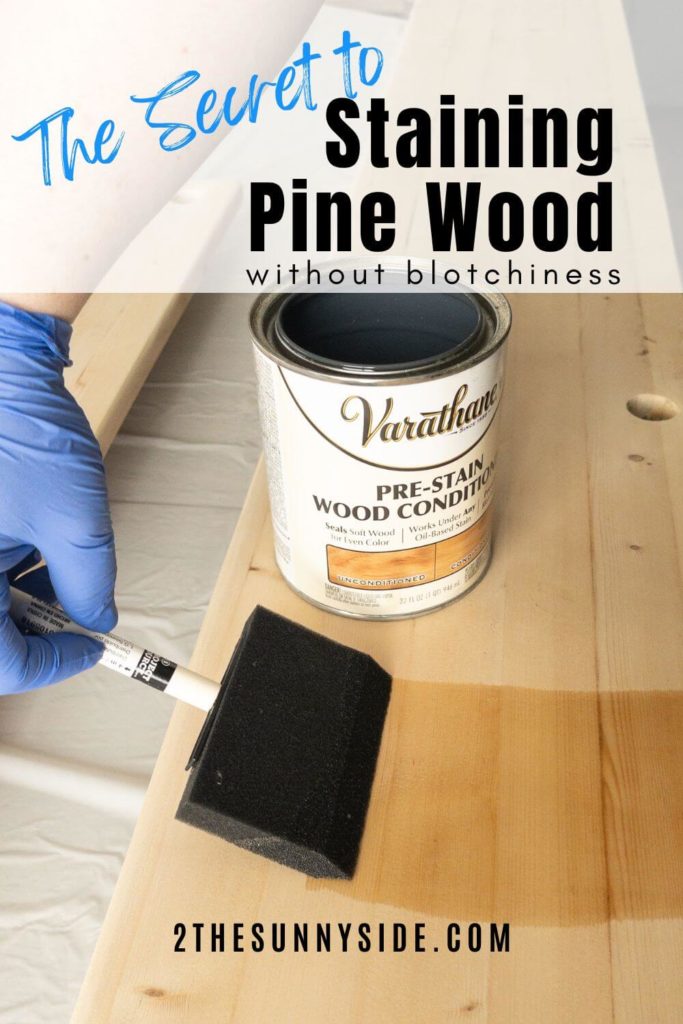
Apply a Pre-Stain Wood Conditioner
If you’re looking for a flawless finish for your wood staining project, pre-stain conditioner is key.
Wood can be unevenly porous and cause stains to be blotchy or streaky.
However pre-stain wood conditioner is designed to help fill the pores of more porous wood so your stained wood project will have a more consistent finish.
It’s best used with soft woods like pine, birch, maple and alder.
Just make sure to use an oil based wood conditioner with oil based stain and a water based wood conditioner with water based stain.
Remember oil and water don’t mix.
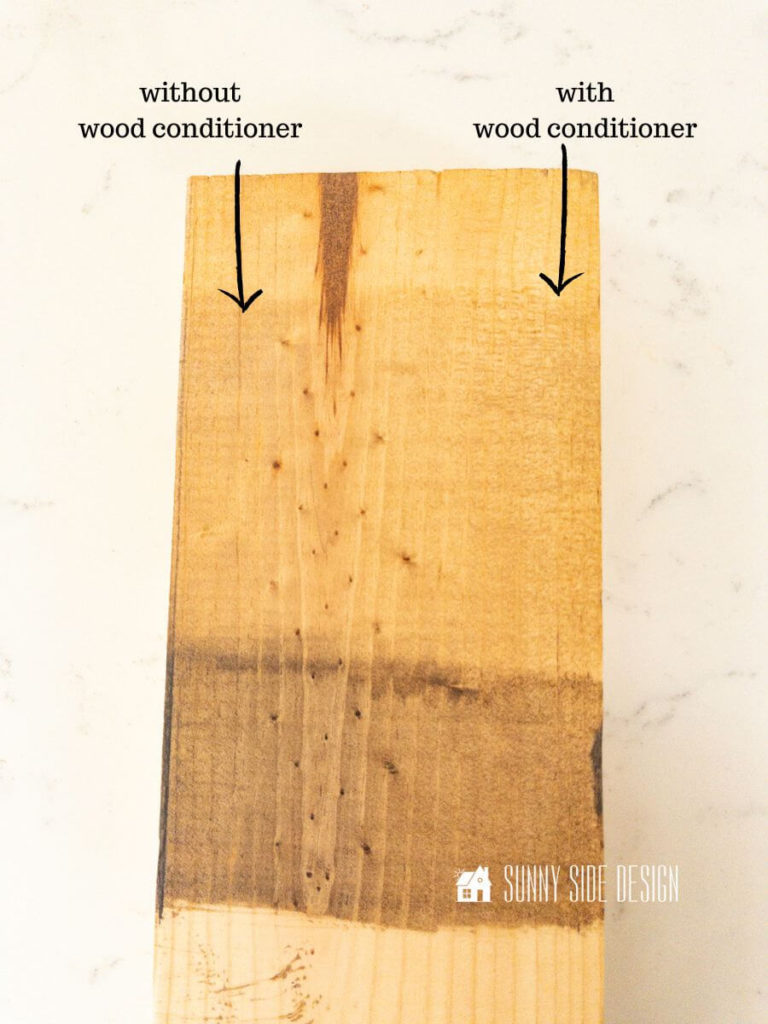
As you can see on the image above the stain is much more uniform on the side where we applied the wood conditioner first.
In addition the darker the stain, the more you’ll notice the blotchiness on softer woods.

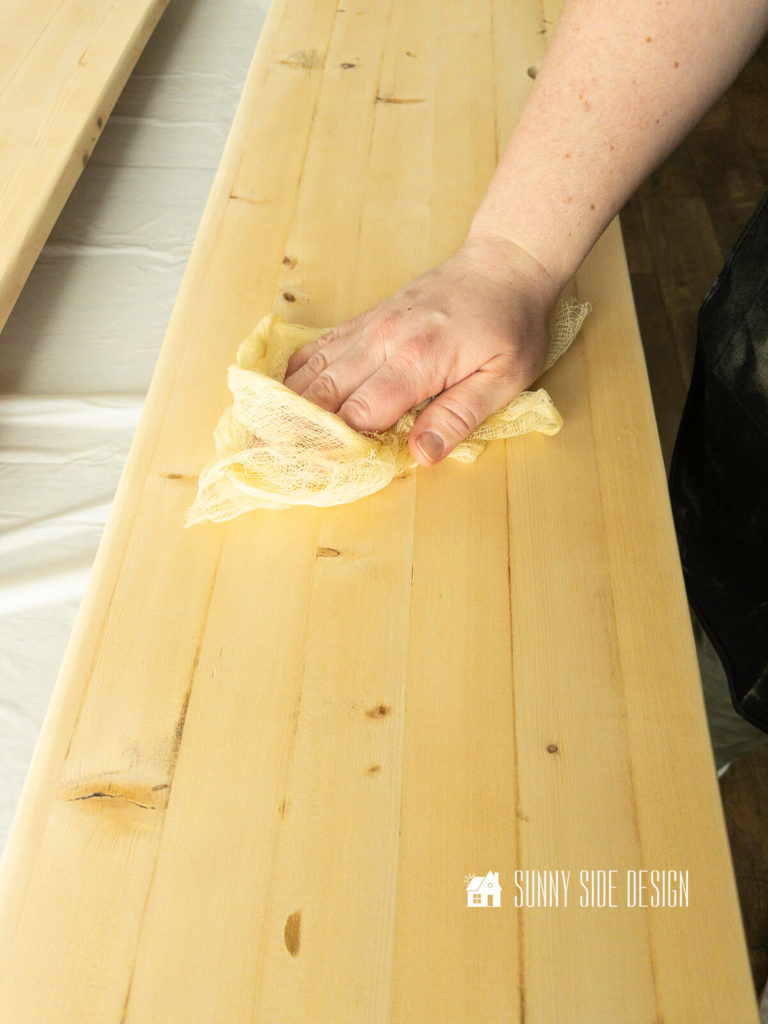
First apply the pre-stain wood conditioner with a brush or a lint free cloth against the grain.
Cover the surface of the wood you plan to stain with the wood conditioner until it is saturated.

Then wipe off the excess conditioner in the direction of the wood grain.
Do not allow the wood conditioner to dry before wiping off the excess.
Finally allow the pre-stain wood conditioner to penetrate the wood surface for 30 minutes before staining.
These directions we’re sharing are for an oil-based wood conditioner and stain.
If you’re using a water-based stain and wood conditioner see our tips for applying here.

[mailerlite_form form_id=2]
Apply Stain to Pine Wood
Once the conditioner is dry, you can begin to apply your chosen stain.
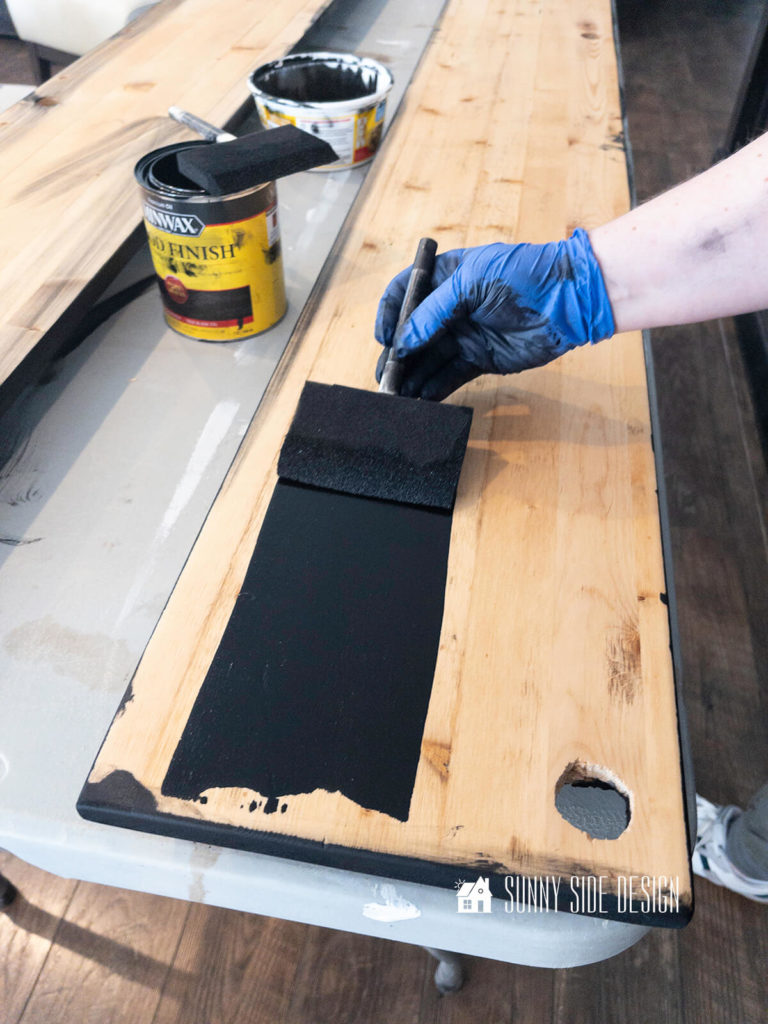
Use a brush or cloth and work in small sections at a time, blending each section together as you go.
You want to always have a wet edge you’re working with.
If the stain begins to dry before you finish your surface you may get lap marks.
So work quickly and get the stain on the entire surface.
This is one of the benefits of working with an oil-based stain.
It takes longer to dry and you have a longer work time.
Let’s stay connected! Follow us on social media!
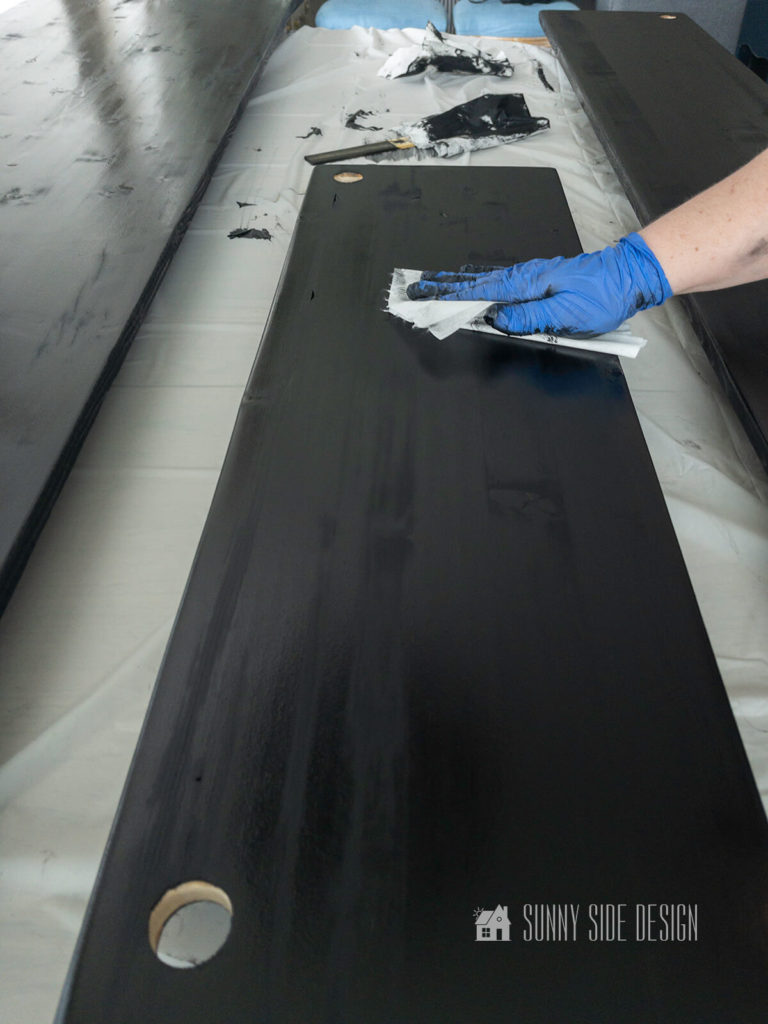
For lighter tones, simply wipe the stain away after application.
If you’re looking for a dark and rich stain, leave it to sit for 5-10 minutes before wiping off in the direction of its grain.
If you feel you still want a darker stain, you can always apply a second coat of stain. Just follow the dry and reapplication times on your stain can.
After 10 minutes, we wiped off the excess stain and felt like we still wanted a more opaque look, so we applied a second coat.
Always wipe excess stain from the wood and let it dry to the suggested manufacture time before applying a topcoat.
Wood stain is intended to be wiped off immediately after application.
If the wood stain remains on the wood, liquid solvents in the stain will evaporate, leaving sticky pigments behind that will never fully dry.
Apply Topcoat
Once your stain is completely dry, you can apply a polyurethane topcoat.
Be sure to check the manufactures suggested drying time before applying the topcoat.
This will help protect the wood and give it an extra layer of shine.

Again, because we are using oil-based products, you’ll want to use an oil-based polyurethane.
Oil-base polyurethane can yellow over time on light colored surfaces, but if it’s dark like ours there’s no need to be concerned.
I prefer an oil-based poly, because I do feel like it’s more durable, but if your stain is light make sure you’re selecting water-based products.
My favorite way to apply polyurethane is with a lint free cloth.
In fact, rags from old cotton t-shirts are perfect for this and you won’t have any brushstrokes.
Avoid using foam brushes or rollers for the topcoat as they can introduce air bubbles into the finish.
Apply the first coat of topcoat in the direction of the woodgrain and allow to dry.
Once dry, lightly sand with 0000 steel wool.
Then apply a second coat of topcoat.
Generally speaking, two coats of polyurethane is usually enough protection, but for our desk surface we applied 3 coats.

Always sand with the 0000 steel wool between coats.

No need for additional sanding once the final coat is applied.
Tips for Pro Results
- Stir stain to incorporate pigments, don’t shake or it will incorporate air bubbles
- Oil-based stain is easier for beginners to work with and is more durable
- Sand your surface before staining
- Use a tack cloth
- Use wood conditioner for soft woods
- Follow manufactures dry times
- Protect your finish with a topcoat
Natural Stains
One of our most popular projects on our site is our Restoration Hardware bed dupe.
For this furniture makeover we prepared a natural stain with vinegar and steel wool.
To learn more about this look and technique click here.
And if you’re looking for more of a raw wood look, take a look at this dresser makeover.
In addition if you choose to use a water-based stain you’ll want to see these tips first.
Shop Staining Supplies
Are you enjoying this post?! Please pin it, save it for later and share it with a friend.
Sharing is caring!
Please follow along each week and watch the progress of Aiden’s room makeover!
Also remember to check out the many other room transformations taking place on the One Room Challenge blog.
No doubt you’ll be inspired with countless design styles and creative ideas.
If you’re new here, WELCOME! We love having new readers and friends!
You can learn more about us here.
Let’s stay connected! Join our DIY community of doers and you won’t miss the weekly updates on our One Room Challenge.
Please PIN and save for later, and share with your friends! Sharing helps grow our following!
Thanks for stopping by and as always here at Sunny Side Design
WE HOPE TO BRING YOUR HOME TO THE SUNNY SIDE OF THE STREET!
Retailers We Love
- Anthropologie
- Birch Lane
- Crate & Barrel
- Joss and Main
- Lampsplus
- Mark & Graham
- One Kings Lane
- Pottery Barn
- Rejuvenation
- Serena & Lily
- Wayfair
- West Elm
- Williams Sonoma
- World Market
Be sure to follow us on Pinterest for even more home decor and DIY ideas.
To see what we are working on before it’s on our blog, follow us on Instagram.
You will also find our video tutorials on our YouTube channel.
- Easy 4th of July Door Decor You Can Make in Minutes

- 35 Easy Decorating Ideas for Summer to Welcome the Season
- Fourth of July Decorating Ideas You’ll Love This Summer
- Simple and Creative Planter Container Ideas from Thrifted Finds


Great tips. You two are amazing.
Thank you Renae. You’re so kind. You’re pretty amazing yourself. Have a wonderful day!
I have a staining project coming up next so this was really helpful!
Thank you. You’re rainbow room looks so fun! I’m sure your girls are going to love it.