Learn how to age wood with vinegar and steel wool for a weathered, vintage finish.
Are you looking to add a weathered, vintage charm to your wooden furniture?
Look no further than vinegar and steel wool!
This simple method creates a finish similar to the coveted “weathered” look from Restoration Hardware.
In our blog post, we’ll guide you through the process step by step, so even if you’re new to furniture refinishing, you can achieve an authentically aged look.
Not only is it satisfying to transform a discarded piece into a treasure, but you can also save thousands of dollars by refinishing instead of buying new.
So grab a few supplies you may already have around the house and get ready to give your furniture an aged, and vintage feel!
The Story Behind This Project
First let me say, both LOVE the Restoration Hardware style!
I will never forget when the store opened up in Salt Lake City and I walked in the doors and my eyes lit up … I was in LOVE with all of the finishes, the lighting, everything!
And then I looked at the prices, yikes!
I knew it would never fit into my budget.
Well, Steph had been eyeing a bed at Restoration Hardware with that vintage coastal style and it was nearly $3000, but luckily we’re DIY’ers and we knew somehow we could get that Restoration Hardware style finish.
We have come up with a simple 3 step process to achieve their wood finish.

First of all Steph bought this bed after graduating from high school, I guess she was anxious to spend all that money she was making!
It is a solid pine bed with lots of rustic character which she loved at the time, however as her tastes changed, she married and bought new furniture.
But thank goodness she hung on to this bed, because it is a good solid wood piece,which is hard to come by these days.
Let’s take a look at this rustic pine bed.
Bed Before
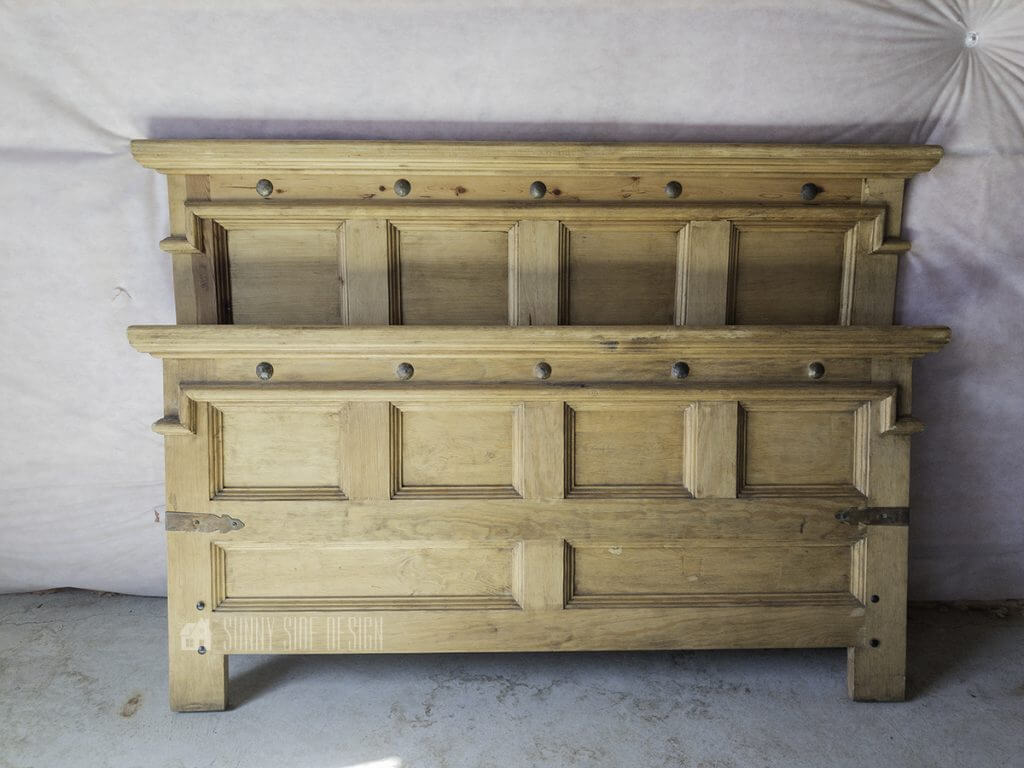
The bed in fact is still in great condition, it was just that Steph no longer liked the finish.
The finish is a natural pine, not only does it have a yellowish hue, but it’s really too rustic for her style.
In addition, now Steph loves a relaxed coastal look, along with a bit of a vintage vibe.
She began to wonder if we could transform this bed into the inspiration bed from Restoration Hardware.
Well take a look, and see if we succeeded in getting that Restoration Hardware style finish!
Are you enjoying this post?! Please pin it, save it for later and share it with a friend.
Sharing is caring!
“How to Age Wood” Supplies
First of all you’ll need the typical supplies when finishing or refinishing furniture, such as paint brush, sandpaper and old rags.
You may already have many of these supplies on hand.
We used:
- paint brush
- Jasco paint and epoxy remover
- steel wool pads (medium grit)
- steel wool pads (0000)
- sandpaper
- old toothbrush
- paper towel
- vinegar
- white wax
- waxing brush
- cotton rag (like an old t-shirt)
Disclosure: This post contains affiliate links or referral links for your convenience. It is a way for this site to earn advertising commissions by advertising or linking to specific products and/or services. Click here to read my full disclosure policy.
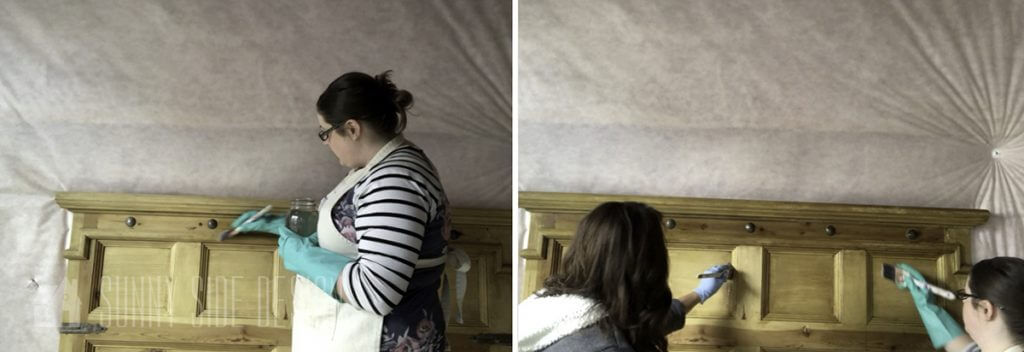
Remove Old Finish
If your furniture piece has a finish on it, you’ll first need to remove it.
However if you are working with an unfinished furniture piece, you can skip this step.
We believe that the bed frame has a wax finish on it and knew that we would need to remove it first so the vinegar and steel would penetrate into the wood.
First and foremost, it must be bare wood for the “stain” to work.
That will require either stripping or sanding the wood.
The stripper we prefer to use is Jasco Paint and Epoxy Remover.
It has a paste or gel-like consistency, which helps it cling to the wood surface better.
Not only did it strip off the wax quickly, but we have used this product to strip off varnish and paint as well.
PRO TIP: When working with a chemical stripper always wear chemical gloves and goggles, it is very powerful and can burn your skin.
Remember safety first when working with chemicals and tools.
Pour the stripper into a glass or metal container, because it will eat right through plastic.
Brush on the stripper with a paint brush, let it sit for 15 minutes, soon you see the finish dissolve.
If you are more of a visual learner, we created a video tutorial on how to age wood with vinegar and steel wool.
Stripper Tips

Let the stripper sit on the wood for about 15 minutes, then the magic happens.
The finish will dissolve and then it’s ready to be removed.
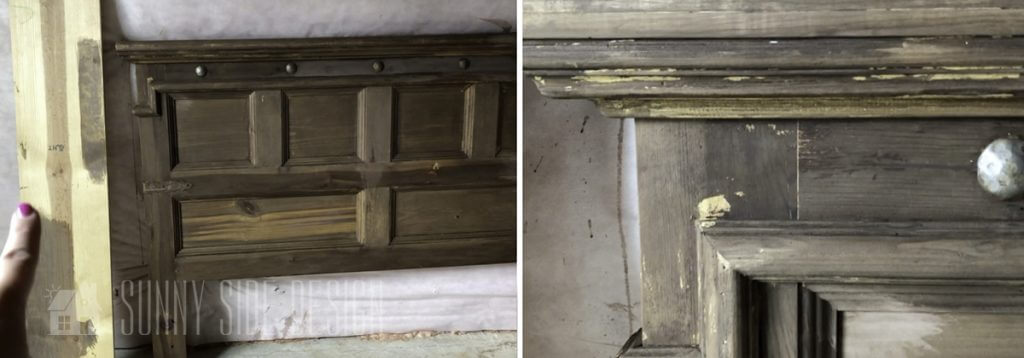
Use a medium grit steel wool pad and then rub back and forth with the pad, pulling off the finish.
This method works really well for surfaces that have moulding and carved details.
We used his method for the entire piece, however we did notice that in some of the corner areas some finish remained.
So then we dipped an old toothbrush into the stripper and worked it into the corners and then wiped the area with a paper towel.
If your furniture piece has more flat surface, once the finish softens with the stripper, you can use a plastic putty knife to lift off the finish.
Once the entire piece is stripped, wipe down all of the surfaces with a damp cloth, removing any remaining chemicals.
When refinishing a piece, it makes it a whole lot more enjoyable to do this with a buddy.
Crank up some tunes and enjoy the process.
We love working on these projects together, it is so rewarding and FUN!

[mailerlite_form form_id=2]
How to Age Wood with Vinegar and Steel Wool

To age wood, we used a combination of vinegar and steel wool.
Place a steel wool pad in a quart size jar and fill with white vinegar.
Then let it sit for a day or two until the steel wool pad almost completely dissolves.
The longer the steel wool pad sits in the vinegar, the darker the stain will be.
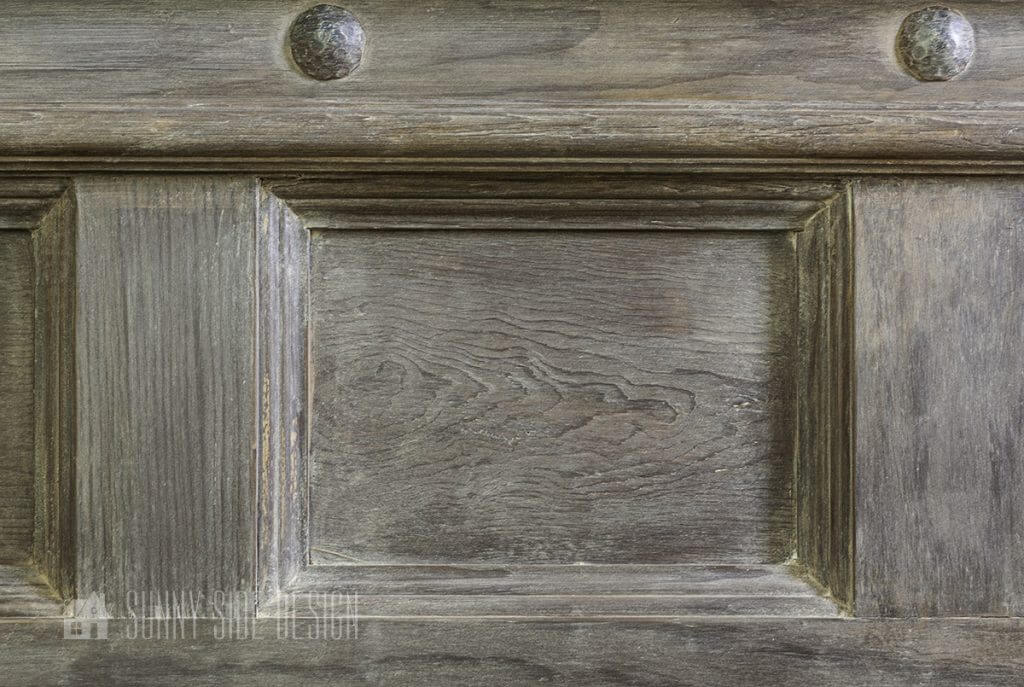
Combining vinegar and steel wool is a very old “staining” technique, sometimes called “ebonizing.”
Technically this is not a “stain,” it’s a chemical reaction with the tannins in the wood.
And that’s what creates this wonderful aged and weathered look on wood.
Because it’s a chemical reaction, each species of wood will react differently, meaning you’ll get different colors with different species of wood.
Be sure to test the vinegar and steel mixture in an inconspicuous spot to make sure you’re happy with the color.
Our wood is pine and it’s just the look we were going for.
I did try this method on a cutting board and the result were orange.
Clearly it’s important to test the vinegar mixture first on your species of wood.
Apply Vinegar and Steel Wool Mixture
To age your wood, apply the vinegar mixture to the wood with paint brush.
It will look clear as you first apply it and then in a matter of minutes the magic happens. his amazing weathered wood look!
In the first photo we’re holding up a piece of the original pine next to the stained headboard.
It’s quite a transformation, we are loving the aged, and weathered finish!
There are also a few areas where the “stain” did not take.
We came to the conclusion that not all of the wax had been removed.
This however is an easy fix.

The areas that did not take the “stain”, gently sand the area with medium grit sandpaper removing any remaining wax.
Then brush on the vinegar and steel wool mixture.

And here’s a look at it after the sanding and touch ups after .
However there is one spot you can see that would not “stain”.
It may have been filled in with wood putty, but you will see in the end it all worked out.
Apply White Wax

The finial step to achieve this beautiful Restoration Hardware aged finish on wood is to apply a white wax.
Apply the wax in a circular motion using a waxing brush, pushing the wax into any grooves or crevices in the wood.
To achieve that driftwood look to the wood, after the wax is applied gently drag a chip brush across the wax.
The result is a more pronounced variation in the color.
This will give your piece the aged and weathered look like the inspiration bed from Restoration Hardware.
Let’s stay connected! Follow us on social media!
Buff
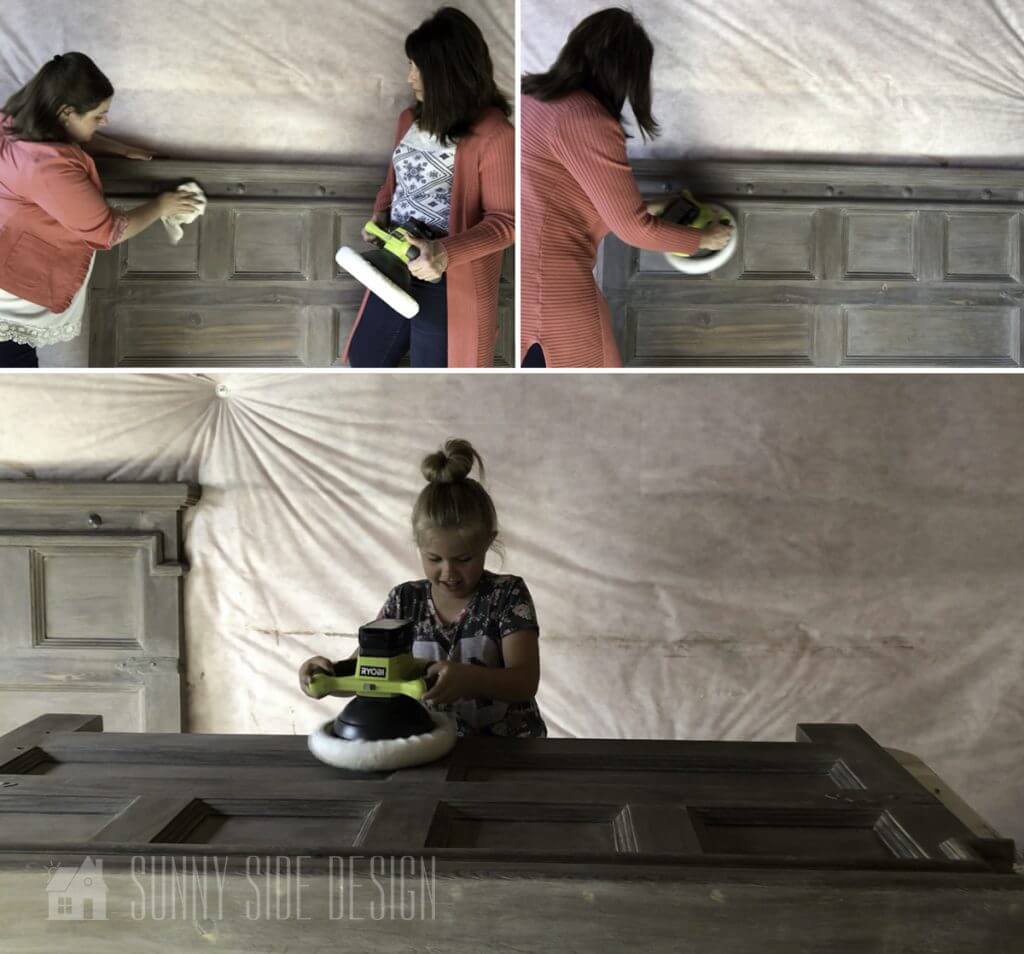
After the wax is dry you’ll be ready to buff.
We like to let it sit overnight, just to make sure the wax is completely dry, before buffing.
Buffing can be done with a soft, clean cotton cloth (old t-shirt) or a buffer also works well.
Let me tell you, every time we get out the buffer our little helper arrives.
Ellie loves to be a part of all our projects, especially if there is a paint brush involved.
Usually we say, “no, you can’t help with this,” but with the buffing she can totally do it!
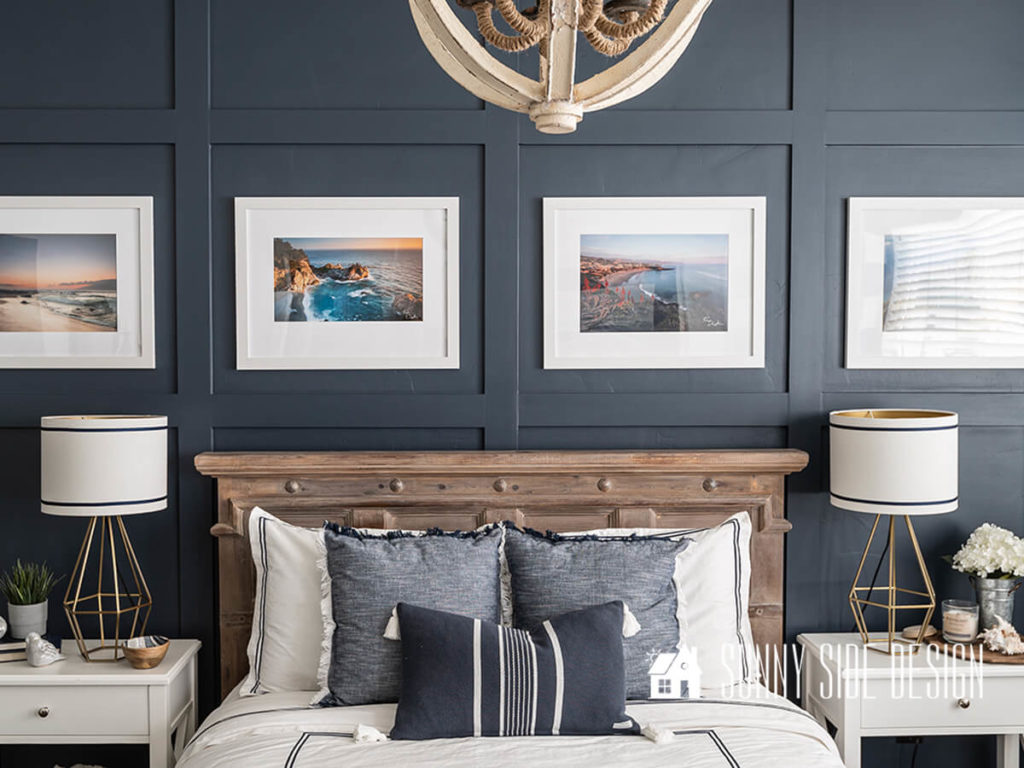
Final Reveal

Here is the finished bed!
As you can see the one spot that wouldn’t take the stain looks fine.

The wax adds another layer of depth and dimension to give the bed that amazing aged and weathered finish.
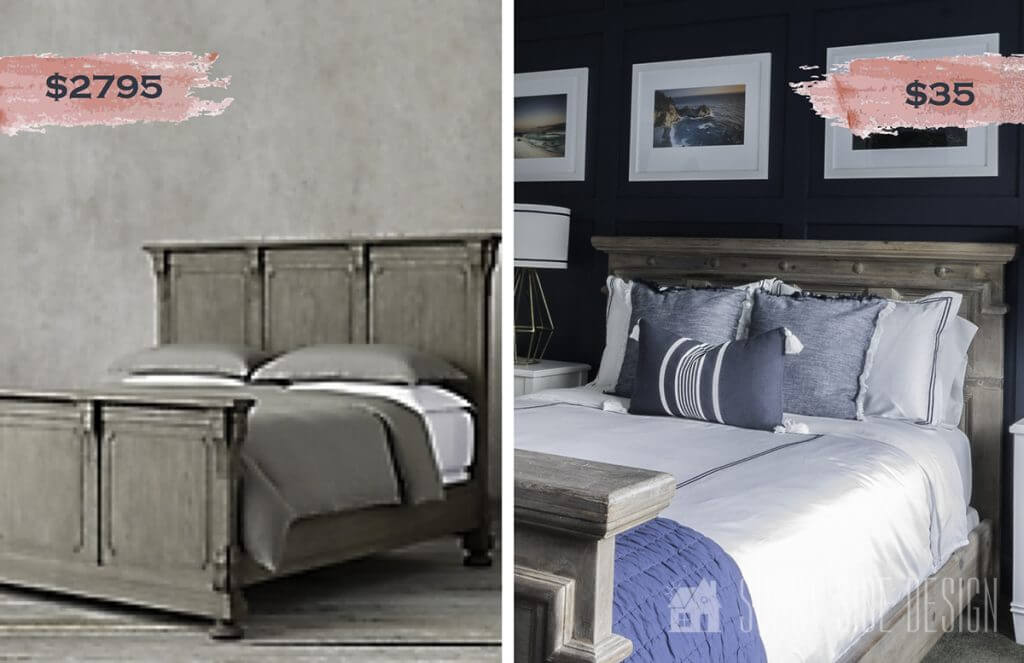
Drum roll please… take a look at the inspiration bed from Restoration Hardware on the left and our bed with the aged wood finish on the right.
Don’t you think it looks fantastic!
What’s even better this project only cost around $35. Can you believe it?
That is quite a savings from the nearly $3000 bed from Restoration Hardware!

Aging wood with vinegar and steel wool is a simple and effective way to give your furniture a weathered and aged look.
This method produces a finish just like Restoration Hardware’s signature “weathered” look, giving your furniture a worn and vintage feel in no time.

By following these 3 steps, you can easily achieve an authentically aged look quickly and easily.

So don’t wait, try aging wood with vinegar and steel wool today for an authentically aged finish!
Do you LOVE it?
Are you ready to give this technique a try?
We would love to hear from you, please drop us a comment!
If you love a natural wood finish, checkout our pro tips for applying a water based stain.
And if you’re looking for tips for evenly staining pine wood click here.
We hope you’ve found some inspiration here today. Please pin it, save it for later and share it with a friend.
Sharing is caring!
See more projects in Steph’s modern primary bedroom makeover.
- –EASY No Sew Curtain Hemming
- –How To DIY Your Own Bay Window Curtain Rod
- –Easy DIY Board & Batten Wall For Only $50!
- –How To Use Saltwash for an Amazing Worn & Weathered Finish
- –How To Repair Light Fixture Ceiling Hole
- –Dresser Refresh
- –Adding Coastal Style to an Orb Chandelier
- –Easy Embellished Lampshades
- –The Most Clever DIY Hidden TV Cabinet
- –Primary Bedroom Makeover on a Budget
- –How To Resize a Canvas
Shop This LOOK

Retailers We Love
- Anthropologie
- Birch Lane
- Crate & Barrel
- Joss and Main
- Lampsplus
- Mark & Graham
- One Kings Lane
- Pottery Barn
- Rejuvenation
- Serena & Lily
- Wayfair
- West Elm
- Williams Sonoma
- World Market
Be sure to follow us on Pinterest for even more home decor and DIY ideas.
To see what we are working on before it’s on our blog, follow us on Instagram.
You will also find our video tutorials on our YouTube channel.
- Creating a Cozy Outdoor Living Room with Thrifted Finds

- The Best ‘Berry in Love’ Bridal Shower Ideas
- Paint an Old World Texture Finish on a Vase
- Easy Strawberry Chicken Salad with Lime Maple Balsamic Vinaigrette


