Are you embarrassed by your dated master bathroom. I sure was. I just kept the door closed and tried to ignore it! Without a doubt it was boring and outdated. Since the day we moved in, I had had big plans to completely gut the bathroom, relocate the fixtures and have my dream modern master bathroom. Five years later it still looks exactly the same as the day we moved in. 😩 It was definitely time for an Inexpensive Master Bathroom Makeover.
Why did I wait so long to make these simple cosmetic changes? Clearly we could have made these inexpensive changes and fit them into our budget years ago and enjoyed the space so much more.
Using the power of paint, tile decals and feather finish concrete we kept on a tight budget. The before and after transformation is remarkable. The bathroom now feels updated, modern and elegant with an industrial flair. The old 90’s bathroom is gone with basically no demo.
We will share easy DIY ideas to create a modern bathroom on the cheap. This master bathroom went from boring & outdated to WOW in 2 weekends.
In addition we will share simple and quick design tips that can create an elegant and industrial look. Black, white and blush pink were used to create a modern feel. Inexpensive mirrors and decor complete the spa like atmosphere.
- Before: Inexpensive Master Bathroom Makeover
- Design Plan: For an Inexpensive Master Bathroom Makeover
- Removing the Mirror
- Prep the wall for paint
- Create a higher vanity
- Update the Bathroom with Paint
- Update the Countertop
- Update the Lighting
- Update the Flooring
- Plumbing Fixtures
- Gold Framed Mirrors
- Accessories
- Shop This Room
Sunny Side Design is a participant in the Amazon Services LLC Associates Program, an affiliate advertising program designed to provide a means for sites to earn advertising fees by advertising and linking to Amazon.com. As an Amazon Associate, this blog earns from qualifying purchases with no additional cost to you. Click here to read our full disclosure policy.
Before: Inexpensive Master Bathroom Makeover
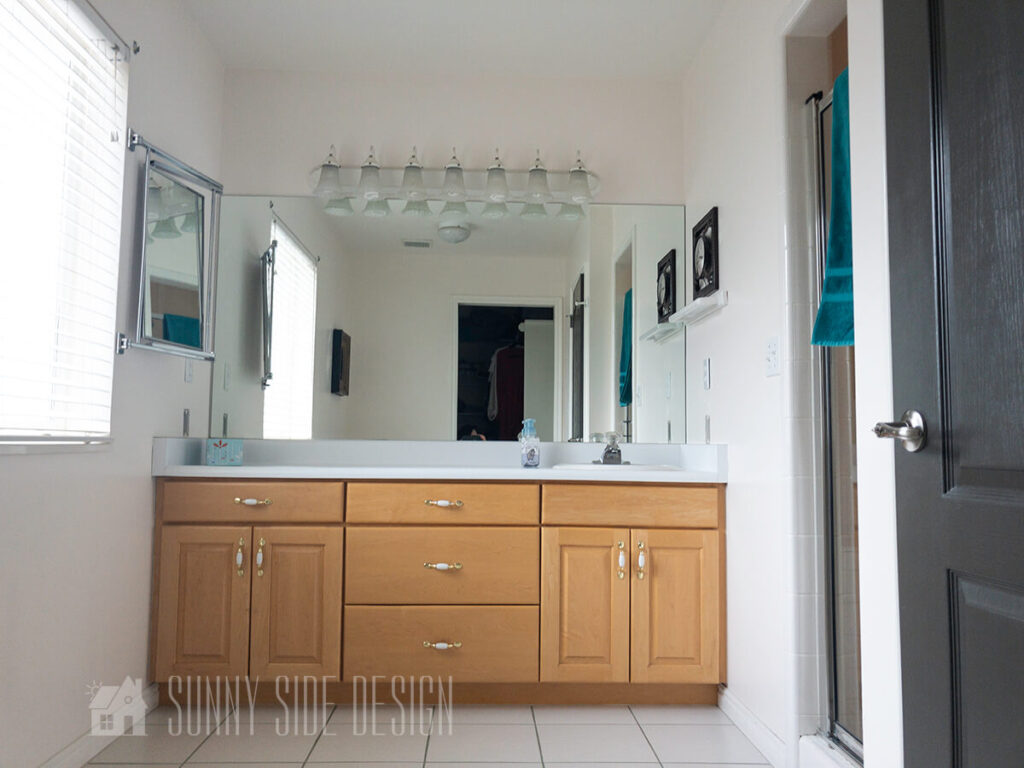
The bathroom is a good size, yet it had its flaws. The vanity was plumbed for 2 sinks, but only had one on the far right. We were constantly wrestling for who got the sink space.
The bathroom has always felt cold and sterile. The white tile floor with green grout, (yikes!) white counter and white walls didn’t help it feel inviting.
I did do a little something with the room earlier. I painted the bathroom door a dark charcoal to match the rest of the doors in the house.

The light fixture was dated and I wasn’t crazy about the large plate glass mirror. The shower is large, but it has a mauve and green tile border. While we didn’t update that now, that will be getting a little make over soon.
Design Plan: For an Inexpensive Master Bathroom Makeover
- Remove the large mirror and add decorative mirrors
- Add a sink (2 sinks are a must have!)
- Update the faucets
- Update the lighting
- Paint the walls
- Paint the vanity
- Make the vanity higher
- New hardware for vanity
- Update the floor (w/o removing tile)
- Update the countertop on the cheap!
Removing the Mirror
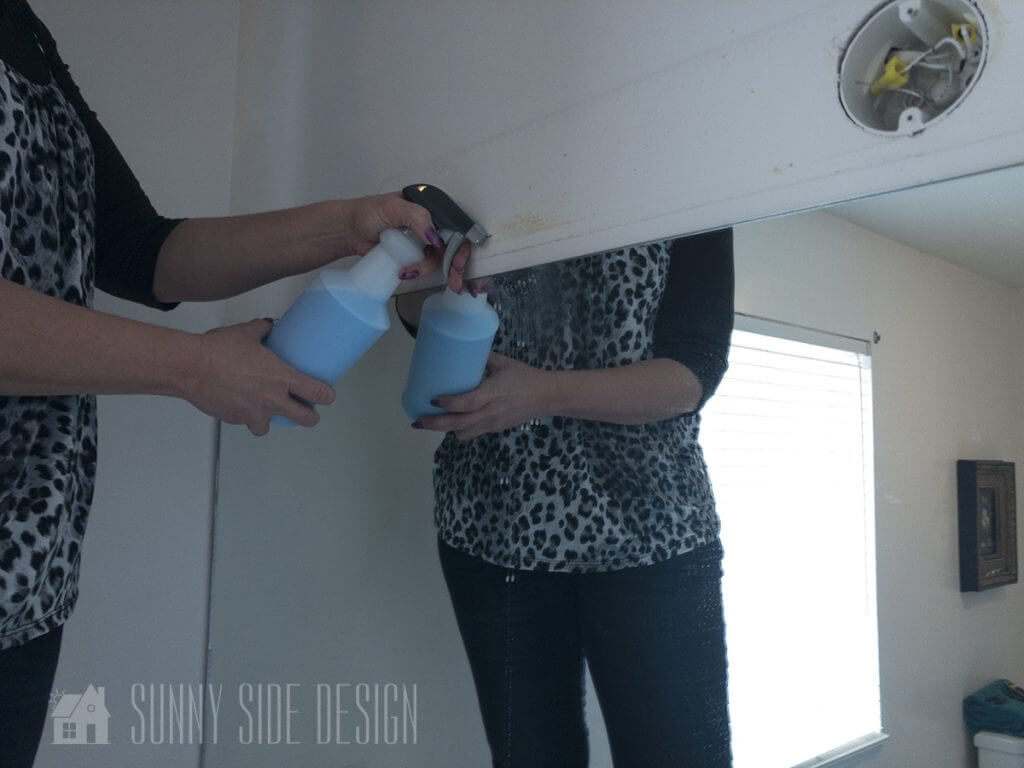

Taking down a large mirror like this may seem like an impossible task. However, we have come up with our own method that works really well.
Our secret ingredient is Downy, yes the fabric softener. We have now removed 6 large glass mirrors with this technique and have only had 1 mirror break. I think that’s a pretty good track record, don’t you think!
Our mix is 1 part Downy to 2 parts water. Place it in a spray bottle and spray the mixture behind the mirror.
Soon the mixture will start running down the wall from behind the mirror.

Let this mixture soak for several hours. Place towels along the countertop to absorb any excess Downy.

For safety, in case the mirror should crack, we placed tape all over the mirror. We generally use large drywall knives along the top and pry the mirror off. However, this time our drywall knives were all over at Steph’s house so we improvised.
We looked for anything we could shimmy down behind the mirror to get leverage to pry it off. We came up with saws. They are quite flexible, but it did the job! 😃

Ta Da! No more mirror!
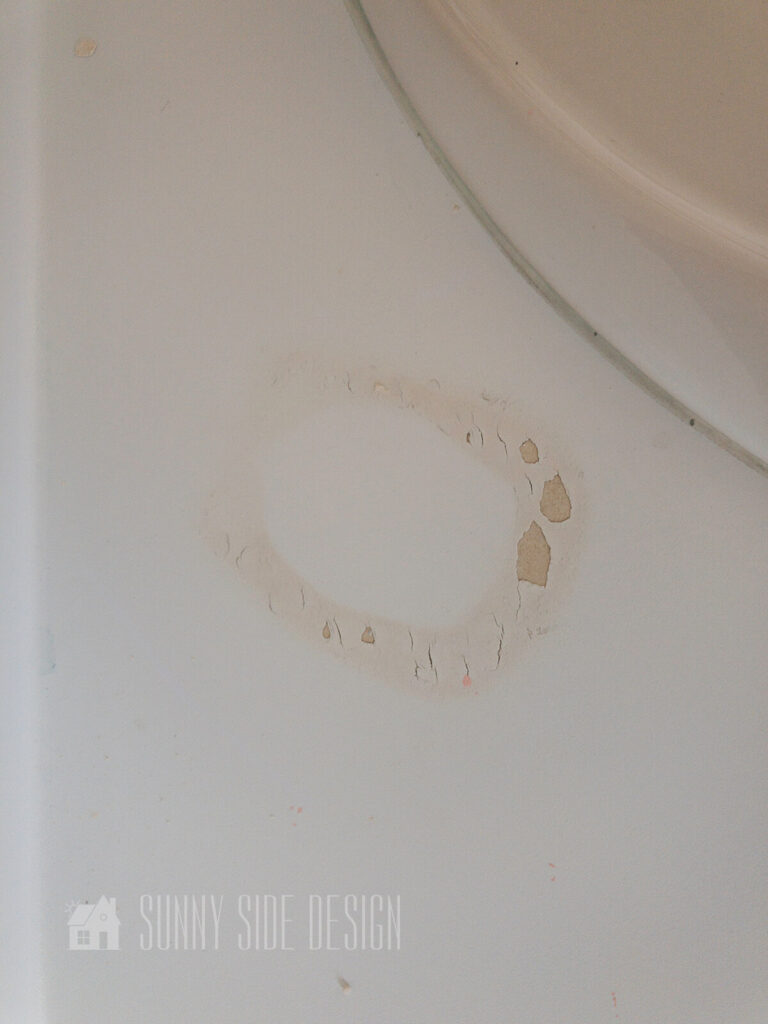
Since we were going to paint the wall, that meant we needed to repair the wall from all of the adhesive.
Are you enjoying this project? Please Pin It, save it for later and share it with a friend.
Sharing is caring!
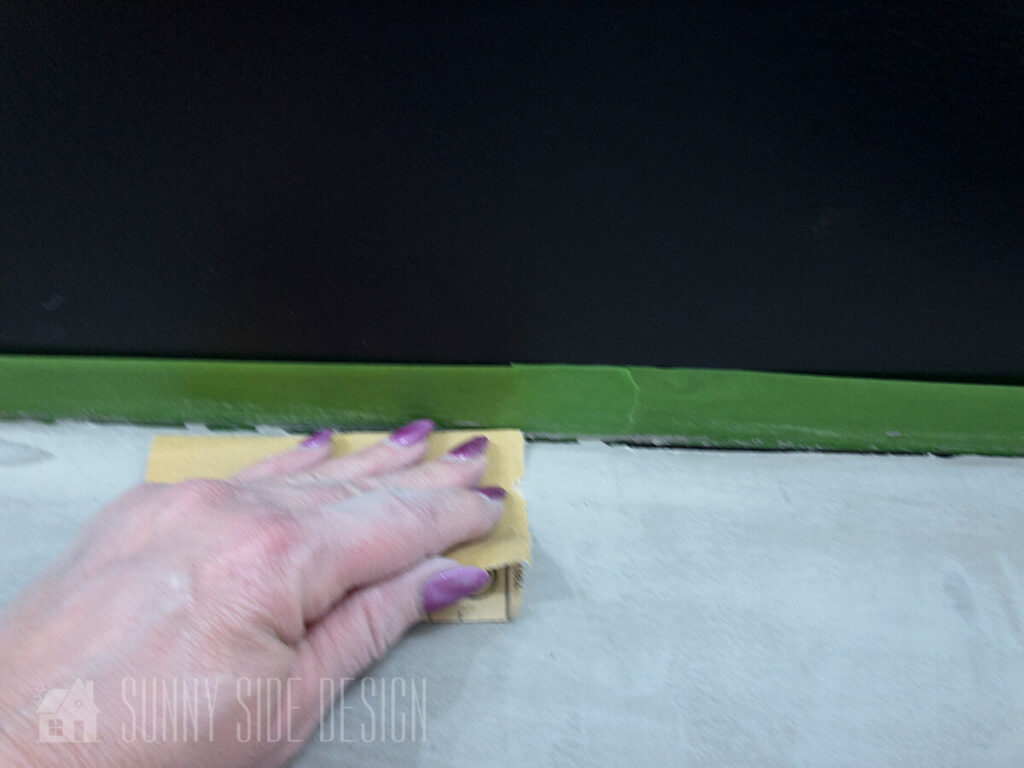
Prep the wall for paint

First, all of the circles of adhesive were scrapped off using a putty knife.
Next, use drywall mud and fill in the areas that were pulled off by the adhesive. This took a couple of coats. Then, we sanded it until smooth.
Finally, apply a coat of primer. We used a grey tinted primer since we were painting this wall a dark color.
Create a higher vanity


Creating a taller vanity was really quit simple to do. We purchased 2 x 6 lumber and cut it to go along the walls and 2 support pieces over the vanity cabinet.
Next, we cut a 1 x 6 piece of pine lumber to fit across the front. This piece was flush with the existing cabinetry.
Finally, we cut a piece of decorative trim moulding to cover the seam where the 2 boards met.

To prepare the vanity cabinetry for paint we caulked all of the seams with a painters caulk.
If you’re new here, welcome! We’re so glad you’re here.
Let us introduce ourselves, we’re Michelle and Steph, a mom and daughter team who love to DIY and decorate our homes.
Not only are we passionate about making our homes warm, comfortable and unique, but it’s our mission to help you create that same feeling in your own home.
You’ll find ideas for repurposing, creating, decorating and making your home truly yours, while always mindful of a tight budget.
Undoubtedly we love finding ways to make your home look high-end on a small budget.
Plus you’ll also find a recipe or two as we share our family favorites with you.
We’d love it if you’d join our community of doers so you won’t miss any inspiration for your home.
We love new friends.

[mailerlite_form form_id=2]
Update the Bathroom with Paint

We began by priming all of the walls. We used a grey primer for the accent wall since that would be a dark color.
While placing sample colors on the wall, we discovered that is was not covering well at all. There was probably a build up of hair products, like hair spray on the walls. Primer takes care of issues like that.
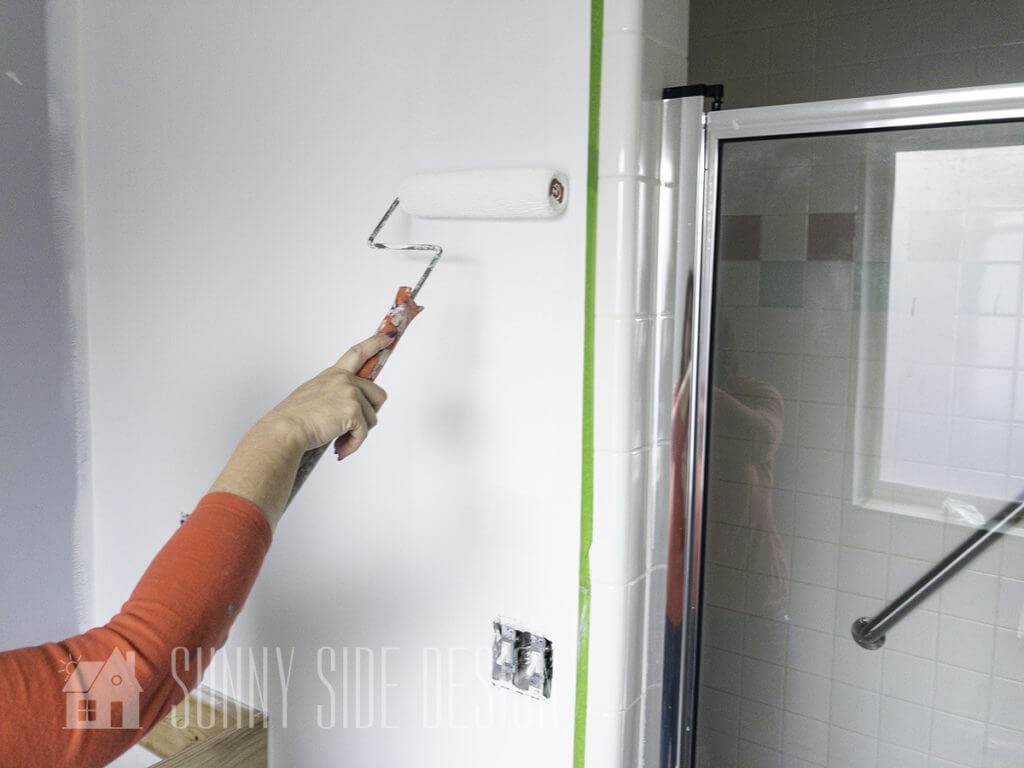

The walls and ceiling were painted with Sherwin Williams Pure White. The accent wall above that vanity was painted in Sherwin Williams Caviar.
How do you feel about dark walls? I just love the drama and coziness they add to any space. I’m looking forward to adding “Caviar” in my bedroom too. Alex and Megan inspired me with their dark and moody walls in their “Man Cave.” You can see their space here.
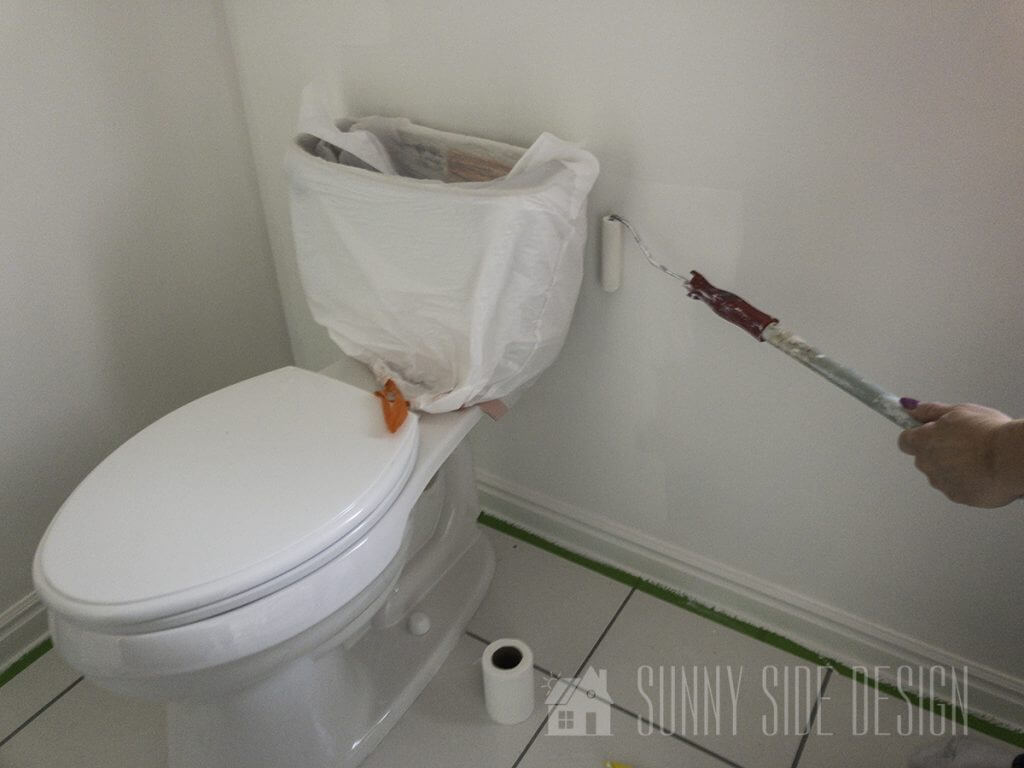
We did 2 coats of paint in the entire bathroom. This bathroom had the original paint from 1998 and really needed some work.
Pro tip: Painting behind the toilet can be a challenge, however using a mini nap roller and an extension handle makes it quick and easy.
To keep from getting paint all over the tank of the toilet I covered it with a garbage bag.
Let’s stay connected! Follow us on social media!


The vanity cabinet was painted with 2 coats Behr Prairie Rose. We used a brush and foam roller for the cabinet base and our paint sprayer for cabinet doors and drawer fronts. Before applying the paint we applied 1 coat of primer.

All of the woodwork in our house had a glossy clear coat finish, which can make it difficult to allow the paint to adhere properly. However, by using Zinsser Cover Stain Primer there is no need to sand or prep the wood before painting. It will adhere to all surfaces without sanding. It is an oil-base primer that can be used with any topcoat.
This is the same primer I used when refinishing my railing. No sanding needed. Just apply primer, then paint and it creates a long lasting and durable finish. To see the full tutorial on refinishing a railing click here.

What a difference paint can make! Now we just need to address the countertop and the flooring.
Update the Countertop
Our countertops were damaged. Not only were they stained, but excess water must have been left on the countertop again and again. It was cracked and chipping off.
I knew that I wanted to spend less that $100 on the countertop and that meant definitely a DIY project.
I looked at the possibility of covering the existing countertop with a film that resembled marble. However, I was concerned about the damaged areas as well as how durable it would be.

We decided to remove the existing countertop and make our own countertop base out of wood. We had oak plywood leftover from another project, which we cut to size.


To make the counter appear thicker, we applied a 1 x 2 board along the front edge. We first ran a bead of glue the entire length, then aligned the top edge and secured it with a pneumatic nailer.

Using the template that comes with the sinks we marked and cut the holes with a jigsaw.
For the countertop itself, we chose to do a concrete. We decided to use the Henry FeatherFinish with Ardex technology.
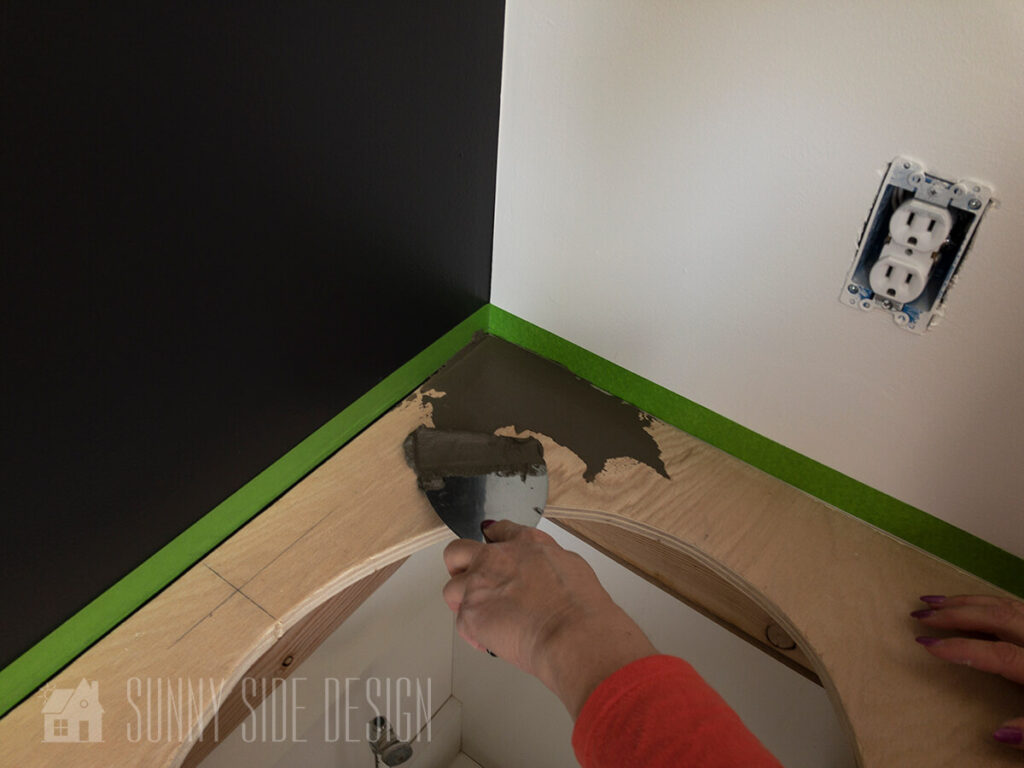
This product is spread on using putty knives. I was at first a little apprehensive about trying this. Looking at many different tutorials using this product, I believed it would give me the look that I wanted and best of all it was CHEAP.
I really didn’t want to spend a lot of money on the countertop. Eventually, I do plan to do a major renovation on this bathroom and move fixtures around so that I can have a free standing bathtub.
After reading and watching tutorials using this product I thought it was going to be more difficult and messy than it was.
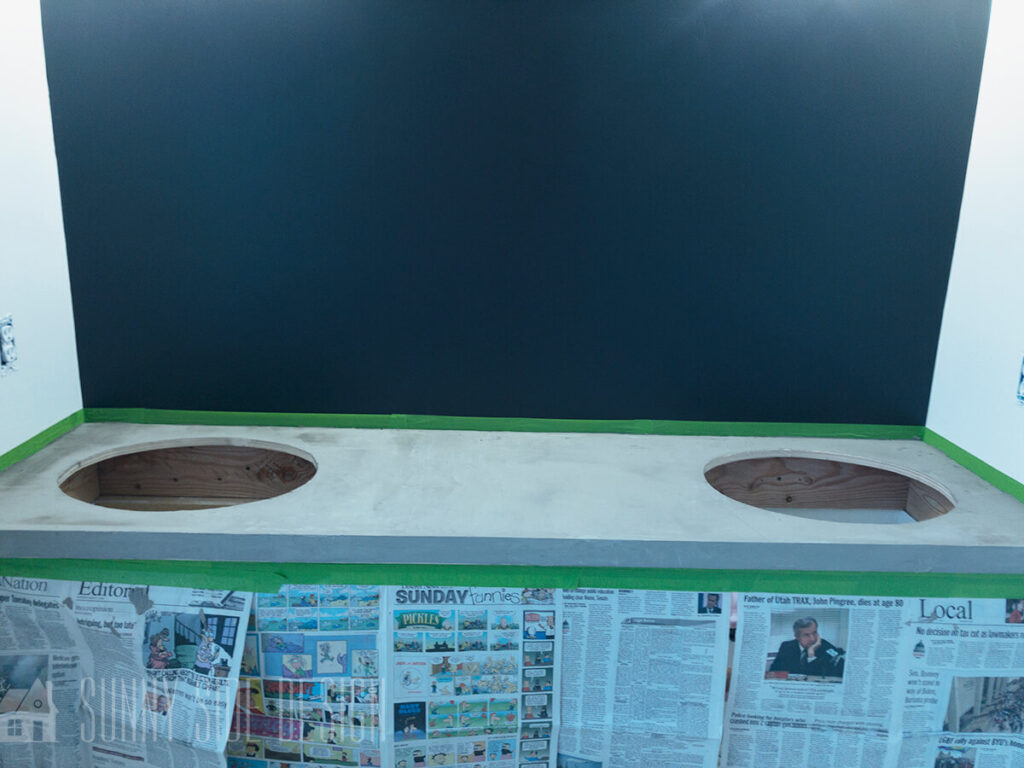
Luckily, I was doing a bathroom countertop that was a little longer than 6 feet. So, not a huge project like a kitchen.
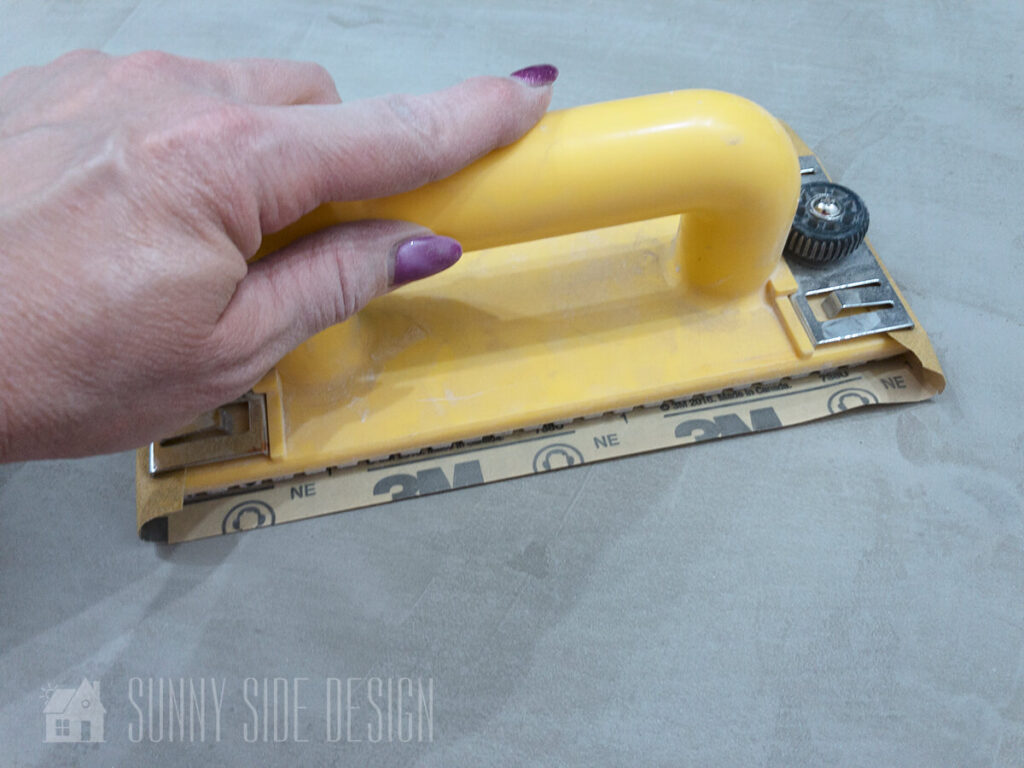
I quickly found out that it was fun, like frosting a cake! You simply spread on a thin layer of the concrete mixture, let dry and sand. Repeat until you have 3 layers of the product. Then, do a final sanding to get it smooth.
For the full tutorial of the Feather Finish Concrete Countertop Tutorial, click here.

The countertops turned out amazing!
It cost me a little less that $20 for the Henry FeatherFinish with Ardex technology product and $30 for the sealer. Much less that the $100 budgeted.
Update the Lighting


We replaced the large existing light fixture with 2 modern black and antique brass light fixtures. I was thrilled to find them at Build.com for less than $70 a piece.

I love the updated classic look of these light fixtures. They really helped pull the room together.
Update the Flooring
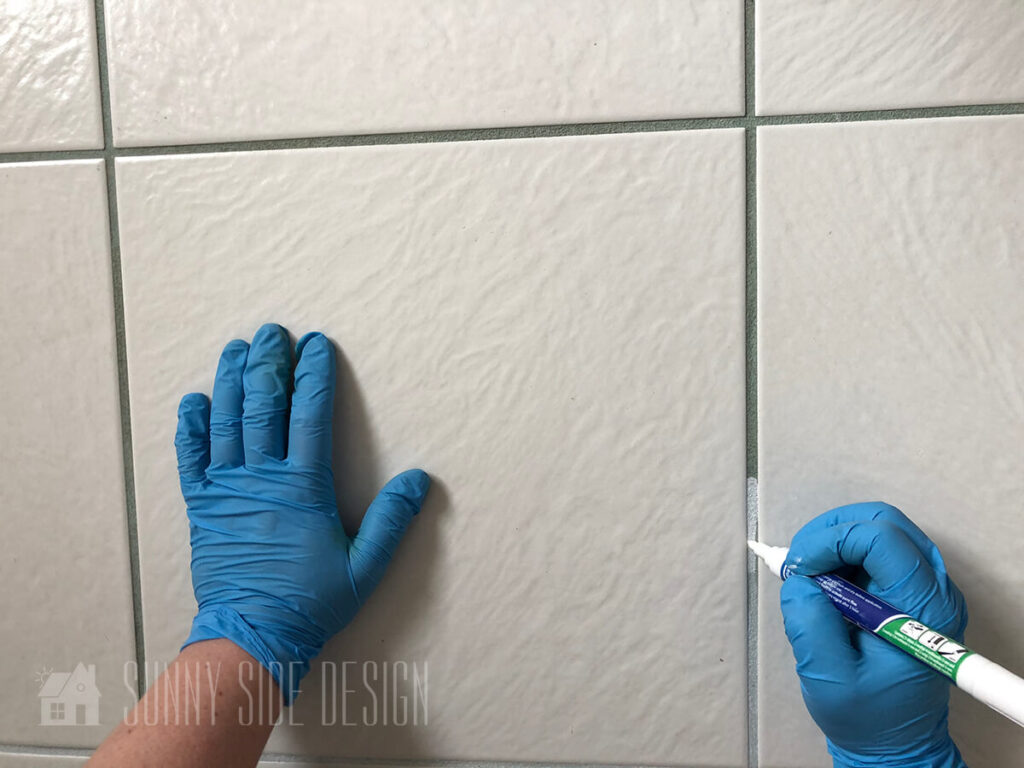
The last area that needed addressing was the flooring. To say that I hated the flooring in this bathroom is an understatement.
We began by using a white grout pen to cover up the green grout and make it a fresh white. We used 2 markers (it took 2 coats to cover up that green grout!)
Since the existing tile was remaining, we needed to cover it up. I considered painting and stenciling on a fun pattern. However, that seemed like a lot of work. Then, when I priced out primer and 2 colors of paint and a floor sealer, I figured I would be spending almost $200.
I had heard about these vinyl decals and I was intrigued that I could change the entire look of the tile. I found that my tiles were not a standard size. They were 12 3/4″. With a little more research, I discovered SnazzyDecals on Etsy. They were able to print and deliver custom tile decals quickly and they were affordable. We had our vinyl decals in just a week after they were ordered, great customer service as well.
We covered about 70 sq. ft for around $200.
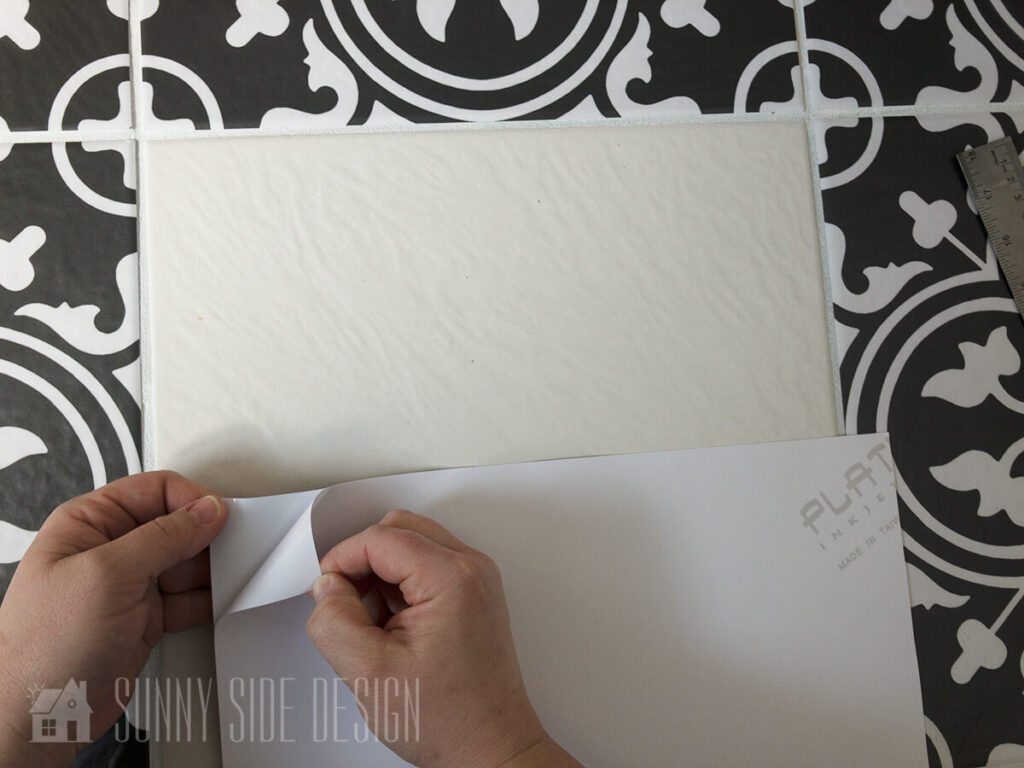
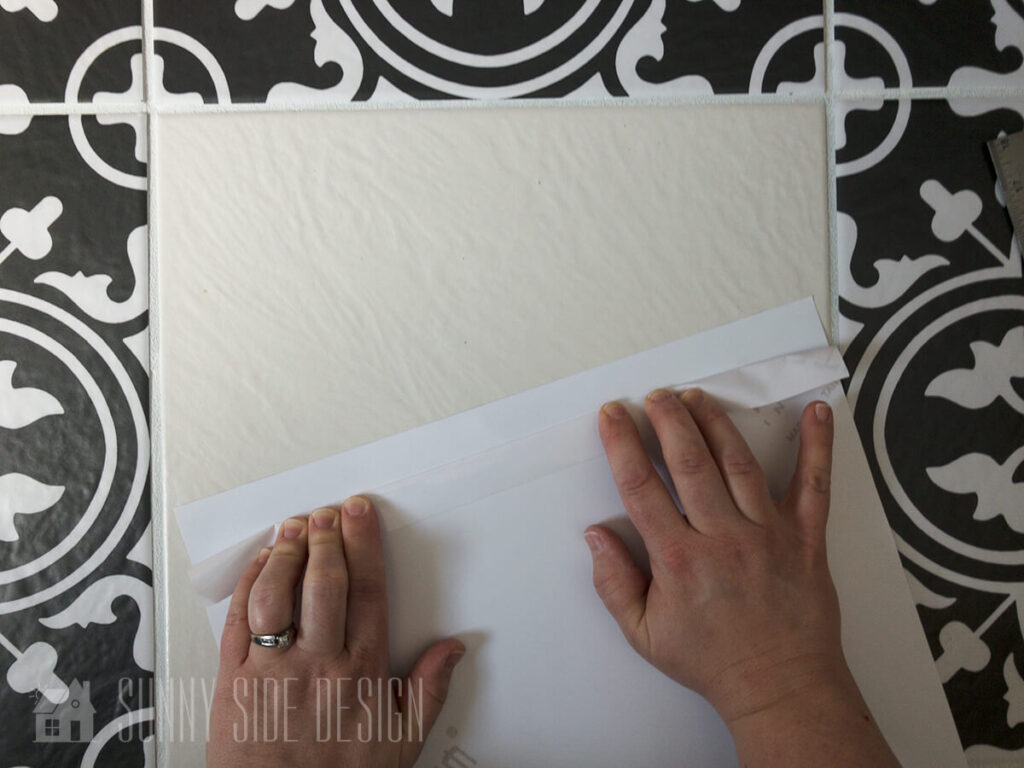
To install, simply peel the backing down about 1″ and crease.
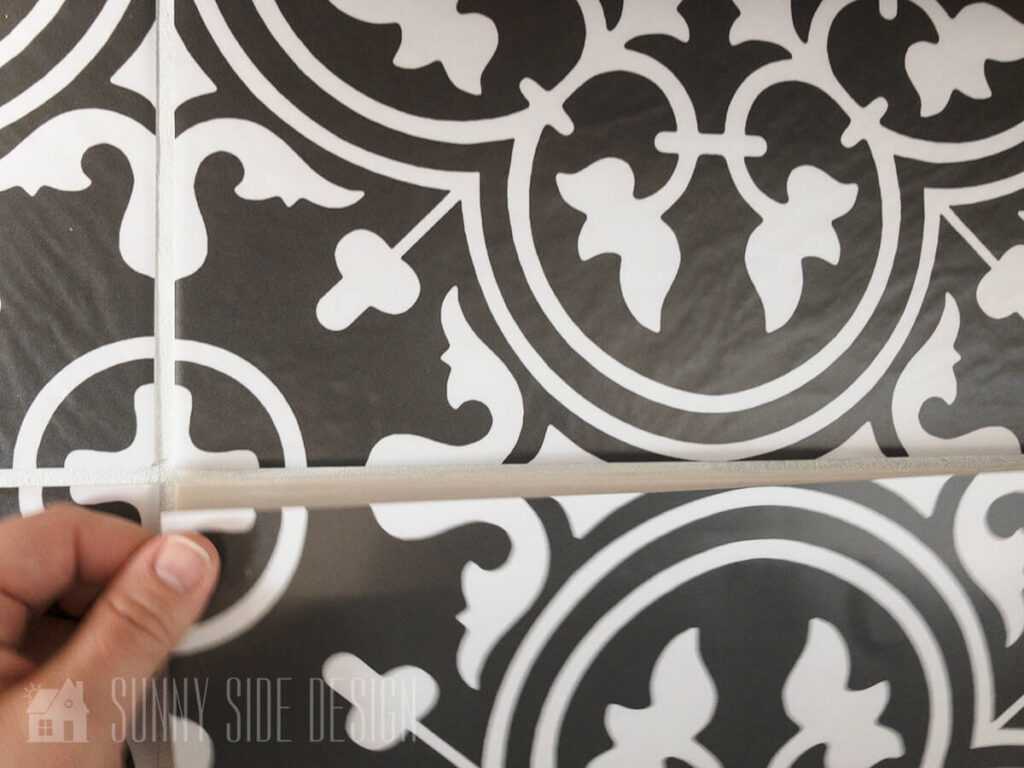

Align the tile decal with the edge of the tile and grout then press down. Before removing all of the backing, make sure the decal is covering the entire tile.
Then place a straight edge on the top of the decal and slide along as the backing is pulled off.
To see the complete tutorial and video of how to install the vinyl decal tiles click here.
By the way, these SnazzyDecals can be used on walls, backsplash, even in the shower. We are planning on installing them later in the shower to cover my mauve and green tile.

The decals were so easy to install! And we are smitten with the dramatic change of the Snazzy Decals!

Isn’t the floor amazing! With the grout lines it really looks like a Moroccan floor tile, without the mess of tiling and a fraction of the cost.
Plumbing Fixtures

Have you priced brushed gold fixtures? They can be pricey! With a little research, we found them much cheaper on Amazon and they are gorgeous! The brushed gold faucets were less than $50 a piece. Such a bargain for a brushed gold finish.
Gold Framed Mirrors
Let’s talk about these fabulous mirrors! Can you believe I found them at Hobby Lobby? They were in the spring collection and at 40% off they were $60 a piece, another bargain! They are currently out of stock online. They may still be found in your local Hobby Lobby.
I found a similar mirror on Houzz for $65. This is a great buy also.
Accessories

The gold trimmed scalloped galvanized tray and bead strand I found at Rod Works and I knew it would add to the elegant industrial vibe I wanted. The carved vase I found at Michael’s along with the blossom stems, both were 50% off. I love the way they compliment the blush color of the vanity. The candle and soap dispenser are from Ross. I found a similar soap dispenser and the candle on Amazon, and the geometrical gold decor is from Walmart.

The faux cheetah fur ottoman is the perfect place to sit and put on shoes. I had the ottoman for years down in my basement, waiting for the perfect spot. We recovered it with faux fur we purchased at JoAnn Fabrics. A full tutorial of the No Sew Upholstered Ottoman can be found here.
The curtains we found on Amazon along with the bamboo shade, which finish off the room. We also replaced the hardware on the vanity. We found a package of 12 pulls on Amazon for $25.
Amazon is such a great place to find bargains when redecorating. I found drawer pulls at the local hardware store that were just what I was looking for, but at $6.50 a piece I decided to look online. I’m so happy I did, the pulls I found on amazon were about $2 a piece.

Shop This Room

What are your favorite elements of this inexpensive master bathroom makeover? Are there elements you would like to try in your own home?
While we didn’t need a shower curtain in this bathroom, it’s another way to add a bit of style on a budget.
We’ve have two tutorials for making your own shower curtain you may like.
Do you have any budget saving ideas you would like to share with us? We would love to hear from you!
We hope you found some inspiration for your home today.
Please share your tips and ideas with us.
We love hearing from you!
If you’re new here, WELCOME! We love having new readers and friends!
You can learn more about us here.
Let’s stay connected! Join our DIY community of doers and you won’t miss the weekly updates and more inspiration for you always on a budget.
Sharing is caring!

Thanks for stopping by Sunny Side Design. Empowering you to create a home you love!
DISCLAIMER
This blog’s content is for entertainment purposes only and is not professional advice. By reading this blog and attempting to recreate a project, you assume all responsibility for any injuries or damages incurred. Read my full disclaimer here.
PHOTO USE AND CONTENT SHARING
All of the photographs you see here are the property of Sunny Side Design unless otherwise credited.
We love for others to share our work, so please feel free to use one photo with a link back to our website.
Pinning and sharing is always encouraged!
Please do not reproduce other Sunny Side Design content without permission.
Retailers We Love
- Anthropologie
- Birch Lane
- Crate & Barrel
- Joss and Main
- Lampsplus
- Mark & Graham
- One Kings Lane
- Pottery Barn
- Rejuvenation
- Serena & Lily
- Wayfair
- West Elm
- Williams Sonoma
- World Market
Be sure to follow us on Pinterest for even more home decor and DIY ideas.
To see what we are working on before it’s on our blog, follow us on Instagram.
You will also find our video tutorials on our YouTube channel.
- Creating a Cozy Outdoor Living Room with Thrifted Finds

- The Best ‘Berry in Love’ Bridal Shower Ideas
- Paint an Old World Texture Finish on a Vase
- Easy Strawberry Chicken Salad with Lime Maple Balsamic Vinaigrette


