Welcome to week 2 of the One Room Challenge!
Today we will share how to make a simple cabinet box that used in constructing our kitchenette or wet bar area in our family room.
This is also the same method we used to make the cabinet for our built in entertainment center.
While we’ve done a bit of woodworking, this is our first cabinet we’ve built and we are pretty pleased with the results.
So much so, I think we’d do it again!
If you’re new here, WELCOME! You can learn more about us here.
For the next 6 weeks we will be transforming an unfinished basement room into the ultimate family hangout room!
Today’s focus will be the kitchenette or wet bar area of our family room.
And be sure to follow us on Instagram for behind the scenes progress and updates!
Be sure to join us each week to check our progress!

Projects in Our One Room Challenge
You can easily navigate through each week of this ultimate modern coastal family room project below.
- Week 1 – How to Make a Built In Entertainment Center
- Week 2 – You are here!
- Week 3 – How to DIY an Epoxy Countertop to Look Like Marble
- Week 4 – How to Install a Laminate Floor Over Concrete
- Week 5 – Add Old World Charm with a Simple Brick Backsplash
- Week 6 – How to Make a Built In Reading Nook in a Closet
- Week 7 – How to Make a Simple Upcycled DIY Sofa Table
- Week 8 – Reveal Day! Basement Family Room Ideas on a Budget
- Projects in Our One Room Challenge
- Can a Beginner Make Cabinets?
- Is It Cheaper To Make Your Own Cabinets?
- Is Plywood or MDF Better for Kitchen Cabinets?
- Supplies to Make A Cabinet Box
- How to Make a Cabinet Box
- Build a Toe Kick
- Make a Cabinet Face Frame
- Attach Face Frame to Cabinet
- Primer and Paint
- Check Out the Progress in the Kitchenette
Can a Beginner Make Cabinets?
We are firm believers that you can do anything you put your heart and mind into.
And it’s always fun to learn new skills and create something amazing.
That being said, with a few woodworking skills, a table saw and a few simple tools you can build your own cabinets too!
Believe me, if we can do it, so can you!
Is It Cheaper To Make Your Own Cabinets?
Now if you don’t already have some tools and you are starting from scratch, it may not save you a lot of money.
That being said, if you already own some basic tools like a saw, a brad nailer, sander and drill, you basically have the tools you’ll need.
You may need a few tools, but if you’re interested in woodworking, and want to invest into a fun hobby, go for it!
In fact, it will save you about 60% of the cost of cabinets to make them yourself.
Is Plywood or MDF Better for Kitchen Cabinets?
If you’ve been following along for a while, you know that we use MDF for many of our building projects.
In fact, MDF can actually be better than plywood or solid lumber.
MDF has great strength and does not noticeably shrink or expand with changing temperatures.
It also has a smooth finish, without knot holes or grain.
Which if you want a painted cabinet, it’s the perfect material.
Not to mention that it’s less expensive than plywood.
With this in mind, we chose to use MDF for making our cabinets, although we did use a plywood panel on the end pieces of the kitchenette.
Supplies to Make A Cabinet Box
Here’s a list of the supplies and tools you’ll need to build a cabinet box.
- 3/4″ 4×8 MDF panel
- 3/4″ 1×6 poplar lumber
- 1/8″ 4×8 hardboard tempered panel
- wood glue
- Kreg coarse thread screw
- 2″ brad nails
- table saw or circular saw
- router (optional)
- 3/4″ router straight bit
- Kreg pocket hole jig
- pneumatic brad nailer
- orbital sander
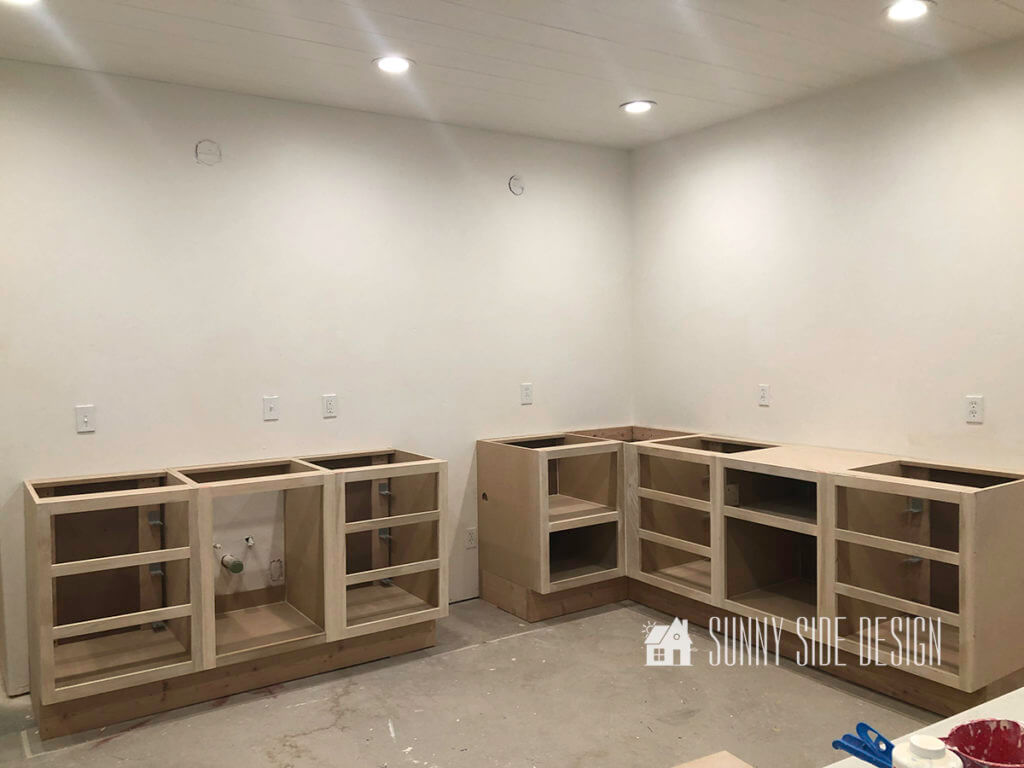
How to Make a Cabinet Box
Before we get started with our step by step tutorial on how to make a cabinet box, let me tell you this was our first time building a cabinet.
We are by no means experts, but we want to share that it’s doable even by a newbie.
Of course, we made mistakes along the way, but that’s how we learn.
However, in the end we are so pleased with the results.
Since this was a new skill for us, we did a lot of watching and studying of different methods.
Our favorite method was from Bourbon Moth Woodworking on YouTube.
I feel that he’s easy to understand, fun to watch and we were able to get amazing results using his methods.
Although I will say we did make ours a little different, but following his general guidelines.
Cut Lumber to Size
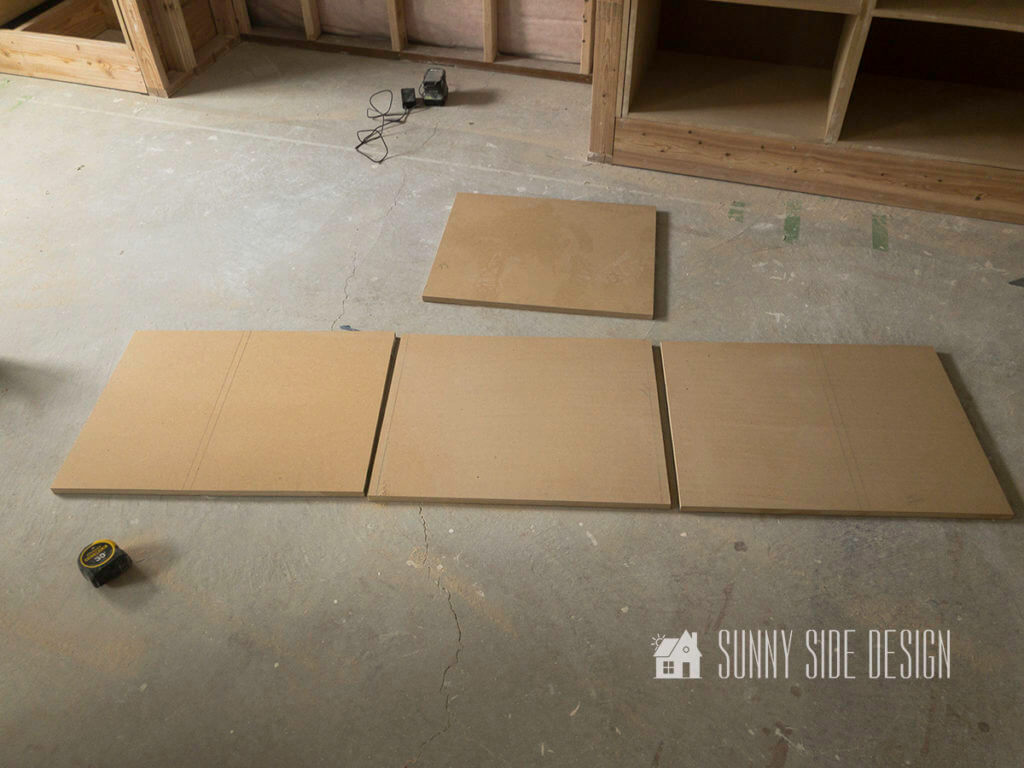
First you’ll want to determine the dimension you want for your finished cabinet.
Once you have a plan for the size of each cabinet, cut the wood for the bottom and sides of your cabinet box.
Also, you’ll find it’s easier to make all of our cuts at once.
Then place all the pieces for each cabinet box in stacks.
Some of our cabinets have a shelf, so there will be 4 pieces for that cabinet box.
Also rip 4″ strips from scrap MDF or plywood.
This will be used for the brace supports for the cabinet.

Next, you’ll want to mark each of the boards where you’ll need to cut a groove or dado cut with the router.
Certainly it’s possible to make these cuts with a table saw, but we feel a router is more accurate.
Cut Dado in Wood
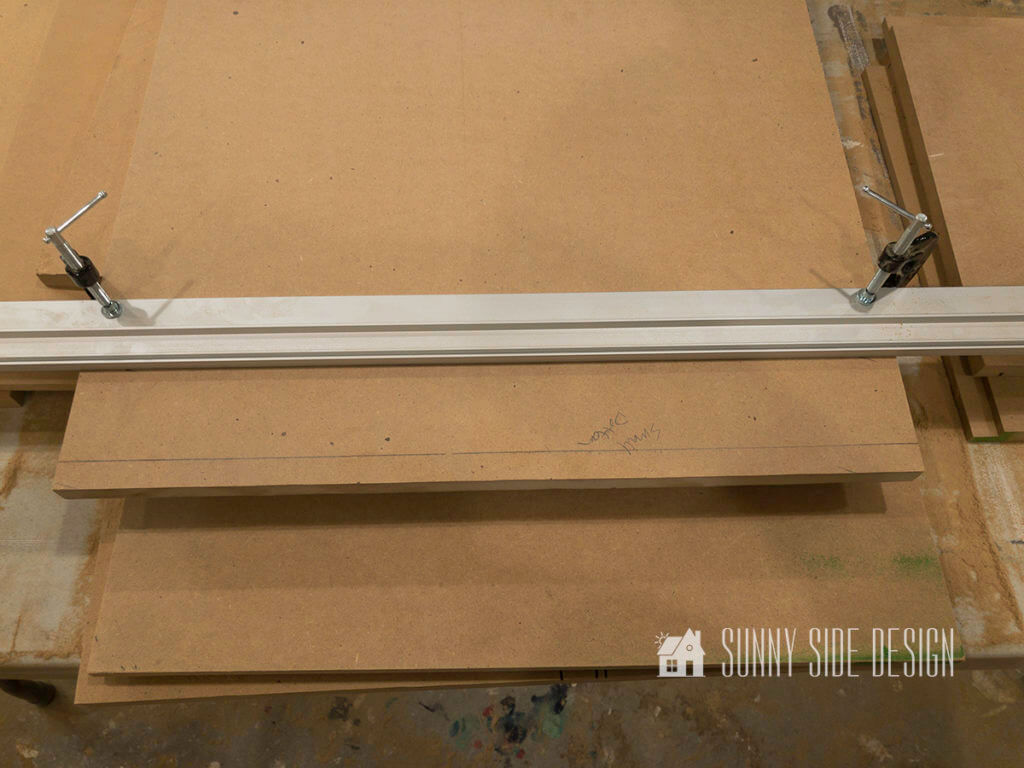
A dado is a groove cut into the wood.
They are used for interlocking applications.
Interlocking joints are common in making bookshelves, drawers, door panels and cabinets.
First, insert a 3/4″ straight cut bit into the router.
To make the dado cut with a router, determine the distance from the bit to the edge of the router.

For instance, our bit is 3 1/2″ from the edge of the router.
Then you’ll clamped the straight edge 3 1/2″ from the line where you want to make the cut.

This is what the dado groove looks like for the shelf in the cabinet.
For this cabinet box we cut a dado cut on each side piece for the shelf.
Then cut a dado on each side of the bottom board of the cabinet.

Finally cut an 1/8″ dado, 3/4″ from the back edge of all three pieces for the cabinet box.
To make this dado without a specific dado blade for the saw, you’ll place the fence on the table saw 3/4″ from the blade.
Adjust the height of the blade on the table saw to 3/8″.
Then you’ll push the board through with the back edge of the board against the fence.
Make all the cuts you need to make with the fence in this position.
Then adjust the fence a blade width, making the fence about 13/16″ to the blade.
This will give you an 1/8″ groove along the back edge of the bottom and sides.
Enjoying this post?!
Pin it and save it for later. And share it with your friends.
Sharing is caring!
Assemble Cabinet Box
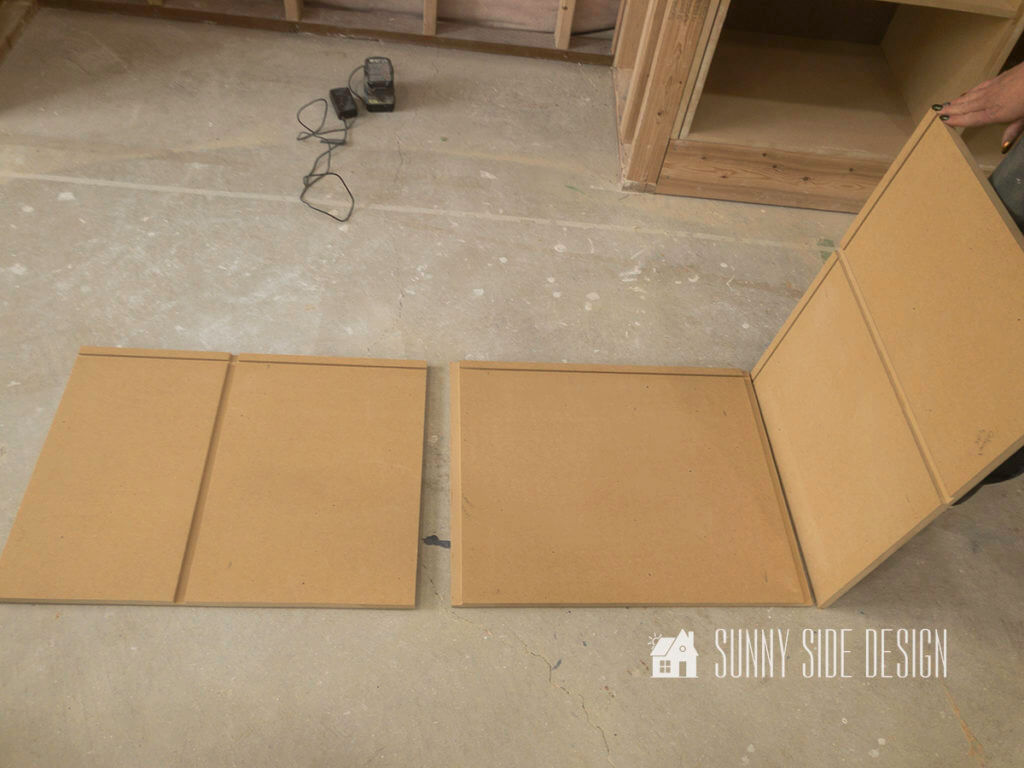
This is what the 3 pieces will look like when making a cabinet after all of the dado cuts are made.
You can see the 1/8″ groove along the back of each piece, the groove for the shelf on the 2 sides and the groove on each side of the bottom piece.

The side pieces will fit into the grooves along the bottom board on each side.
First you’ll apply wood glue along the 2 grooves on the bottom board.

Then place the side piece in the groove.
In addition, make sure the cabinet box is square by placing a framing square inside the box as you place 2″ brads through the bottom board up into the side piece.

Next place wood glue in the grooves on the side pieces for the shelf.
Then place the shelf board into the groove.
I don’t think I mentioned this, when cutting the boards for the cabinet.
But, the shelf board will be cut 13/16″ smaller than the depth of the cabinet, so that it will sit inside the back panel of the cabinet.

We also found it helpful to mark on the outside of the cabinet the center of where the shelf is placed.
This will give you a straight line for placing brads through the side into the shelf.

[mailerlite_form form_id=2]
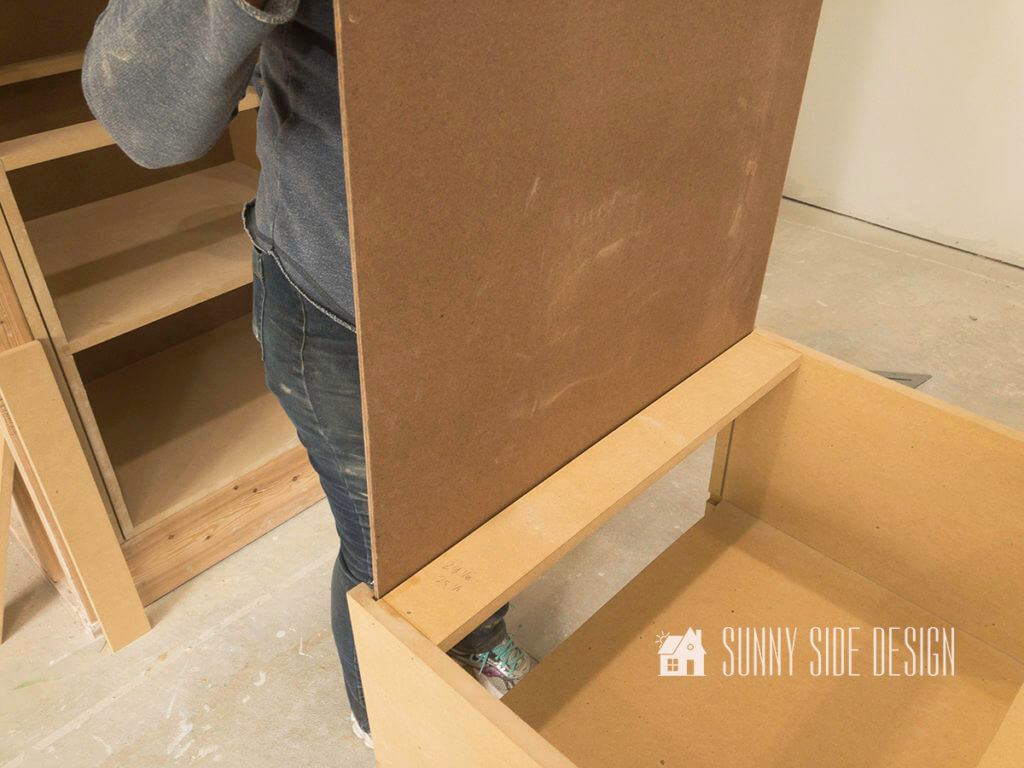
Add Brace Supports

Finally we need to place a couple of support braces at the top of the cabinet.
Using the 4″ wide boards, cut 4 pieces the exact measurement of the inside of your cabinet box.
Then attach 2 of the boards to the top with wood glue and brads.
The first one will be flush with the front of the cabinet and the second board will be flush with the 1/8″ groove cut in the back of the cabinet.
Then you’ll cut a piece of hardboard tempered panel to fit inside the groove in the back of the cabinet and slide into position.

Now we’re ready to add the back support pieces.
Apply wood glue to each side and place them against the back panel.
One will be mounted against the bottom board and the second flush with the top of the cabinet.

This is what the finished cabinet box looks like from the back.
These braces are also known as the nailer pieces.
Then the boards will be used to actually secure the cabinet to the wall.

And this is the finished cabinet box from the front.
Build a Toe Kick
Clearly, a toe kick spaces is an important element for base cabinets.
In fact, any cabinet that you would stand in front of should have one.
The purpose of a toe kick is to create a recess for your feet, which allows you to stand closer to the countertop or workspace more comfortably.

You’ll see on our built in entertainment center, our cabinets are mounted on a base, but it’s not a true toe kick, because it’s not recessed.
A kick plate should be between 3 1/2″ to 4″ in height.
It can be constructed from scrap plywood ripped down to your desired height.
While a kick plate can be designed into the cabinet itself.
We like the idea of a separate kick plate.
That way you can shim and level the kick plate first, and then you can easily install your cabinet right on top.
Cut your lumber to fit your cabinet base and miter any corners that will be exposed.
Use a Kreg jig to make pocket holes in your boards and assemble with wood glue and screws.
Then you won’t see any screws.
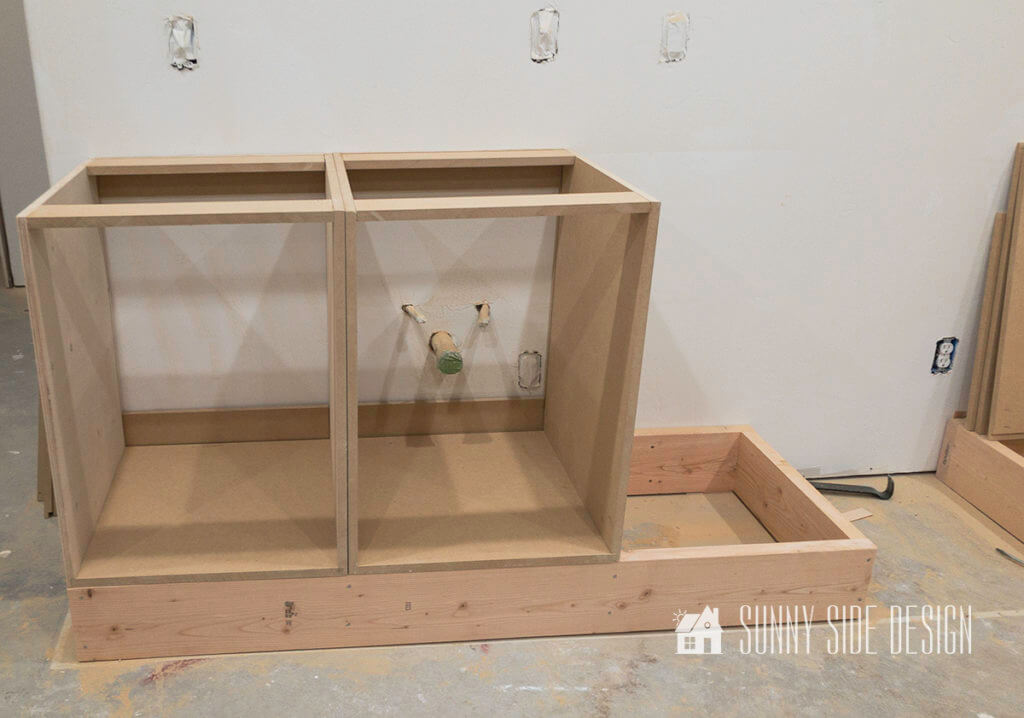
You can see that our toe kick area is built differently.
We had a little miscommunication with this step.
My husband thought I wanted it built the same as the entertainment center.
So, ours is made with 2×6″ lumber because of this.
However, we still needed it recessed, so some adjustments had to be made.
I did want to run our baseboard in front of the cabinets to cover the edge of the laminate flooring.
So our kick plate is now a finished wood at this time.
But if you are doing something similar, you can construct the toe kick with the plywood and run a 1/4 round around the base of the cabinets.

Make a Cabinet Face Frame

Next you’ll need to make a face frame for the cabinet box.
Our face frame is constructed from poplar lumber since we are painting our cabinets.
Rip the poplar to 1 5/8″ wide.
Cut 2 pieces to the height of your cabinet box.
Secure them to the cabinet box with clamps, flush with the outside edge.
Measure the length for the horizontal face frame pieces.
You’ll need to cut 2 for a cabinet box with doors.
However if you are making a cabinet box for drawers, you’ll also need a piece cut to go in between each drawer.
Let’s stay connected! Follow us on social media!

Then, the face frame is assembled with pocket screws.

Place a horizontal board in the Kreg jig and drill 2 pocket holes in each side.

Lay out the pieces for the face frame on a workbench.
To assemble the pieces you need wood glue, coarse thread wood screws and an extension for the driver bit in the drill.
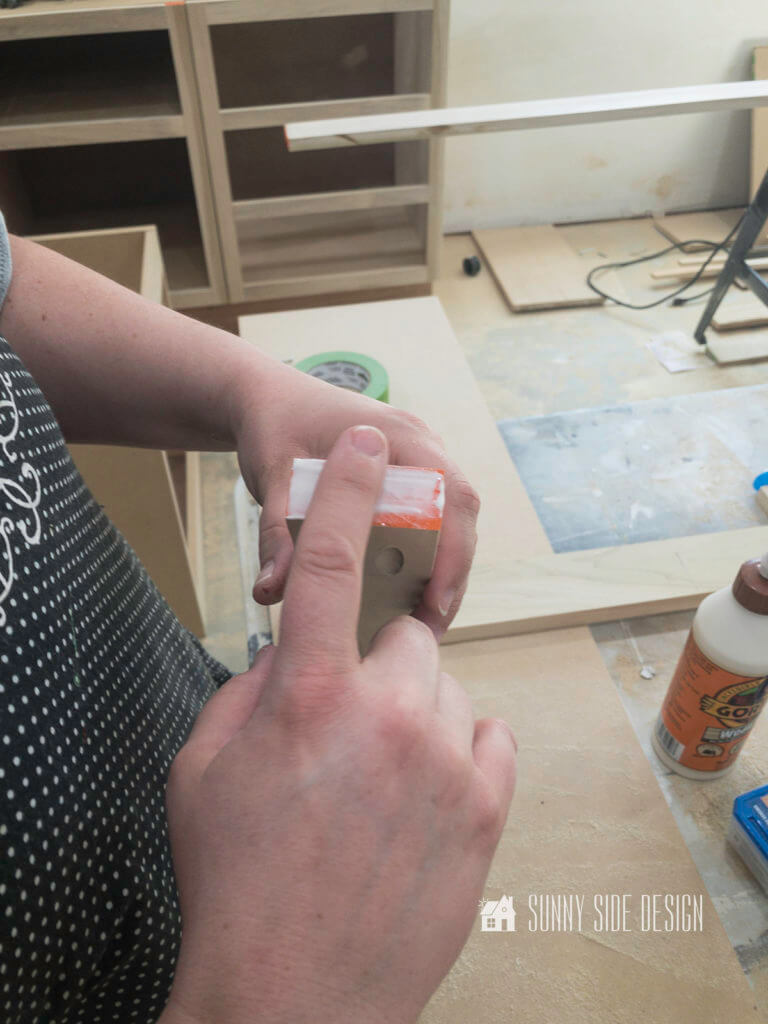
First place wood glue on each end of the horizontal board.

Then clamp the joint together.

And insert the coarse wood screw into the pocket hole.
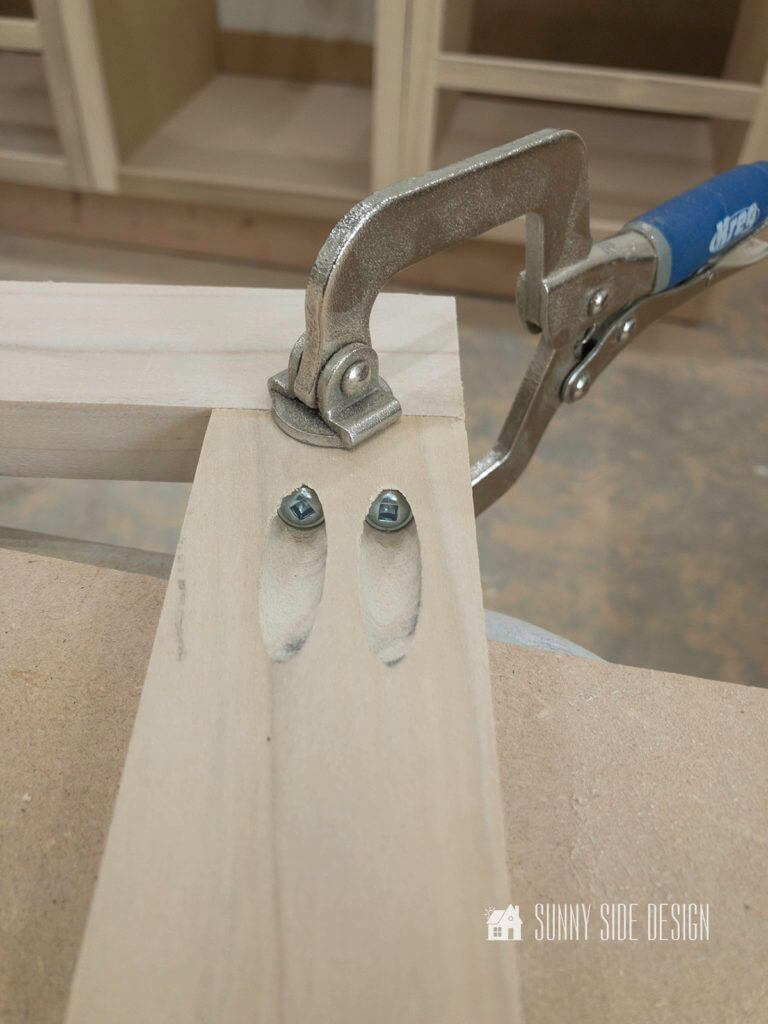
Then repeat with each pocket hole.

Here’s a look at the backside of the face frame all assembled, placed on top of the cabinet box.
Attach Face Frame to Cabinet
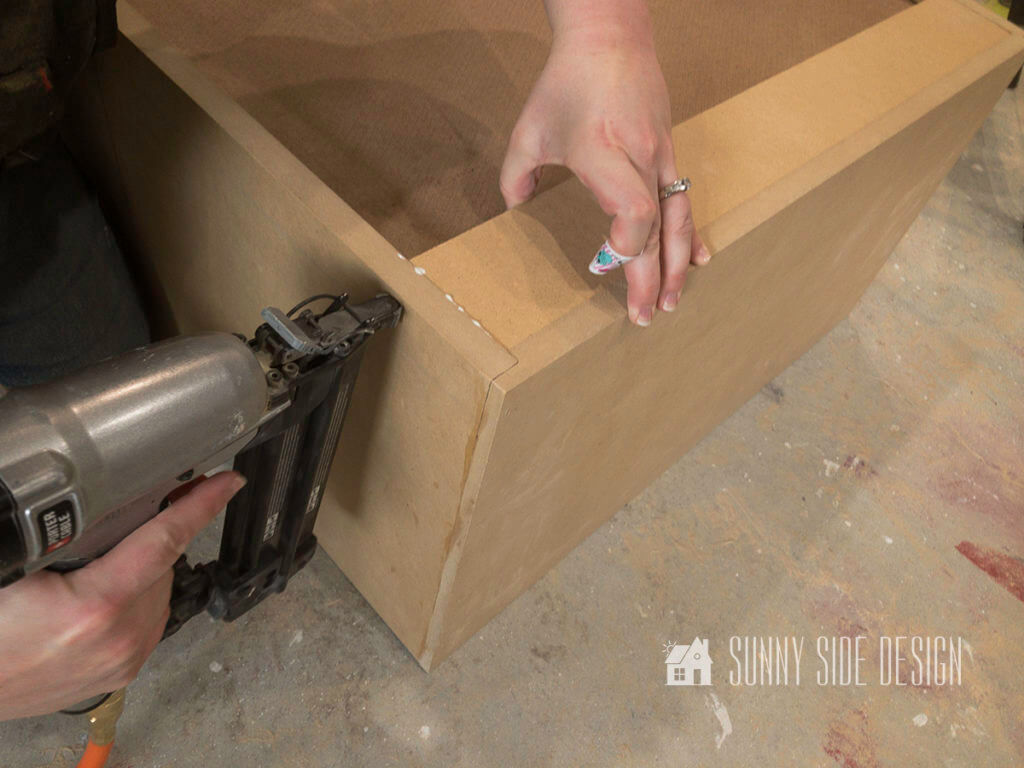
Once all of the face frames are built, you are ready to attach them to the cabinet boxes.
First we ran a bead of wood glue around the cabinet box and then placed a few brads through the face frame, securing it to the cabinet box.
You’ll then want to fill in all of the nail holes with wood putty and sand until smooth.
You can see in this photo that the toe kick area has been adjusted and is now recessed under the cabinet box.
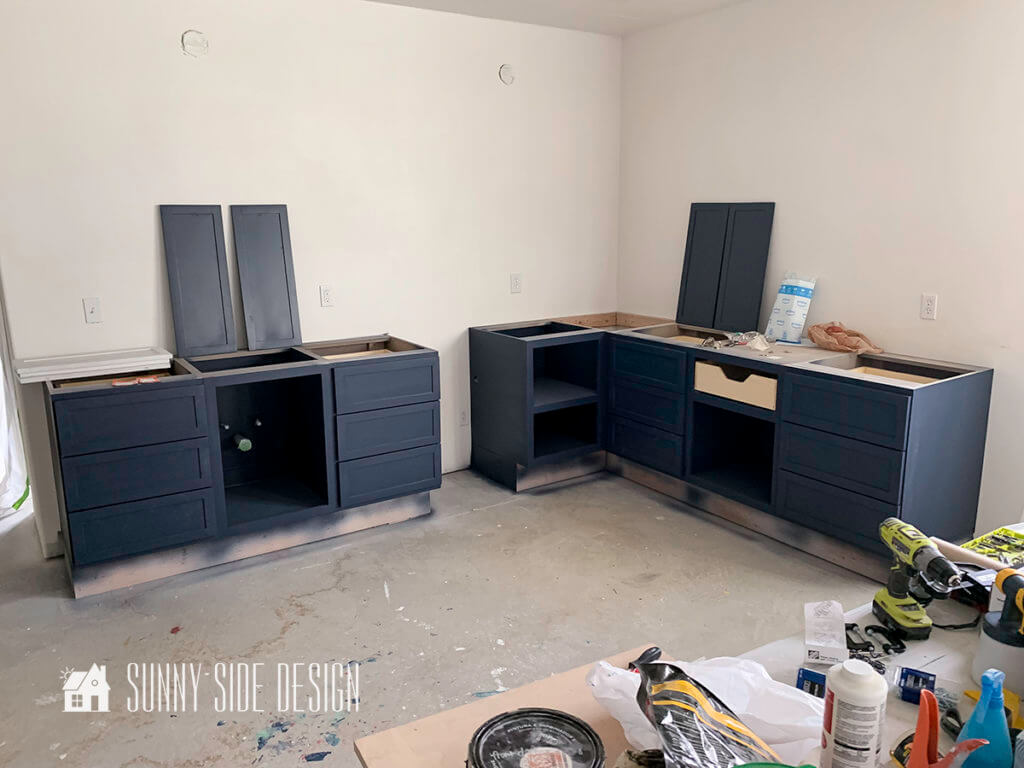
Primer and Paint

Priming and painting the cabinets is certainly made easier with our Wagner Flexio 5000 paint sprayer.
First we applied 2 coats of primer, sanding between coats.

Finally we applied 2 coats of our paint.
Of course we had our Hale Navy color mixed in our favorite Behr cabinet paint.
In my view, this paint is extremely durable, it self levels and is easy on the budget.
Don’t you think the progress is exciting!
In upcoming posts we will share with you how to build a drawer, drawer fronts and cabinet doors.
Next week we are so excited to share with you how we made our own countertops.
You don’t want to miss this!
They are gorgeous!
In addition, make sure you are signed up to receive our FREE newsletter, so you don’t miss any projects in our ultimate family hangout room.
Enjoying this post?!
Please pin it and save it for later. Share it with your friends too!
Sharing is caring!
Check Out the Progress in the Kitchenette
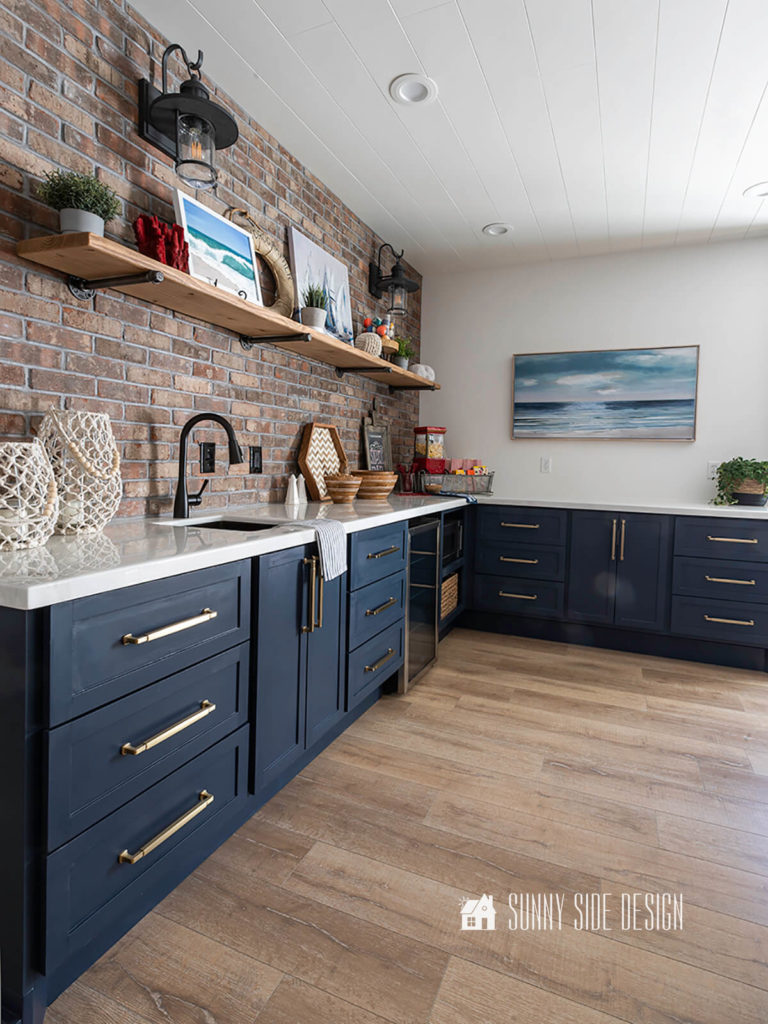
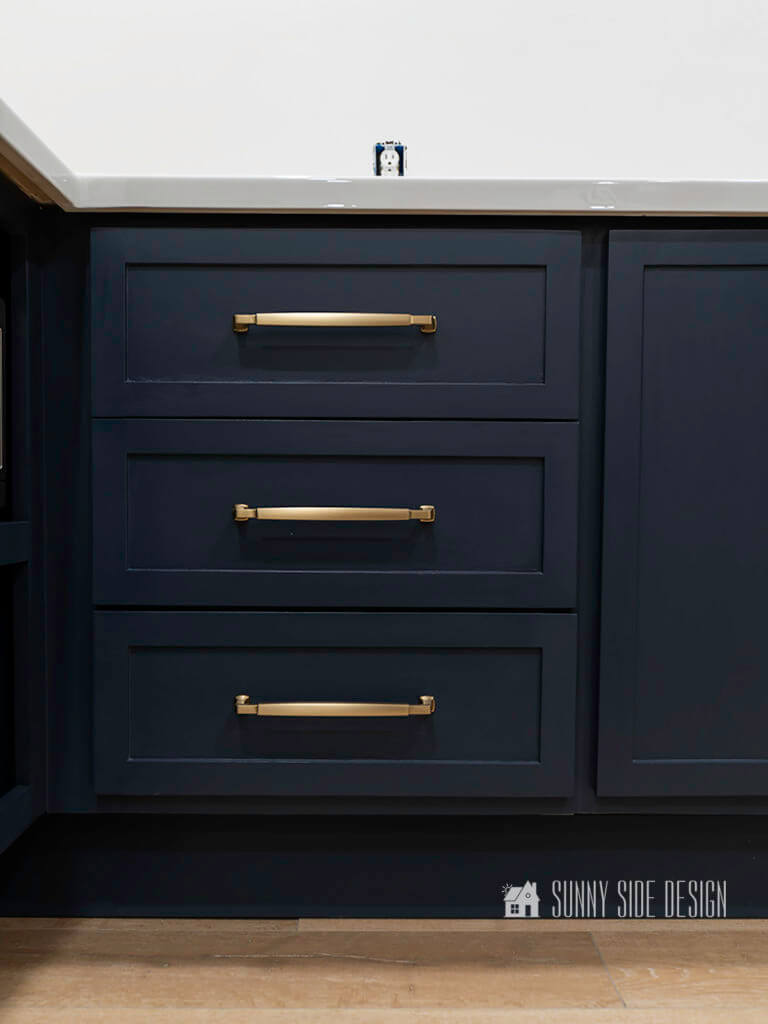
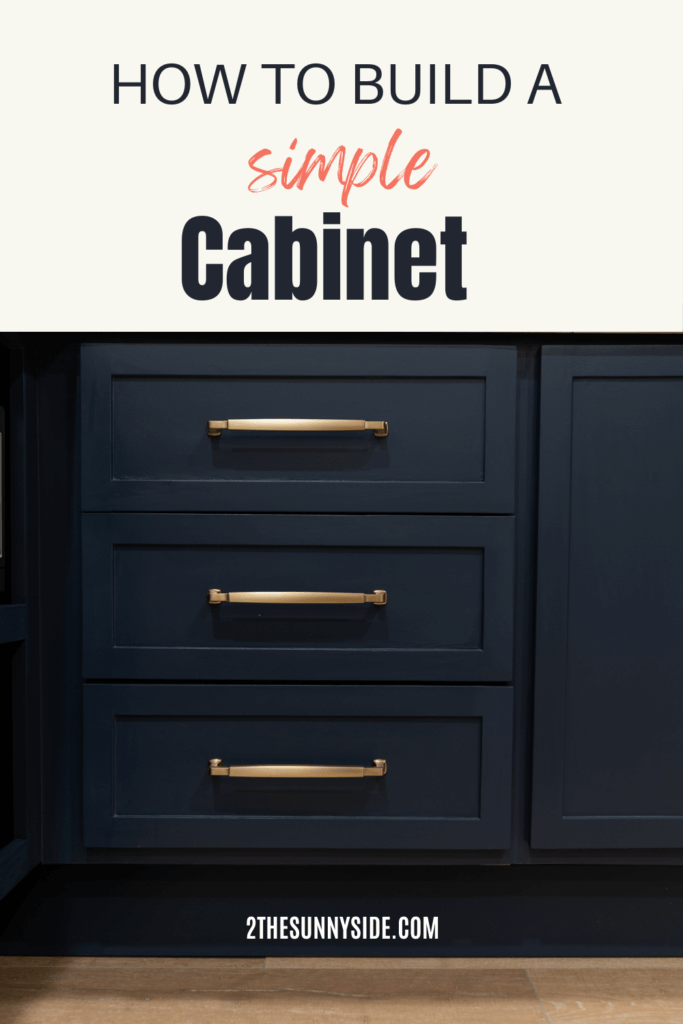
Finally, we installed this beautiful hardware from Amerock.
To match the entertainment center hardware, I chose the Stature pull in champagne bronze.
Personally, I think this hardware looks amazing against my navy cabinets and I love the quality!

Now we still have a bit of work to finish the kitchenette.
Not only do we need to install the baseboard around the kitchenette, but also the cabinet doors needed a little touching up with paint.
And we still need to install the hardware on the cabinet doors.
We hope you found a little inspiration here today.
Are you ready to try your hand and making a cabinet?
Remember to check back each week as we continue the One Room Challenge.
Each week we’ll share a new DIY project.
Next week we’ll share how to build a countertop.
You are going to want to see this!
It’s absolutely gorgeous!
What are your favorite elements in this room so far?
We’d love to hear from you!
Please share your thoughts and questions with us.
If you’re new here, WELCOME! We love having new readers and friends!
You can learn more about us here.
Let’s stay connected!
Subscribe to our free newsletter so you don’t miss any inspiration for your home.
Please PIN and save for later, and share with your friends!
Sharing helps grow our following!
Thanks for stopping by and as always here at Sunny Side Design…
WE HOPE TO BRING YOUR HOME TO THE SUNNY SIDE OF THE STREET.
Be sure to follow us on Pinterest for even more home decor and DIY ideas.
To see what we are working on before it’s on our blog, follow us on Instagram.
You will also find our video tutorials on our YouTube channel.


