Breathe new life into a worn or dated ottoman or chair, without ever picking up a needle and thread. This step-by-step guide will walk you through the no-sew upholstery process, offering tips and tricks to achieve professional-looking results.
Does upholstery work intimidate you? Wondering if you can do it yourself? We’ll show you how easy it can be to reupholster furniture. After you see this NO SEW upholstery before and after, you’re sure to get ideas that will have you transforming the furniture in your home!
Sunny Side Design is a participant in the Amazon Services LLC Associates Program, an affiliate advertising program designed to provide a means for sites to earn advertising fees by advertising and linking to Amazon.com. As an Amazon Associate, this blog earns from qualifying purchases with no additional cost to you. Click here to read our full disclosure policy.
Supplies and Tools Needed
Ready to get started? First lets go over the list of supplies you’ll need.
- Tack Puller
- Flat Head Screwdriver
- Needle-Nose Pliers
- Rubber Mallet
- Pneumatic Staple Gun OR Heavy Duty Staple Gun
- Sewing Scissors
- Hammer
- Hot Glue Gun
- Measuring Tape
- Permanent Marker
- Staple Setter
- Cording of your choice
- Fabric of your choice
- Batting
(Be sure to watch this ottoman transformation in our quick video tutorial below. Sometimes it’s a little easier seeing the visual in action, along with still pictures.)
Step 1: Removing Cording, Fabric & Staples
Here’s a look at the ottoman before we dug into it. My Mom picked it up years ago from the local classifieds with a matching chair.
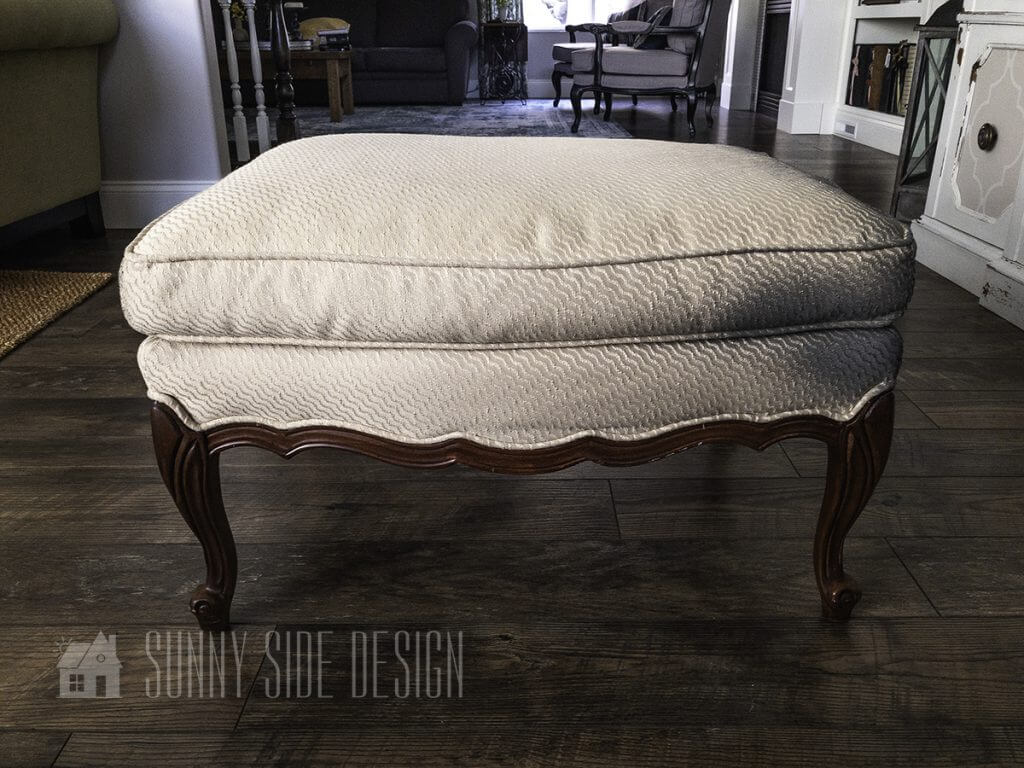
At one point she had the intention to paint them with chalk paint, which explains the darker coloring on the right edge.
Needless to say she didn’t like the way it was looking so it sat in the basement for years. That is until we embarked on the Inexpensive Master Bathroom Makeover!
She wanted a little stool or bench in this makeover. She’d looked on the local classifieds for something to refresh, but we ultimately ended up shopping in her own basement!
It’s amazing what you can find to re-purpose and refresh by shopping your own home!

Using a tack remover, insert the tip behind the cording and pry away from the ottoman.
Once you get a little bit removed, you can pull the rest off with your hands. It should come off fairly easy.

After all of the piping has been removed, use the tip of the tack puller, or a flat head screwdriver to pry each of the staples loose.

Then use a pair of needle-nose pliers to remove each of the staples.
Sometimes the staples may break when prying them loose. In that case it’s easiest to remove them by grabbing hold of the end of the staple, twisting the pliers a quarter turn and pull.
Are you enjoying this project? Please Pin It, save it for later and share it with a friend.
Sharing is caring!
Step 2: Secure New Batting


This step is optional, but we like to cover the existing piece of furniture with a new layer of thin batting.
If you’re new here, welcome! We’re so glad you’re here.
Let us introduce ourselves, we’re Michelle and Steph, a mom and daughter team who love to DIY and decorate our homes.
Not only are we passionate about making our homes warm, comfortable and unique, but it’s our mission to help you create that same feeling in your own home.
You’ll find ideas for repurposing, creating, decorating and making your home truly yours, while always mindful of a tight budget.
Undoubtedly we love finding ways to make your home look high-end on a small budget.
Plus you’ll also find a recipe or two as we share our family favorites with you.
We’d love it if you’d join our community of doers so you won’t miss any inspiration for your home.
We love new friends.

[mailerlite_form form_id=2]
Step 3: Measure For Fabric

Now we’re getting to the fun part, adding the fabric!
To determine how much fabric you’ll need, use the measuring tape and take measurements from side to side and front to back.
You’ll want to allow about 4-6 extra inches onto each measurement. This will give you plenty of fabric to work with.
You can see that the fabric hangs a couple of inches below the wood trim all the way around the ottoman.
If you’re working with a pattern that needs to be centered on the furniture like the stripes on the Farmhouse barstools, use the measuring tape and mark the middle on the foam with a permanent marker. Now you’ll easily be able to get your pattern centered.)
4: Attach New Fabric

The piece of furniture you’re working with should have a groove where you removed all of the staples from.
This is where you’ll be securing the new fabric with staples.

Pulling the fabric tight insert 1 staple in the center of the piece of furniture. Then insert 1 on each side. At this point you will have 3 staples evenly spaced across the front of the furniture.
Be sure to insert the staples into the groove.
Repeat this process on the back side of the furniture and each of the sides. All four sides will have only the 3 evenly spaced staples at this point.

We’ve been doing upholstery work for years, and have achieved great results using a heavy duty staple gun. This particular piece of furniture however had a narrower and slightly deeper groove which was making it difficult to insert new staples.
We ended up getting a pneumatic staple gun that was small enough to fit inside the groove. It was awesome! After giving this new tool a whirl, I’d use it over the heavy duty staple gun any day! It just made the job so much easier and quicker!
But like I said, you’ll get great results using the heavy duty staple gun! This is a great option if you don’t have access to an air compressor or pneumatic staple gun.
Heavy duty staple guns are also less expensive, so there’s that plus!
(If you’re having a hard time getting the staples inserted all the way into the wood you can use a staple setter tool and hammer or rubber mallet to tap them into the wood all the way. We did this for a while on this piece before we purchased the pneumatic staple gun.)

After each of the four sides have a couple of staples holding the fabric into place, you’ll then start inserting staples across the entire piece, one right next to the other.
Do this on all four sides, leaving about an inch or two of fabric without staples as you get to the corners.
Neat Corners


Finally, secure the corners. Somehow we 🤪inadvertently missed taking photos or video of the actual corners of the ottoman. So, we are showing the corners on the matching chair, using the same fabric and technique. It has the same leg, shape and groove to attached the fabric in.
It may seem intimidating to finish off the corners. There are multiple ways to secure corners and have them look professional.
For this project, the faux fur fabric is pretty forgiving. First we placed a finger right in the middle of the groove above the leg, and inserted a staple.
Then we folded the fabric from the left toward the center making a pleat and secured it with a staple.


Create a 2nd pleat, by pulling the fabric from the right toward the center, place a staple and secure it. Then add several staples across the entire grooved area to secure into place.
This fabric is a bit thicker than a typical upholstery weight fabric. We ended up placing staples below the pleated areas as well as on top to ensure everything was secured well.

Here’s the finished pleated corner. As I mentioned earlier it’s kind of hard to see the pleats due to the fabric choice we used. But it is very forgiving fabric, which pretty much means you don’t need to worry about it being perfect! As long as all of the fabric around the corner is secured well, it will be great!

Once the corners have been secured with staples, take the sewing scissors and trim away all the excess fabric.
Try to get as close to the staples as you can. You don’t want any excess fabric below the groove where you’ve secured it.
Let’s stay connected! Follow us on social media!
Step 5: Attach Cording

We’re in the home stretch now! The last thing you’ll do is attach the new piping.
Place some hot glue on the edge of the piping to prevent from fraying.

Beginning on the backside of the furniture in one corner secure the edge of the piping down with a hot glue gun.
You can use a craft stick to hold it into place while the glue cools a little, to avoid burning yourself.

Continue to glue the piping over the grooved area all the way around the furniture.

Hold the piping to meet the edge of where is was initially begun and trim with scissors.

Then add hot glue to the end of the cut piping to prevent it from fraying and secure the remaining piping into place over the groove.
Reveal No Sew Upholstery Ottoman

So, what do you think?
Is this something you think you can try for yourself?
You can see another upholstery tutorial we did that was featured on hometalkTV!
Or you can check out the blog post with step by step directions and pictures here.
For another quick and easy upholstery project check out this ottoman makeover.
Does the thought of sewing a box cushion intimidate you?
Then checkout our post How to Make a Simple Box Cushion with Piping and a Zipper.
Thanks for spending some time with us today! We hope you enjoyed this tutorial and are a little less intimidated to try reupholstering a piece of furniture yourself!
Do you have any great thrift finds you want to tackle now?
Maybe you even have something waiting for a little refresh in your basement like we did?
Let us know what you plan to work on, we’d love to hear from you.
We hope you found some inspiration for your home today.
Please share your tips and ideas with us.
We love hearing from you!
If you’re new here, WELCOME! We love having new readers and friends!
You can learn more about us here.
Let’s stay connected! Join our DIY community of doers and you won’t miss the weekly updates and more inspiration for you always on a budget.
Sharing is caring!

Thanks for stopping by Sunny Side Design. Empowering you to create a home you love!
DISCLAIMER
This blog’s content is for entertainment purposes only and is not professional advice. By reading this blog and attempting to recreate a project, you assume all responsibility for any injuries or damages incurred. Read my full disclaimer here.
PHOTO USE AND CONTENT SHARING
All of the photographs you see here are the property of Sunny Side Design unless otherwise credited.
We love for others to share our work, so please feel free to use one photo with a link back to our website.
Pinning and sharing is always encouraged!
Please do not reproduce other Sunny Side Design content without permission.
Retailers We Love
- Anthropologie
- Birch Lane
- Crate & Barrel
- Joss and Main
- Lampsplus
- Mark & Graham
- One Kings Lane
- Pottery Barn
- Rejuvenation
- Serena & Lily
- Wayfair
- West Elm
- Williams Sonoma
- World Market
Be sure to follow us on Pinterest for even more home decor and DIY ideas.
To see what we are working on before it’s on our blog, follow us on Instagram.
You will also find our video tutorials on our YouTube channel.
- Paint an Old World Texture Finish on a Vase

- Easy Strawberry Chicken Salad with Lime Maple Balsamic Vinaigrette
- How to Fix Chipped Kitchen Cabinets with a Pen
- Easy 4th of July Door Decor You Can Make in Minutes