Do you find you’re drawn to old, chippy, vintage items? Maybe you love the worn character and are drawn to the history of the piece? For me, this is always the case! When I first laid eyes on these old, broken corbels I knew they were coming home with me! I didn’t have a specific need for them, or even have an idea of where I was going to use them, but I knew I’d use them somehow eventually! So today, I’m excited to show you how to restore vintage corbels and incorporate them into your modern-day home.
- How To Restore Vintage Corbels and Incorporate Them Into Your Modern-Day Home
- 1st Step To Restoring Vintage Corbels, Forming A Plan
- Labeling Vintage Corbel Parts
- Loosen Vintage Corbel Sections For Parts
- Cut Vintage Corbel Sections Apart Using A Hack Saw
- Repair Any Broken Pieces To Be Salvaged
- Rebuilding The Vintage Corbels
- Installing The Fireplace Surround
- How To Install The Vintage Corbels
- The Restored Vintage Corbels
Sunny Side Design is a participant in the Amazon Services LLC Associates Program, an affiliate advertising program designed to provide a means for sites to earn advertising fees by advertising and linking to Amazon.com. As an Amazon Associate, this blog earns from qualifying purchases with no additional cost to you. Click here to read our full disclosure policy.
How To Restore Vintage Corbels and Incorporate Them Into Your Modern-Day Home
(You may also like to watch our 👆 quick video tutorial to see these vintage corbels come back to their former glory, with step by step directions.)
1st Step To Restoring Vintage Corbels, Forming A Plan
Now, corbels can be used in so many different ways, and we’ll give you a list of 20+ ideas at the end of the post, but today, you’ll see how we’ve incorporated them into our fireplace design.
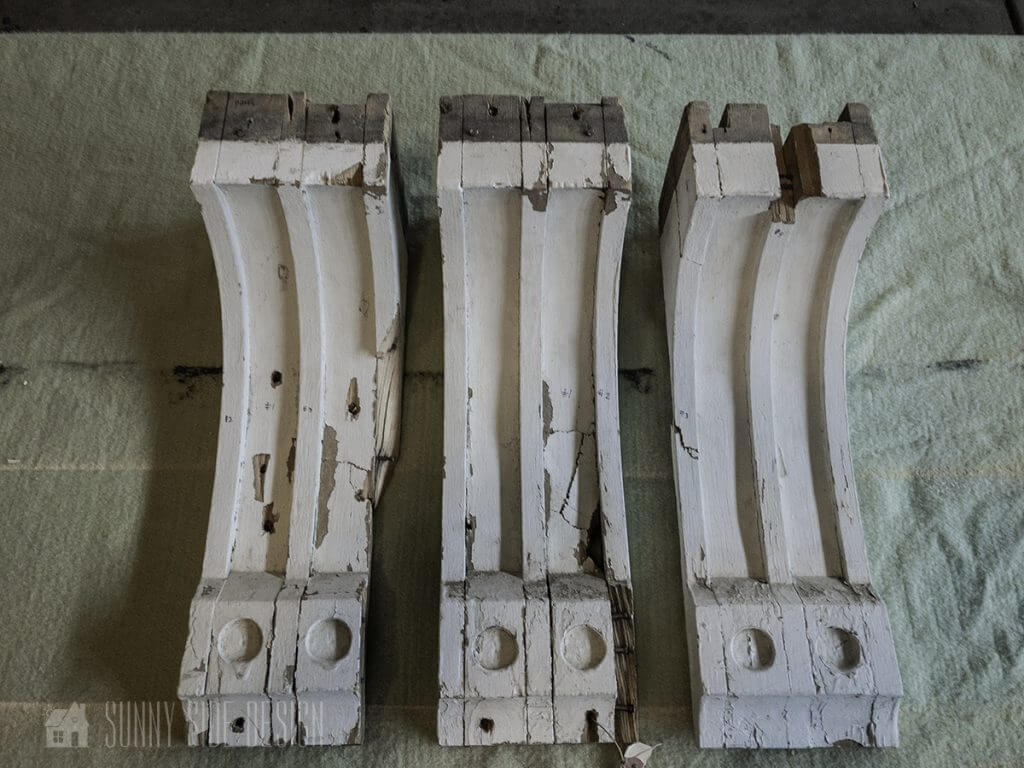
To start, we had 3 vintage corbels I snagged from a vintage market years ago. Again I wasn’t really sure where I was going to use them when I initially purchased them.
I was drawn to the simplistic carpentry, the old chippy wood, the natural wear and tear. Upon purchasing them, I learned they came from an old home in Logan, Utah which was over 100 years old!
(If only I had a picture of this old home in it’s days of glory! Oh well, I can picture it in my mind.)

For the use in our fireplace design, we only needed 2 corbels. Which actually turned out to be a good thing! We basically used the third vintage corbel for parts to repair the other two!
Labeling Vintage Corbel Parts
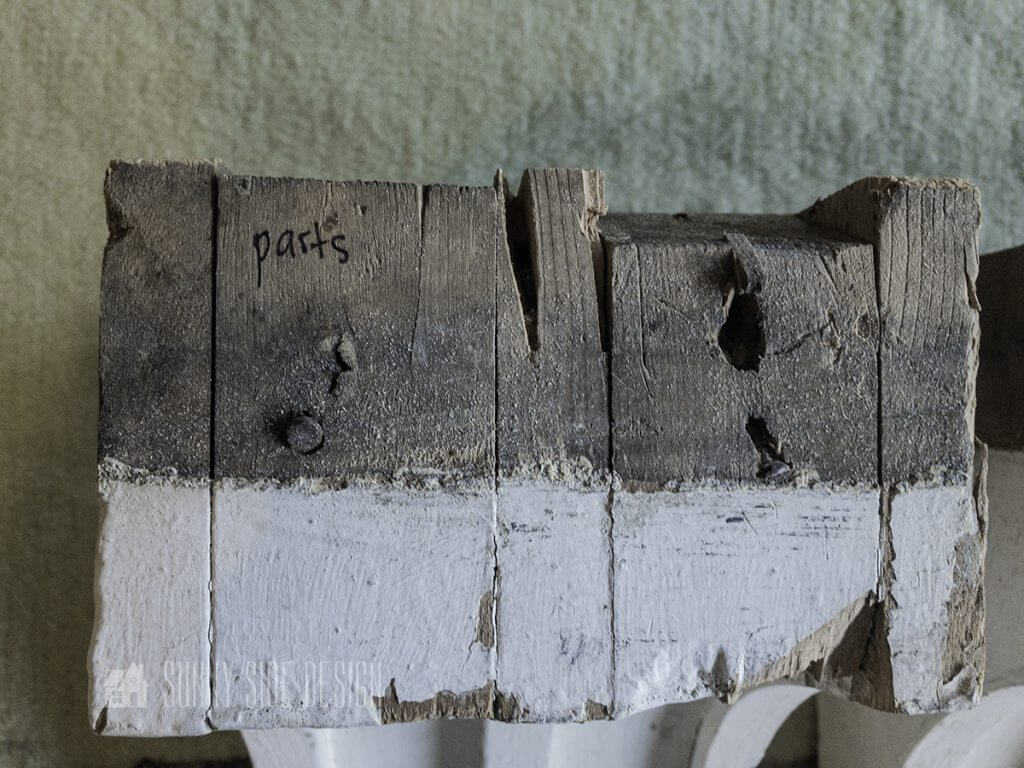
After determining which corbel was in the worst condition, I labeled it “parts” so I knew which one I was going to be tearing into for replacement parts.
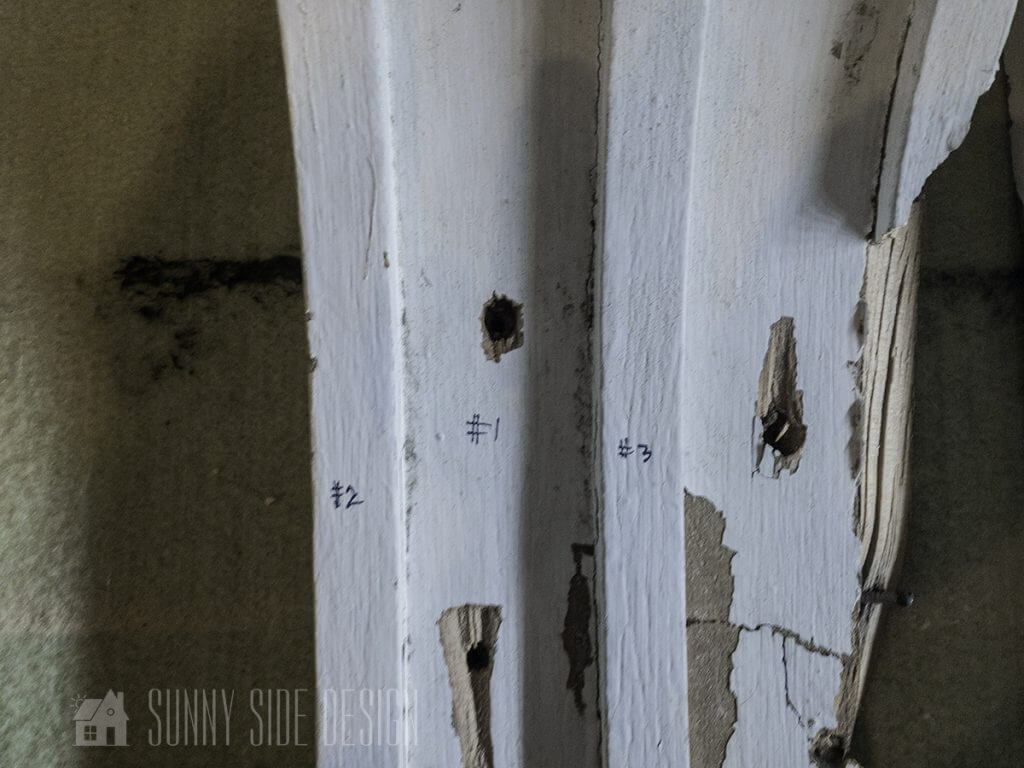
Then I labeled each section I was planning to use from the vintage corbel labeled “parts”. I placed numbers on each section I needed to salvage.
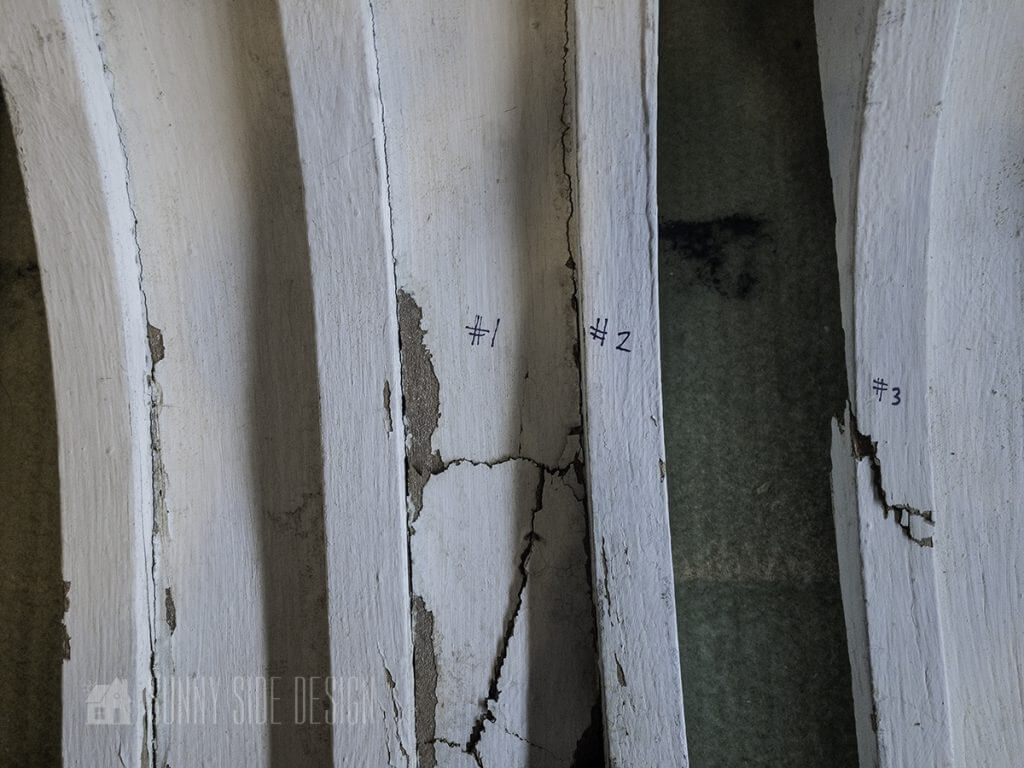
The same numbers were then written on the corresponding sections of wood to be replaced on the other two vintage corbels.
Are you enjoying this project? Please Pin It, save it for later and share it with a friend.
Sharing is caring!
Loosen Vintage Corbel Sections For Parts

Once everything has properly been labeled and you know which pieces of wood you need to salvage, the vintage corbel can be taken apart.
Now, upon first glance of a corbel you’d think it was one solid piece of wood right? I sure did! That is until I started digging into these vintage corbels and looking for ways to salvage them.
You can see in the image above that the vintage corbel is actually made from several different pieces of wood that have been attached together.
In this case because our corbels are so old, they have been secured with long nails throughout the entire corbel.
First we used a heavy duty pry bar and gently hammered it into each of the different joints to loosen the pieces of wood.
If you’re new here, welcome! We’re so glad you’re here.
Let us introduce ourselves, we’re Michelle and Steph, a mom and daughter team who love to DIY and decorate our homes.
Not only are we passionate about making our homes warm, comfortable and unique, but it’s our mission to help you create that same feeling in your own home.
You’ll find ideas for repurposing, creating, decorating and making your home truly yours, while always mindful of a tight budget.
Undoubtedly we love finding ways to make your home look high-end on a small budget.
Plus you’ll also find a recipe or two as we share our family favorites with you.
We’d love it if you’d join our community of doers so you won’t miss any inspiration for your home.
We love new friends.

[mailerlite_form form_id=2]
Cut Vintage Corbel Sections Apart Using A Hack Saw

Again, these vintage corbels were assembled using long nails throughout each section! After loosening up each section with the pry bar, we used a hack saw to cut through the nails.
Once each section has been removed you’ll be able to see just how many nails were holding these vintage corbels together!
Each of the nails will then need to be removed. For the most part, we used the nail remover tool on the end of the pry bar to pull them out.
Others were a little more stubborn and we had to use needle-nose pliers to twist and pull them out.
And then there were even some that were more difficult to remove. We used a hammer to set them into the wood, to give us a flat piece of wood to work with.
(You can see what I’m talking about here much better in the video! If you’re like me, I learn a lot better when I can see things in action!)

Once everything had been pulled apart and nails were removed, we laid each piece out in the order where we’d be using them for replacement parts.
This gave us a better visual of where each piece would be used, and gave me piece of mind that we really did have ALL of the parts we needed to put these amazing vintage corbels back together again!
Repair Any Broken Pieces To Be Salvaged

When prying wood apart whether old or new, it’s likely that a few pieces of wood will end up breaking.
In the image above you can see that we had to repair one of the sections that would be used in rebuilding the vintage corbels.
We used wood glue and then secured the two pieces together using 2″ brads and our pneumatic brad nailer.
Let’s stay connected! Follow us on social media!
Rebuilding The Vintage Corbels

After repairs have been made to specific sections of wood, you can begin to rebuild the vintage corbels.
(Again you can see a better visual of this in our video tutorial.)
Working on one section of the vintage corbel at a time, we applied a liberal amount of wood glue, held it into position and secured into place using 2″ brads and our pneumatic brad nailer.
Repeat this on all sections to be added to the finished corbel.
PRO TIP: Be sure to wipe off any excess glue with a damp rag while it it still wet to prevent globs of glue from hardening on your newly restored vintage corbels.

Here’s a little look at the two vintage corbels we were able to rebuild…and all that remained from the third corbel that we used for parts.
(You can see just how many pieces are broken, which gives you an idea of how old this wood is because it was falling apart in many spots.)
Installing The Fireplace Surround

If you’re joining us from the previous post in our fireplace series, How To Make A Faux Wood Beam Mantel, we spoke a little bit about installing the cleat to hang the mantel.
This same method was used to install the surround we made using MDF. (More on building the surround in next weeks post.)
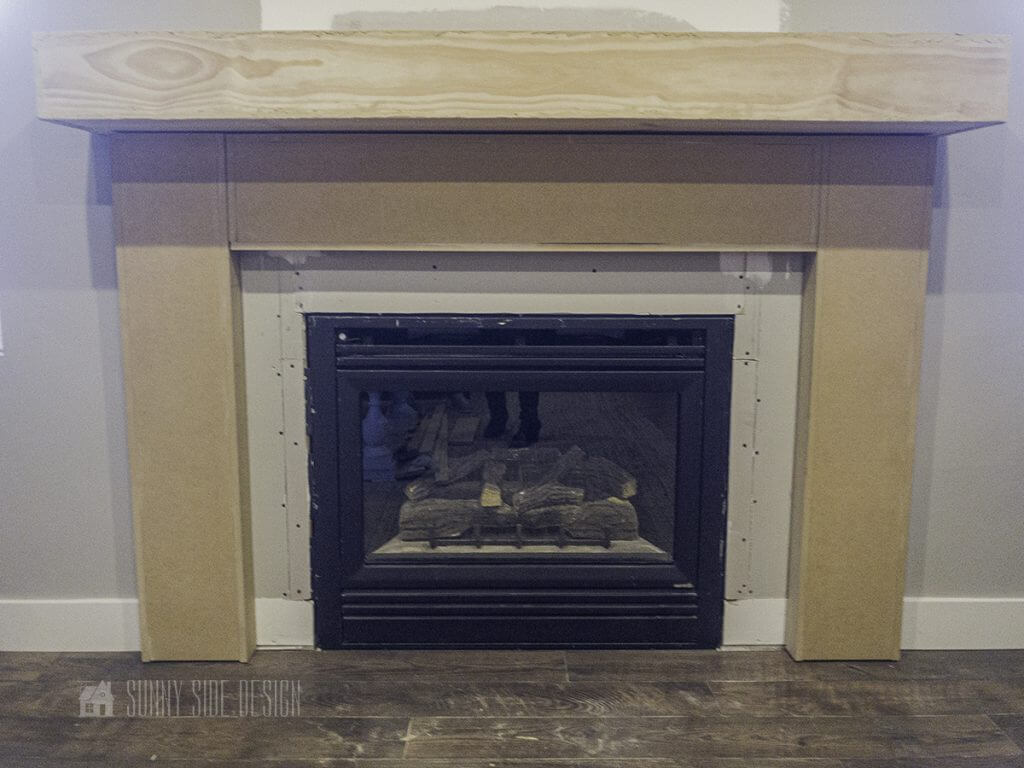
The mantel was installed first, then we were able to fit the MDF surround and snug it right up to the bottom of the mantel.
To secure the surround we used 2″ brads and our pneumatic brad nailer.
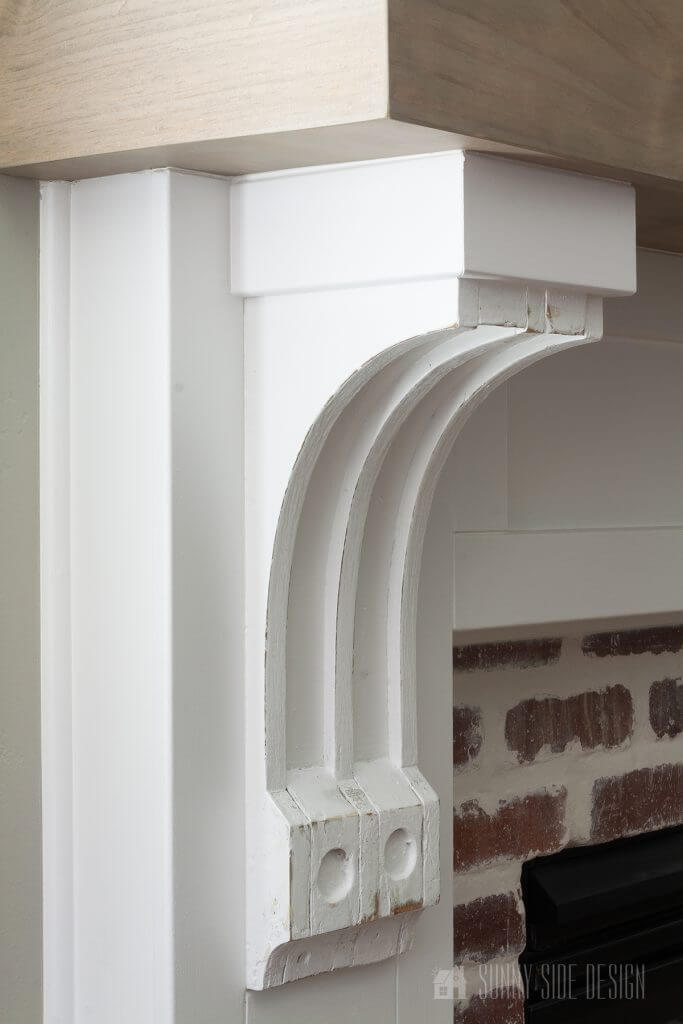
How To Install The Vintage Corbels
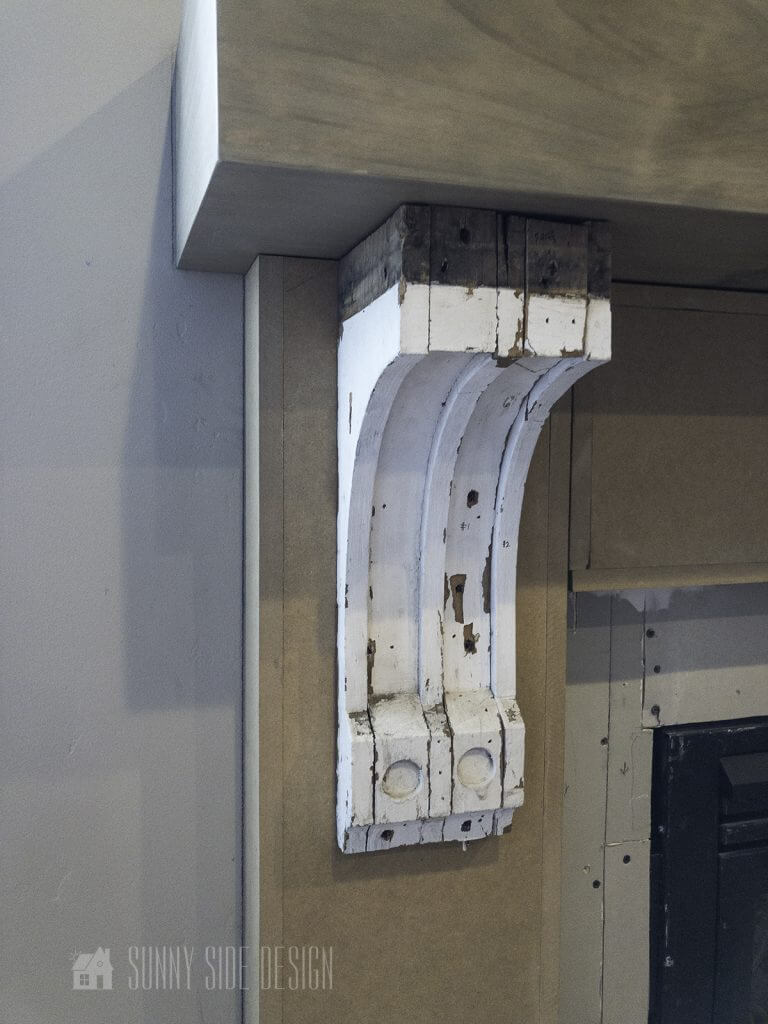
The vintage corbels are ready for installation now that the mantel and surround are secured into place.
NOTE: These corbels are purely ornamental in our fireplace design. They are not holding any weight of the mantel since we designed a “floating” mantel. Again you can see how we did this in the previous post.
To install the vintage corbels, we applied a liberal amount of wood glue to the back of each corbel, centered each on the sides of the surround and secured into place using 2″ brads and the pneumatic brad nailer.
Toward the bottom of the vintage corbels where the wood was a bit thinner we were able to drive the brads directly into the front of the corbel into the surround.
As it gets thicker toward the top of the corbels, we angled the brad nailer from the side and drove brads into the corbels and down into the surround.
Again because these vintage corbels are purely for aesthetics, the amount of wood glue and brads we used will keep these from going anywhere! These things are solid and sturdy!
The Restored Vintage Corbels
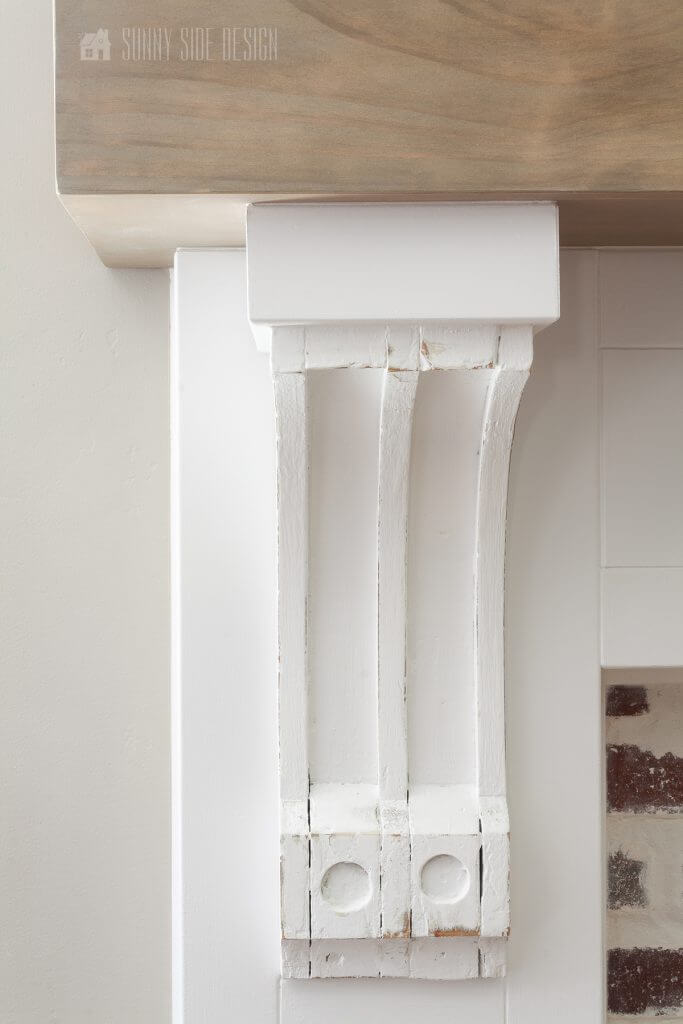
And here they are, all fixed up to their former glory! I’m SO happy with the way they turned out, and the old charm and character they add to our fireplace design!
(You can see how to install the decorative trim work, which adds even more architectural detail to this design here.)
After all of the trim work had been added, we finished off the restored vintage corbels by adding caulk to all of the seams, applying putty to fill in all the holes, and added a fresh coat of paint. Once dry, we took a fine grit sandpaper to distress the corbels just a little bit to bring out some of that old chippy paint look!


If you’ve missed either of these previous posts from our fireplace series click on each image to take you to the corresponding post.
We hope you found some inspiration for your home today.
Please share your tips and ideas with us.
We love hearing from you!
If you’re new here, WELCOME! We love having new readers and friends!
You can learn more about us here.
Let’s stay connected! Join our DIY community of doers and you won’t miss the weekly updates and more inspiration for you always on a budget.
Sharing is caring!

Thanks for stopping by Sunny Side Design. Empowering you to create a home you love!
DISCLAIMER
This blog’s content is for entertainment purposes only and is not professional advice. By reading this blog and attempting to recreate a project, you assume all responsibility for any injuries or damages incurred. Read my full disclaimer here.
PHOTO USE AND CONTENT SHARING
All of the photographs you see here are the property of Sunny Side Design unless otherwise credited.
We love for others to share our work, so please feel free to use one photo with a link back to our website.
Pinning and sharing is always encouraged!
Please do not reproduce other Sunny Side Design content without permission.
Retailers We Love
- Anthropologie
- Birch Lane
- Crate & Barrel
- Joss and Main
- Lampsplus
- Mark & Graham
- One Kings Lane
- Pottery Barn
- Rejuvenation
- Serena & Lily
- Wayfair
- West Elm
- Williams Sonoma
- World Market
Be sure to follow us on Pinterest for even more home decor and DIY ideas.
To see what we are working on before it’s on our blog, follow us on Instagram.
You will also find our video tutorials on our YouTube channel.
- Fourth of July Decorating Ideas You’ll Love This Summer

- Simple and Creative Planter Container Ideas from Thrifted Finds
- 25 Must See Simple and Creative Reading Nook Ideas
- How to Make Peonies Last Longer with 7 Simple Tricks