How clever are these DIY reversible holiday signs?! I wish we could take credit for the creativity behind this clever idea. Nonetheless others beat us to the punch, but that’s ok. We want to show you how easy it is to make your own DIY reversible holiday signs!
Not only do you get two pieces of home decor out of one sign, but this also helps eliminate the need to find more storage space for all of the home decor! I think everything should be reversible 😂 it’s budget-friendly and takes up less space! Win Win.
Sunny Side Design is a participant in the Amazon Services LLC Associates Program, an affiliate advertising program designed to provide a means for sites to earn advertising fees by advertising and linking to Amazon.com. As an Amazon Associate, this blog earns from qualifying purchases with no additional cost to you. Click here to read our full disclosure policy.
Building the base of the reversible signs
If this method looks too intimidating or you don’t have access to these tools, you can always find something similar that’s already made at your local craft store. Michaels or Hobby Lobby would be great places to check.
This is an affiliate link for your convenience, we earn from qualifying purchases. Please see our disclosure here for details.


It’s another cold and snowy spring day … time to stay inside and craft. What do you like to do when it’s cold outside? Craft we hope! Today we would like to share how we made these fun DIY reversible holiday signs. One side is for St. Patrick’s Day the other side for Easter.
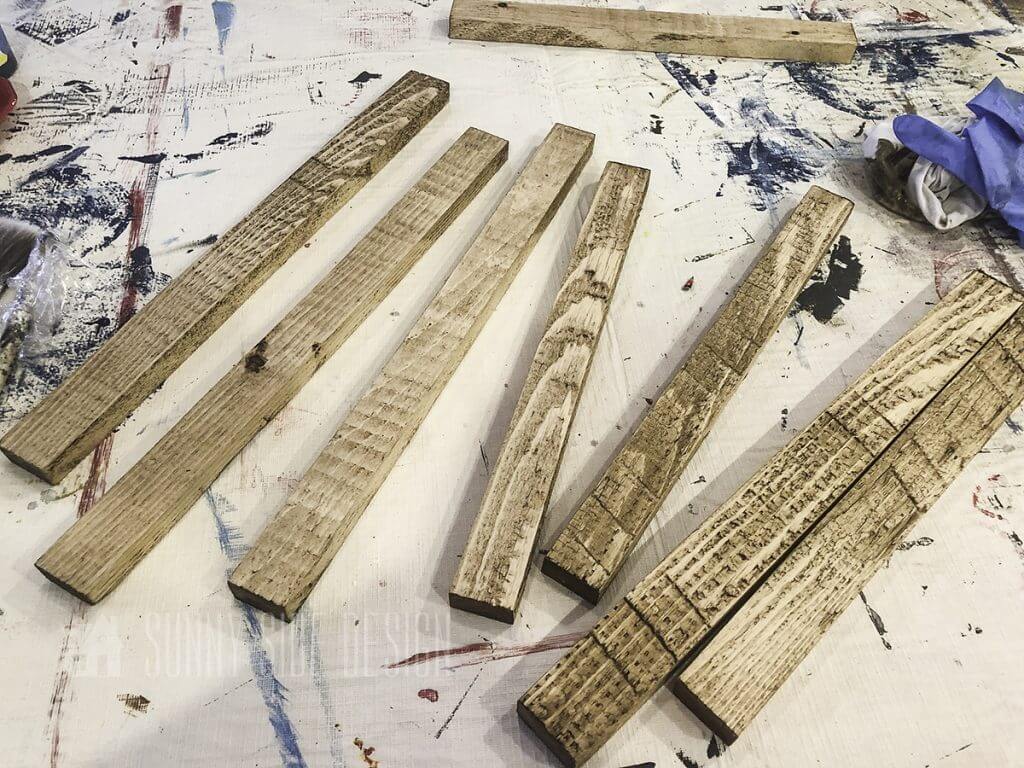
For the base of this craft we used some scrap wood we had left over from another project. In addition, we purchased a 1 X 4 pine board to make the frame.
Let’s get started. First we began by cutting the scrap wood to size. Ours is 14” X 14”, this seemed to be a good size for our wooden circle and egg shape we purchased at the craft store.

We wanted this to look like planks of wood, so to mimic that look we cut 1/8” grooves in the wood. We did this by setting the blade depth to 1/8″.

We made an 1/8″ groove every 3 1/2” on both sides of the piece of wood.


Once all the grooves are cut on one side, flip it over to make grooves on the other side as well.
Are you enjoying this project? Please Pin It, save it for later and share it with a friend.
Sharing is caring!

We applied a coat of paint, and used the same color on both sides. It would also be fun to have one side stained and the other side painted. The choice is yours.
Building the frame for the reversible holiday signs

To create the frame around the plank board, we purchased a 1 X 4 which is actually 3 1/2” wide. We trimmed off 1/4” from each side, so it would have a sharp square edge. Then we ripped the board in half. So each piece was 1 1/2” wide. Cut these to length to fit the plank board.

Once all the frame pieces were cut we applied a dark wax. A stain would also work well for this.


Center each frame board one at a time on the plank board. Nail in place. We used a pneumatic nail gun for this.
If you’re new here, welcome! We’re so glad you’re here.
Let us introduce ourselves, we’re Michelle and Steph, a mom and daughter team who love to DIY and decorate our homes.
Not only are we passionate about making our homes warm, comfortable and unique, but it’s our mission to help you create that same feeling in your own home.
You’ll find ideas for repurposing, creating, decorating and making your home truly yours, while always mindful of a tight budget.
Undoubtedly we love finding ways to make your home look high-end on a small budget.
Plus you’ll also find a recipe or two as we share our family favorites with you.
We’d love it if you’d join our community of doers so you won’t miss any inspiration for your home.
We love new friends.

[mailerlite_form form_id=2]
Making the elements for the reversible holiday signs


The circle and egg shaped wood came from our favorite local craft store.
We didn’t take photos creating the “Lucky” sign. However, it was pretty simple to make, here’s what we did. We painted the wooden circle white, then taped off stripes and painted them Kelly green. We cut the “Lucky” word from glitter vinyl using a Silhouette machine and applied it to the circle. Finally glue the “Lucky” sign to the plank board.

Our plan was to make the polka dots using the circles as a mask. Therefore, we painted the egg black.

Using scrap vinyl (some white and some brown) we punched out circles using a 1 1/4” hole punch. The circles can also be easily cut with a vinyl cutting machine.

Then the vinyl circles were applied as a mask in a pattern on the egg shape.

Then apply 2 coats of black paint. If there is any bleeding of the paint, it will match the base coat and seal the edges.
Let’s stay connected! Follow us on social media!

Once the black paint is dry, it’s time to apply 2 coats of white paint. Then when it is almost dry peel off the vinyl circles.

Once completely dry, sand the edges to distress lightly. This will reveal the black paintunderneath.

Attach the egg to the plank board with wood glue.

Wasn’t that a fun way to make your own DIY reversible holiday sign? Are you already thinking of other types of reversible signs you can make?
We also have an alternate version of the Easter egg pictured. Steph simply painted her egg white and traced the egg shape onto a piece of polka dot paper and then glued it to the egg. Super simple and it adds a pop of color!
We hope you found some inspiration for your home today.
Please share your tips and ideas with us.
We love hearing from you!
If you’re new here, WELCOME! We love having new readers and friends!
You can learn more about us here.
Let’s stay connected! Join our DIY community of doers and you won’t miss the weekly updates and more inspiration for you always on a budget.
Sharing is caring!

Thanks for stopping by Sunny Side Design. Empowering you to create a home you love!
DISCLAIMER
This blog’s content is for entertainment purposes only and is not professional advice. By reading this blog and attempting to recreate a project, you assume all responsibility for any injuries or damages incurred. Read my full disclaimer here.
PHOTO USE AND CONTENT SHARING
All of the photographs you see here are the property of Sunny Side Design unless otherwise credited.
We love for others to share our work, so please feel free to use one photo with a link back to our website.
Pinning and sharing is always encouraged!
Please do not reproduce other Sunny Side Design content without permission.
Retailers We Love
- Anthropologie
- Birch Lane
- Crate & Barrel
- Joss and Main
- Lampsplus
- Mark & Graham
- One Kings Lane
- Pottery Barn
- Rejuvenation
- Serena & Lily
- Wayfair
- West Elm
- Williams Sonoma
- World Market
Be sure to follow us on Pinterest for even more home decor and DIY ideas.
To see what we are working on before it’s on our blog, follow us on Instagram.
You will also find our video tutorials on our YouTube channel.
- Paint an Old World Texture Finish on a Vase

- Easy Strawberry Chicken Salad with Lime Maple Balsamic Vinaigrette
- How to Fix Chipped Kitchen Cabinets with a Pen
- Easy 4th of July Door Decor You Can Make in Minutes