Today we would like to share an innovative solution to a hidden TV. Do you wish you could hide your TV? This was Stephanie’s dilemma! Her hubby, Dan brought home this large TV with his bonus and announced he wanted to hang it on the bedroom wall. She was not a happy camper, but what was she to do? She thought about it and knew if she could conceal it when not it use, create a Hidden TV Cabinet, then she would be happy!
This is Part 1 of a 2 part project. To see Part 2 click here.
- Hidden TV Cabinet in Action
- Hidden TV Cabinet: The Box
- Hidden TV Cabinet: Adding Reclaimed Lumber
- Hidden TV Cabinet: Touch up with Paint
- Hidden TV Cabinet: Seal the Chippy Finish
- Hidden TV Cabinet: Ready to Mount
- Hidden TV Cabinet: Preparing the Art
- Hidden TV Cabinet: Adding the Slides
- Hidden TV Cabinet: Locking Mechanism
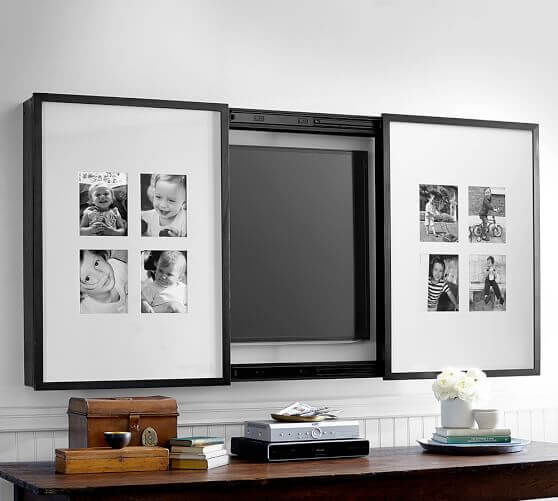

Browsing ideas on the web, she was inspired by this hidden TV cover from pottery barn (which is no longer available) and knew that we could build our own version for much less money. After much online searching she came up with an innovative slide system to conceal the TV.
Sunny Side Design is a participant in the Amazon Services LLC Associates Program, an affiliate advertising program designed to provide a means for sites to earn advertising fees by advertising and linking to Amazon.com. As an Amazon Associate, this blog earns from qualifying purchases with no additional cost to you. Click here to read our full disclosure policy.
To see ALL the highlights from this master bedroom makeover on a budget click any link below.
–How To DIY Your Own Bay Window Curtain Rod
–Easy DIY Board & Batten Wall For Only $50!
–How To Use Saltwash for an Amazing Worn & Weathered Finish
–How To Weather Wood with Vinegar & Steel Wool Stain
–How To Repair Light Fixture Ceiling Hole
–Adding Coastal Style to an Orb Chandelier
–The Most Clever DIY Hidden TV Cabinet
–Master Bedroom Makeover on a Budget
Hidden TV Cabinet in Action
Hidden TV Cabinet: The Box
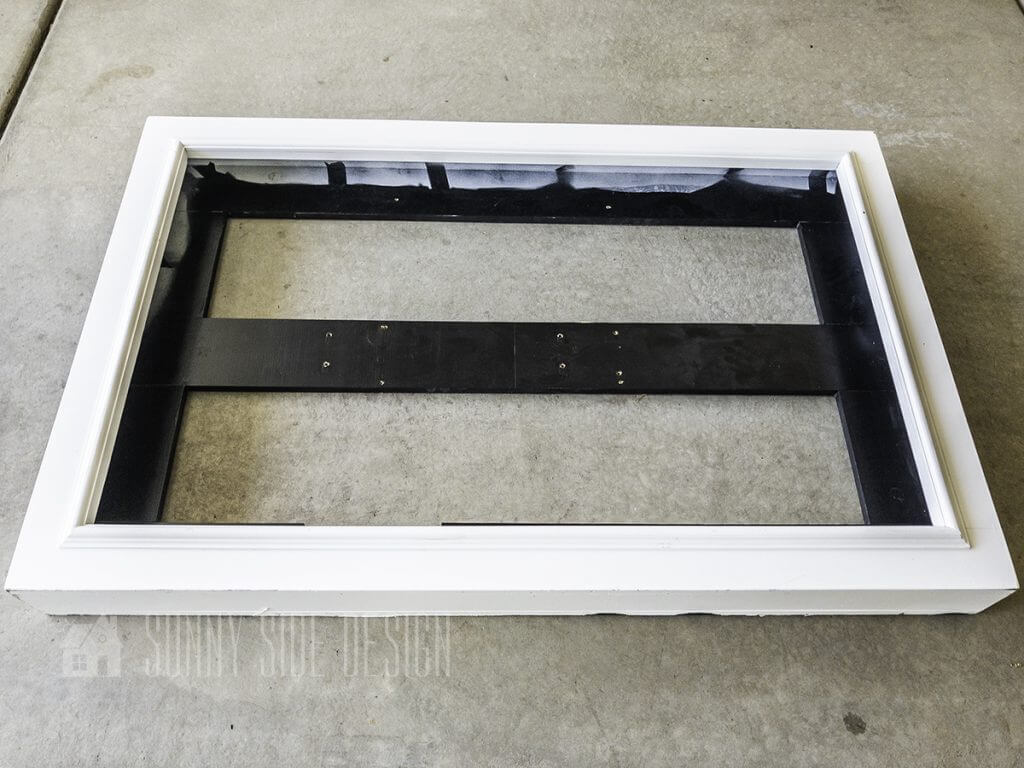
Our original plan, was that we would construct our own box that we would mount to the wall and make our own sliding mechanism to conceal the TV, but as luck would have it we found a box for this purpose at our local thrift store! It was solid, well constructed was the right size and best of all it was only $5.00 !!! There was no way we could even purchase the lumber for $5.00, so we snatched it up!


This box was constructed of 1 x 6 pine boards, painted white with a cross bar in the center to mount the TV on. While the construction was solid, we had a different vision for the finish. Stephanie’s bedroom has that relaxed coastal feel and we wanted the box to have a rustic white finish.


This box only framed the TV, there was no method for concealing it. We began by removing the decorative moulding on the front. We scored the moulding with a utility knife and then pried it off with a multi painters tool.

Next, we decided to remove the cross bar that the TV would mount on. Stephanie’s TV was already mounted to the wall with an adjustable TV mount. We marked it, and cut off the cross bar with our Bosch circular saw on the backside of the box, removing that section of wood. If you don’t own a circular saw, a jigsaw would also work.
Are you enjoying this project? Please Pin It, save it for later and share it with a friend.
Sharing is caring!
Hidden TV Cabinet: Adding Reclaimed Lumber


I’m so blessed with friends who are always on the look out for scrap wood that I could possibly use. Well, I had a stack of tongue and groove lap siding that a dear friend had brought me when a garage was being taken down. I knew that it would give Stephanie’s hidden TV box the perfect finish.
We began by using the table saw and trimmed off the tongue and groove edges from each board.


Our plan was to just cover the existing box with this chippy, white lumber. We began covering the outer edges of the box. Using our chop saw, we mitered the edges of the wood, with a 45° cut. We cut 2 sides, then made sure the fit was good before we actually attached it to the hidden TV box.


We applied wood glue to the back side of each board and nailed it with a brad nailing gun. We completed the entire outer edge first.


Once all the sides were covered with the chippy boards, we began to cut pieces to cover the front edge. We again made mitered cuts and glued and nailed them into position.
If you’re new here, welcome! We’re so glad you’re here.
Let us introduce ourselves, we’re Michelle and Steph, a mom and daughter team who love to DIY and decorate our homes.
Not only are we passionate about making our homes warm, comfortable and unique, but it’s our mission to help you create that same feeling in your own home.
You’ll find ideas for repurposing, creating, decorating and making your home truly yours, while always mindful of a tight budget.
Undoubtedly we love finding ways to make your home look high-end on a small budget.
Plus you’ll also find a recipe or two as we share our family favorites with you.
We’d love it if you’d join our community of doers so you won’t miss any inspiration for your home.
We love new friends.

[mailerlite_form form_id=2]
Hidden TV Cabinet: Touch up with Paint

We then covered up the raw wood with some white paint where we had to trim the wood. We did not paint over the chippy wood finish.


We then lightly distressed the newly painted areas with a palm sander and then removed the dust with a damp cloth.
Let’s stay connected! Follow us on social media!
Hidden TV Cabinet: Seal the Chippy Finish

We had no idea if the paint on this chippy wood had lead in it and we also didn’t want it to continue to flake off. We searched for a clear coat finish we could apply that would not change the look of the wood, but would seal and protect it. We found the Varathane Triple Thick Polyurethane coating with a clear matte finish was the perfect choice. The finish went on thick and only required one coat. It has a great matte finish and did not change the rustic look that we were going for.

We applied this polyurethane finish with a brush. We love the way this particular finish went on. It was thick and sealed the chippy finish really well. We also love the matte finish, it still retains that worn, aged and weathered look that we wanted. Once dried it feels smooth to the touch.
Hidden TV Cabinet: Ready to Mount

To hang this bad boy, it took many hands! We made sure it was level and secured it to the studs in 4 different places with long wood screws.
Hidden TV Cabinet: Preparing the Art


Stephanie did a lot of research to figure out how to create a hinge, or sliding mechanism to conceal the hidden TV with art. She first found her art, which was on canvas, so she knew she did not want it to be 2 separate panels that slid to the side. She finally came up with the idea to use a drawer slides and have her panel raise vertically.
The dimensions of the canvas art did not work with the dimensions of the panel that we needed to cover the TV. We resized the canvas art and you can see the full tutorial how we did that here.
We had a piece of MDF wood cut to size at Home Depot. We measured the opening we needed to cover, plus the width of the drawer slides with a 1/4″ additional border on each side. We love the friendly workers at Home Depot who are always so willing to help us. It’s so much easier to have is cut to size there, than trying to handle a large piece of lumber on our table saw. What we both would really like is to have a saw set up like they have at Home Depot. Wouldn’t that be amazing on one wall of my garage? One can only dream!

We then painted our piece of MDF with the same paint which we used on the board and batten wall Benjamin Moore, Hale Navy. We had it mixed at Home Depot in our favorite brand Behr Premium Plus Ultra. We only painted the edges and one side, since the other side would always be facing the TV.

In order for our panel to rise high enough to allow the entire TV screen to show we needed a 28″ drawer slide. At the local hardware store we were only able to find 26″ slides. With a little research Stephanie located some on Amazon. The drawer slides were $22.44 for the pair of slides.
Hidden TV Cabinet: Adding the Slides


Separating the drawer slides, we took the one that would mount to the cabinet and marked where we were going to attach it with screws. We drilled a pilot hole and then attached the slide with screws.


On the back side of our sliding panel we marked where to attach the other sliding bar. We first located the center where the bar would attach, marked the screw placement, drilled pilot holes and attached with screws.


We are getting close to the finish line, so exciting. We placed the canvas art on the back of the board, centered it and marked it with a pencil. This would give us an idea of where to attach it with screws on the back side.


We once again, drilled pilot holes, then on the front side we could see where to line up the canvas. We attached it with 4 screws, 2 on the top, 2 on the bottom.
Hidden TV Cabinet: Locking Mechanism


We now needed some sort of bar to hold up the panel when the TV was to be viewed. We came up with the idea of using this window bolt. It is attached to the inside of the hidden TV frame, one on each side with a couple of screws.


Here you can see the window bolts attached on each side. They are hardly noticeable when the panel it open and it works great!


We just love how this hidden TV cabinet turned out! When it is closed, it just looks like a fabulous piece of art on the wall.
To add to the decor on this side of the room we added a console table that we refinished with a worn and weathered look with SaltWash. You can learn more about it here.

We hope you found some inspiration for your home today.
Please share your tips and ideas with us.
We love hearing from you!
If you’re new here, WELCOME! We love having new readers and friends!
You can learn more about us here.
Let’s stay connected! Join our DIY community of doers and you won’t miss the weekly updates and more inspiration for you always on a budget.
Sharing is caring!

Thanks for stopping by Sunny Side Design. Empowering you to create a home you love!
Retailers We Love
- Anthropologie
- Birch Lane
- Crate & Barrel
- Joss and Main
- Lampsplus
- Mark & Graham
- One Kings Lane
- Pottery Barn
- Rejuvenation
- Serena & Lily
- Wayfair
- West Elm
- Williams Sonoma
- World Market
Be sure to follow us on Pinterest for even more home decor and DIY ideas.
To see what we are working on before it’s on our blog, follow us on Instagram.
You will also find our video tutorials on our YouTube channel.
- How to Make Peonies Last Longer with 7 Simple Tricks

- How to Build a Birdhouse with CharmingThrift Store Finds
- Simple Clay Pot Lighthouse Garden Decor Project
- Simple Tabletop Fire Bowl DIY in Under 10 Minutes