Hey guys! Sorry we’ve been a little MIA around here! We just spent a week away from home enjoying the sunny and warm weather in Southern California…a much-needed change from this bitter cold here in Utah! It’s been so hard getting used to being back in the cold weather! Time to get a grip on reality and bundle up again. I might have to talk myself through the next couple of months, but at least I have some fun projects up my sleeves I’m working on that I’m anxious to share with you. Hopefully that will help keep my mind off of the cold! (Seriously though…aren’t these gorgeous shots of Laguna Beach? I could just dive right into these pictures and relax again!)
Sunny Side Design is a participant in the Amazon Services LLC Associates Program, an affiliate advertising program designed to provide a means for sites to earn advertising fees by advertising and linking to Amazon.com. As an Amazon Associate, this blog earns from qualifying purchases with no additional cost to you. Click here to read our full disclosure policy.


Anyway, getting my mind back on track! As I was looking through my list of the many finished projects I still want to share with you, I thought I’d spare you from yet another tutorial from my boys’ rooms again! I truly am such a huge DIYer that I still have plenty to share with you from their rooms, but let’s break it up a bit, shall we? Today I want to share with you the collage wall my Mom helped me with in our entryway.

I talked a little bit about the entryway in my home tour on the website, but if you haven’t seen that I’ll fill ya in. The inspiration all started with the Bombay Dresser. I found it at a local consignment shop and immediately fell in love with it! (I tell ya, some people have a shoe or clothing problem…I’m not afraid to admit that I have a furniture problem! My basement looks like a furniture shop with projects waiting to be re-purposed and refinished.) It was painted navy and had a white X painted on the front. Sorry I don’t have a before picture, you’ll just have to use your imagination. I was lucky enough to tag along with my Hubby to London in 2013 for a business trip. We were fortunate to spend an additional week touring after his business was finished, to celebrate our 10th Anniversary. As soon as I saw this dresser, I knew I wanted to paint the British flag on the front as a memento from our trip.

Actually painting the dresser was a huge undertaking! I wish I could find the pictures we took several years ago when I was working on it! Painting the dresser was the easy part! But I will admit I spent way too long measuring and marking where the flag would be. It was also a little tricky taping the dresser because of the many curves. Once it was finished though I was so happy with the way it turned out! I thought I would either use it as a sofa table or put it in our entryway flanked with 2 chairs, I snagged at a thrift store and refinished. Ultimately, I decided the entryway was a better spot for the dresser, however it felt a bit too crowded with the chairs in there as well. So, they have a new spot in our home.
Are you enjoying this project? Please Pin It, save it for later and share it with a friend.
Sharing is caring!

What was I to do with a lone dresser in the entryway? Since the dresser was a memento from our travels, I decorated the top with a globe I’d picked up from a thrift store and some treasures we’d gotten from The Netherlands years earlier. The travel theme grew from there. As you know I like to frequent thrift stores and vintage markets and I’d picked up several pieces over the years that went with the travel theme, so I collaborated with my Mom and she helped me design a travel collage wall. Amazingly most of the frames and décor on the wall I had already purchased over the years. There are only a few frames I bought specifically for this project.

Once we gathered all of the different frames and décor from other spaces in my home, we laid them out on the floor to visualize how to arrange them the best. Really there wasn’t too much rhyme or reason as to the layout. That’s kinda what makes a collage wall so fun. There are a lot of different shapes and sizes, textures and colors. We started with bigger frames toward the middle and worked our way out.
We also used a roll of butcher paper that I have lying around for my kids to doodle on, and traced all of the different frames. Once they were all traced and cut out, we hung them on the wall with masking tape to give us a better visual of everything all grouped together. This also allowed us to easily reposition and space things without having to nail holes in the wall just to reposition them later and putty unwanted holes. Having the frame templates on the wall even made it a breeze to hang everything! All we had to do was measure how far down each hook was on the backside of the frame and we made a mark on the frame template and put a nail right through the template. Once the nail was in place, we just pulled the template off the wall and hung the designated frame. Easy peasy!

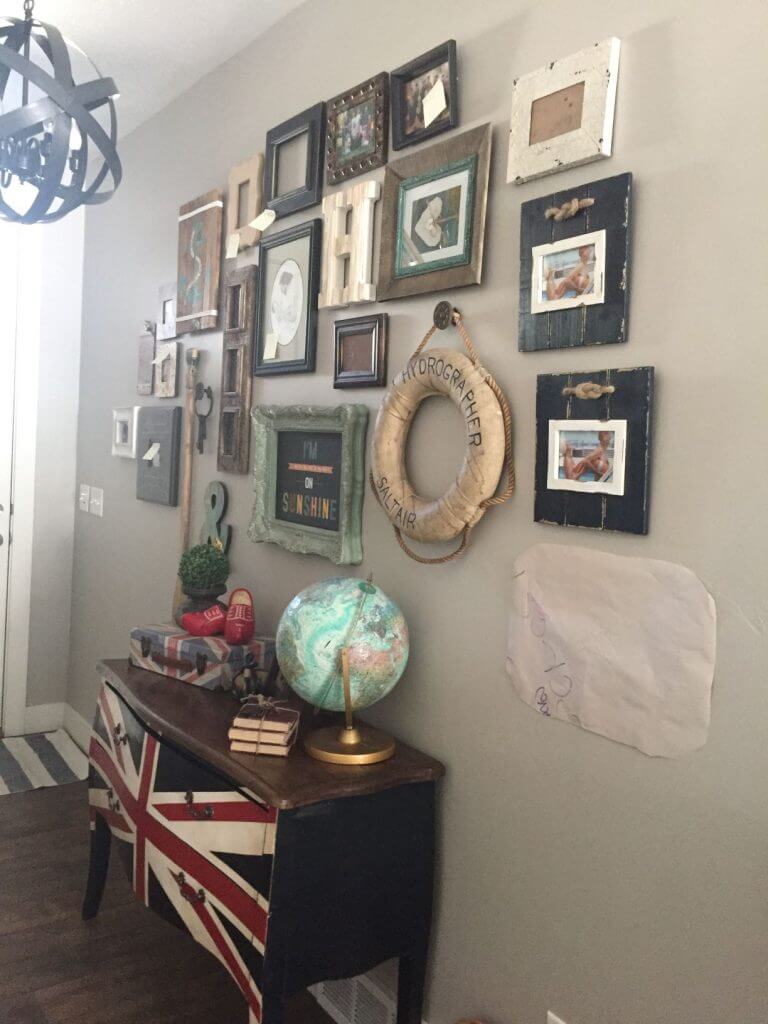
This is what the wall looked like once everything had been hung. If you look closely many of the frames have post it notes on them telling me what colors to paint them so they would coordinate well together.
If you’re new here, welcome! We’re so glad you’re here.
Let us introduce ourselves, we’re Michelle and Steph, a mom and daughter team who love to DIY and decorate our homes.
Not only are we passionate about making our homes warm, comfortable and unique, but it’s our mission to help you create that same feeling in your own home.
You’ll find ideas for repurposing, creating, decorating and making your home truly yours, while always mindful of a tight budget.
Undoubtedly we love finding ways to make your home look high-end on a small budget.
Plus you’ll also find a recipe or two as we share our family favorites with you.
We’d love it if you’d join our community of doers so you won’t miss any inspiration for your home.
We love new friends.

[mailerlite_form form_id=2]


Oh boy! Here’s something exciting! Have you ever heard of Saltwash? It’s basically a powdered paint additive made with real sea salt to create an aged, weathered and worn look. This was the first time I had given it a try and I’m hooked! I used Saltwash on a few of the frames to create this finish. You can check out the saltwash tutorial here for more info. And I will eventually get around to giving our piano a makeover using saltwash too!!! Can’t wait to get my hands on that and see the finished look! Make sure to subscribe to our website so you don’t miss any of our upcoming projects!

A few of the frames I bought specifically for this project came from Michaels. Here on the right side of the collage are 2 distressed navy frames with a rope knot centered on top. I loved the nautical flare these had and knew they would make a great addition to this collage. I also found this great vintage life preserver from a local vintage market a while back and thought it’d be great on the wall! You know me and my love for old vintage pieces! I’m always drawn to the history of the piece and wonder what stories it would tell if it could speak. It was especially exciting to find a life preserver from Saltair, local to where I grew up! Another great find from a local thrift store is this bamboo tray. I picked it up for $1 and stenciled this travel saying onto it. You can see what template and products I used in the tutorial here.

I painted navy and white stripes on these 2 square frames to bring some navy over to this side of the collage. By simply repeating the same color throughout the collage helps make the design feel more cohesive.
Let’s stay connected! Follow us on social media!


To start off, my Mom painted both frames white. After letting them cure overnight I masked off stripes using my favorite painters tape, Frog Tape, then painted the navy stripes. Once the frames had dried a couple hours, I sanded the edges and along some spots where the navy paint bled a little bit and roughed up the frames. I love using Behr paint from The Home Depot! It’s so thick and creamy and has great coverage! You can even buy these little sample sizes for a few bucks and they’re great for small projects like this! So much cheaper than buying a whole gallon or quart of paint! You can even bring in an old paint sample, or piece of clothing etc. and they can scan the item and create a color match!

Now, what kind of fun would a travel themed collage wall be without an old vintage oar? I was so excited when I found this! My Mom often times has to reign in my obsession with nautical décor! I’ll admit that sometimes I can get pretty carried away and want every single piece of nautical décor I lay my eyes on! I pretty much had to get the A-OK from her before I bought the oar! I had to have a purpose for this purchase and so here it is. Insert my giddy face here! Ha Ha. That’s also something that makes a collage wall fun, by adding other items other than picture frames. Here I have the oar, a set of old keys, a life preserver, bamboo tray, a capital H for Hofer, hey I even have a clipboard on the wall and stuck a picture on that! I don’t think there are any rules to what can and cannot go on a collage wall. If you like it and can find a way to hang it, then go for it!
Well, there you have it. A little tour of my entryway and inspiration for the collage wall.
I hope you found this post helpful and gave you some inspiration for your own home.
If you’re looking for art for your home then you’ll want to see our Best Guide to Free Printable Wall Art Online.
In this post you’ll find 18 online resources for downloading and printing FREE public domain vintage art.
If you have any suggestions of projects, you’d like to see us do, let us know!
Please share your tips and ideas with us.
We love hearing from you!
If you’re new here, WELCOME! We love having new readers and friends!
You can learn more about us here.
Let’s stay connected! Join our DIY community of doers and you won’t miss the weekly updates and more inspiration for you always on a budget.
Sharing is caring!
Thanks for stopping by Sunny Side Design. Empowering you to create a home you love!
DISCLAIMER
This blog’s content is for entertainment purposes only and is not professional advice. By reading this blog and attempting to recreate a project, you assume all responsibility for any injuries or damages incurred. Read my full disclaimer here.
PHOTO USE AND CONTENT SHARING
All of the photographs you see here are the property of Sunny Side Design unless otherwise credited.
We love for others to share our work, so please feel free to use one photo with a link back to our website.
Pinning and sharing is always encouraged!
Please do not reproduce other Sunny Side Design content without permission.
Retailers We Love
- Anthropologie
- Birch Lane
- Crate & Barrel
- Joss and Main
- Lampsplus
- Mark & Graham
- One Kings Lane
- Pottery Barn
- Rejuvenation
- Serena & Lily
- Wayfair
- West Elm
- Williams Sonoma
- World Market
Be sure to follow us on Pinterest for even more home decor and DIY ideas.
To see what we are working on before it’s on our blog, follow us on Instagram.
You will also find our video tutorials on our YouTube channel.
- How to Fix Chipped Kitchen Cabinets with a Pen

- Easy 4th of July Door Decor You Can Make in Minutes
- 35 Easy Decorating Ideas for Summer to Welcome the Season
- Fourth of July Decorating Ideas You’ll Love This Summer