Are you looking for ideas to DIY a Fireplace Mantle and Surround. Whether your style is shaker, craftsman or farmhouse, clearly you will find this easy step by step guide will help you create a beautiful fireplace for your living room or family room.
Without a doubt, we LOVE fireplaces. Not only do we love the way a fireplace anchors a room, but it also adds charm, character and architectural detail.
There is nothing better than cozying up with a blanket by the fireplace on a chilly winter’s day. Just ask my youngest grandson, Mr. A about that!
It can be 90 degrees outside and the A/C is on and Mr. A wants to turn on the fireplace and cuddle up in a blanket! If you look closely at this photo you will see that the patriotic decor is on the shelves, the fireplace is on and we are cuddled up reading a book.
Yep, it’s July and he wants a fire! Definitely there is something magical about a fire. It beckons to a simpler time, gathering around the fire as a family and sharing stories.
Real quick – are you new here? If so WELCOME! We love new friends, be sure to say hi in the comments and sign up for our weekly newsletter and never miss any of our latest ideas!
- Before: Fireplace Mantle and Surround
- Supply List: Fireplace Mantle and Surround
- Design & Plan: Fireplace
- Framework for Installation of Fireplace
- Drywall Around Fireplace
- Design & Plan Fireplace Mantle and Surround
- Cut & Assemble Fireplace Surround
- Cut & Assemble Fireplace Mantle
- Final Step: Caulk, Putty & Paint: Fireplace mantle & Surround
Sunny Side Design is a participant in the Amazon Services LLC Associates Program, an affiliate advertising program designed to provide a means for sites to earn advertising fees by advertising and linking to Amazon.com. As an Amazon Associate, this blog earns from qualifying purchases with no additional cost to you. Click here to read our full disclosure policy.
Before: Fireplace Mantle and Surround
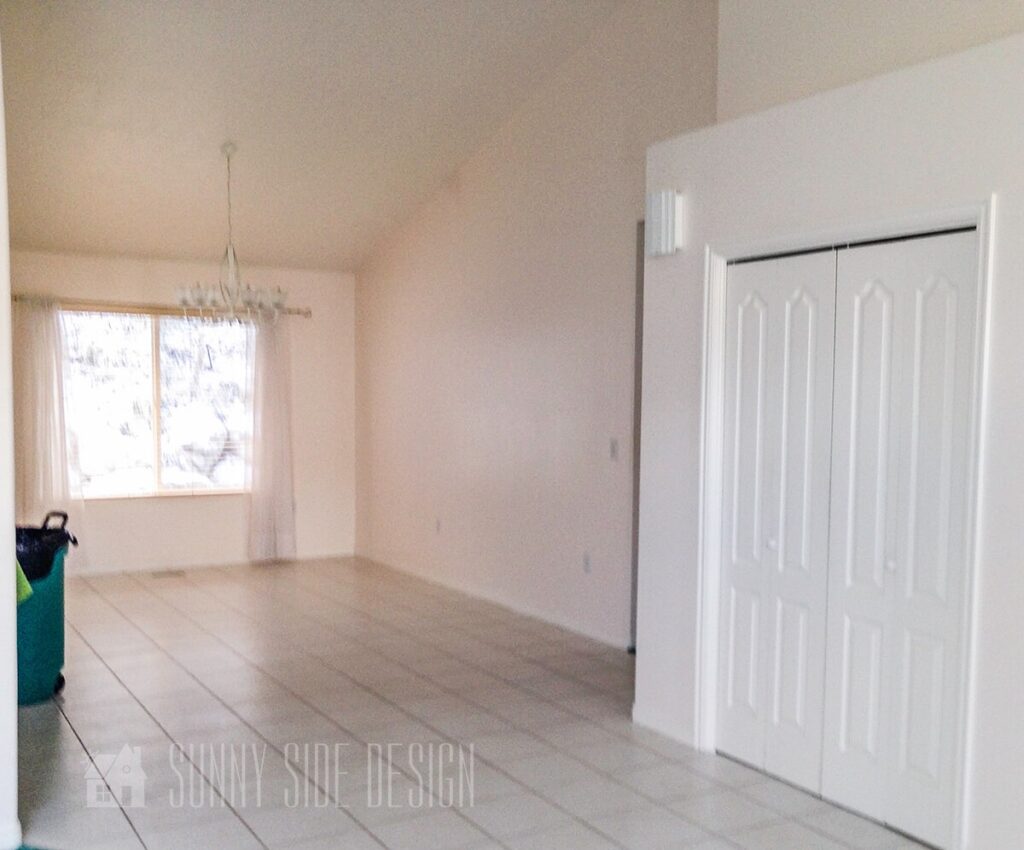
Let’s take a look back at what this space looked like the day we moved in. This area was once the formal dining room. However with some creative redesign, this area became a cozy living room. Would like to see more of this transformation? click here

Can you believe the transformation? Isn’t it amazing what a fireplace and built-ins can do for a space? Clearly we think so! We are thrilled with the way this turned out. It definitely completes the room.
For detailed plans to create built-in bookcase shelves, click here.
Now on with the build . . .
This post contains affiliate links for your convenience. As an Amazon Associate I earn from qualifying purchases. See our disclosure for details.
Supply List: Fireplace Mantle and Surround
Tools and supplies we used:
- table saw or circular saw
- pneumatic finish nail gun
- wood glue
- 2 x 4 lumber
- 3/4″ 4 x 8 MDF wood panel
- 3 1/2″ base molding
- 1 1/2″ x 1/2 flat trim
- 8″ x 1″ flat board molding
- crown molding
Design & Plan: Fireplace
We began by drawing out the design plan on the wall so we could visualize it.
Pro tip: Our markings on the wall were 1″ smaller than our desired design to accommodate the thickness of the drywall.
As I began looking for the right gas fireplace insert, my brilliant hubby, Steve said, “why don’t we just reinstall the fireplace that was in the den?”
At first I didn’t like the idea, it looked dated with a lot of shiny brass trim. If we were using the existing fireplace I thought I would paint it with a high heat spray paint to update it.
Once again my cleaver hubby, Steve found a way to just remove the brass trim, no need for paint.
Let me share a secret with you, he is CHEAP! I don’t know of anyone who hates spending money quite like him.
Which is a great thing for me, because he is always looking for way to reuse and re-purpose something we already own.
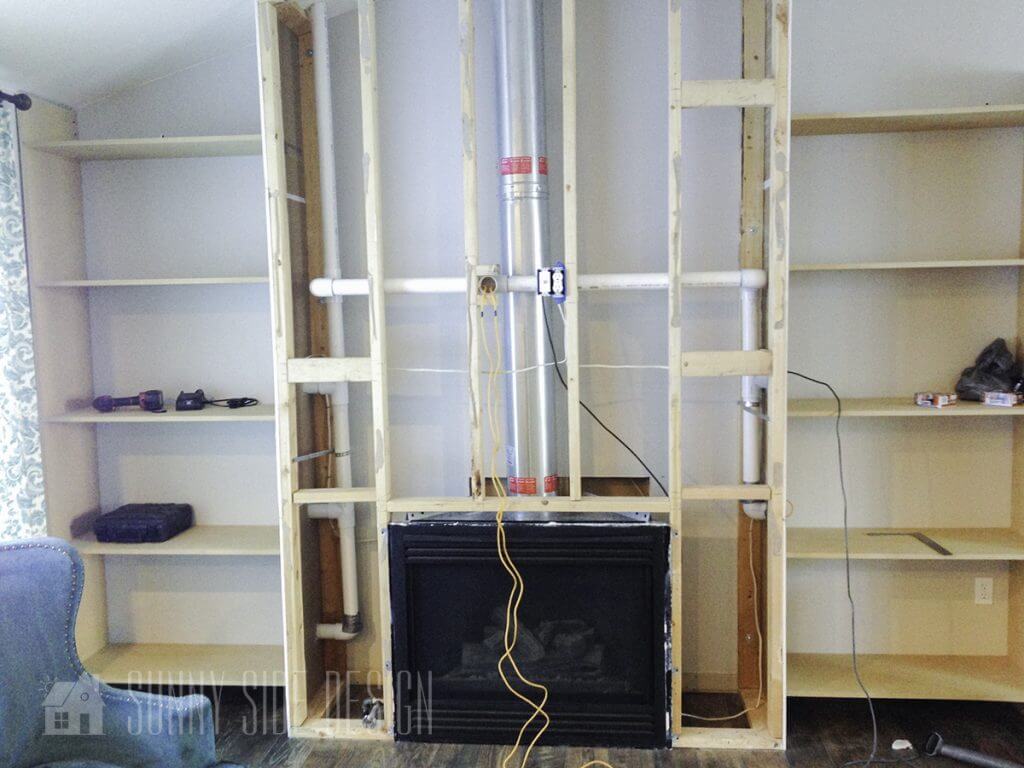
Framework for Installation of Fireplace
We built the framework for the fireplace out of 2 x 4 lumber, using our drawing plans which we made on the wall.
You may also notice PVC pipe behind the framing. This was Steve’s idea for running cables and wiring for gaming, surround sound and cable. Once again he is the BRAINS behind every project.
Drywall Around Fireplace

Once all the framing was complete, as well as running the gas line for the fireplace it was time for the drywall.
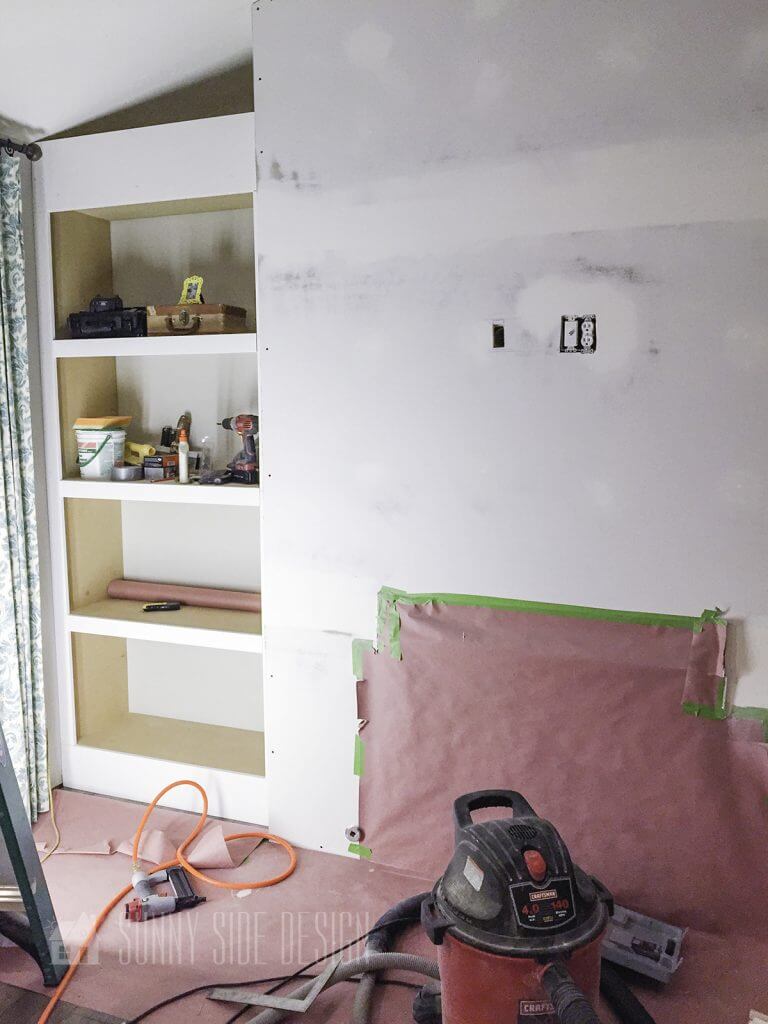
We then taped and applied dry wall mud on all of the seams and screws.
Design & Plan Fireplace Mantle and Surround
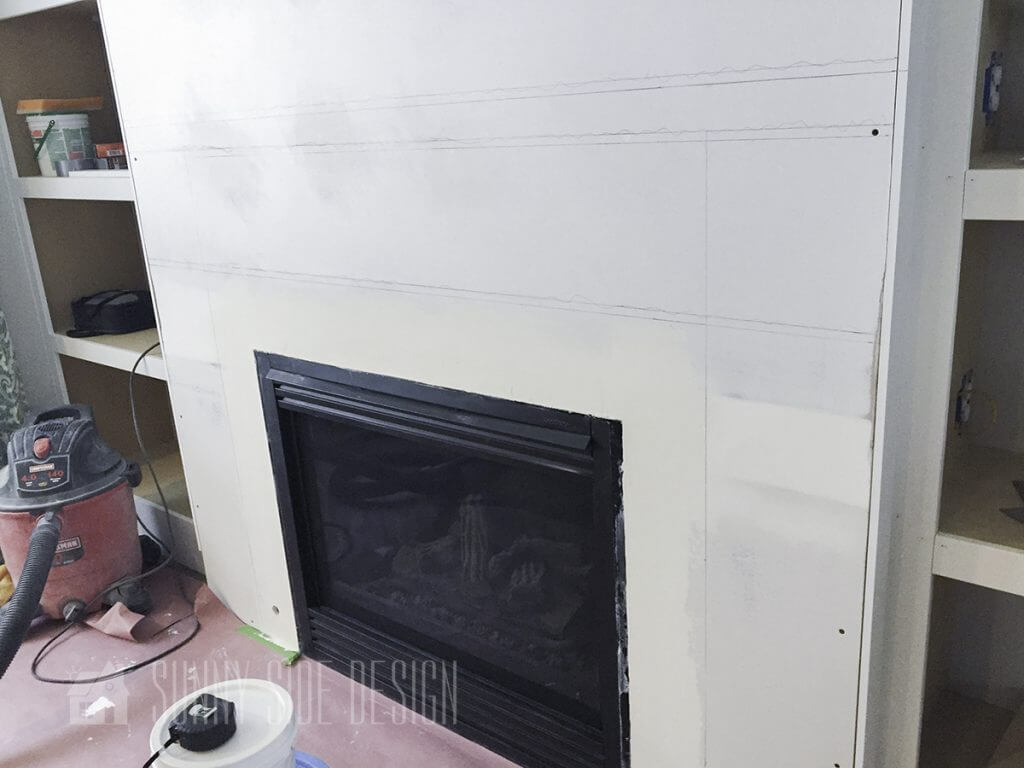
With the taping and mudding finished, we mapped out the design and dimensions of the mantle and surround on the wall.
You are able see here the sketch of the surround and mantle areas. This helped to know exactly how to cut each piece of wood.
Are you enjoying this project? Please Pin It, save it for later and share it with a friend.
Sharing is caring!
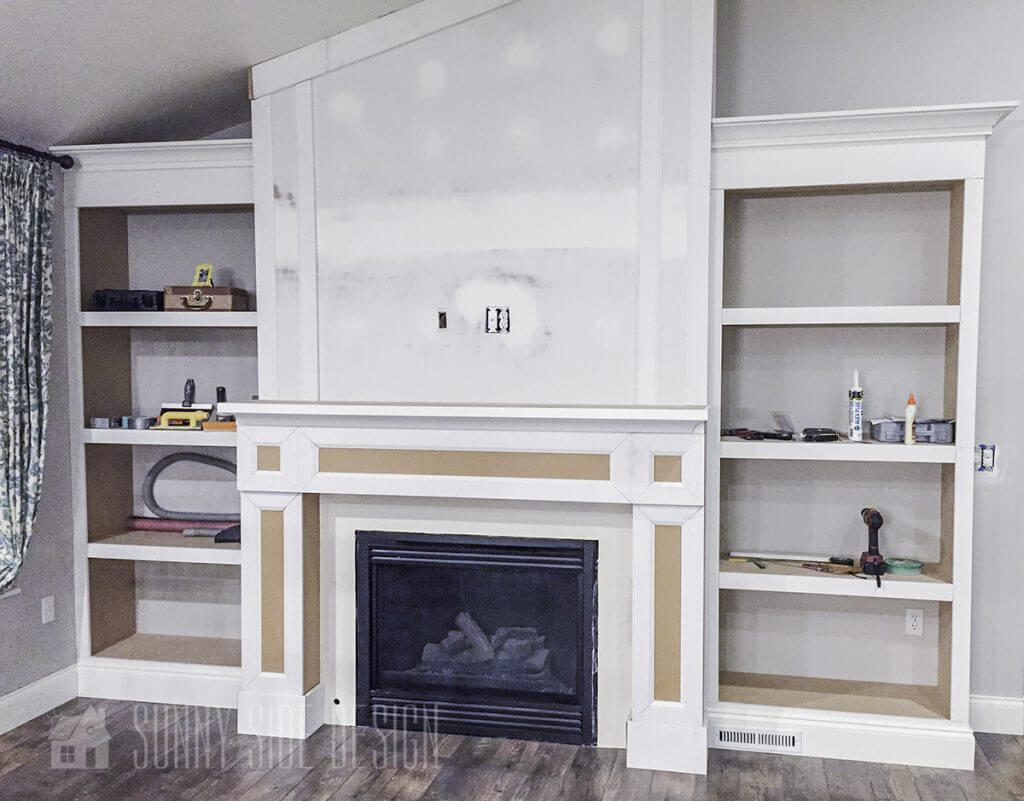
Cut & Assemble Fireplace Surround


For the fireplace surround we used 3/4″ MDF panels. We chose MDF because it paints up beautifully and it is more economical.
We cut 2 of each piece pictured in the diagram.
- 53″ x 7″ (note: that the bottom section of this is 6″ wide for 40 1/2″)
- 40 1/2″ x 6″
- 40 1/2″ x 9 1/2″

Assemble the surround boxes by running a bead of wood glue on the 2 sides of the 40 1/2″ x 9 1/2″ piece. Align this board so that it is flush with the 2 side panels as pictured. Then using the pneumatic nail gun secure the sides.
Note: the seam of the wood will be on the front of the boxes. It will be covered later by the molding.
We next secured the 2 boxes to the wall by lining them up with the pencil lines we had made on the wall. We attached them by securing some strips of wood to the wall into the studs, then nailing the boxes to the wood strips on the sides.

Next we cut a board (72 1/2″ x 7″) that will fit on top of the 2 side pieces. Secure into place with wood glue and nails.

Cut another board (72 1/2″ x 12 1/2″). Run a bead of glue along the bottom edge and the 2 sides and mount to the 2 side boards and the board that connects the 2 side columns. Secure with nails.
Note: The seam should be on the front and it will be flush with the 2 side boards. This seam will be covered with molding.
If you’re new here, welcome! We’re so glad you’re here.
Let us introduce ourselves, we’re Michelle and Steph, a mom and daughter team who love to DIY and decorate our homes.
Not only are we passionate about making our homes warm, comfortable and unique, but it’s our mission to help you create that same feeling in your own home.
You’ll find ideas for repurposing, creating, decorating and making your home truly yours, while always mindful of a tight budget.
Undoubtedly we love finding ways to make your home look high-end on a small budget.
Plus you’ll also find a recipe or two as we share our family favorites with you.
We’d love it if you’d join our community of doers so you won’t miss any inspiration for your home.
We love new friends.

[mailerlite_form form_id=2]
Cut & Assemble Fireplace Mantle

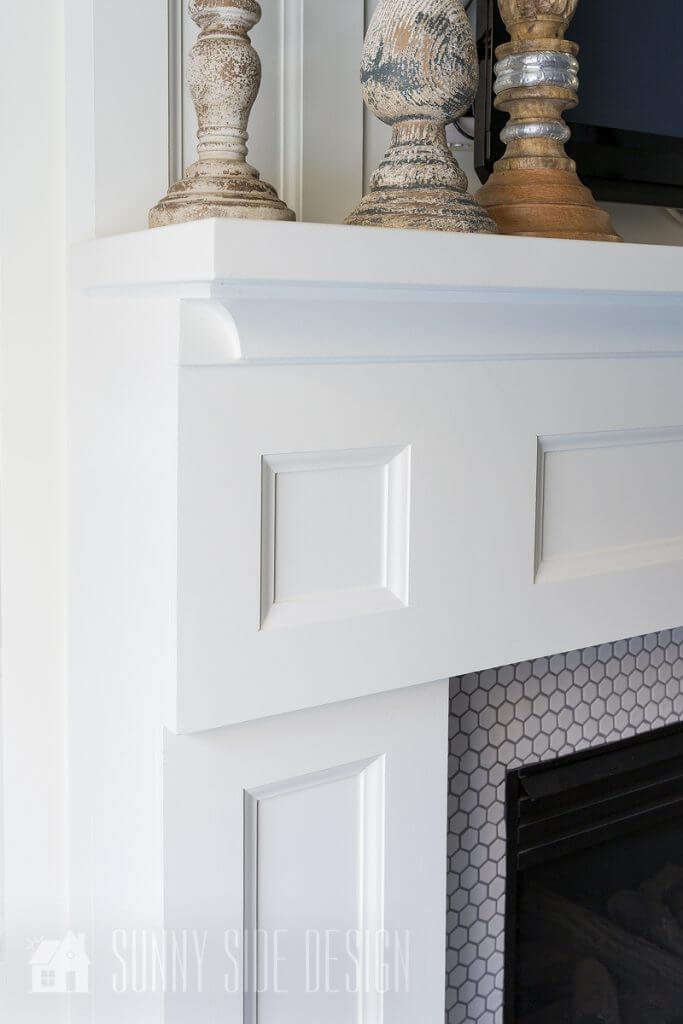
Now it’s time for all of the details! Yeah! Without a doubt, this is what makes the fireplace mantle and surround come to life!
We used baseboard for all of the decorative craftsman/shaker details. I wanted a cohesive look in my home. Therefore to mimic the design of the custom shaker cabinets that are in our kitchen, we found a baseboard molding that was very similar to the cabinets.
Take a look at the cabinets and the molding we used. Don’t you think it’s a pretty good match?
At the base of the 2 columns we used the 8″ x 1″ molding board, trimmed to 7″ wide. We mitered the corners and installed this with wood glue and nails. This can be seen better in the close up picture of the column piece above.
We cut a 5 1/2″ strip from the 3/4″ MDF panel to use against the chimney wall where it meets the ceiling. Cut the board longer than needed then hold it in place and draw lines on the back of the board where it meets the side of the wall. Cut the boards on the marked lines and secure it in place using nails.
For all of the decorative trim we used a 3 1/2″ baseboard, mitered the corners and secured in place with wood glue and nails. Just below the top of the mantle we used a 1 1/2″ board behind the crown molding piece. It can be seen a little better in the photo below.
On the wall above the mantel we ran 2 lengths of the baseboard with the decorative edge facing each other on each side.
Let’s stay connected! Follow us on social media!
Final Step: Caulk, Putty & Paint: Fireplace mantle & Surround
The final step is to caulk all of the seams and putty in the nail holes. Once it is all sanded and prepped it is ready for paint. We had a custom color paint mixed that matched the kitchen cupboards.
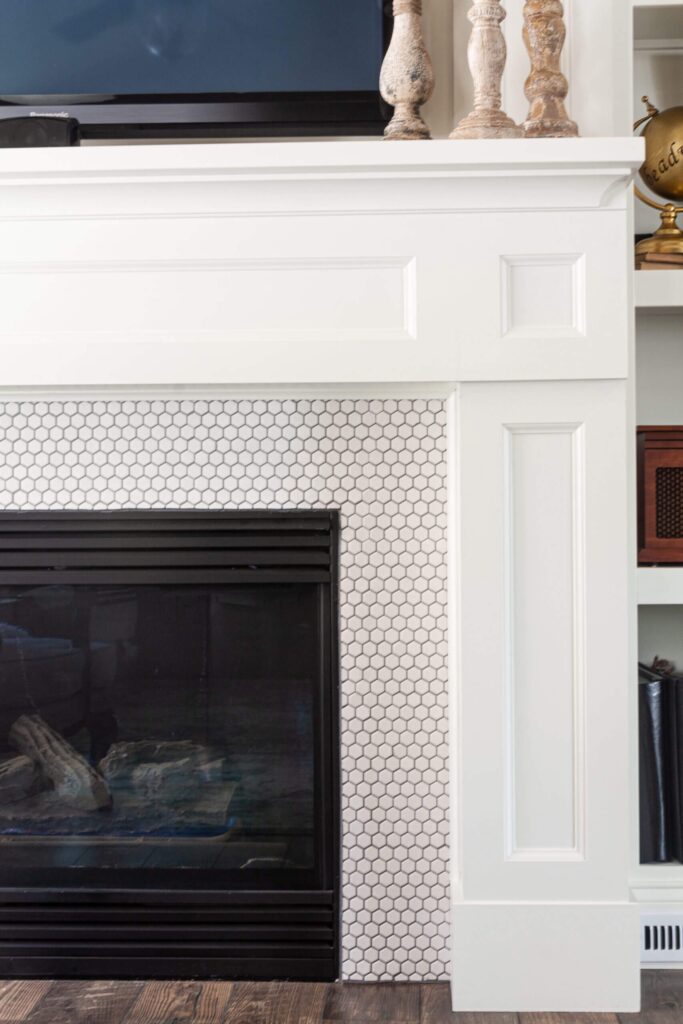
Quick tip: Wait to install the tile around the fireplace until the painting is finished. This will save time masking off the tile. We used a traditional and classic white hexagon tile for the surround.
To finish off the tile edge we installed a cove molding painted with the same paint we used on the fireplace mantle and surround.

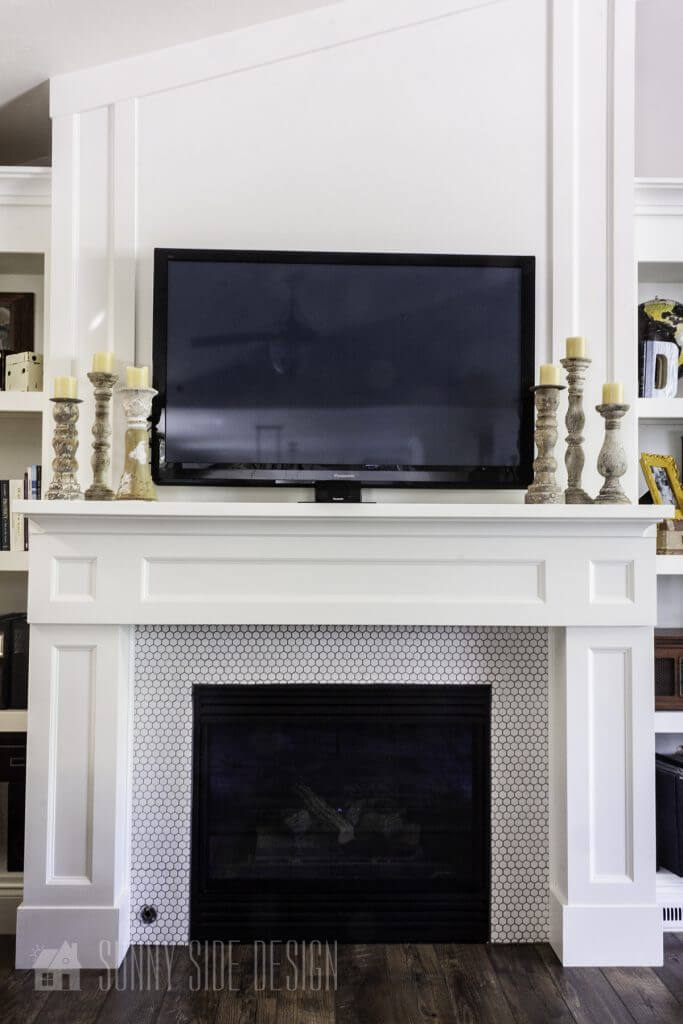

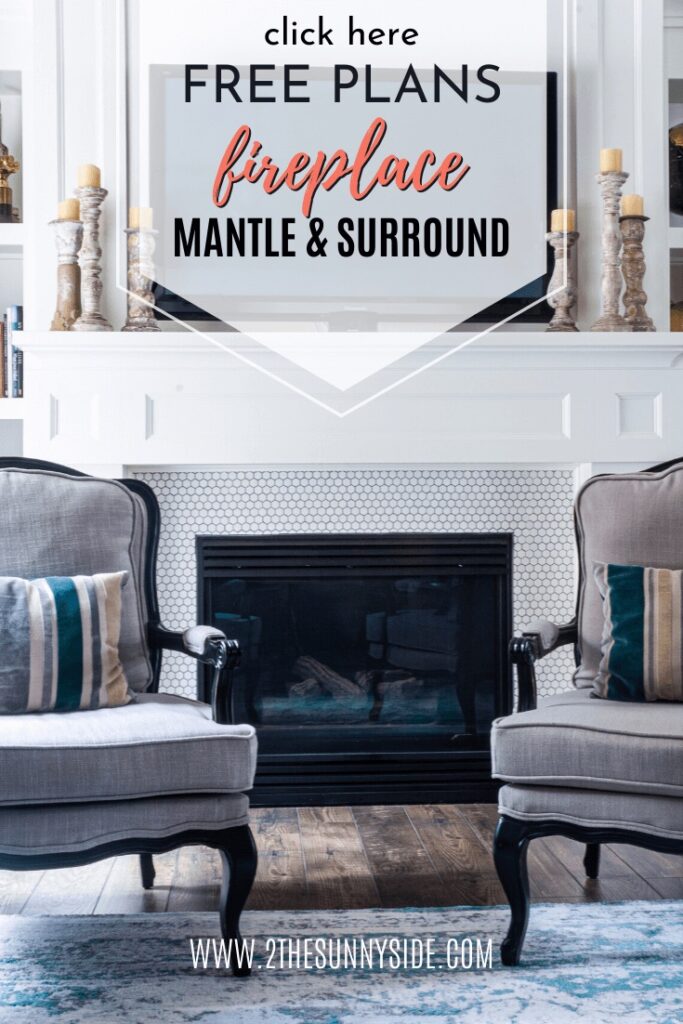
Do you love the fireplace mantle and surround? We absolutely LOVE it! The perfect spot to cozy up and read a book or cuddle with the grandkids. We also love the extra storage the built-ins provide too.
For more fireplace with built-in inspiration check out Steph’s built-in entertainment center with an electric fireplace.
Is this a project you would like to try? Please drop us a comment if you have any questions or if you try this project. We would love to hear from you!
We hope you found some inspiration for your home today.
Please share your tips and ideas with us.
We love hearing from you!
If you’re new here, WELCOME! We love having new readers and friends!
You can learn more about us here.
Let’s stay connected! Join our DIY community of doers and you won’t miss the weekly updates and more inspiration for you always on a budget.
Sharing is caring!
Thanks for stopping by Sunnyside Home. Empowering you to create a home you love!
Retailers We Love
- Anthropologie
- Birch Lane
- Crate & Barrel
- Joss and Main
- Lampsplus
- Mark & Graham
- One Kings Lane
- Pottery Barn
- Rejuvenation
- Serena & Lily
- Wayfair
- West Elm
- Williams Sonoma
- World Market
Be sure to follow us on Pinterest for even more home decor and DIY ideas.
To see what we are working on before it’s on our blog, follow us on Instagram.
You will also find our video tutorials on our YouTube channel.
- How to Paint a Ceramic Pitcher Inspired by Pottery Barn

- How to Build Simple Basement Storage Shelves That Last
- Easy One Pot Beef and Cabbage Soup with a Kick
- Simple Valentine Heart Decor Using Vintage Linens & Lace