Treasured vintage linens, doilies, lace, and handiwork are getting new life in this simple, sentimental Valentine Heart Decor project. Today learn how to turn these beautiful remnants from the past into charming, heartfelt Valentine decor with timeless style.
Several months ago, my 91-year-old mother-in-law decided it was time to open her cedar chest and part with a few treasured keepsakes she’s lovingly saved over the years.
As she offered them to my two sisters-in-law and me, I was genuinely shocked—no one wanted the vintage linens.
Doilies, quilt pieces, lace scraps, delicate napkins with cutwork details, even fur collars she once added to her sweaters felt like priceless treasures to me.
Lucky me!
I could instantly envision all the ways these sentimental pieces could live on.
Today, I’m turning a few of them into Valentine heart decor, and let me tell you—she was absolutely thrilled to see her mother’s crocheted handiwork given new life.
Grab your favorite drink and get ready to see how to make Valentine heart decor using vintage linens and lace, with heart and a whole lot of love. 💕
- Why Use Vintage Linens for Valentine Decor
- Supplies Needed
- Create a Heart Pattern
- Cut Out Your Heart Shapes
- Plan Your Design Layout
- Attach Trims and Details
- Sew the Hearts Together
- Stuff with Polyfill
- Style and Display Your Valentine Heart Decor
- Tips for Success & Variations
- FAQs for Valentine Heart Decor Using Vintage Linens
- Shop Vintage Inspired Valentine Decor
- More DIY Valentine Decor
- Final Thoughts
Sunnyside home is a participant in the Amazon Services LLC Associates Program, an affiliate advertising program designed to provide a means for sites to earn advertising fees by advertising and linking to Amazon.com. As an Amazon Associate, this blog earns from qualifying purchases with no additional cost to you. Click here to read our full disclosure policy.
Why Use Vintage Linens for Valentine Decor
Using vintage linens for Valentine decor adds instant charm and soul that simply can’t be replicated with new materials.
The softness of aged fabric, the delicate crochet, and the imperfect details all tell a story, and layering these vintage pieces into your home creates a cozy space full of warmth and character.
Many older linens are stained or have worn areas, which actually makes them perfect for crafting—especially when they might otherwise stay tucked away in a drawer.
Repurposing these pieces is a meaningful way to update and honor items that were often handmade by loved ones who are no longer with us.
Bringing them into your home in a fresh, modern way allows you to remember those stories and share them with your children and grandchildren.
When choosing linens to use, select pieces you won’t feel sad cutting into—items that are already damaged or have trims removed, like the crocheted rosette I’m using here.
These well-loved details deserve a second life, and Valentine decor is a beautiful way to give it to them.
Are you enjoying this project? Please Pin It, save it for later and share it with a friend.
Sharing is caring!
Supplies Needed
Before getting started, gather a few simple supplies—this is a great project for using what you already have on hand.
Mixing textures and materials is part of what makes this Valentine Heart Decor feel so special and unique.
Supplies Needed:
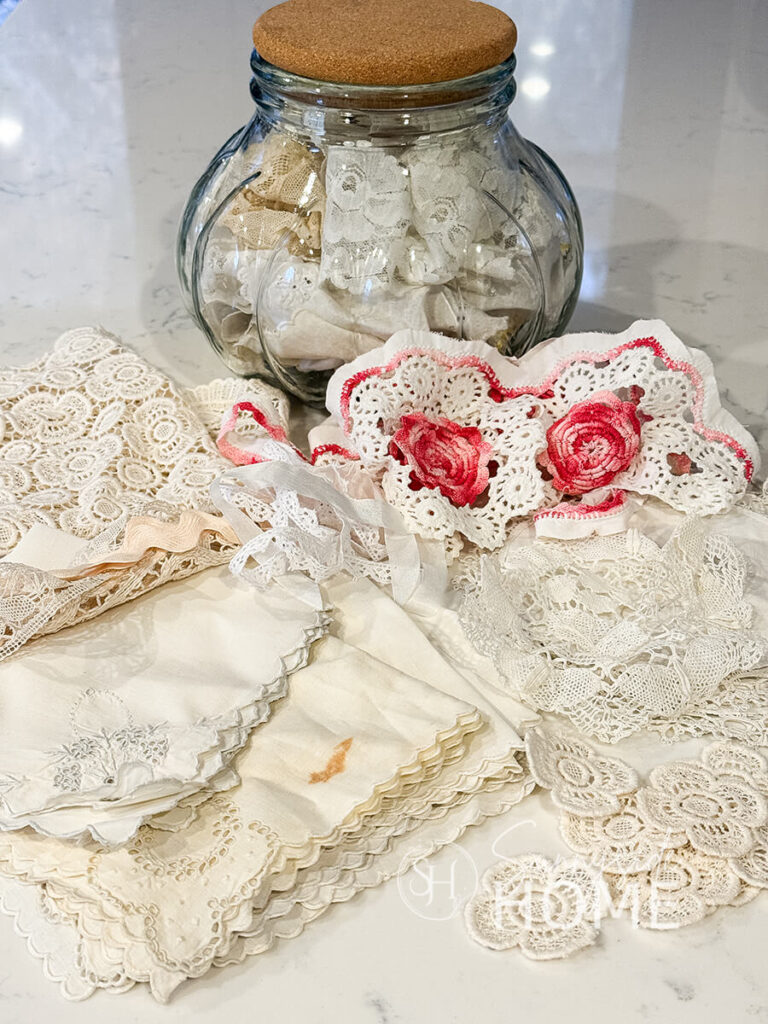
- Vintage linens: napkins, stained tablecloths, doilies, lace, and crochet pieces
- Trims: buttons, ric rac, lace scraps, or any decorative notions you love
- Polyfill: for softly stuffing the hearts
- Fabric Scissors
- Paper: to create a reusable heart pattern
- Fusible web (Wonder Under): great for adhering vintage doilies or trim
- Hot glue or fabric glue: perfect for no-sew or quick attachment
- Needle and thread: hand-stitching works great
- Sewing machine (optional): for faster assembly
Optional substitutions: Beginners or no-sew crafters can skip stitching altogether and rely on fusible web and fabric glue. Felt or cotton fabric can also be used in place of vintage linens if you’re just starting out or prefer to practice first.
Create a Heart Pattern
Creating a heart pattern is a simple step that makes the whole project come together easily.
Start by folding a piece of paper in half and sketching half of a heart along the fold, then cut it out and unfold it to reveal a full heart shape.
I like to make mine slightly elongated for a more primitive, vintage look that pairs beautifully with old linens.
This template can be reused again and again, making it easy to cut multiple hearts in different sizes—small for bowl fillers, medium for garlands, or larger statement hearts for shelves and displays.
For consistent shapes, trace the same template each time and cut carefully, especially when working with delicate fabrics.
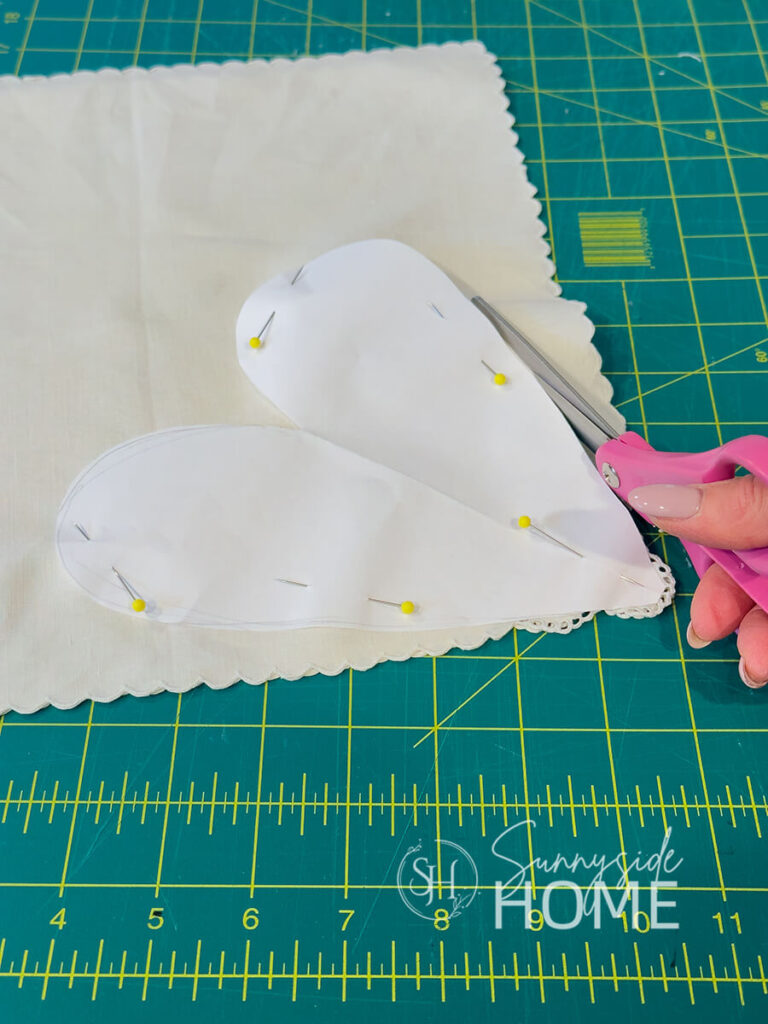
Cut Out Your Heart Shapes
When cutting out your heart shapes, take a little time to plan so you can highlight the prettiest details.
For one heart, I wanted to feature the delicate cutwork on the corner of a napkin, so I layered two napkins together, pinned my heart template over the corner with the decorative edge, and carefully cut it out using a good pair of sharp fabric scissors.
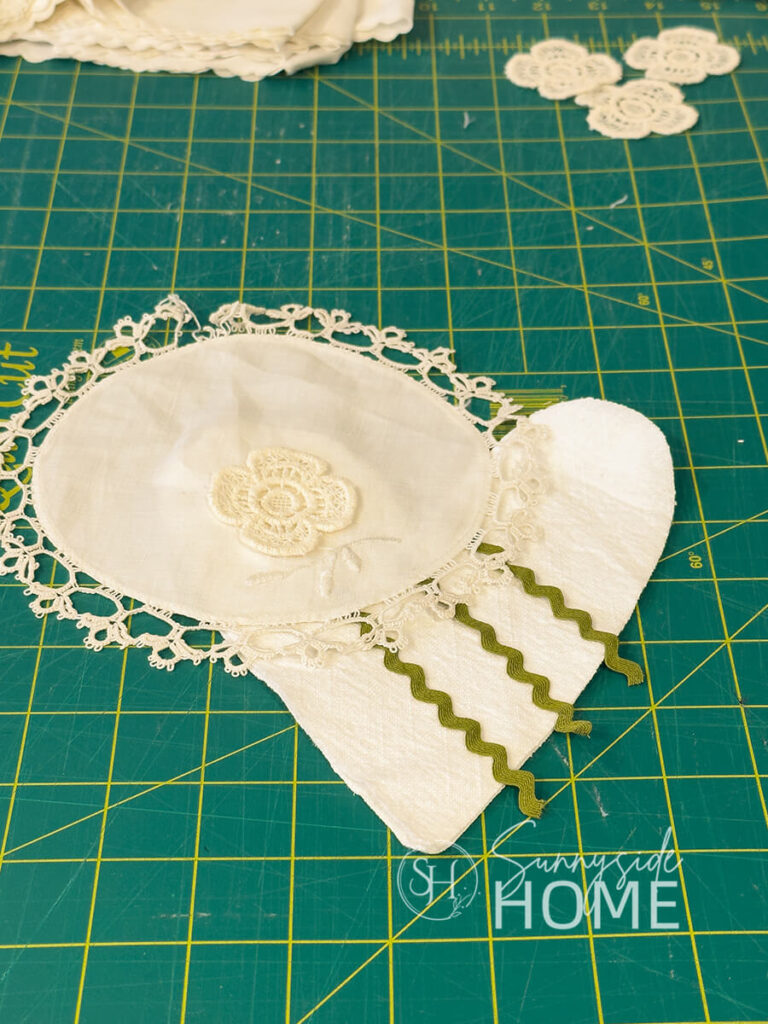
For the second heart, I used a slightly smaller heart template and chose an old stained linen tablecloth that’s been well loved and used in several past projects, including these pillow covers.
Folding the fabric before cutting makes it easy to create two matching heart pieces at once.
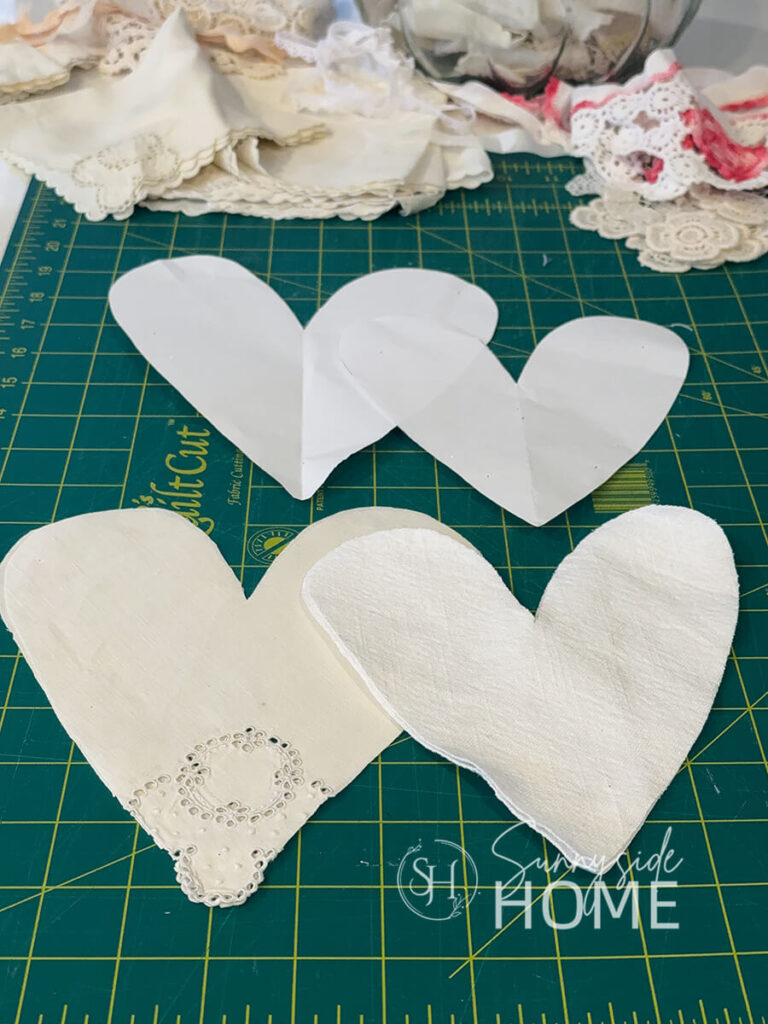
When working with vintage linens, always cut slowly and support fragile areas to avoid tearing.
Mixing different textures—smooth linen, delicate cutwork, and sturdy tablecloth fabric adds depth, character, and that perfectly imperfect charm that makes this Valentine Heart Decor so special.
If you’re new here, welcome! We’re so glad you’re here.
Let us introduce ourselves, we’re Michelle and Steph, a mom and daughter team who love to DIY and decorate our homes.
Not only are we passionate about making our homes warm, comfortable and unique, but it’s our mission to help you create that same feeling in your own home.
You’ll find ideas for repurposing, creating, decorating and making your home truly yours, while always mindful of a tight budget.
Undoubtedly we love finding ways to make your home look high-end on a small budget.
Plus you’ll also find a recipe or two as we share our family favorites with you.
We’d love it if you’d join our community of doers so you won’t miss any inspiration for your home.
We love new friends.
Plan Your Design Layout
Once your heart shapes are cut, it’s time for the most fun part—planning how to embellish your Valentine heart decor.
For my hearts I included strips of vintage lace, olive ric rac, tatted doily and rosettes.
Before attaching anything, dry-fit your trims and embellishments by laying lace, crochet pieces, and fabric details directly onto the hearts.
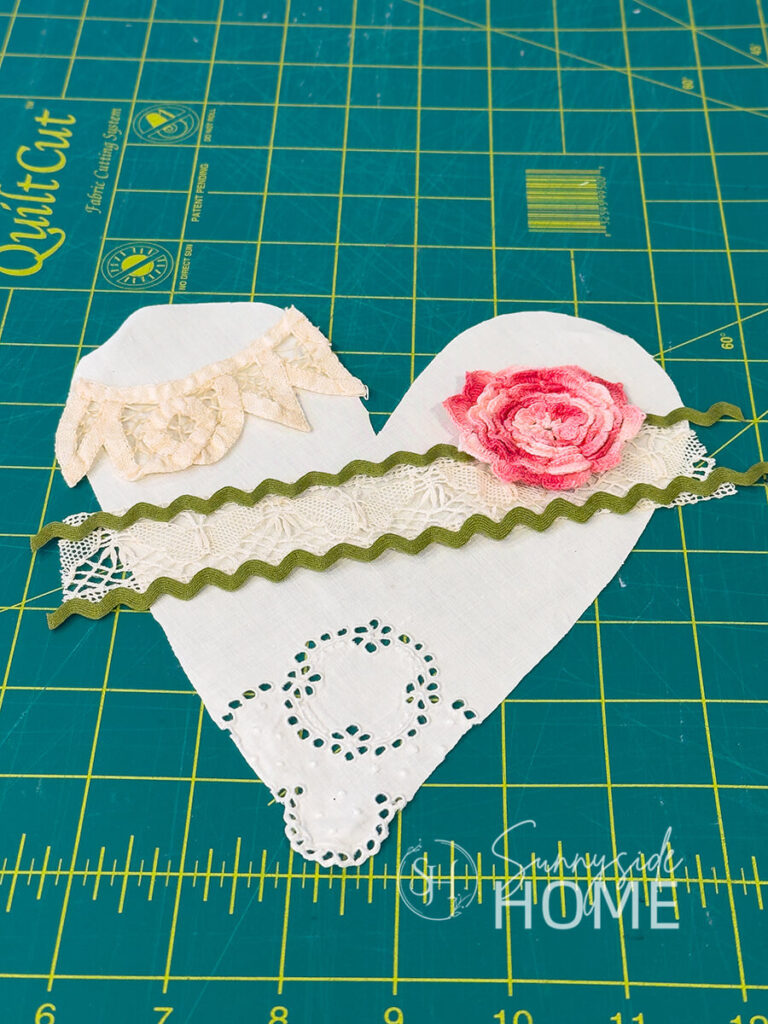
This allows you to play with placement, layering, and scale without committing right away.
Try stacking different textures, like soft lace over sturdy linen or a crocheted rosette as a focal point, to create depth and interest.
Keep the overall look vintage and classy by limiting your color palette and letting the natural beauty of the fabrics shine.
Stepping back and adjusting as you go helps ensure each heart feels balanced, timeless, and thoughtfully designed.
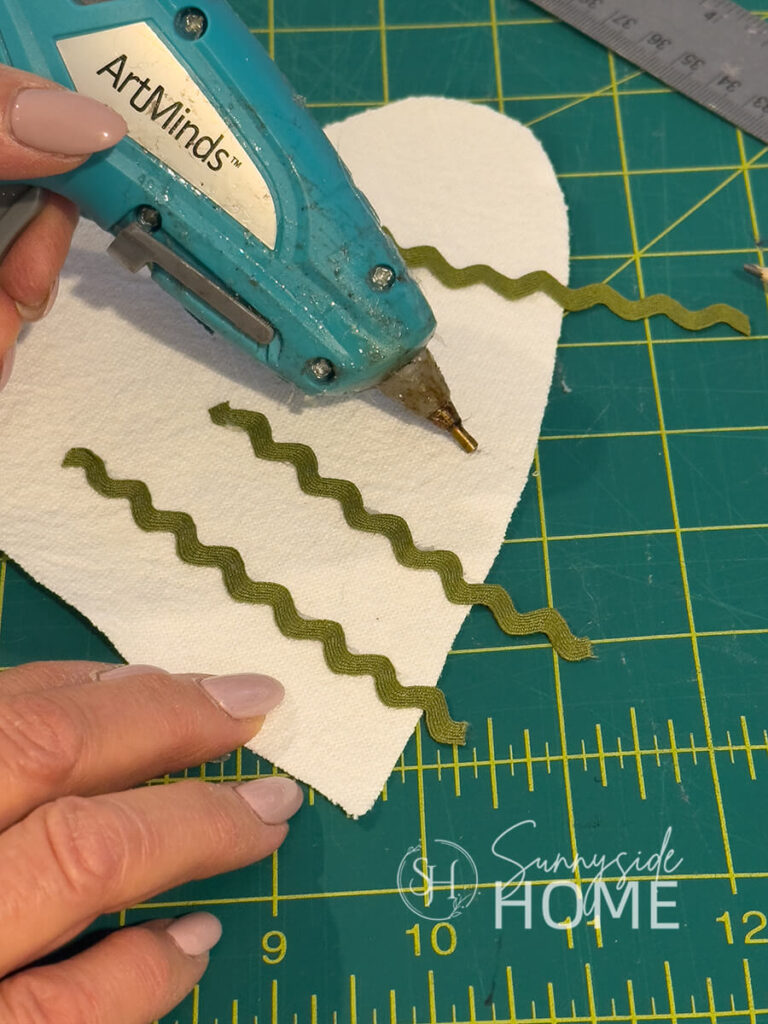
Attach Trims and Details
When it’s time to attach trims and details, you can choose between stitching, gluing, or a combination of both.
To keep this Valentine heart decoration simple, I opted to glue most of my pieces in place using fabric glue and hot glue.
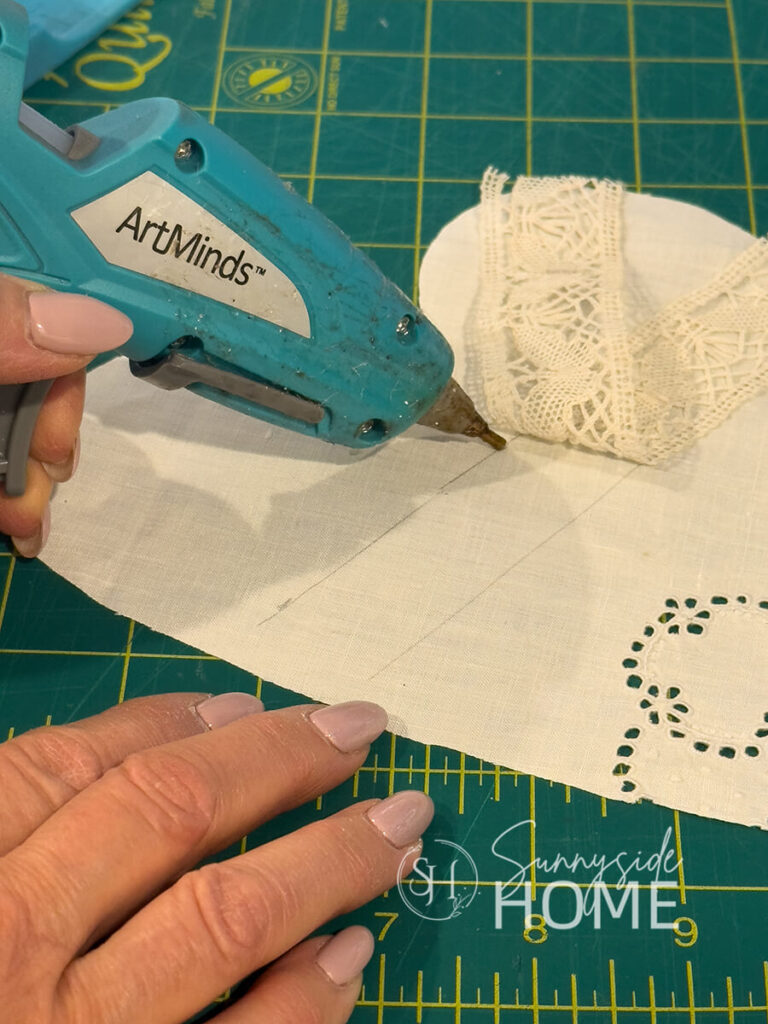
Just be sure to keep the glue about ¼ inch away from the cut edge of the heart—this leaves the edge clear for stitching the hearts together later.
I learned the hard way that glue too close to the edge will gum up your needle and make sewing difficult.
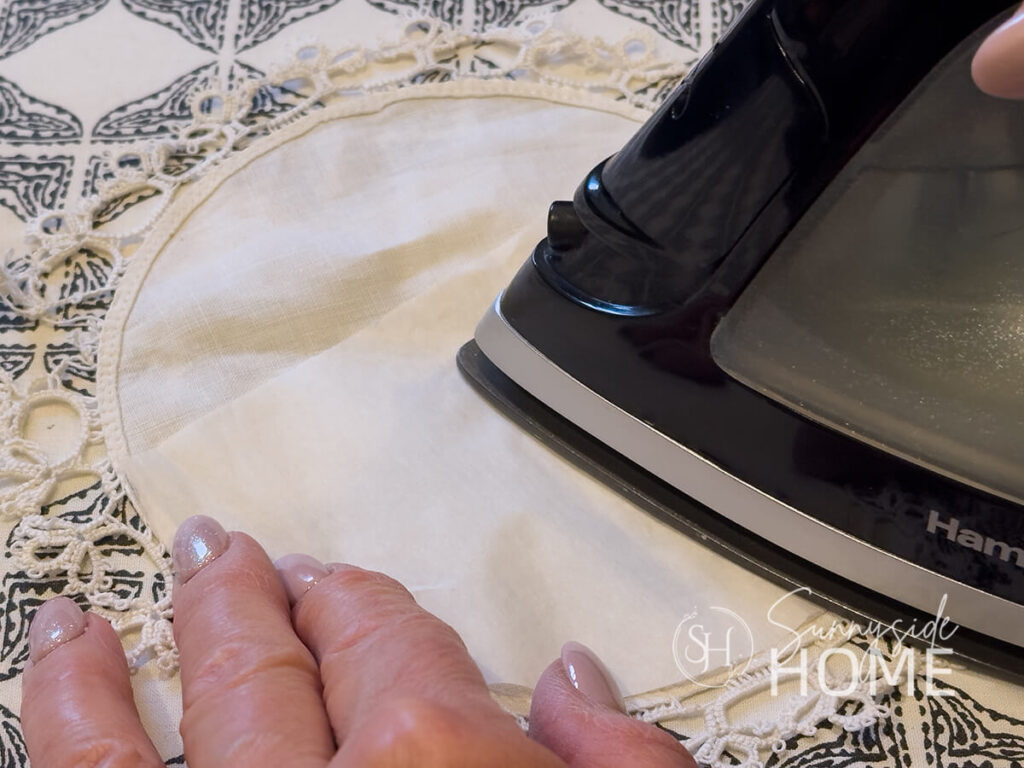
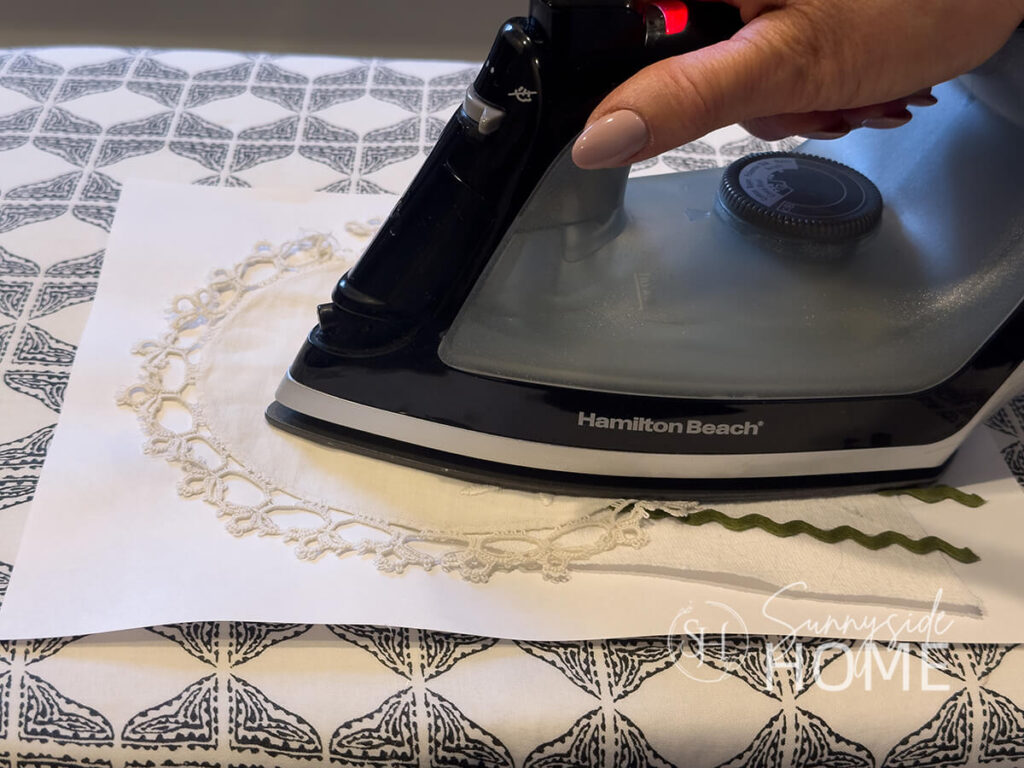
For another no-sew option, fusible web works beautifully; I used a small scrap to attach the doily on the smaller heart and simply followed the manufacturer’s instructions.
Buttons, ric rac, and lace all add wonderful texture, and simple decorative stitching is another creative way to secure trims.
This is your Valentine heart—have fun, experiment, and let your creativity flow!
Let’s stay connected! Follow us on social media!
Sew the Hearts Together
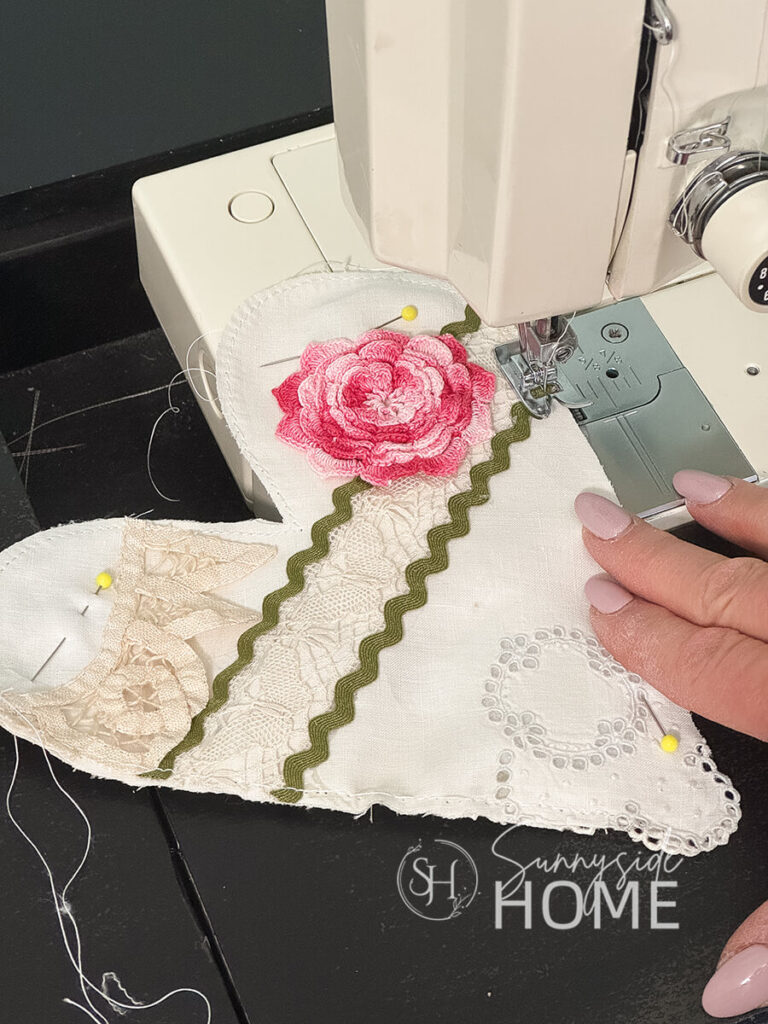
To sew the hearts together, I placed the wrong sides facing each other for a more primitive, handmade look, then pinned the two heart shapes in place.
I stitched around the outer edge about ¼ inch from the cut edge, starting 3/4″ from the point of the heart and stopping about ¾ inch from that same point.
This small opening allows room for stuffing and also works perfectly if you plan to turn your Valentine hearts into topiaries, since the opening is needed to insert a stick.
If you’re making bowl fillers, a garland, or a larger hanging heart, you may want to leave a 1½–2 inch opening along the side instead.
I used my sewing machine to speed things up, but these hearts are just as lovely when stitched by hand using a simple running stitch or blanket stitch.
Stuff with Polyfill
Stuffing your hearts with polyfill is where they really start to take shape and feel soft and plump.
I like to stuff mine loosely so the hearts have a gentle, natural fullness.
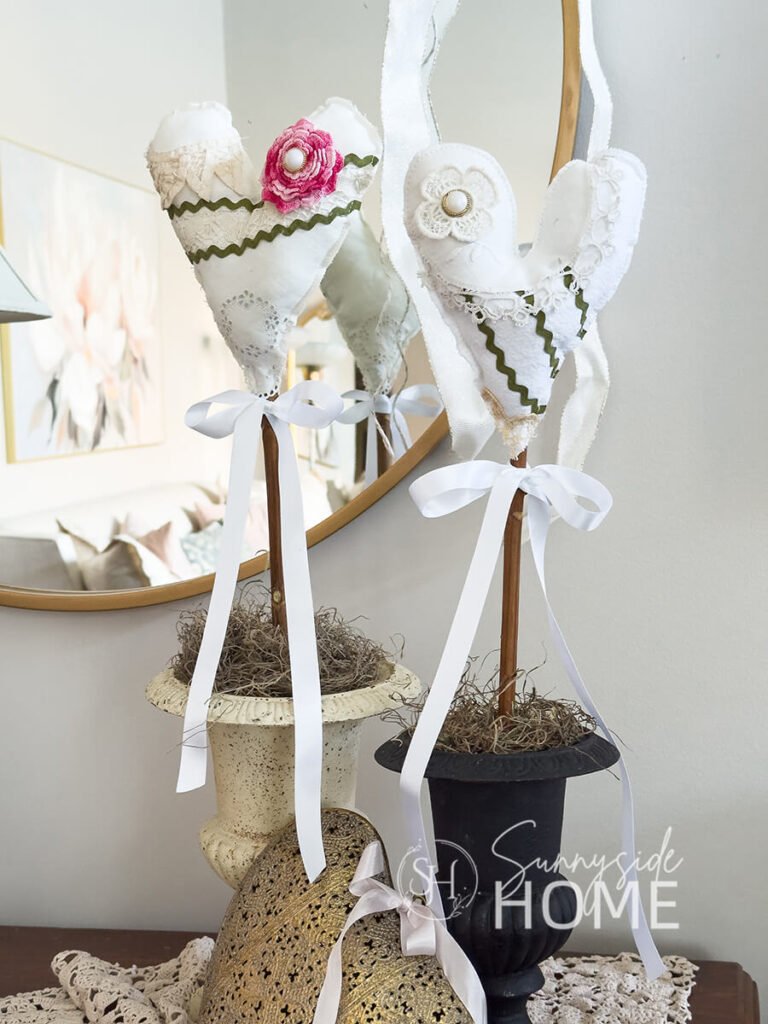
Before adding the final bit of polyfill, I inserted a stick—cut from a couple of hydrangea stems in my garden—pushing it in as far as possible.
Then I placed polyfill on both sides of the stick to keep the heart cushioned and balanced.

To secure the opening, I ran a small bead of hot glue along the edges and pressed the fabric closed while holding the stick firmly in place.
For hearts that will be used as bowl fillers or in a garland, you can skip the glue and simply close the opening with a few hand stitches, making them easy to display anywhere in your home.
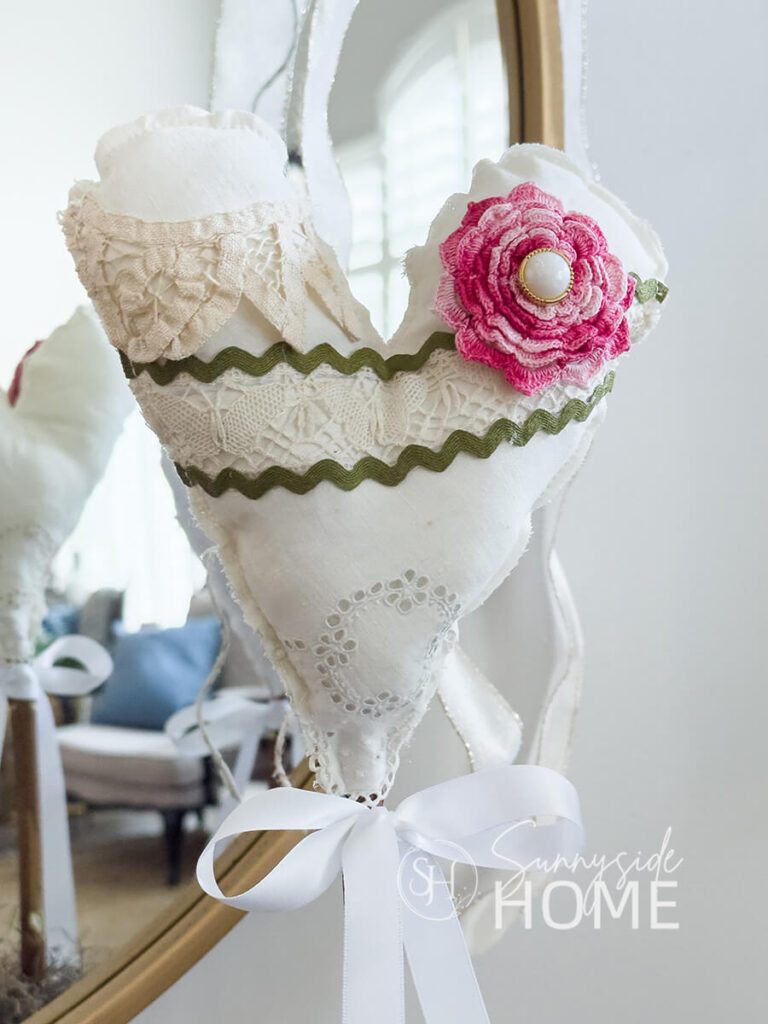
Here’s a close-up look at my hearts, showcasing all the delicate vintage details.
At the last minute, I dug through my button jar and added a tiny button to the center of each flower, and I love the charming touch it adds.
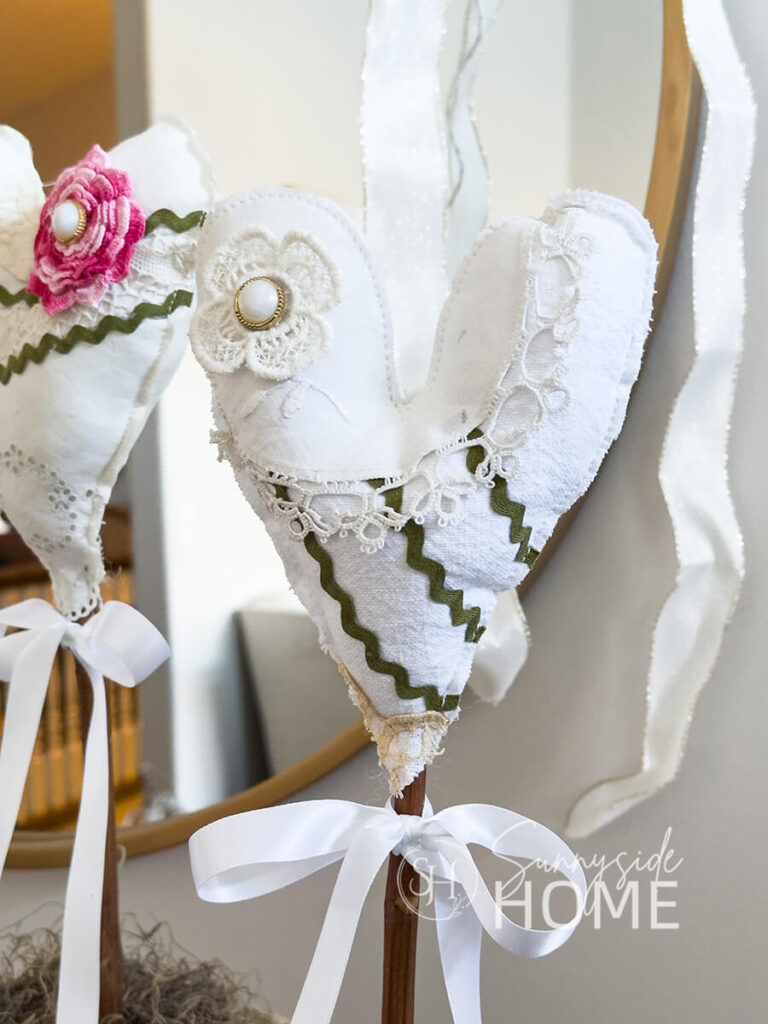
I’m absolutely thrilled with how these Valentine hearts made with vintage linens turned out, and when I showed them to my mother-in-law, her delight was priceless—she couldn’t have been happier to see her treasured fabrics brought to life.
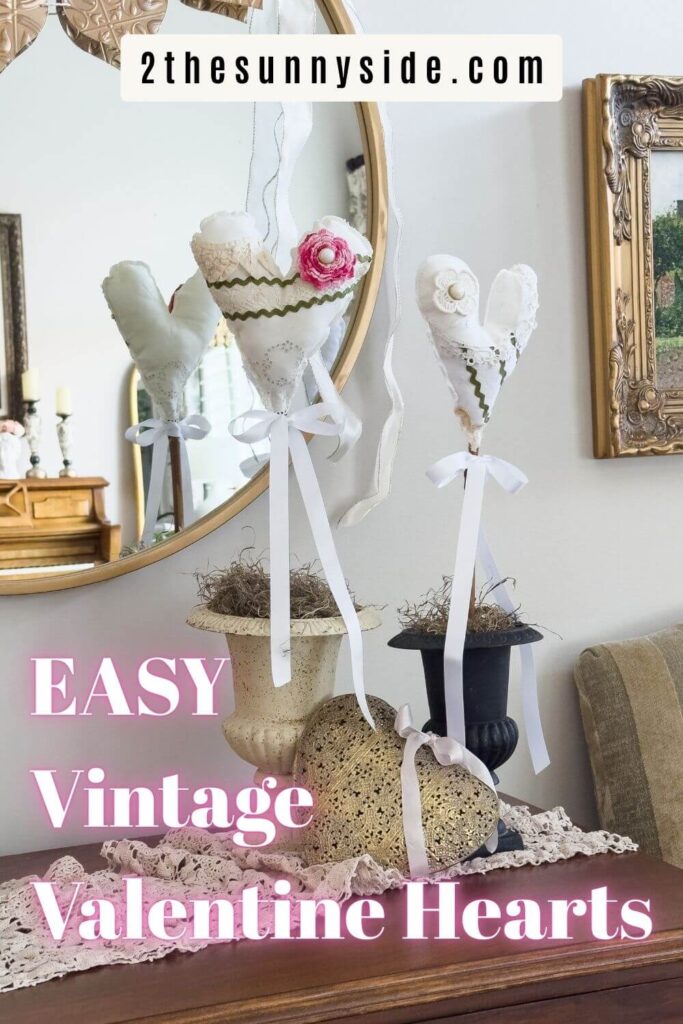
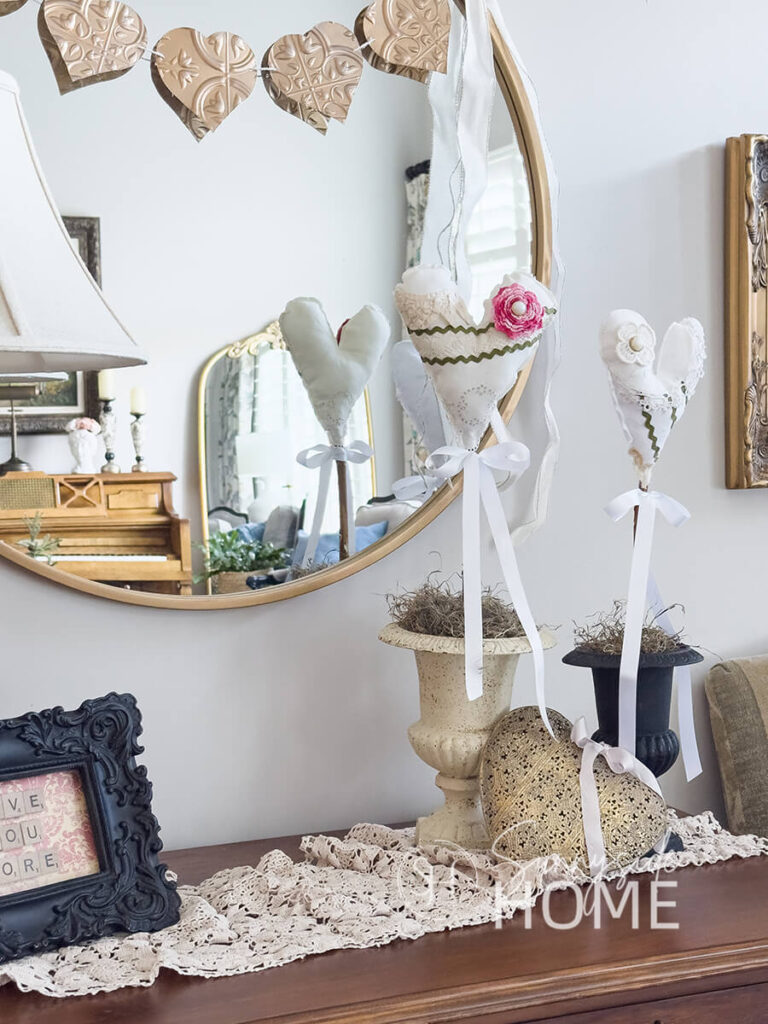
Style and Display Your Valentine Heart Decor
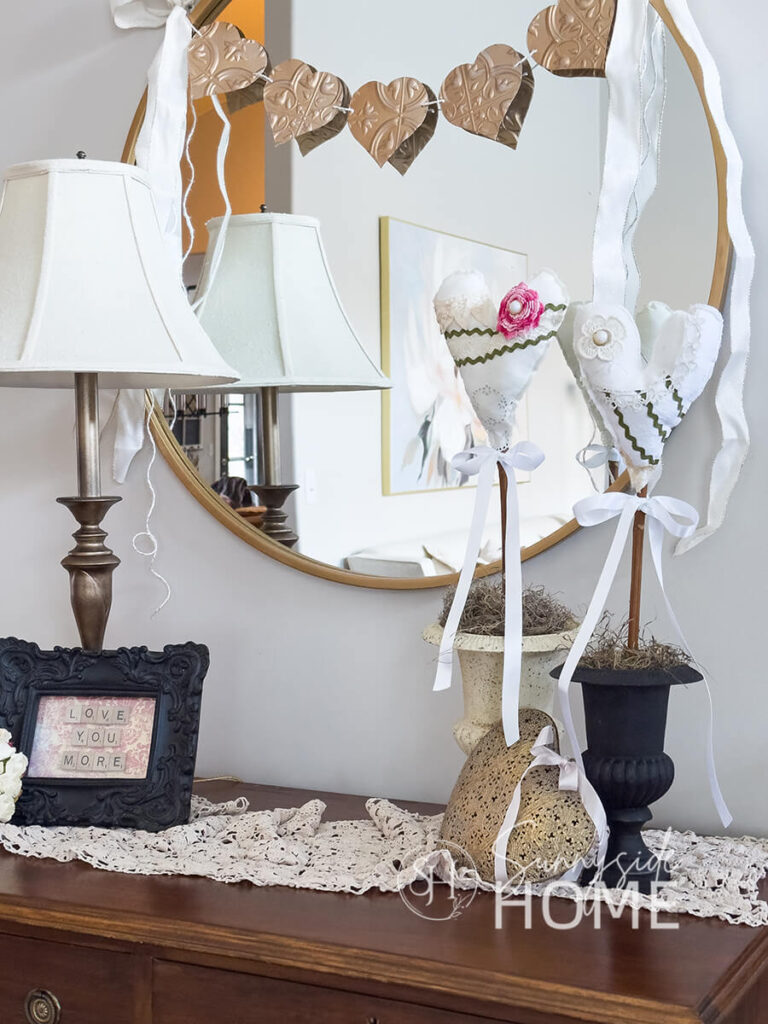
I love the way these Valentine hearts add charm to my entry table.
They pair beautifully with the DIY faux tin hearts and complement the faux antique brass finish on my lamp, creating a warm, layered look full of vintage character.
Tips for Success & Variations
To make this project work for everyone, a few tips and variations can help.
If sewing isn’t your thing, no-sew alternatives like fabric glue or fusible web work beautifully and still give your hearts a polished look.
You can also use non-vintage fabrics if you don’t have linens on hand—cotton, felt, or even patterned scraps can create equally charming hearts.
For extra versatility, consider turning your Valentine hearts into ornaments, gift toppers, or even little sachets filled with dried lavender.
These simple tweaks allow you to adapt the project to your style, space, and gifting needs while keeping that cozy, homemade charm.
FAQs for Valentine Heart Decor Using Vintage Linens
Q: Can I use fabrics other than vintage linens?
A: Absolutely! While vintage linens add charm and history, cotton, felt, or scrap fabrics work perfectly for this project, especially for beginners or no-sew options.
Q: Do I need a sewing machine to make these hearts?
A: Not at all! You can hand-stitch using a running or blanket stitch, or use fabric glue or fusible web for a no-sew version.
Q: How do I choose vintage pieces that are safe to cut?
A: Select pieces that are already stained, worn, or have trims removed. That way you can craft without worry, while still honoring their sentimental value.
Q: How much polyfill should I use?
A: Stuff hearts loosely for a soft, natural look. Add more polyfill if you want them plump, but avoid overstuffing.
Q: Can I make these hearts into ornaments or gift toppers?
A: Yes! Simply reduce the heart size, leave a small opening for hanging ribbon or string, and you have charming handmade ornaments or gift embellishments.
Q: How do I layer trims like lace, buttons, or crochet pieces?
A: Dry-fit all embellishments first to plan your design. Mix textures and sizes, and attach using glue, fusible web, or stitching depending on your preference.
Q: What is the best way to preserve the vintage linens after making the hearts?
A: Keep them out of direct sunlight to prevent fading. If storing for later, wrap gently in acid-free tissue to protect delicate fabrics.
Shop Vintage Inspired Valentine Decor

More DIY Valentine Decor
- Quick & Easy Valentine Yarn Wreath
- Simple Faux Brass Embossed Tile DIY Hearts
- Easy DIY Valentine Wreath with a Little Sparkle
- Make Unique Valentines Decor with Confetti
- No Sew Valentine Pillow Cover
- How to Make a Simple Neutral Valentine Garland
- Easy 30 Minute Valentine’s Day Craft Idea for Your Mantle
- Easy Valentine’s Day Decor Using Gold Leaf
- 30+ Easy DIY Valentine’s Day Decoration Ideas
Final Thoughts
Handmade decor like these Valentine hearts made with vintage linens is such a meaningful way to honor the past and keep treasured fabrics and the memories they carry, alive in your home.

This project is a gentle reminder that you don’t need to buy anything new to create something beautiful; often the supplies you already have tucked away can be transformed into charming, heartfelt pieces.
We hope this inspires you to gather your own vintage linens, lace, or scraps and create something special.
If you loved this project, don’t forget to save it for later or share it with friends so they can bring a little vintage charm into their homes too.
Please share your tips and ideas using vintage linens with us.
We love hearing from you!
If you’re new here, WELCOME! We love having new readers and friends!
You can learn more about us here.
Let’s stay connected! Join our DIY community of doers and you won’t miss the weekly updates and more inspiration for you always on a budget.
Sharing is caring!

Thanks for stopping by Sunnyside Home. Empowering you to create a home you love!
Retailers We Love
- Anthropologie
- Birch Lane
- Crate & Barrel
- Joss and Main
- Lampsplus
- Mark & Graham
- One Kings Lane
- Pottery Barn
- Rejuvenation
- Serena & Lily
- Wayfair
- West Elm
- Williams Sonoma
- World Market
Be sure to follow us on Pinterest for even more home decor and DIY ideas.
To see what we are working on before it’s on our blog, follow us on Instagram.
You will also find our video tutorials on our YouTube channel.
What’s New . . .
- How to Fix Chipped Kitchen Cabinets with a Pen

- Easy 4th of July Door Decor You Can Make in Minutes
- 35 Easy Decorating Ideas for Summer to Welcome the Season
- Fourth of July Decorating Ideas You’ll Love This Summer


