Do you dream of having long flowing curtains in your space? Chances are any prefab curtains will be too long for your specific measurements. Would the idea of hemming them to the correct length defer you from making the curtain purchase? Maybe you despise sewing, or maybe you don’t know how or don’t have the means to hem them.
Well today I’m going to share with you the EASIEST way to hem your curtains with NO sewing! You read that right! Absolutely no sewing involved, and they look great!
Sunny Side Design is a participant in the Amazon Services LLC Associates Program, an affiliate advertising program designed to provide a means for sites to earn advertising fees by advertising and linking to Amazon.com. As an Amazon Associate, this blog earns from qualifying purchases with no additional cost to you. Click here to read our full disclosure policy.

Before I dive into this simple no sew hemming hack I have to share a little something. I became a new auntie again last week! 😊💖 YAY! If you know anything about me by now you know I LOVE babies! I think I could be perfectly content to volunteer in a hospital nursery and snuggle babies all day! A huge congrats to my brother and sister-in-law and their family!

You can definitely get away with this long overflowing curtain look if your space is the right style. I’m thinking very luxurious, and extravagant, but that’s just not gonna work in my space. I wanted to have clean crisp lines in all the details in this space. I was fully intending to hem them as I normally would, using my sewing machine … but I thought I’d give this method a try for those of you out there who may not know how to sew, or don’t own a sewing machine. This is seriously SO simple!


PRO TIP: Once the curtains of your choice have been ironed and hung, you can complete the entire hemming process while they are still hanging! NO need to take them down and hang them back up!
First, you’ll want to have your curtains ironed and hanging. This will allow you to see the exact length they need to be hemmed to. Then you simply fold the curtain edge under, behind the curtain to the desired length (I like my curtains to be about 1″ above the floor, this of course is totally up to your preference.) You’ll then place straight pinsevery few inches to hold the hem in place.
Are you enjoying this project? Please Pin It, save it for later and share it with a friend.
Sharing is caring!

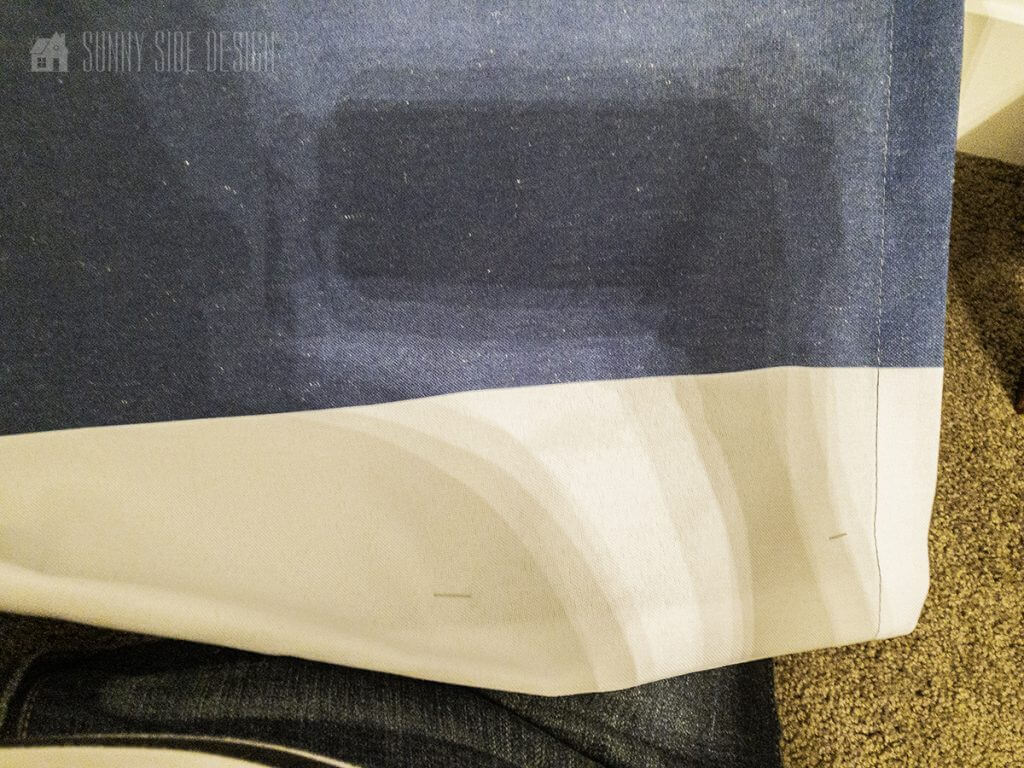
Here are a couple more views of the curtain panels pinned at the desired length. You may want to take a step back once the panel has completely been pinned to see if you like the length and if it’s approximately the same length across the whole curtain panel.


PRO TIP: For this space I was hemming 6 curtain panels. Instead of working on one panel at a time from start to finish, I moved onto each panel as if I were working in an assembly line. I would complete each of these steps on each curtain before moving onto the next step. It just made it more simple to repeat the same step 6 times in a row. (Just my preference)
Once all the curtain panels have been pinned, place the bottom edge of a panel onto the ironing board, wrong side facing you. With a hot iron press and make a crease on the fold. I like to use the steam setting, but this of course will depend on your fabric type.
If you’re new here, welcome! We’re so glad you’re here.
Let us introduce ourselves, we’re Michelle and Steph, a mom and daughter team who love to DIY and decorate our homes.
Not only are we passionate about making our homes warm, comfortable and unique, but it’s our mission to help you create that same feeling in your own home.
You’ll find ideas for repurposing, creating, decorating and making your home truly yours, while always mindful of a tight budget.
Undoubtedly we love finding ways to make your home look high-end on a small budget.
Plus you’ll also find a recipe or two as we share our family favorites with you.
We’d love it if you’d join our community of doers so you won’t miss any inspiration for your home.
We love new friends.

[mailerlite_form form_id=2]


Now may I introduce you to the best part of this process…”Steam a Seam” This is seriously so simple, you may be asking yourself why you’ve never hemmed this way before! Working on one panel at a time, unroll the steam a seam, cut to desired length and press onto the bottom edge of the fabric. (Some brands work a little differently … read the specific directions for the brand you have. You may need to leave the backing on the strip of “steam a seam” and iron into place, other brands like mine you simply rub on like you would apply a sticker, then remove the paper backing.)


Every now and then the paper backing would tear and a small piece of the backing would remain on the fabric. Using a small pair of scissors I gently inserted the point under the backing which helped the backing come off in one piece. Once the backing has been removed, carefully fold the hem up to the crease you ironed on the fold earlier. Again following the specific directions to the brand you have, iron the “Steam a Seam” into place and allow to cool. It’s that easy! You’ve successfully hemmed a curtain panel without any sewing!
Let’s stay connected! Follow us on social media!

The end result is every bit as professional as a hem that has been sewn using a machine or by hand. Next time you need to hem a pair of curtains (or a pair of pants for that matter!) give this method a try. Pin this post so you have it on hand when you need it later. You’ll be glad you did!
And to update or change the look of curtain panels, see how we dyed them in the washing machine.

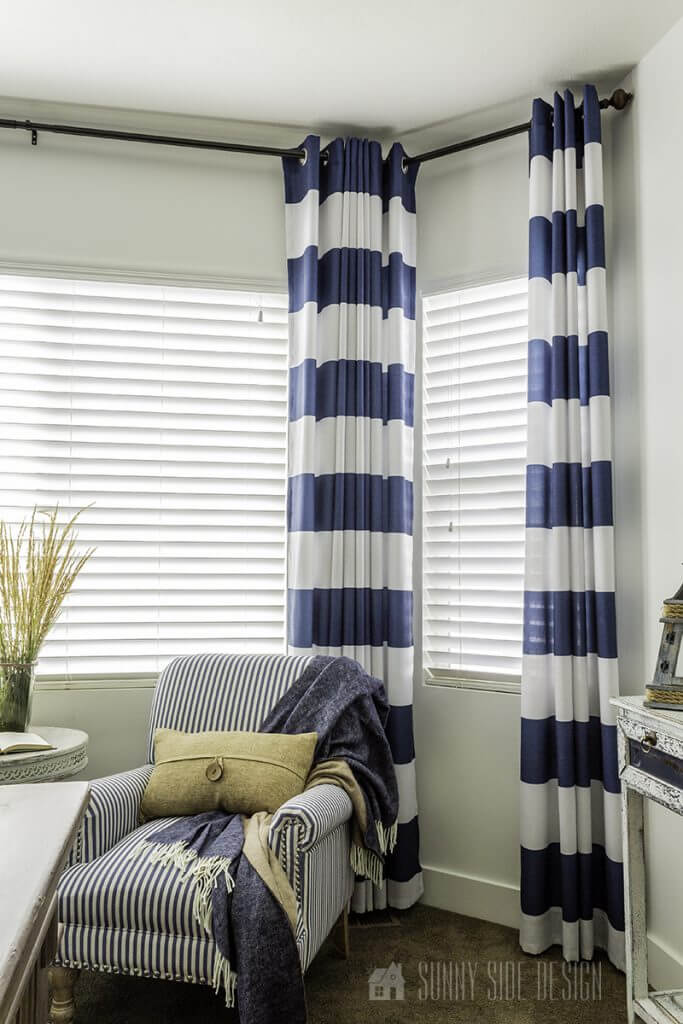

You may have noticed that these curtains are hanging inside a bay window. Ever tried to find a rod to hang inside a bay window before? It’s nearly impossible! In our previous home, we had a custom rod made and fit to size for curtains to be hung in our bay window. That company no longer offers this service. As far as I know (or at least as far as my search efforts lead me) you can’t buy curtain rods to hang inside a bay window, which is frustrating! We had to come up with our own DIY version for such a custom rod! Curious how we pulled this off? Check out this QUICK tutorial on How To Hang Curtains inside a Bay Window.
We hope you found some inspiration for your home today.
Please share your tips and ideas with us.
We love hearing from you!
If you’re new here, WELCOME! We love having new readers and friends!
You can learn more about us here.
Let’s stay connected! Join our DIY community of doers and you won’t miss the weekly updates and more inspiration for you always on a budget.
Sharing is caring!

Thanks for stopping by Sunny Side Design. Empowering you to create a home you love!
DISCLAIMER
This blog’s content is for entertainment purposes only and is not professional advice. By reading this blog and attempting to recreate a project, you assume all responsibility for any injuries or damages incurred. Read my full disclaimer here.
PHOTO USE AND CONTENT SHARING
All of the photographs you see here are the property of Sunny Side Design unless otherwise credited.
We love for others to share our work, so please feel free to use one photo with a link back to our website.
Pinning and sharing is always encouraged!
Please do not reproduce other Sunny Side Design content without permission.
Retailers We Love
- Anthropologie
- Birch Lane
- Crate & Barrel
- Joss and Main
- Lampsplus
- Mark & Graham
- One Kings Lane
- Pottery Barn
- Rejuvenation
- Serena & Lily
- Wayfair
- West Elm
- Williams Sonoma
- World Market
Be sure to follow us on Pinterest for even more home decor and DIY ideas.
To see what we are working on before it’s on our blog, follow us on Instagram.
You will also find our video tutorials on our YouTube channel.
- 15 Simple Decorating Ideas for Spring with Common Thrifted Items

- Easy DIY Easter Wreath with Dollar Store Finds
- 25 Must See Ideas for Organizing Under Kitchen Sink
- How to Decoupage a Vase with Blue and White Napkins