Create stunning frosted pinecone Christmas ornaments without the glitter chaos with this fast, affordable DIY that brings handmade charm to your tree in minutes.
This year we wanted to add a little bit of nature to our old-fashioned Christmas tree, but without the mess of glitter explosions or the Epsom-salt blizzard that seems to follow us for months.
Can you relate?!
We have a love-hate relationship with glitter and Epsom salts.
So we set out to find a way to get that dreamy frosted look—minus the chaos—and guess what?
We nailed it.
This simple, budget-friendly DIY gives your pinecone ornaments a gorgeous, permanent frost that looks stunning on any Christmas tree or as decor on your coffee table.
It’s quick, easy, and perfect for anyone craving that handmade holiday charm without giving up an entire weekend.
Ready to try it?
Grab some pinecones and let’s make your tree sparkle the fun (and mess-free!) way!
Sunnyside home is a participant in the Amazon Services LLC Associates Program, an affiliate advertising program designed to provide a means for sites to earn advertising fees by advertising and linking to Amazon.com. As an Amazon Associate, this blog earns from qualifying purchases with no additional cost to you. Click here to read our full disclosure policy.
Materials Needed for Pinecone Christmas Ornaments
For these frosted pinecone Christmas ornaments, you don’t need much—

We used craft-store pinecones for this project, but you can easily forage them for free from your own yard, local parks, or nearby trails.
And if you do prefer store-bought, here’s a money-saving tip: we grabbed ours at the end of the Christmas season and paid just $1 for an entire case—more pinecones than we’ll need in a lifetime!
This project truly proves that beautiful, handmade holiday décor doesn’t have to break the bank.
What Does the Pinecone Symbolize?
Pinecones have been treasured symbols for centuries, representing renewal, hope, and the promise of new beginnings.
Because they protect the seeds of future growth, many cultures view them as symbols of life, resilience, and even wisdom.
It’s no wonder they fit so beautifully into Christmas traditions—right when we’re celebrating Christ’s love, family, and the magic of the season.
Adding pinecone Christmas ornaments to your tree brings not only natural charm, but a meaningful touch that connects your holiday décor to nature’s timeless beauty.
Are you enjoying this project? Please Pin It, save it for later and share it with a friend.
Sharing is caring!

Clean and Sanitize Pinecones
If you’ve foraged your pinecones from your yard, a park, or the trails, you’ll definitely want to clean and sanitize them before crafting.
Start by shaking off loose debris or brushing them gently. Then place the pinecones on a foil-lined baking sheet and bake them at 200°F for 30–45 minutes to remove bacteria, dry out sap, and help the scales open up nicely.
Let them cool completely, and they’ll be clean, safe, and perfectly prepped for your handmade Christmas ornament!
If you’re new here, welcome! We’re so glad you’re here.
Let us introduce ourselves, we’re Michelle and Steph, a mom and daughter team who love to DIY and decorate our homes.
Not only are we passionate about making our homes warm, comfortable and unique, but it’s our mission to help you create that same feeling in your own home.
You’ll find ideas for repurposing, creating, decorating and making your home truly yours, while always mindful of a tight budget.
Undoubtedly we love finding ways to make your home look high-end on a small budget.
Plus you’ll also find a recipe or two as we share our family favorites with you.
We’d love it if you’d join our community of doers so you won’t miss any inspiration for your home.
We love new friends.

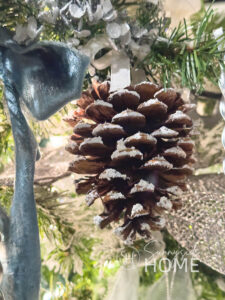
Frosting the Pinecones
There are countless ways to create that icy, frosted look on pinecones—glitter, Epsom salts, faux snow—but if you’re anything like me, it’s a love-hate relationship.
Sure, they look magical… but I’m still finding glitter in corners of my house nine months later.
So I set out to find a mess-free method that still gives that gorgeous snowy finish, and guess what?
This one is super quick, easy, and budget-friendly.
I made 50 frosted pinecone Christmas ornaments in about an hour!

Once your pinecones are clean, cover your workspace (I used an old cardboard box), grab an old paintbrush, and dab on Snow-Tex using a pouncing motion.
This creates a beautifully textured, natural-looking frosty finish.
Add a little or a lot depending on how snowy you want them to look.

Let one side dry—mine dried in under 30 minutes—then flip and frost the other side.
Easy, fast, and no glitter cleanup until next July!
Let’s stay connected! Follow us on social media!
Add a Hanger
To turn your frosted pinecones into ready-to-hang Christmas ornaments, you’ll need a hanger.
For ours, we kept it simple and used ribbon.

We made a knot in the center of the ribbon, then secured it with just dab of hot glue at the top of the pinecone, pressing the knot of the ribbon into the glue.
To avoid burned fingers, use a skewer or silicone finger protectors to press the ribbon in place.
Other options include twisting a small eye screw into the bottom of the pinecone and using an ornament hook, twine, or wire.
Make sure your hanger is secure, especially for larger or heavier pinecones.
For an extra festive touch, you can also add embellishments like sprigs of greenery, berries, or mini bells for added charm.
Style and Hang on the Christmas Tree
Now for the fun part—styling and hanging your frosted pinecone Christmas ornaments!

These natural beauties work with just about any tree theme, whether rustic, vintage, Scandinavian, or woodland-inspired.

For my vintage inspired Christmas tree, I simply tied the pinecones to the branches with a pretty bow—easy, charming, and totally mess-free.
You can also try grouping a few pinecones together in clusters or hanging them at varying heights for visual interest.
Mix them with other ornaments, lights, or ribbon to create depth and texture.
And don’t toss those leftover pinecones!

They’re perfect for coordinating garlands, wreaths, or festive table décor, helping tie your holiday decorations together beautifully and naturally.
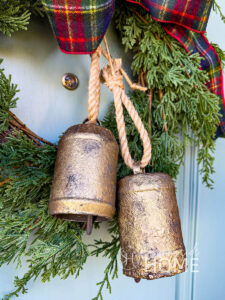
More Easy Christmas Ornaments & Decor
- Metal Tinsel Christmas Ornaments
- How to Make a Christmas Star with Bottlebrush Trees
- Beautiful DIY Christmas Bells Made From Recycled Materials
- Christmas Bells Using Dollar Tree Items
- Quick and Easy Cameo Christmas Ornaments
- How to Make Christmas Bell Decorations
- Personalized Christmas Ornaments with Nostalgic Memories
- Cozy Christmas Decorations That Are Quick & Easy
- Easy Finger Knit Christmas Tree Decor
- How to Make Vintage Door Plates into Christmas Ornaments
Shop Pinecone Ornaments & Decor

Final Thoughts
Creating frosted pinecone Christmas ornaments is such a fun, quick, and budget-friendly way to bring a touch of nature and handmade charm to your tree.
Whether you tie them with a ribbon, cluster them together, or use them for garlands and wreaths, these ornaments add a timeless, cozy feel to your holiday décor.

Give it a try and see how easy it is to make your tree sparkle with natural beauty, then share your creations with us!
Don’t forget to pin this tutorial so you can revisit it every holiday season.
We hope you found some inspiration for your home this Christmas.
Please share your tips and ideas with us.
We love hearing from you!
If you’re new here, WELCOME! We love having new readers and friends!
You can learn more about us here.
Let’s stay connected! Join our DIY community of doers and you won’t miss the weekly updates and more inspiration for you always on a budget.
Sharing is caring!
Wish you a joyous Holiday Season!

Thanks for stopping by Sunnyside Home. Empowering you to create a home you love!
Retailers We Love
- Anthropologie
- Birch Lane
- Crate & Barrel
- Joss and Main
- Lampsplus
- Mark & Graham
- One Kings Lane
- Pottery Barn
- Rejuvenation
- Serena & Lily
- Wayfair
- West Elm
- Williams Sonoma
- World Market
Be sure to follow us on Pinterest for even more home decor and DIY ideas.
To see what we are working on before it’s on our blog, follow us on Instagram.
You will also find our video tutorials on our YouTube channel.
What New . . .
- How to Make Simple Frosted Pinecone Christmas Ornaments

- How to Make a Christmas Tree Collar with Dollar Tree Tiles
- Beautiful DIY Christmas Bells Made From Recycled Materials
- 4 Simple and Unique Blue Thanksgiving Table Decor Ideas