This was a fun and simple DIY that took only one evening with the help of my husband, Steve. I have been looking for a vintage ladder to hang a few blankets on for quite some time and never found one I loved. Then one day while rummaging through some of my thrifting finds I spotted the croquet mallets. This was the inspiration I needed for this ladder.
Sunny Side Design is a participant in the Amazon Services LLC Associates Program, an affiliate advertising program designed to provide a means for sites to earn advertising fees by advertising and linking to Amazon.com. As an Amazon Associate, this blog earns from qualifying purchases with no additional cost to you. Click here to read our full disclosure policy.

These are the supplies I used:
- Croquet mallets (I used 5)
- 2 X 6 lumber
- Saw
- Drill with wood bits
- Wood Glue
- Nail gun (or you could use a hammer or screw and screw driver)


I used a 2 X 6 board, because it is what I had lying around. You could use a 2 X 4 or whatever you like. We measured and cut it to length. I wanted it to be 7′ tall.

We then ripped the boards down to the width that I wanted which was 2 1/2″.


We then positioned the 2 boards next to each other to mark the placement for the rungs for the ladder. I spaced each rung 14″ apart.
Are you enjoying this project? Please Pin It, save it for later and share it with a friend.
Sharing is caring!


We removed the mallet portion from each croquet mallet and cut the handle portion to length on a chop saw. We cut each croquet handle to be 22″ long.


We drilled holes in the boards that will be the sides of the ladder. Each croquet handle had a slightly different circumference, so we used several different wood drill bits for each hole. Each hole was drilled to a depth of 1/2″

Working on one side of the ladder at a time, put a little wood glue into each hole. Place the handle of the croquet mallet into each hole.

Carefully turn it over and place a nail (or screw) in the center of the croquet mallet handle through the board, securing it in place. Repeat for the other side of the ladder.
If you’re new here, welcome! We’re so glad you’re here.
Let us introduce ourselves, we’re Michelle and Steph, a mom and daughter team who love to DIY and decorate our homes.
Not only are we passionate about making our homes warm, comfortable and unique, but it’s our mission to help you create that same feeling in your own home.
You’ll find ideas for repurposing, creating, decorating and making your home truly yours, while always mindful of a tight budget.
Undoubtedly we love finding ways to make your home look high-end on a small budget.
Plus you’ll also find a recipe or two as we share our family favorites with you.
We’d love it if you’d join our community of doers so you won’t miss any inspiration for your home.
We love new friends.

Sand any rough edges to prepare it for a finish.

I knew that I wanted this to look like an old vintage ladder, so for the finish I wanted to use the vinegar and steel wool method. To make this stain, fill a glass jar with vinegar and add a piece of steel wool. Let this sit for a couple of days and let the magic happen.

I know my “stain” jar looks pretty yucky, but I had made my vinegar & steel wool stain over a year ago for another project. I just save any unused portion for my next project. On the lower portion of the photo you can see where I have applied the stain. Brush it on with a paint brush, let it sit for a few minutes and wipe off any excess. Let dry.
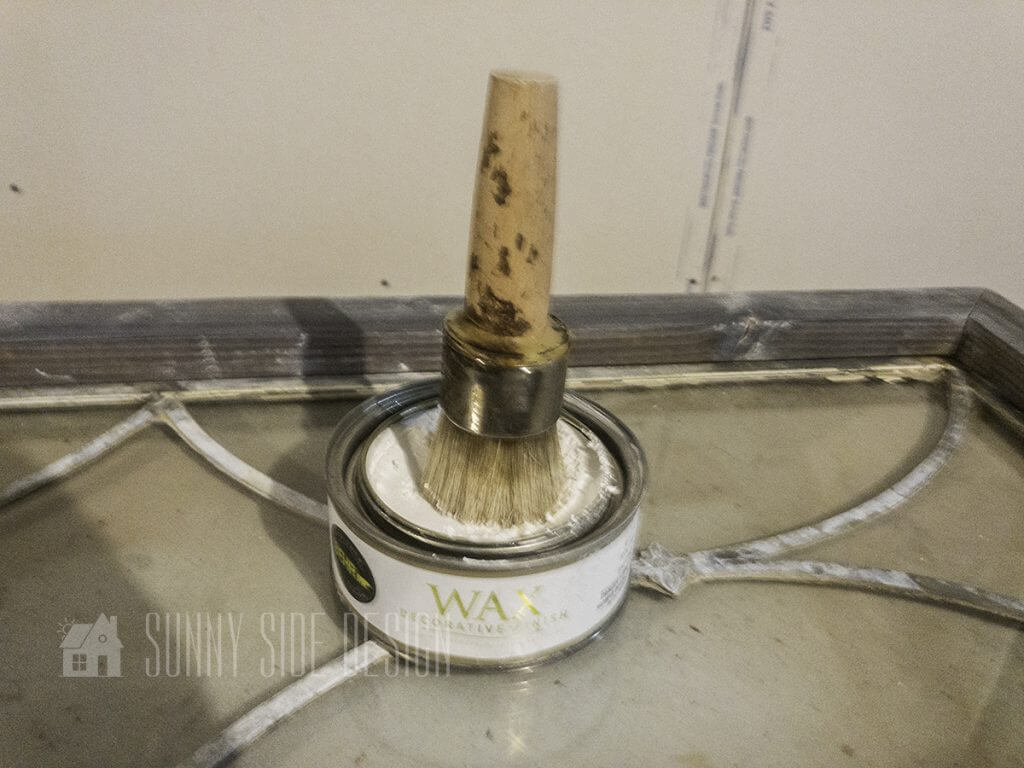
To finish off my aged and vintage look for this ladder, I applied a liming wax or a white wax.

Using a stiff waxing brush, I applied the wax in a circular motion pushing the white wax into the groves and imperfections of the wood.


I let the wax dry overnight and then I buffed it with a clean cotton cloth. This gives it a silky smooth finish with a slight sheen.
Let’s stay connected! Follow us on social media!

Here is the final result of my staining and waxing process. Isn’t it wonderful? It looks so aged and worn, just what I was looking for.


Wasn’t this a fun and simple project? We love it when we can incorporate vintage items into our projects. Has this inspired you to incorporate some items you have lying around your home into your next project? We would love to hear from you, please share with us what you are working on.
More Cheap DIY Projects for Your Home
- Simple DIY Pedestal Bowl with Thrift Store Finds
- How to Create a Frame From Scrap Lumber
- How to Make Cardboard Picture Frames with Saltwash
- How to Make Quick and Easy DIY Mirror Frame
- Easy Pedestal Serving Tray from Thrift Store Finds
- How to Make a Simple and Stylish Cane Tray
We hope you found some inspiration for your home today.
Please share your tips and ideas with us.
We love hearing from you!
If you’re new here, WELCOME! We love having new readers and friends!
You can learn more about us here.
Let’s stay connected! Join our DIY community of doers and you won’t miss the weekly updates and more inspiration for you always on a budget.
Sharing is caring!

Thanks for stopping by Sunny Side Design. Empowering you to create a home you love!
DISCLAIMER
This blog’s content is for entertainment purposes only and is not professional advice. By reading this blog and attempting to recreate a project, you assume all responsibility for any injuries or damages incurred. Read my full disclaimer here.
PHOTO USE AND CONTENT SHARING
All of the photographs you see here are the property of Sunny Side Design unless otherwise credited.
We love for others to share our work, so please feel free to use one photo with a link back to our website.
Pinning and sharing is always encouraged!
Please do not reproduce other Sunny Side Design content without permission.
Retailers We Love
- Anthropologie
- Birch Lane
- Crate & Barrel
- Joss and Main
- Lampsplus
- Mark & Graham
- One Kings Lane
- Pottery Barn
- Rejuvenation
- Serena & Lily
- Wayfair
- West Elm
- Williams Sonoma
- World Market
Be sure to follow us on Pinterest for even more home decor and DIY ideas.
To see what we are working on before it’s on our blog, follow us on Instagram.
You will also find our video tutorials on our YouTube channel.
- Stunning Decoupage Christmas Balls for a High-End Christmas Look

- How to Make Vintage Inspired Santa Ornaments
- The Best Sweet Potato Casserole with a Pecan Topping
- 25 Beautiful Thanksgiving Centerpiece Ideas You Can Create