Oh hey, it’s me again. Are you ready for another curtain tutorial? I feel like that’s all I’ve been talking about lately, but I do have a lot of different DIY curtains to show you. Are you guys ever pressed to get projects done by a deadline? For some reason I find that’s how a lot of my projects get finished. It’s no different with these cute yellow quatrefoil curtains.
(Real quick…are you new here?! WELCOME! We’re always excited to have new friends! You may want to subscribe to our weekly newsletter for even more great ideas!)
Sunny Side Design is a participant in the Amazon Services LLC Associates Program, an affiliate advertising program designed to provide a means for sites to earn advertising fees by advertising and linking to Amazon.com. As an Amazon Associate, this blog earns from qualifying purchases with no additional cost to you. Click here to read our full disclosure policy.

I had offered to host a baby shower for my Sister-in-law at our home so naturally I wanted to have my curtains finished. I had actually had them for a while and knew what I wanted to do with them, I just hadn’t started them yet because I knew it was going to be a big undertaking. Especially since I was also expecting a baby and was due in a month! What was I thinking?! All I can say is, deadlines are a good motivator for me.First of all, let me tell you how I even came up with the crazy idea of painting my curtains anyway! Remember when I first made mention of painting curtains with my Mom in my favorite things post? I also talked about how I got into being such a big DIYer when our budget was tight on one income. I wanted to have a beautiful home, full of personality, but we could not afford to do it without doing everything ourselves! At the time I loved the quatrefoil pattern and thought that would be a fun print in yellow to help make our space feel brighter and happy. Believe me I did spend a lot of time pricing out fabric that would’ve been perfect, but I just couldn’t justify the expense. Then it came to me. What if I painted the pattern on the MERETE curtains from IKEA? With a little elbow grease, I knew I would be able to justify making these curtains because it was substantially less money. And I’d already painted stripes on curtains for my boys’ room…how hard could it be?

Here’s a list of supplies you’ll need for this project:
-curtain panels
–Bowl to mix the paint and fabric medium
-Disposable foam plate
I used the MERETE room darkening curtains, 1 pair, bleached white, 57×98” for $29.99. It’s a great price for a pair of curtains that already have the gromets added and ready to hang.
You can pick up a drop cloth for about $12 from The Home Depot, Lowes, Harbor Freight, or Walmart to name a few stores.

I love using Behr paint from The Home Depot. (You’ll probably hear this from me in every post I use paint!) It’s thick and creamy and has great coverage. I’ve tried other brands and always come back to my beloved Behr. The size of your project will determine how much paint you’ll need to buy. I purchased 1 gallon which cost roughly $30 because I planned to paint 8 curtain panels total.

You’ll want to buy Fabric Medium to mix into your paint to make sure the paintproperly bonds to the fabric. This will also help the paint to stay intact if you plan to ever wash your curtains. I used the 8oz. Delta Creative Ceramcoat Textile Medium from Hobby Lobby. It’s listed for $5.99, but if you’re super frugal like me and on a tight budget I used a 40% off coupon for each tube I bought which saved a bit once it was all added up. I can’t remember the exact number of tubes I used since these were painted 5 years ago. (I’m feeling lucky I even have pictures since we weren’t blogging at the time.) But I’d guess we used 5-6 tubes. You’ll use 1-part fabric medium to 2-parts paint.

You can use any old bowl you have to mix the paint and fabric medium together. An empty cool whip container or something similar works great.
You’ll want to use a disposable foam plate as your paint tray. A regular paper plate would soak up the paint and get soggy, so the foam plate really is best here. The reason we used a foam plate instead of our paint tray was to allow us to have as smooth a surface as possible while loading the roller with paint. Typically paint trays have a raised dot or linear pattern and that will show as you roll onto the fabric.
Paper towels will be used to blot out any excess paint from the roller to get a more even application. Any brand will do.
Baby wipes come in handy for cleaning the stencil.
I picked up a 3-Piece High-Density Foam Mini Paint Trim Kit at The Home Depot for about $6. This included a 4” roller with handle and a rolling tray.

Last but not least you’ll need a stencil of your choice. I purchased the Casablanca stencil from www.cuttingedgestencils.com for about $32. I used a coupon that came via email after I’d signed up for their newsletter, the list price is $39.99.
Are you enjoying this project? Please Pin It, save it for later and share it with a friend.
Sharing is caring!
Who’s ready to get down and dirty and learn how to stencil these cute curtains? Here’s a quick VIDEO tutorial to show you how we painted them. For more in-depth details please continue to read the post.
All I can say is my sweet Mom is and Angel! Who would want to help paint 8 curtain panels especially if they weren’t even for your own home? It took us several days to paint all 8 panels! Weather permitting you could easily paint them in your garage or patio and get more than one panel done at a time. We painted them in our dining area one panel at a time since it was February and the temperature was too cold to paintoutdoors.

To start, we moved the dining table into the front room to give us more space to work. Then we spread the drop cloth onto the floor and taped it down to keep it in position. Using a drop cloth under the curtain gave me peace of mind that if any paint were to bleed through the curtain it would get on the drop cloth and not my kitchen floor!

After getting the drop cloth into place and secured down with tape you can spread out a curtain panel. You’ll want to use painters’ tape to hold the curtain down as well to make sure it’s secure. As you tape it into place, you’ll want to gently pull the curtain to make sure it’s nice and taught. This will help remove any wrinkles and make it easier to use the stencil.
We learned how uneven the MERETE curtains are truly cut while painting these curtains. Not only were the bottom edges not cut straight but we noticed as we were trying to line up the stencil to a straight edge that the sides weren’t cut real perfectly either. We opted to line the stencil up to the bottom edge of the grommets. We figured that would give us the straightest line since the curtains would be hanging from the grommets. Secure the stencil down with painters’ tape. A piece on each corner should work.
Note: You can see in the pictures that the curtains are hanging prior to being painted. I did this so I could pin the bottom edges up and hem them prior to painting. I also pre-washed and ironed them before hemming.

To prepare the paint, simply follow the directions on the fabric medium of your choice. We mixed 1-part fabric medium to 2-parts paint in an old bowl we didn’t care about having paint in. We used a paint stir stick to mix the two parts together. Once mixed you can pour a small amount onto the foam plate.
We started from the left side of the panel and worked our way to the right side. This allowed the paint to dry enough that we could move down to the next row without worrying if we would smear the paint.
You may be a little apprehensive to start painting, I sure was! I had the grand vision in my head of how I wanted this project to turn out, but I also didn’t want them to be a complete disaster! I would recommend practicing on a scrap piece of fabric before diving right into the curtains. I used the scraps I’d cut off from hemming the curtains. This way it was the same fabric and would absorb the paint the same way, this gave me a real accurate way to practice and see how it would look. When you’re comfortable (or a little less scared) you can move to your curtain panel.


Begin by loading the roller with paint. You’ll want the roller to be fully covered but not too saturated with paint. After the roller is loaded, roll it onto the paper towel with very light pressure just to remove any excess paint on the roller.
If you’re new here, welcome! We’re so glad you’re here.
Let us introduce ourselves, we’re Michelle and Steph, a mom and daughter team who love to DIY and decorate our homes.
Not only are we passionate about making our homes warm, comfortable and unique, but it’s our mission to help you create that same feeling in your own home.
You’ll find ideas for repurposing, creating, decorating and making your home truly yours, while always mindful of a tight budget.
Undoubtedly we love finding ways to make your home look high-end on a small budget.
Plus you’ll also find a recipe or two as we share our family favorites with you.
We’d love it if you’d join our community of doers so you won’t miss any inspiration for your home.
We love new friends.

[mailerlite_form form_id=2]


Both my Mom and I were a little nervous to start painting on the actual curtain. We were very cautious with the first panel simply because we weren’t sure how it was going to turn out. We started with the roller on the stencil and gently rolled it off of the stencil and onto the fabric. We did this with each of the cutouts on the stencil to help prevent any paint bleeding under the stencil.

Once you’ve completed painting the entire stencil, carefully peel the painters’ tape up and lift up the stencil. We then laid the stencil down on an old towel and used the baby wipes to clean off all the paint from the stencil. Clean the front of the stencil and then turn it over and clean the back side. (You can purchase baby wipes at your local dollar store…we went through a lot of wipes!)

Once the stencil has been cleaned, carefully position it, lining it up with the previous pattern and tape into place. Repeat the same steps as before. As time consuming as it was to clean the paint off after each time we had painted the entire stencil it was well worth it. Let me explain why. If we were to simply move the stencil over to the next position two potential problems would occur. First, each time you add paint to the stencil, would build layer upon layer of paint and increase the chance of the dry paintflecking off and getting rolled onto the curtain. Second, there is an increased possibility that paint could bleed under the stencil and you won’t end up with nice crisp lines. This added a lot of time to the project but we had nice crisp lines to the pattern each time. If you skip this step you might regret it.
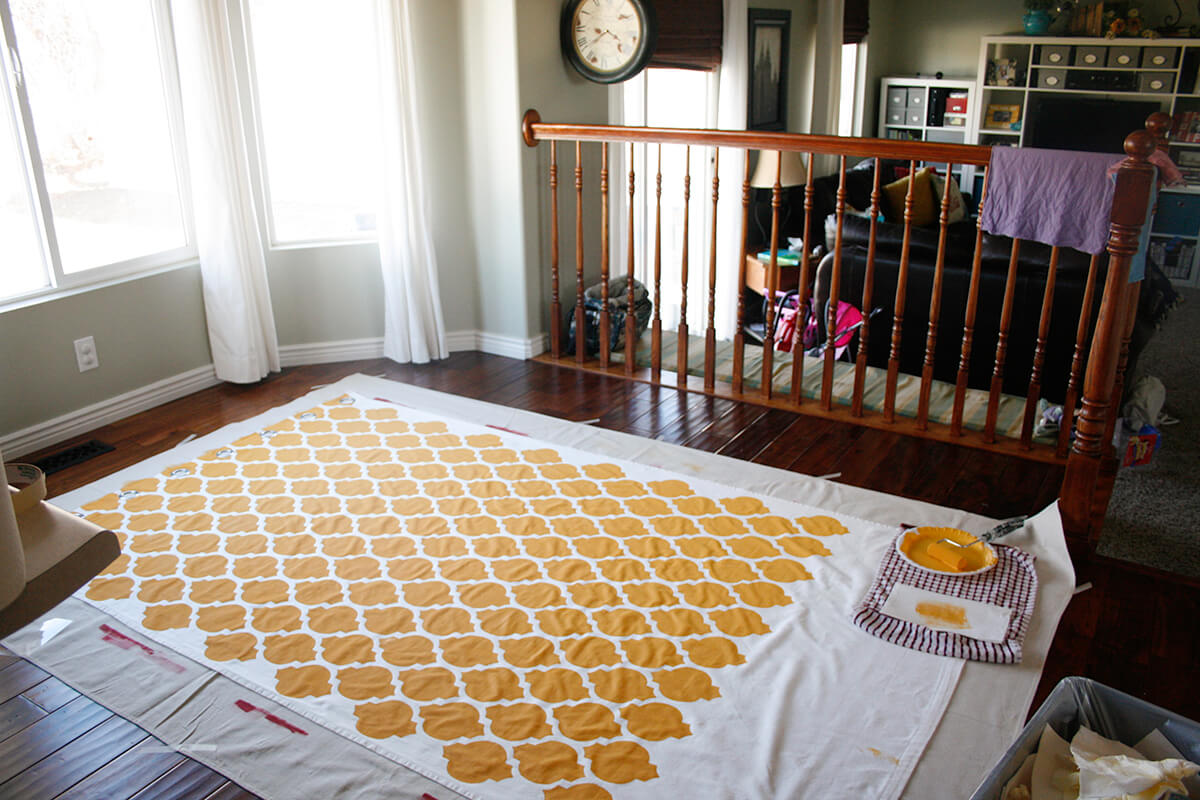
Continue on with the same steps as before to complete the entire panel. Left to right, row by row. Once you have painted the entire panel you can now go back in to paintthe side pieces that still need the pattern. (Refer to the picture to see what I mean.) We started at the top and worked our way down, just to ensure the paint would be dry and we weren’t setting the stencil on top of wet paint.
Let’s stay connected! Follow us on social media!

Once the panel has been painted, let it completely dry. Since we had so many panels we were painting, we carefully lifted the panel up while it was wet and draped it over the railing to let it dry. This allowed us to have the space to start painting the next panel. After the first panel had dried, we held it up to get a better look at our work. Overall it looked pretty good. There were a few spots in the pattern where it wasn’t as opaque as other areas, but it gave it a bit of a vintage look. And once the curtains were hung you couldn’t even see the difference.

After closely looking at the first dried panel we learned that the fabric really soaked up the paint which caused some areas to be more opaque than others. Instead of trying to perfectly line up the stencil again on the entire panel for another coat of paint, we opted that it was good enough. On the remaining panels we really tried to make sure the curtain had enough paint on it. After each section had been painted, we would carefully look to see if there were any spots that needed a little more paint. Then we could quickly give it another coat before cleaning the stencil and moving it to the next position. This seemed to help get each section of the design to be more opaque.
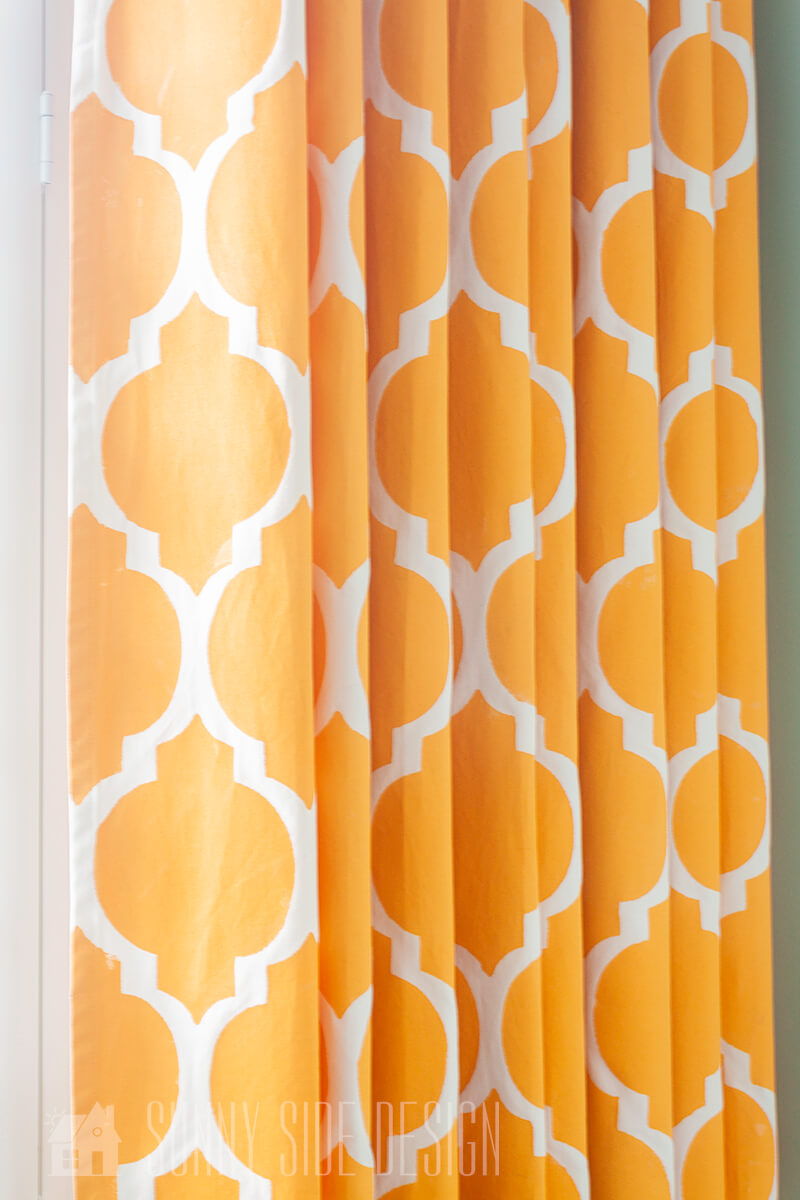
After you have painted all of the panels and they have all completely dried, you’re ready for the last step! The paint should be heat set to ensure it’s properly bonded to the fabric and won’t wear off when washed. If you were painting a small area, say an image on a shirt, you could easily use your iron. Since we had painted an entire curtain panel, we tossed them in the dryer for about 20 minutes each. A light ironing may be needed to get any wrinkles out, but after that they’re finally ready to be hung!
Phew! You’re finally finished! Now you can take a step back and admire your MANY hours of hard work! As mentioned, before it took us several days to paint all 8 panels with the limited space we were working, but I was so happy with the way they turned out!

We enjoyed these curtains in our previous home. They were hung to the top of the ceiling to give the illusion that the ceiling was higher than it actually was. Upon moving to our new home we built, our ceilings were 1’ taller, so these curtains ended up being too short for our new home. Gah! After the many hours of work, they weren’t going to be the right length for this house!

As a thank you to my Mom for her many hours of labor helping me paint them, I gave her a pair to hang in her new home! They look so adorable in the kids’ sleepover room! I was able to sell the remaining panels through our local classifieds.
Another way you can easily change the look of curtain panels is with fabric dye. See how we simply dyed quickly curtain panels in the washing machine.
We hope you found some inspiration for your home today.
Please share your tips and ideas with us.
We love hearing from you!
If you’re new here, WELCOME! We love having new readers and friends!
You can learn more about us here.
Let’s stay connected! Join our DIY community of doers and you won’t miss the weekly updates and more inspiration for you always on a budget.
Sharing is caring!

Thanks for stopping by Sunny Side Design. Empowering you to create a home you love!
DISCLAIMER
This blog’s content is for entertainment purposes only and is not professional advice. By reading this blog and attempting to recreate a project, you assume all responsibility for any injuries or damages incurred. Read my full disclaimer here.
PHOTO USE AND CONTENT SHARING
All of the photographs you see here are the property of Sunny Side Design unless otherwise credited.
We love for others to share our work, so please feel free to use one photo with a link back to our website.
Pinning and sharing is always encouraged!
Please do not reproduce other Sunny Side Design content without permission.
Retailers We Love
- Anthropologie
- Birch Lane
- Crate & Barrel
- Joss and Main
- Lampsplus
- Mark & Graham
- One Kings Lane
- Pottery Barn
- Rejuvenation
- Serena & Lily
- Wayfair
- West Elm
- Williams Sonoma
- World Market
Be sure to follow us on Pinterest for even more home decor and DIY ideas.
To see what we are working on before it’s on our blog, follow us on Instagram.
You will also find our video tutorials on our YouTube channel.
- Creating a Cozy Outdoor Living Room with Thrifted Finds

- The Best ‘Berry in Love’ Bridal Shower Ideas
- Paint an Old World Texture Finish on a Vase
- Easy Strawberry Chicken Salad with Lime Maple Balsamic Vinaigrette