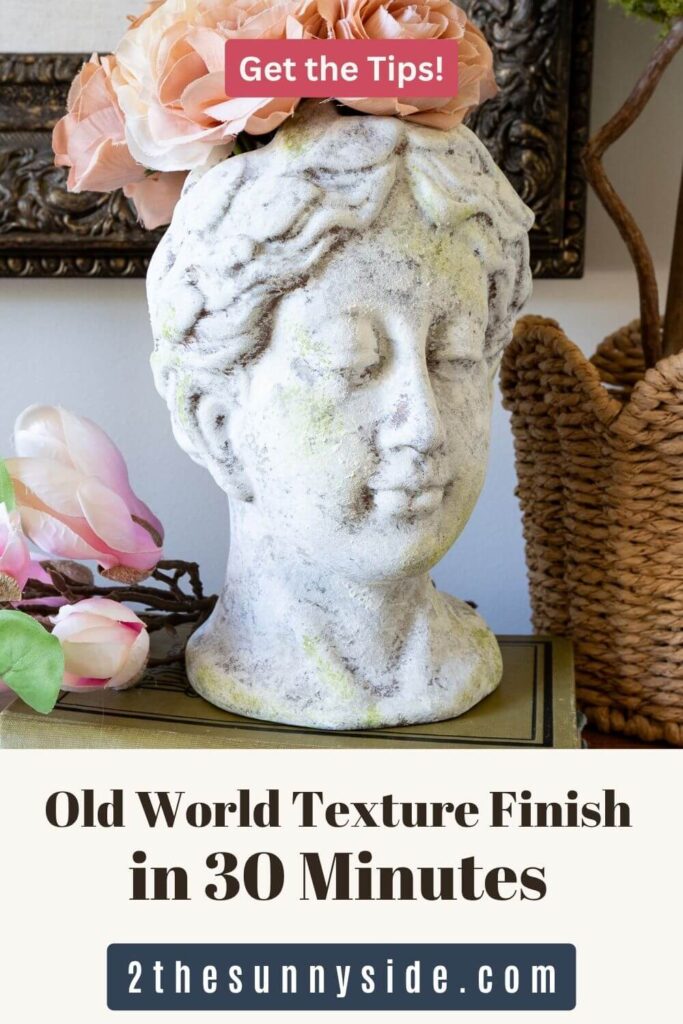
Create an old world texture finish on a vase in just about 30 minutes of hands-on time, using a simple paint technique. The result is a beautifully textured, weathered piece that looks like it’s been aged outdoors in a garden for years.
Over the years, we’ve experimented with a lot of different techniques to create a beautifully textured finish on a vase.
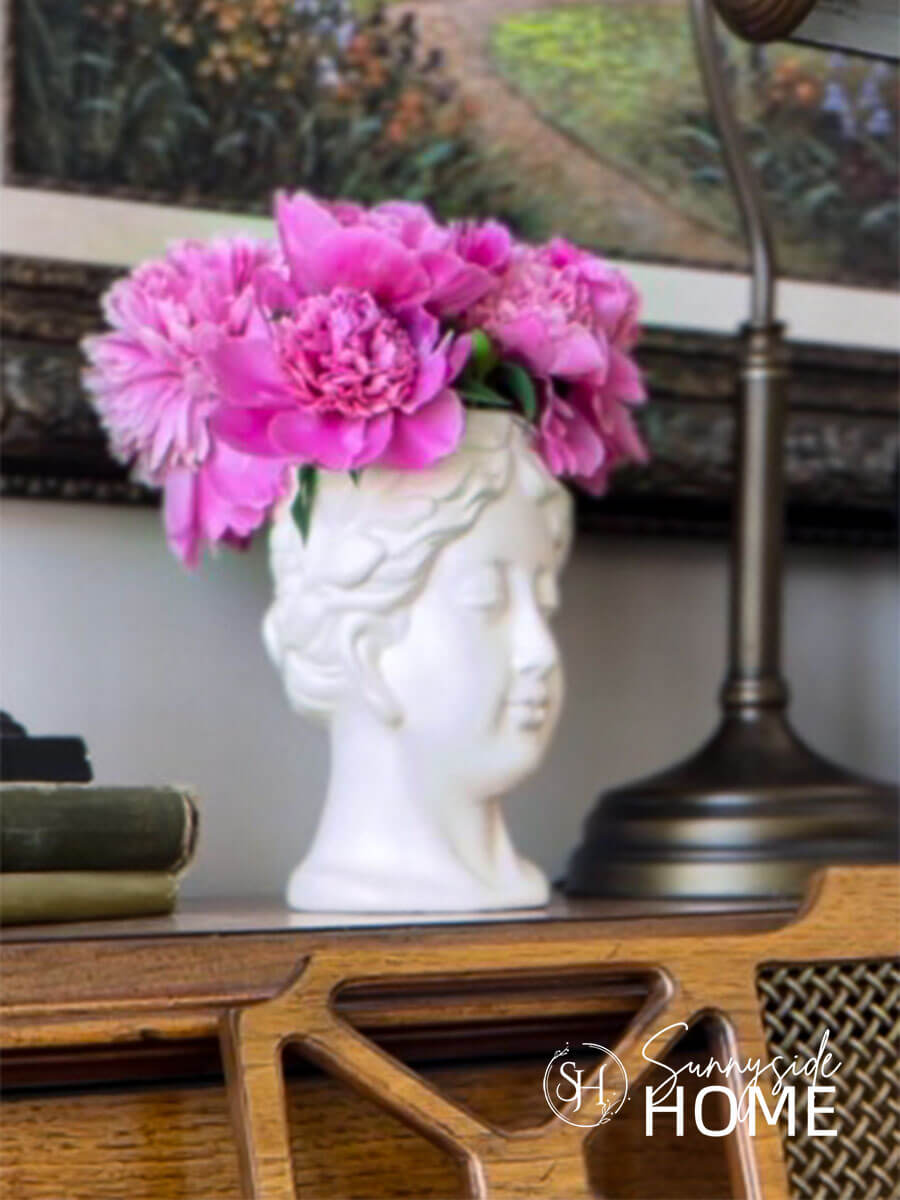
While decorating for summer, I placed my head vase on the piano next to a sleek, modern piece, and something immediately stood out.
It felt like my head vase needed a more rustic, weathered Old World texture finish as a contrast to the clean lines of the newer vase.
I’ve been toying with this idea for a while, and I’m so thrilled with how it turned out.
The final result looks like this vessel has been sitting out in the garden for years…
naturally aged, softened by time, with layers of texture and hints of mossy charm.
Just the look I absolutely love!
The best part?
This transformation only takes about 30 minutes of hands-on time to create.
Even better, thanks to the paint additive, the finish dries quickly so you can enjoy your piece sooner.
Keep reading to learn more and see just how simple this technique really is.
Sunnyside home is a participant in the Amazon Services LLC Associates Program, an affiliate advertising program designed to provide a means for sites to earn advertising fees by advertising and linking to Amazon.com. As an Amazon Associate, this blog earns from qualifying purchases with no additional cost to you. Click here to read our full disclosure policy.
What You’ll Need
To create this old world texture finish, you’ll only need a few simple supplies.
- Vase
- dark brown paint (I used leftover paint from my lamp makeover)
- taupe paint
- soft white paint
- mossy green paint
- SaltWash paint additive
- matte sealer
You’ll also want a few paintbrushes in different sizes for layering on the paint, old sprung brushes are perfect for this project.
I also like to have a few coffee filters around to dab and soften the paint or texture.
Clean and Prep Vase
Before you begin adding your old world texture finish, it’s important to properly clean and prep your vase so the paint adheres well and lasts.
Start by washing the surface with warm soapy water to remove any dust, dirt, or oils from handling.
If your vase has a very smooth or glossy finish, lightly sanding it will help create a better grip for the paint and texture layers.
Once cleaned (and sanded if needed), wipe it down and allow it to dry completely before moving on to painting.
Taking a few extra minutes here makes all the difference in achieving a durable, beautifully aged finish.
Are you enjoying this project? Please Pin It, save it for later and share it with a friend.
Sharing is caring!
Painting an Old World Texture Finish
Base Coat
To begin creating the old world texture finish, mix SaltWash into your dark brown paint color.
You’ll want to add enough SaltWash to thicken the paint that when it’s applied it will add texture to your surface.
A good rule of thumb is to make the mixture thick enough that it doesn’t drip from your brush when lifted.
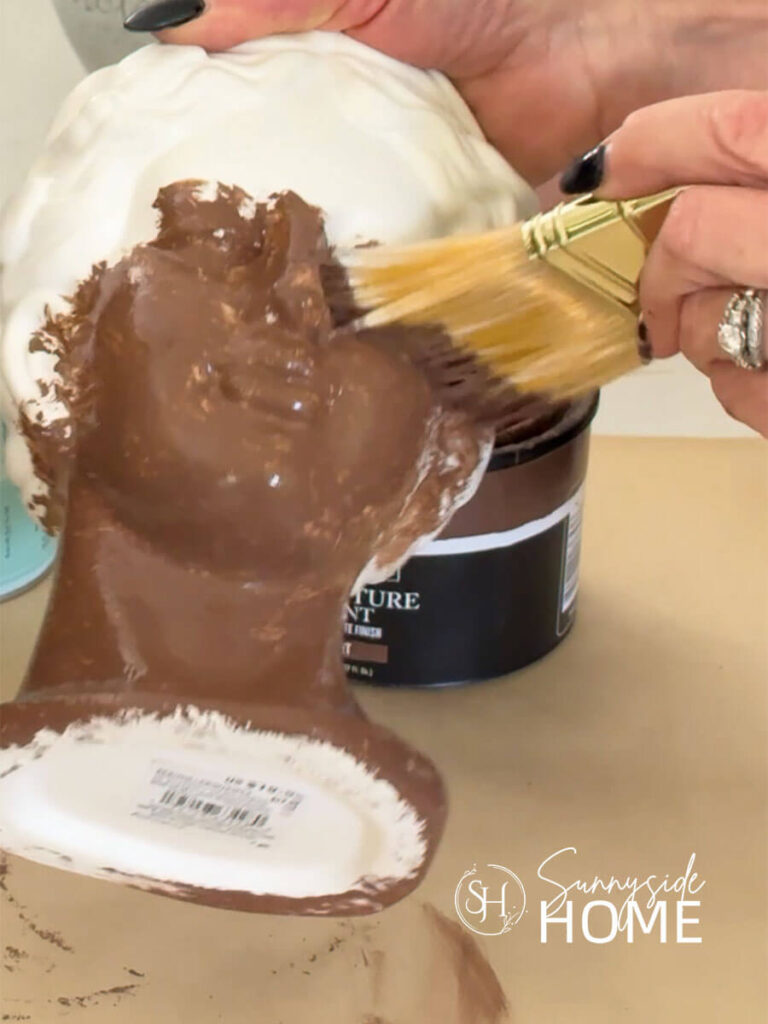
Once mixed, apply the paint to the vase using a pouncing motion rather than traditional brush strokes.
This dabbing technique helps build texture and creates the uneven surface that gives the piece its aged, weathered character.
Continue until the entire vase is covered, then allow the paint to dry completely before moving on to the next step.
If you’re new here, welcome! We’re so glad you’re here.
Let us introduce ourselves, we’re Michelle and Steph, a mom and daughter team who love to DIY and decorate our homes.
Not only are we passionate about making our homes warm, comfortable and unique, but it’s our mission to help you create that same feeling in your own home.
You’ll find ideas for repurposing, creating, decorating and making your home truly yours, while always mindful of a tight budget.
Undoubtedly we love finding ways to make your home look high-end on a small budget.
Plus you’ll also find a recipe or two as we share our family favorites with you.
We’d love it if you’d join our community of doers so you won’t miss any inspiration for your home.
New friends are always welcome!
Layering Paint
Once the base coat is completely dry, it’s time to begin building depth and dimension with the second layer.
Mix a small amount of SaltWash into your taupe-colored paint, again making the mixture thick enough that it won’t drip from your brush.
Using the same pouncing or stippling motion, apply the paint over the vase, but don’t aim for full coverage.
Instead, intentionally leave some areas of the dark brown base coat visible.
These peeks of darker color create natural variation, adding shadows and dimension that make the finished look aged and authentic.
As the layers build, you’ll start to see the old world texture finish come to life with the character and charm of a timeworn garden vessel.
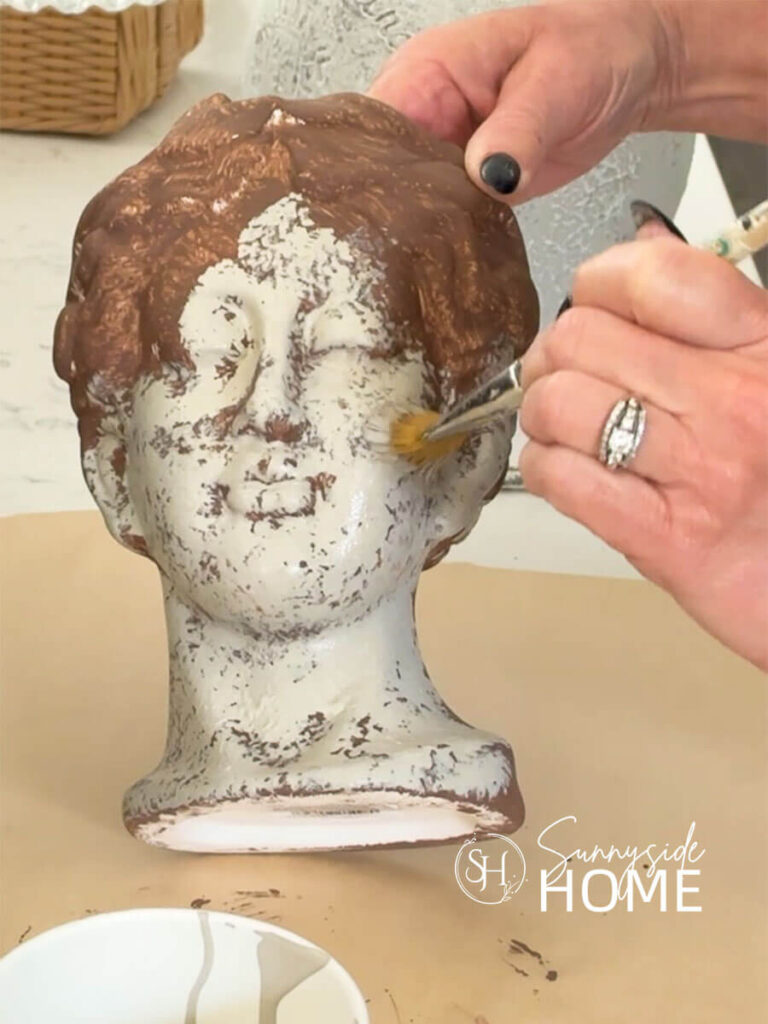
The third paint layer is what really brings the old world texture finish to life.
Mix a small amount of SaltWash into a soft white paint, creating the same thick consistency you’ve used for the previous layers.
Using a stippling or pouncing motion, lightly apply the paint over the vase.
Be careful not to cover the entire surface, you’ll want even more of the taupe and dark brown layers to remain visible.
Allowing these colors to peek through creates the depth, dimension, and natural variation that make the finished look authentically aged.
As the soft white catches the high points of the texture, the vase begins to take on the appearance of weathered stone that has been sitting in a garden for years.
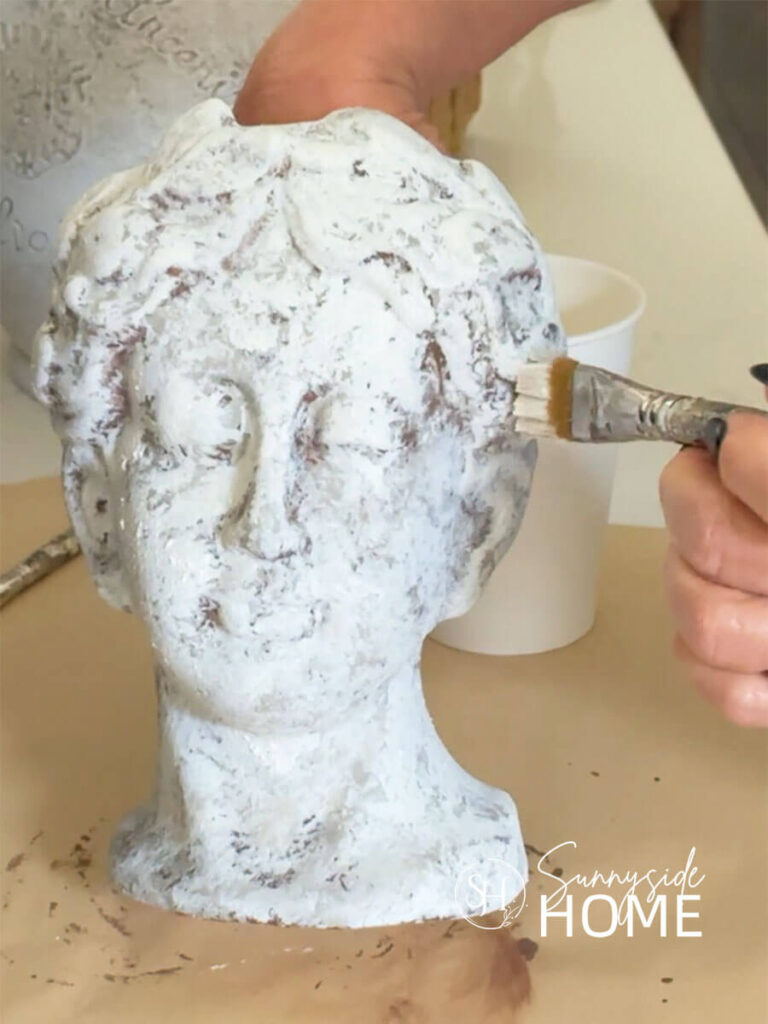
Enhancing the Weathered Look
This is the step where your vase truly begins to look like an aged garden treasure.
To highlight the texture, load a chip brush with a small amount of soft white paint.
Then brush it back and forth on a paper plate or palette until very little paint remains in the bristles.
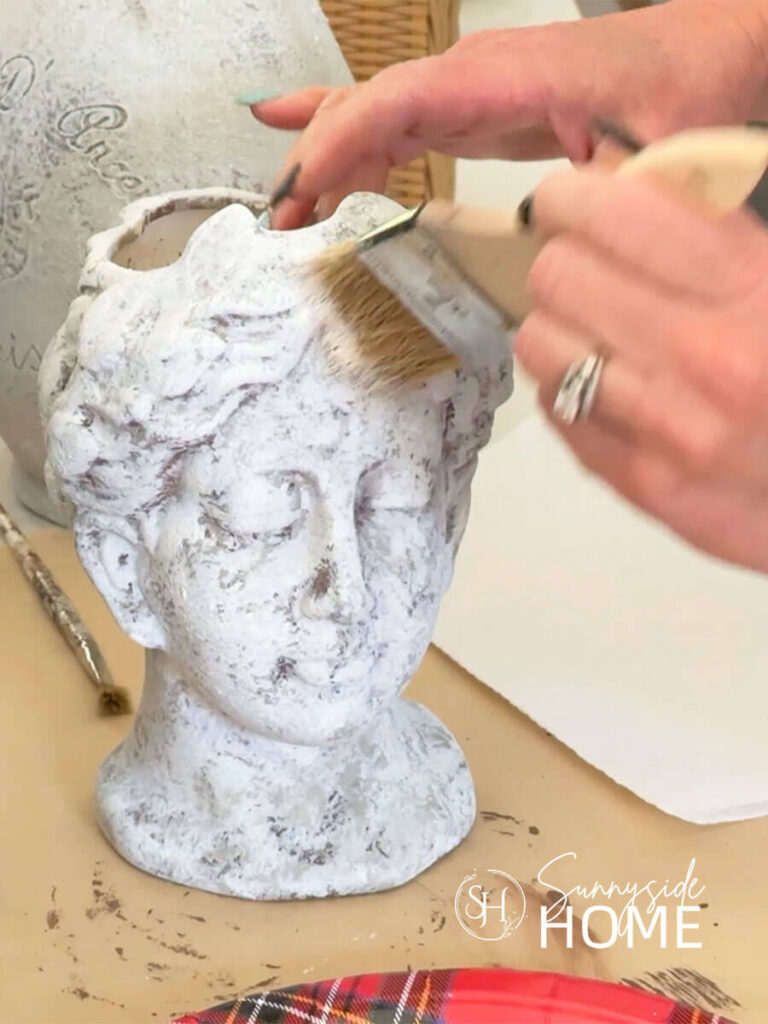
Lightly drag the brush across the raised areas of the vase, allowing the paint to catch only the high points of the texture.
This dry-brushing technique adds depth, dimension, and the appearance of years of natural wear.
If you feel like you’ve covered too much of the surface with the lighter paint colors, don’t worry.
Simply thin a small amount of dark brown paint with water and brush it into some of the crevices and recessed areas.
This creates shadows and restores contrast, helping the texture stand out even more.
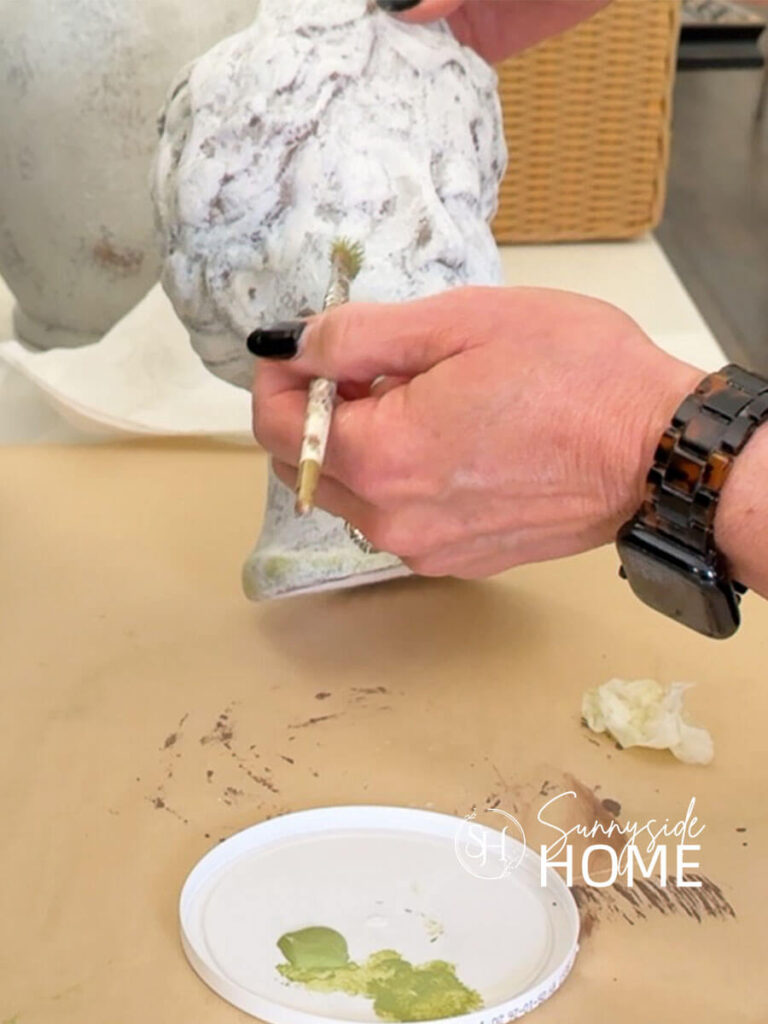
For an authentic mossy, garden-aged look, finish by adding subtle touches of light green paint to a few areas of the vase.
Concentrate the color in the crevices, around the base, and anywhere moss might naturally develop over time.
Using a small stencil or round brush, apply the paint with a light stippling motion, gradually building the color.
A little goes a long way.
Just a hint of green is enough to create the illusion of natural weathering and give your old world texture finish even more character and charm.
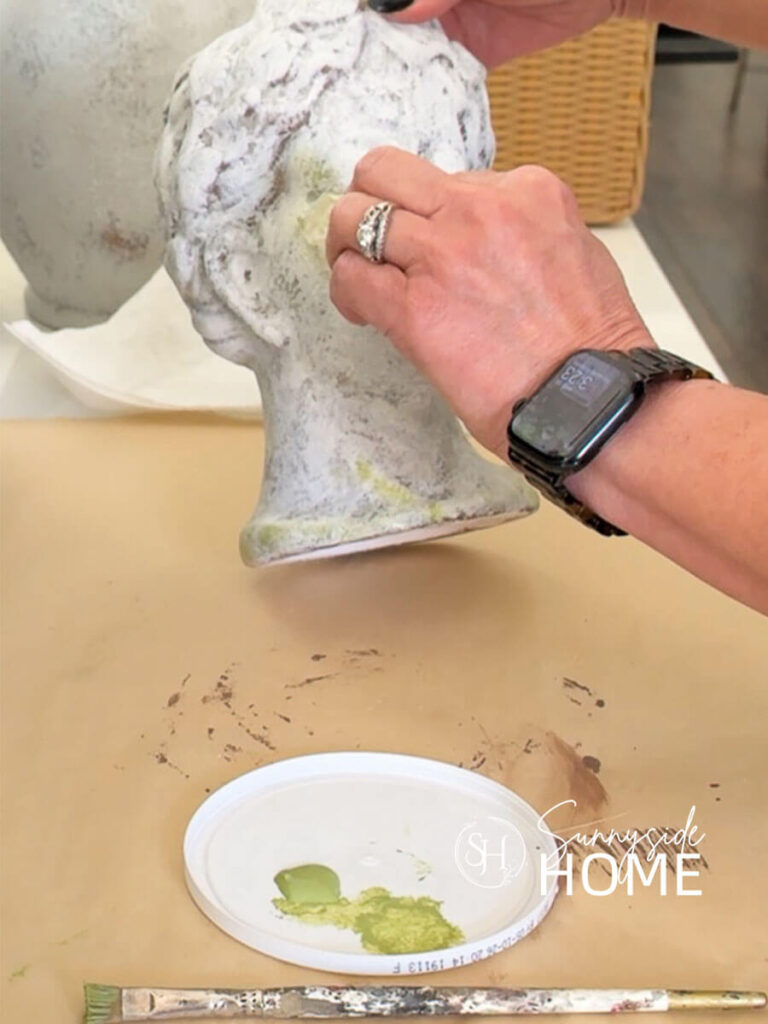
If you’d like to soften the mossy effect, gently dab the area with a damp coffee filter.
This will diffuse the color and create a more natural, aged appearance.
Let’s stay connected! Follow us on social media!
Seal and Protect
If you’re going to be handling your finished piece, you’ll definitely want to seal your textured surface with a matte topcoat.
It not only helps protect all that layered detail, but it also makes it much easier to keep your vase clean over time.
A matte spray sealer is the easiest way to apply an even finish that won’t take away from the old world texture look.
Apply 1–2 light coats, allowing each coat to fully dry.
What is SaltWash
SaltWash is a paint additive that makes it easy to create rich, layered texture and a naturally weathered finish on almost any surface.
When mixed with paint to a thick, slightly lumpy consistency and applied in a dabbing motion, it dries to mimic an authentic, sun-baked, sea-salt, air-kissed look.
Like weathered beach cottages and coastal furniture that have aged beautifully over time.
One of the best parts is that it requires no prep.
It contains real sea salt and organic compounds that help it adhere to surfaces like wood, laminate, glass, plastic, and even fabric without sanding, cleaning, or priming.
Beyond a coastal look, it can also be used to create a textured finishes on ceramic pieces.
Style and Enjoy
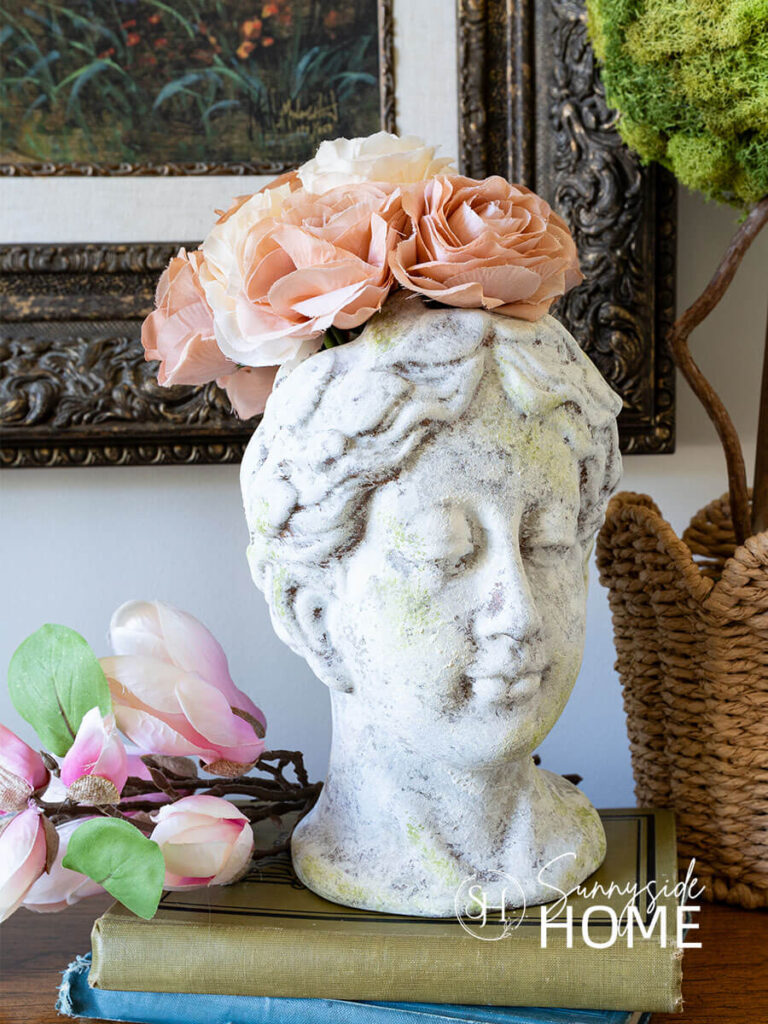
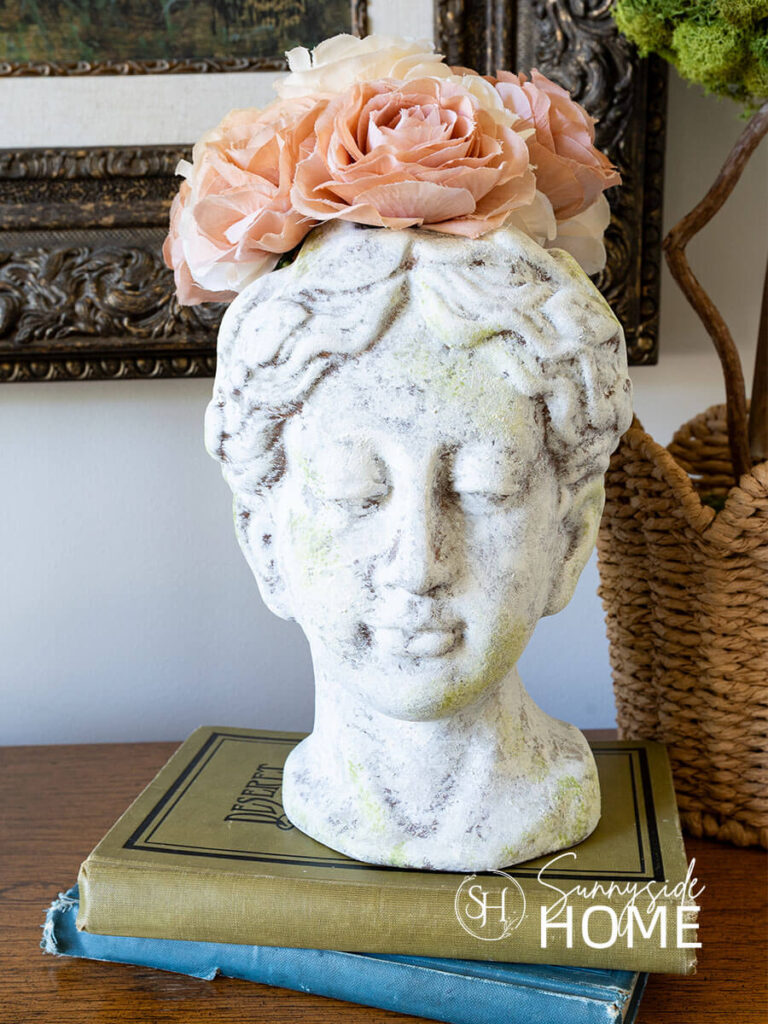
Now for the fun part, let’s take a closer look at the details of this old world textured finish.
First, here’s that the vase looked like before…
And here’s the after…
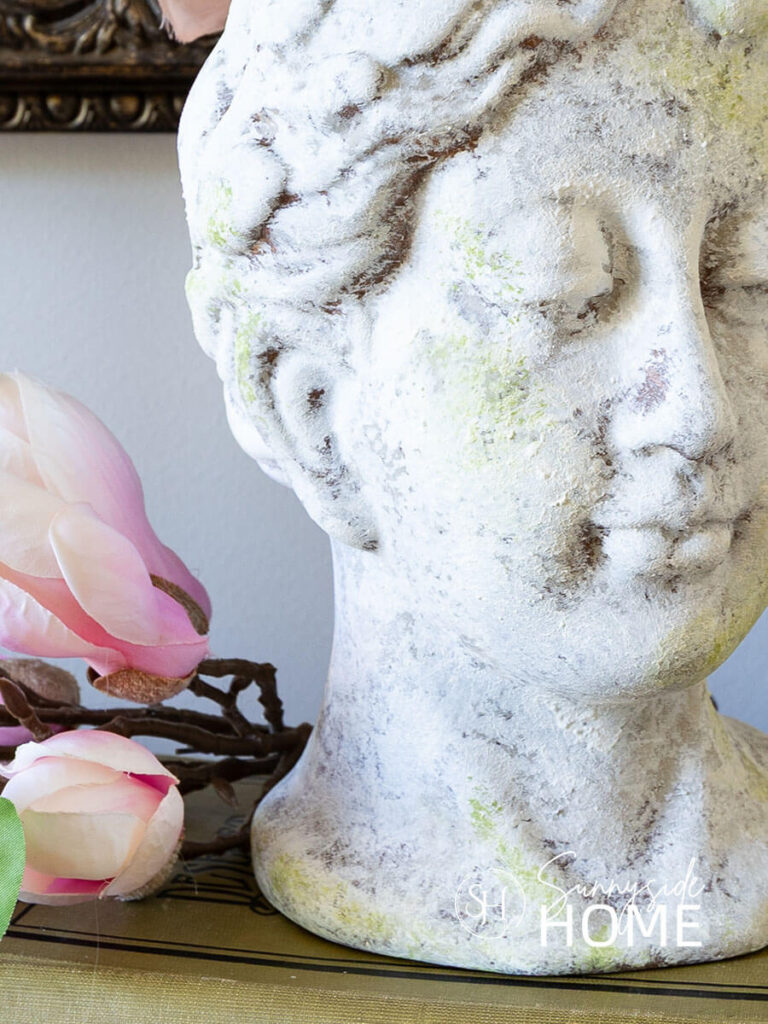
Up close, you can really see the layers of paint working together to create depth, dimension, and that naturally weathered, timeworn character.
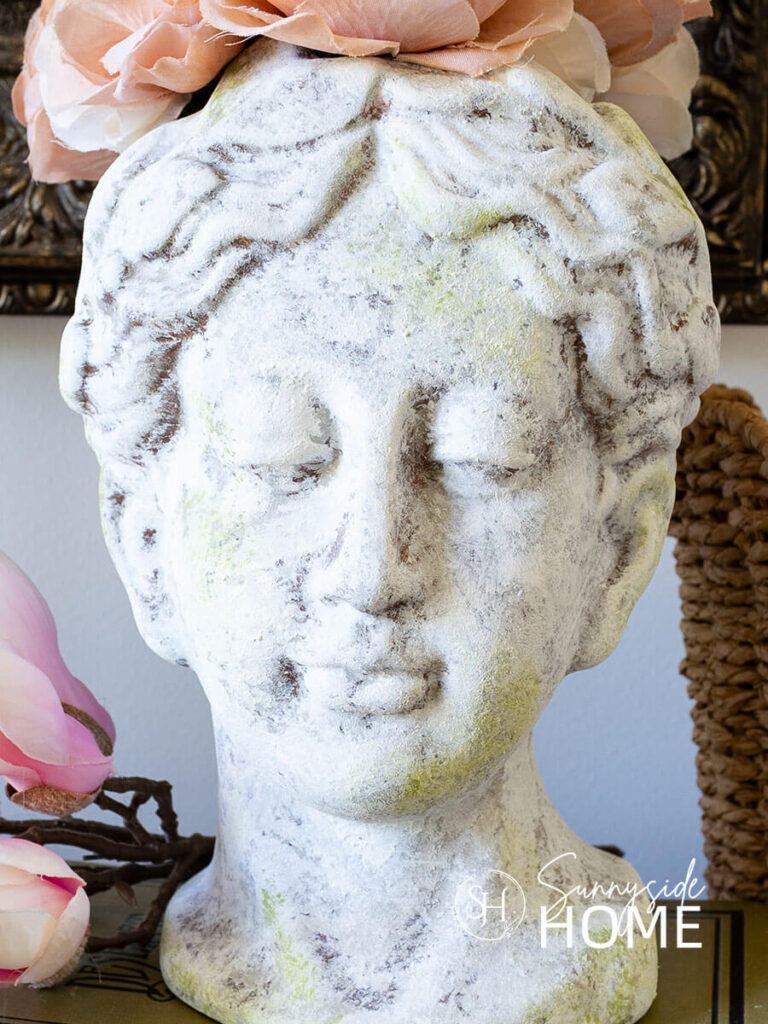
The subtle variations in tone, along with the raised texture, give the vase the look of a piece that’s been aged by years of sun, wind, and garden life.

These close-up images really show just how much richness and movement this simple technique can create.
Now it’s time to style and enjoy your finished piece!
This textured vase looks beautiful in so many spaces, try it on a mantel, piano, open shelf, or as a table centerpiece where it can really stand out.
One of my favorite ways to style it is by pairing it with a more modern, clean-lined piece so the contrast really highlights that old world texture finish.
Tips for Best Results
For the best old world texture finish, don’t rush the layering process, each step builds the depth and character that gives your vase its aged, timeworn look.
Just make sure that each layer is fully dry before adding the next.
Embrace imperfections as part of the charm; uneven texture and variation are what make the finish feel authentic and naturally weathered.
It’s also a good idea to test your texture mix on a small area or scrap surface first so you can get comfortable with the consistency and technique before applying it to your vase.
Shop Old World Texture Vases

More Creative DIY Vase & Vessel Ideas
- Simple DIY Pedestal Bowl with Thrift Store Finds
- Make a Pottery Barn Color Block Vase Dupe
- Paint a Ceramic Pitcher Inspired by Pottery Barn
- Decoupage a Vase with Blue and White Napkins
- Paint a Vase with an Aged Look
- Simple Wooden Plant Pot with Paint Sticks
- DIY Textured Vase
- Paint a Faux Concrete Finish
More Ideas for Creating an Age Worn Finish
- Simple Painted Lamp Base – a Pottery Barn Dupe
- Easy Lamp Makeover with Spray Paint and White Wax
- Faux Concrete Planter with Plaster
- Make Cardboard Picture Frames with Saltwash
- How To Make Vintage Textured Paint
- Saltwash Tutorial
- Age Wood with Vinegar & Steel Wool
Final Thoughts
This old world texture finish is such a simple way to transform an ordinary vase into something that feels timeless, weathered, and full of character.
With just a few basic supplies and some layered painting techniques, you can create a piece that looks like it has been collected from an old garden or European cottage.
I hope this inspires you to try it on your own and experiment with different colors and textures—once you start, it’s hard to stop!
We hope you found some inspiration today for your home.
What piece would you like to try this technique on?
Please share your tips and ideas with us.
We love hearing from you!
If you’re new here, WELCOME! We love having new readers and friends!
You can learn more about us here.
Let’s stay connected! Join our DIY community of doers and you won’t miss the weekly updates and more inspiration for you always on a budget.
Sharing is caring!
Thanks for stopping by Sunnyside Home. Empowering you to create a home you love!
Retailers We Love
- Anthropologie
- Birch Lane
- Crate & Barrel
- Joss and Main
- Lampsplus
- Mark & Graham
- One Kings Lane
- Pottery Barn
- Rejuvenation
- Serena & Lily
- Wayfair
- West Elm
- Williams Sonoma
- World Market
Be sure to follow us on Pinterest for even more home decor and DIY ideas.
To see what we are working on before it’s on our blog, follow us on Instagram.
You will also find our video tutorials on our YouTube channel.
What’s New . . .
- Paint an Old World Texture Finish on a Vase

- Easy Strawberry Chicken Salad with Lime Maple Balsamic Vinaigrette
- How to Fix Chipped Kitchen Cabinets with a Pen
- Easy 4th of July Door Decor You Can Make in Minutes