A while back, I received a phone call from my mother-in-law. A piano, which has been in her family since the 1880’s was returned to her. As a result of some neglect, the piano was badly damaged. Despite this, she was hoping that I could somehow perform a miracle and repair the piano. I believe that we did achieve this. See this amazing before and after family heirloom piano makeover.
Over the years, this piano has seen many homes and moving it is no easy feat. In fact, an old upright piano can weigh more than 800 pounds. So you can easily see how it can get damaged in a move, if not using professionals. If you are in the Ogden, Utah area try Muscle Men Movers.
Sunny Side Design is a participant in the Amazon Services LLC Associates Program, an affiliate advertising program designed to provide a means for sites to earn advertising fees by advertising and linking to Amazon.com. As an Amazon Associate, this blog earns from qualifying purchases with no additional cost to you. Click here to read our full disclosure policy.
- Piano Before and After Makeover
- When the Piano was New
- Repairs Needed to Restore the Piano
- The Piano Makeover Plan
- Disassembling the Piano for Parts
- Removing the Sides of the Piano for Makeover
- Removing the Piano Legs
- Putting the Puzzle Back Together
- Attaching the Legs to Piano
- Attaching the Music Stand Board
- Attaching Side Panels to the Piano
- Adjusting Front Panel
- Our Frankenstein Piano
- Putty in Imperfections
- Piano Ready for it’s New Home
- Tools and Products We Used

Utah professional piano movers are trained to lift heavy furniture including couches and pianos so you don’t hurt yourself attempting to do it yourself. They truly are the muscle behind the work and a company I’d recommend!
Now, I’ve refinished and repaired a lot of furniture over the years, but never a piano. So, this was a learning experience for me as well. Scroll down to see the before and after photos and learn how we restored this old family heirloom.
Piano Before and After Makeover


In today’s post, we will focus more on how to repair the damaged piano. Not only will we show you how we repaired the piano, but how we did it for free. Then in a future post we will focus on how to paint a piano.
I know some purists will be upset that an antique piano would be painted. However, you must realize that in order to repair this family heirloom, we needed parts from another piano. The wood species are not the same and it would be difficult, if not impossible, to make the finish consistent.
When the Piano was New

We are so blessed to have this photograph circa 1892. In this photo we not only have my husband’s grandmother and great grandmother, but also a portion of the piano.
Clearly, you can see how beautiful this piano was. For example, look at the detail in the leg.
In the process of restoring this piano, I searched high and low for a piano with similar features with no luck.
However, I think we were able to bring it back to life with what we had to work with.
Are you enjoying this project? Please Pin It, save it for later and share it with a friend.
Sharing is caring!
Repairs Needed to Restore the Piano
To begin with, the piano had been “modernized” in the 1940’s. During World War II, piano manufacturers in order to help with the war effort stopped making pianos.
During these years, piano tuners and rebuilders saw a great opportunity to modernize the old Victorian piano, by cutting them down and adding a mirrored front. This made the piano appear smaller and more up to date. This became extremely popular for almost 30 years.
The original legs were gone as well and had been replaced in the late 60’s or early 70’s.
The music stand area was badly damaged. Someone tried to repair it with glue. Overall the repair on this piece was poor, so it needed to be replaced.
Since the inner workings of the piano had already been professionally restored, my part in this was to restore the exterior of the piano.
The Piano Makeover Plan

The plan was to look for a piano that would have pieces roughly the same size we needed to replace on our piano.
So, I scoured the online classifieds and found this piano for free. It would work with some modifications.
Of course it would have been amazing to find a piano with turned legs, but when I did, the sides and top pieces were too small.

These are the parts we salvaged from this free Marketplace piano.
- piano sides
- piano top
- front of piano
- music stand area
- legs
If you’re new here, welcome! We’re so glad you’re here.
Let us introduce ourselves, we’re Michelle and Steph, a mom and daughter team who love to DIY and decorate our homes.
Not only are we passionate about making our homes warm, comfortable and unique, but it’s our mission to help you create that same feeling in your own home.
You’ll find ideas for repurposing, creating, decorating and making your home truly yours, while always mindful of a tight budget.
Undoubtedly we love finding ways to make your home look high-end on a small budget.
Plus you’ll also find a recipe or two as we share our family favorites with you.
We’d love it if you’d join our community of doers so you won’t miss any inspiration for your home.
We love new friends.

Disassembling the Piano for Parts

To begin with, we used our drill fitted with a screwdriver bit to remove the hinges from the top of the piano.


Then, the next piece to remove was the front of the piano. This piece is intended to be removed when the piano is tuned. There is a little lever that locks it into place. We simply lifted the lever and we were able to lift the front of the piano off.

The next piece to remove was the music stand area. It was secured in place with a screw on each side.
Clearly the most difficult part of disassembling the piano was dealing with the old straight slot screws. Often we had to do it the old fashioned way with a screwdriver.
Having never disassembled a piano before, we were surprised at how quickly it had gone so far. In less than an hour we had all of these pieces off of both pianos.
Removing the Sides of the Piano for Makeover

As far as we could see there were no nails or screws attaching the side panels to the body of the pianos.
This led us to believe that they were just attached with glue. So I started to do a little research to learn how to soften old glue.
Considering the age of these pianos, we figured that the glue was animal based and discovered that good old vinegar will soften this type of glue.

Our first step to removing the side panels from each piano was to create a groove between the side panels and the piano base.
We used our oscillating tool to cut grooves along all the edges where the side panels were connected.
Then we placed full strength white vinegar in spray bottles and saturated the joints.


We then used screwdrivers, pry bars and chisels to pull the joint apart.
Again we sprayed more vinegar into the opening, allowing another section of glue to soften.
We repeated this process until the sides of both pianos were off. It took about 1 1/2 hours to remove the sides from both pianos.
Clearly, this was a concern if we were going to be able to get them off in one piece, so we could reuse them on our piano makeover.
I think this method worked really well. We just had to be patient and let the vinegar do the work.
Removing the Piano Legs

To see how the legs were attached we removed the piano keys. The keys are simple to remove, they just sit on the metal pegs, with the end of the key under each hammer.
Once the keys were removed we could see that the legs were attached at the top to the keyboard area with 2 screws.


The final piece to remove from the 2 legs was the cross piece at the bottom where the pedals are located. There was one screw to remove on each side.
Let’s stay connected! Follow us on social media!
Putting the Puzzle Back Together
Once we had all the pieces off of our family piano as well as our parts piano we were ready to put it back together.
The area that concerned me the most was how to attach the legs to our heirloom piano.
Certainly the legs that were on the piano before were not sturdy or attached very well. Of course, I didn’t want the piano to be hazardous and tip over on someone.
So we enlisted the help of my hubby, Steve. He is amazing at figuring the best way to put items back together. It’s a gift!
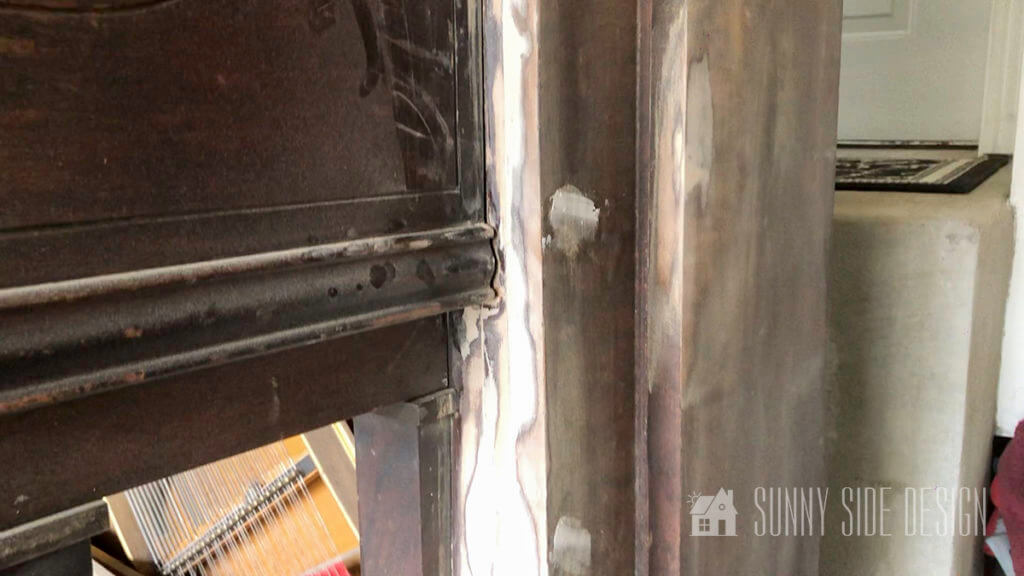
Attaching the Legs to Piano

Steve thought it would be best to attach each leg with 2 dowels. Therefore, he drilled 2 holes using a wood bit at the base of each leg.


He then put corresponding marks on the piano where the leg would attach. Then, using a wood bit drilled 2 holes for the dowels.


First, we applied glue to one end of the dowels and placed them in each hole at the base of the leg.
Next, we applied glue to the other end of the dowel and on the base of the leg wood. You can never use too much glue right?! 😉
Then Steve used a rubber mallet to tap it into place.
Then we wiped off any excess glue with a wet cloth.

Finally, we placed a clamp securing the leg to the piano base while the glue dried. We left it on overnight just to be sure it was secure.
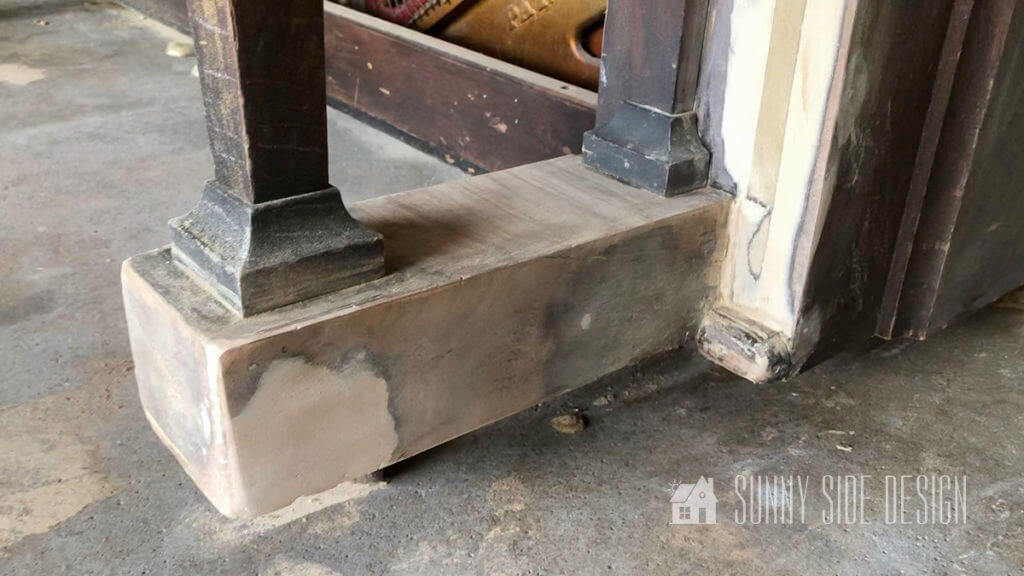
Our final step for securing the bottom section of the piano leg was inserting a long screw from inside the piano cavity into the base of the leg.

Finally to secure the top part of the leg we drilled down through the keyboard section into the top of the leg. Then 2 long screws were inserted.
This section of the keyboard will be covered by a piece of wood so the screws will never show.
Attaching the Music Stand Board

The piano that we were scavenging parts from was a little bigger all around.
The music stand piece was about 2″ too long. Therefore, we trimmed off 1″ from each side.
Once we had the board in position we attached it with a screw at each end. The front panel will cover the screws when it’s back up.
Attaching Side Panels to the Piano

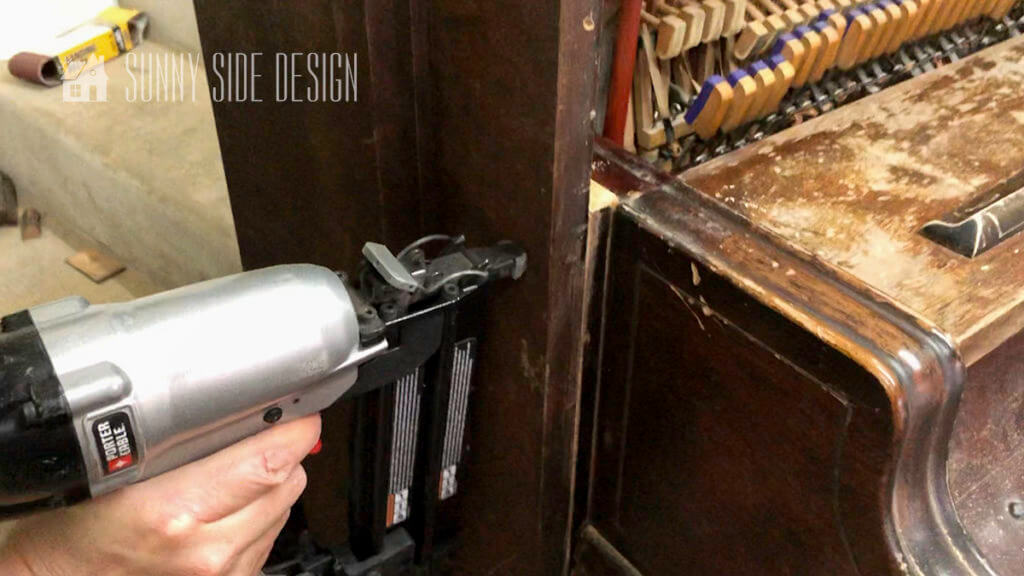
Once we knew that the puzzle would all fit together we attached the side panels.
First, we applied a generous amount of glue to the piano base and placed the side panels into position.
We made sure that every thing was flush, then we secured it with wire brads.
Adjusting Front Panel

Adjusting the front piece of the piano was a bit tricky. It’s not one solid piece. The center section hinges and tilts forward as a music stand.
Therefore, to adjust this piece we needed to take out 1″ from the center cross piece.

First, we cut the cross piece to the final length we would need.
Then we trimmed off the remaining piece flush with the decorative trim area.

I always get excited when I get to use my Kreg pocket jig. It was the perfect tool to use to secure this joint back together.

The jig was adjusted for the thickness of the board and I drilled 2 pocket holes in the front cross piece.

Finally, wood glue was placed on each piece of wood and the screws were placed in the pocket holes. To do this I had to have Steve hold the joint together while the screws were placed in.
If you do not have a pocket hole jig, a joint like this could also be secured with dowels, like how we attached the legs or a biscuit joiner would also work.
Last but not least, the center panel was trimmed to fit and secured to the hinges on the cross board.
This front panel piece slides into a groove on the music stand board and is secured with the original latches.
Our Frankenstein Piano

This piano makeover is nearing the end. The piano puzzle is now put back together. We affectionately called it our Frankenstein piano.
Putty in Imperfections
Finally we are coming to the finish line on this project. This piano makeover took us about 4 Saturdays to reconstruct. We knew it was a big job, but persistence pays off!
Not only have I made my mother-in-law so happy that we saved this family treasure, but also my son who will be the new owner is thrilled this piano will now be in his home.
We used Bondo Wood Filler to putty in all of the seams, dings and gouges. I love this product for filling in major gouges in the wood. It’s a 2 part epoxy that when mixed together creates an incredibly strong bond. You must work quickly, it hardens in about 15 minutes. Once dry, we used our palm sander to make it smooth.
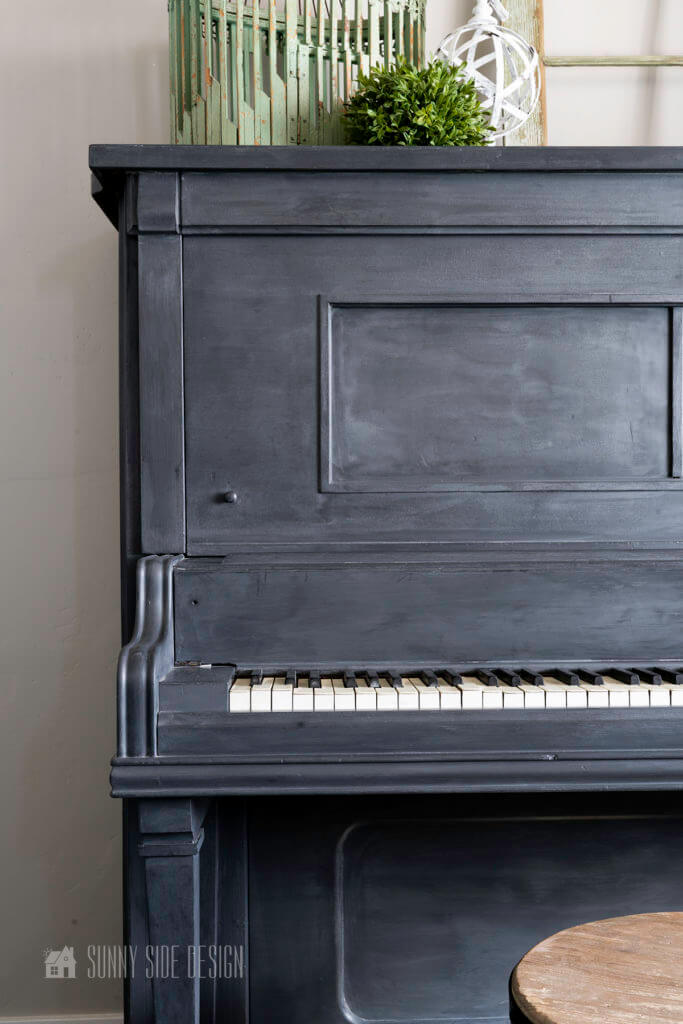
Finally, we applied a dark charcoal chalk paint and sealed it with a clear wax.
We will have another post in the near future on how to paint a piano.
Piano Ready for it’s New Home
This piano is now ready for it’s new home. The best way to move a piece like this is with professional movers like Muscle Men Movers.
They have the expertise and man power to save your back! Not only do they realize that pianos can be expensive and delicate, but also can have sentimental memories attached to them. That’s definitely the case with our piano.


Tools and Products We Used

We hope you’ve been inspired to use this piano makeover idea to transform something around your home! This idea of using another piece of furniture for parts can save you money as well as create a unique piece for your home. Share your ideas and projects with us, we love hearing from you!
For more furniture makeover ideas click here.
Please share your tips and ideas with us.
We love hearing from you!
If you’re new here, WELCOME! We love having new readers and friends!
You can learn more about us here.
Let’s stay connected! Join our DIY community of doers and you won’t miss the weekly updates and more inspiration for you always on a budget.
Sharing is caring!

Thanks for stopping by Sunny Side Design. Empowering you to create a home you love!
DISCLAIMER
This blog’s content is for entertainment purposes only and is not professional advice. By reading this blog and attempting to recreate a project, you assume all responsibility for any injuries or damages incurred. Read my full disclaimer here.
PHOTO USE AND CONTENT SHARING
All of the photographs you see here are the property of Sunny Side Design unless otherwise credited.
We love for others to share our work, so please feel free to use one photo with a link back to our website.
Pinning and sharing is always encouraged!
Please do not reproduce other Sunny Side Design content without permission.
Retailers We Love
- Anthropologie
- Birch Lane
- Crate & Barrel
- Joss and Main
- Lampsplus
- Mark & Graham
- One Kings Lane
- Pottery Barn
- Rejuvenation
- Serena & Lily
- Wayfair
- West Elm
- Williams Sonoma
- World Market
Be sure to follow us on Pinterest for even more home decor and DIY ideas.
To see what we are working on before it’s on our blog, follow us on Instagram.
You will also find our video tutorials on our YouTube channel.
- 4 Simple and Unique Blue Thanksgiving Table Decor Ideas

- How to Paint a Faux Antique Brass Finish
- Make Your Home Cozy with 10 Fall Simmer Pot Recipes
- Simple and Healthy Pumpkin Spice Granola Recipe