If you’re searching for an affordable and stylish way to transform your kitchen or bathroom, a feather finish concrete countertop could be the perfect solution. This easy DIY project allows you to achieve a sleek, modern look without the hefty price tag of new countertops.
Are you looking for and inexpensive way to update your countertop? My budget for updating my bathroom countertop was $100. Consequently, I had to find a creative solution for updating the countertop in my master bathroom. I had read about this Feather Finish Concrete Countertop and decided to give it a try. My total cost for this project was $50, well under my $100 budget. I found that Henry Feather Finish with Ardex technology was readily available at Home Depot, so this is the product I used. It is a simple DIY project that can transform your space. We have provided a step by step tutorial with useful tips.
Are you joining in from the Inexpensive Master Bathroom Makeover post? We’re glad to have you here with us again! We can’t wait to share with you how to transform your countertops with a Feather Finish Concrete product!
- What is Ardex Feather Finish Concrete?
- Damaged and Dated Countertop
- Supplies Used
- Step 1: Prep Surface
- Step 2: Prepare Feather Finish Concrete
- Step 3: Apply Feather Finish Concrete
- Step 4: Prep Surface for 2nd Coat
- Step 5: Apply 2nd Coat
- Step 6: Apply 3rd Coat Feather Finish Concrete
- Step 7: Final Sanding
- Step 8: Sealing
- Step 9: Caulk Edge
- Feather Finish Countertop Reveal
What is Ardex Feather Finish Concrete?
Ardex Feather Finish is a versatile, self-drying, cement-based finishing underlayment that provides a smooth, durable finish for a variety of surfaces.


Here are some key features and uses of Ardex Feather Finish:
- Versatility: It can be applied over a wide range of substrates, including concrete, wood, tile, and more.
- Ease of Use: Mixes easily with water and can be applied with a trowel, making it accessible for DIYer like us.
- Quick Drying: It sets quickly, usually within 15-30 minutes, allowing for fast project completion.
- Smooth Finish: Provides a smooth, even surface.
- Durability: Once cured, it forms a strong, long-lasting surface that can withstand regular use.
Before I jumped into this project I read many other tutorials on how to apply the Ardex Feather Finish product. Some had more success than others. I believe the key is to not rush the process, don’t add other product to it to change the look and make sure each layer is completely dry before adding the next layer of concrete product.
Most tutorials complained about the dusty mess. They all seamed to used electric sanders, but since my project was fairly small, my counter was just over 6′, I did my sanding by hand. It really helped keep the dust down. Also, keeping the doors closed really helped too.
Most tutorials I found on this process used the Ardex product. However, I found that it is more difficult to find without buying it online.
I found the Henry Feather Finish at my local Home Depot store. It states on the box that is is engineered with Ardex technology and I also found reviews from others who used this product on their countertops.
Damaged and Dated Countertop
Another budget friendly choice for a bathroom countertop would be an epoxy countertop.
While it will be more expensive than a feather finish countertop the results are stunning.
Let’s take a look at the before photos of my master bathroom.


We had not made any changes to it since we had moved in. I was waiting for the stars to align so I could gut the space and create this fabulous master bath retreat. I just kept putting off making any changes because I didn’t want to spend a lot of money on it now. Now that it’s complete, I wonder why I waited so long to just make these cosmetic changes. Clearly an updated and beautiful space affects your moods and outlook each day.
Obviously keeping the existing countertop was not an option. Not only was is it stained and boring, but is was also damaged. Several areas had cracking and chipping of the laminate surface. Because of this, we chose to make a new surface to apply the Feather Finish concrete product on.
Sunny Side Design is a participant in the Amazon Services LLC Associates Program, an affiliate advertising program designed to provide a means for sites to earn advertising fees by advertising and linking to Amazon.com. As an Amazon Associate, this blog earns from qualifying purchases with no additional cost to you. Click here to read our full disclosure policy.
Are you enjoying this project? Please Pin It, save it for later and share it with a friend.
Sharing is caring!
Supplies Used
- Feather Finish
- Putty Knife
- Sanding Block
- Sand Paper
- 511 Impregnator Sealer
- Grout Caulk
Step 1: Prep Surface
From other tutorials I saw, if you are applying the feather finish concrete over a laminate surface it is recommended to rough up the surface before applying it. This can be done with a course sand paper.
Since we were concerned with the damage to our laminate countertops, we decided to build the base of our countertop out of wood.

Using plywood we had leftover from another project we first cut it to the depth and length we needed. (76″ x 21 1/2″)

We then cut out holes for the 2 sinks using a jigsaw. (A pattern for the sink shape was included with the sink.)

To make the countertop appear thicker we added a 1 x 2 board to the front of the plywood.

We first cut it to length, applied wood glue and then nailed it in place.

Then we placed the countertop over our raised vanity and secured it in place with nails.
If you’re new here, welcome! We’re so glad you’re here.
Let us introduce ourselves, we’re Michelle and Steph, a mom and daughter team who love to DIY and decorate our homes.
Not only are we passionate about making our homes warm, comfortable and unique, but it’s our mission to help you create that same feeling in your own home.
You’ll find ideas for repurposing, creating, decorating and making your home truly yours, while always mindful of a tight budget.
Undoubtedly we love finding ways to make your home look high-end on a small budget.
Plus you’ll also find a recipe or two as we share our family favorites with you.
We’d love it if you’d join our community of doers so you won’t miss any inspiration for your home.
We love new friends.

[mailerlite_form form_id=2]
Step 2: Prepare Feather Finish Concrete


To prepare the Feather Finish Concrete, place 1 1/2 – 2 cups of water in a disposable container. I used a yogurt container. Gradually add the feather finish concrete stirring until it is about the consistency of drywall mud or a thick frosting. If it gets too thick you can always add more water. It needs to be spreadable, but not too thin that it will not adhere to the edge of the countertop. I used a paint stick to stir mine.
The video tutorial will be helpful to watch to see the consistency of the concrete mixture.
Step 3: Apply Feather Finish Concrete


I masked off my walls before I began, but I would not do it again. You will see in later photos that it was difficult to get the tape off because the concrete finish was covering the edge of the tape.
However, I ended up removing the tape before I did my last coat, I found that if I got the cement product on the wall it washed off easily.
I used 2 sizes of putty knifes to spread the feather finish mixture. I found it easier to apply the cement with the smaller putty knife, then I would smooth out the finish with a larger putty knife.
Start at one end of countertop and spread on the feather finish concrete. Then take the larger putty knife and smooth out the cement mixture.
Keep each coat thick enough to skim coat the surface. You may see some of your surface showing through on the first coat. That’s okay, it will get covered on the second coat.


This is what my surface looked like after the first coat. As is drys it becomes lighter. You will see some areas are a little rough along with marks from the putty knife.
Step 4: Prep Surface for 2nd Coat


To prepare the surface for the 2nd coat, I first knock down any raised marks from the putty knife. I placed the straight edge of the knife flat on the surface and gently pushed out the raised areas.
Then using a sanding block, level off the surface. Sand down any raised areas. Along the edges I just used my hand to do this.


This is what the feather finish concrete looked like after sanding. You can see there are tiny holes where there may have been air bubbles and a few gouges from the putty knife. This will all be filled in with the second coat.
Step 5: Apply 2nd Coat
Apply the second coat of the Feather Finish Concrete in the same way as the first coat.
Start at one end applying a thin layer of the cement finish, smoothing it out with a large putty knife.

This is what my countertop surface looked like after the 2nd coat was applied. In this photo it is still damp, you can see in the darker shaded areas.
Once it was dry, I again smoothed out the surface with the putty knife and sanded it. This time I did a bit more sanding, prepping it for my 3rd and final coat.

Before I applied my 3rd and final coat I thought I had better remove the masking tape. This proved to be harder than I thought.
The cement had hardened over the lower edge of the tape and I finally had to get an X-acto knife to trim it off.
Once again, I would not tape off the area before doing this technique. I found that if I did get the cement on the wall it easily washed off with a cloth.
Step 6: Apply 3rd Coat Feather Finish Concrete
Apply the 3rd coat of the Feather Finish Concrete in the same manner as before. This time I tried to be a little more careful, making sure that I was leveling the cement finish and trying to leave less marks with my knife.
There will always be marks with the knife, but they will be sanded out once dry.
Side Note: I must say that I found this entire process fun and rewarding! It’s like frosting a big cake. It was amazing for me to watch it transform into this incredible countertop.

This is what it looked like after the 3rd coat. It is still wet here. You can see that on the edge it was difficult to get this area smooth with the putty knife.

Waiting for the feather finish concrete to dry ….
Let’s stay connected! Follow us on social media!
Step 7: Final Sanding

This may seem like the most difficult part. I personally didn’t think it was that difficult. After reading horror stories of sanding, I chose not to use my palm sander, so I didn’t have dust flying everywhere.
I closed the doors, opened the window and enjoyed the spring air. Then I used a sanding block to level out the finish, sanding the perimeter and edge with my hands. It took me about 45 minutes to get it smooth.


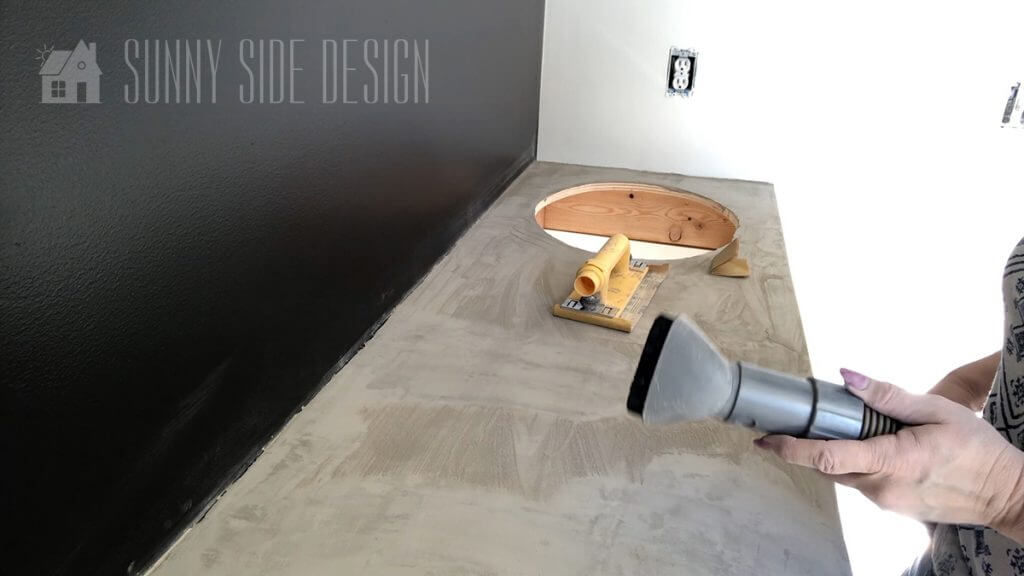
I would sand an area, feel it with my fingertips to see if it was smooth enough, then move onto another area. As the dust would build up on the countertop, I would remove it with the attachment on my vacuum.

Once I was satisfied with the finish, I vacuumed off the entire surface, prepping it for the sealer.
Step 8: Sealing

Concrete must be sealed, it is very porous and will stain and absorb liquids.
There are so many sealer options out there. Just google it and you will see how many options there are.
If your countertop is in a kitchen, make sure you choose one that is food safe!
One of the most popular choices out there for kitchens countertop sealer is Cheng Concrete Sealer. However, they will only ship to areas when there will be no freezing. They were currently not shipping to our area.
I was anxious to get our countertop sealed so we could begin using the bathroom. Because I didn’t want to wait, I chose to use 511 Impregnator Sealer. This sealer penetrates the concrete and forms a water barrier to protect the concrete and still lets it breath. However, this is not a food safe sealer, but works fine for my bathroom.
When choosing a sealer, read the pros and cons of each. Do you want your concrete to have a matte finish or glossy? Does it need to be food safe? Do your homework before you choose.
Step 9: Caulk Edge

One final step I decided to do was caulk the edge where the countertop meets the wall. I decided not to do a backsplash and needed to create a neat edge. This grout caulk in the tiling section of Home Depot in the color New Taupe, was a close match to the color of the concrete.

Pro tip: To make a nice neat edge, I first applied frog tape to the wall around the perimeter of the countertop. The grout caulk was then applied and smoothed out with a finger (Steph’s to be specific! It’s super hard to apply grout if you have acrylic nails. ) We then removed the frog tape and voilà a perfect grout line!
Feather Finish Countertop Reveal

What do you think of my Feather Finish Concrete countertop?
I am in love!
So much better than the white damaged countertops!

They have a unique and beautiful patina that adds depth to the room.

I am so happy that I chose to try this technique.

Best of all, they only cost $50.
Now that is amazing!

Do you have any budget saving ideas you would like to share with us?
We hope you found some inspiration for your home today.
Please share your tips and ideas with us.
We love hearing from you!
If you’re new here, WELCOME! We love having new readers and friends!
You can learn more about us here.
Let’s stay connected! Join our DIY community of doers and you won’t miss the weekly updates and more inspiration for you always on a budget.
Sharing is caring!

Thanks for stopping by Sunny Side Design. Empowering you to create a home you love!
DISCLAIMER
This blog’s content is for entertainment purposes only and is not professional advice. By reading this blog and attempting to recreate a project, you assume all responsibility for any injuries or damages incurred. Read my full disclaimer here.
PHOTO USE AND CONTENT SHARING
All of the photographs you see here are the property of Sunny Side Design unless otherwise credited.
We love for others to share our work, so please feel free to use one photo with a link back to our website.
Pinning and sharing is always encouraged!
Please do not reproduce other Sunny Side Design content without permission.
Retailers We Love
- Anthropologie
- Birch Lane
- Crate & Barrel
- Joss and Main
- Lampsplus
- Mark & Graham
- One Kings Lane
- Pottery Barn
- Rejuvenation
- Serena & Lily
- Wayfair
- West Elm
- Williams Sonoma
- World Market
Be sure to follow us on Pinterest for even more home decor and DIY ideas.
To see what we are working on before it’s on our blog, follow us on Instagram.
You will also find our video tutorials on our YouTube channel.
- Paint an Old World Texture Finish on a Vase

- Easy Strawberry Chicken Salad with Lime Maple Balsamic Vinaigrette
- How to Fix Chipped Kitchen Cabinets with a Pen
- Easy 4th of July Door Decor You Can Make in Minutes