Basement storage was frustrating and unorganized without a proper system. Building simple, heavy-duty basement storage shelves solved the problem and made the space functional.
Every time I went to grab seasonal décor from the basement, I felt the same frustration.
Even though we have a large unfinished space, it never worked the way it should.
Totes were stacked wherever they fit, bins were hard to reach, and nothing stayed organized for long.

What we really needed were solid basement storage shelves to make the space functional.
So I enlisted the help of my hubby, Steve, and together we built simple, heavy-duty storage shelves designed to last.
Today, we’re sharing exactly how we built them so you can do the same.
Sunnyside home is a participant in the Amazon Services LLC Associates Program, an affiliate advertising program designed to provide a means for sites to earn advertising fees by advertising and linking to Amazon.com. As an Amazon Associate, this blog earns from qualifying purchases with no additional cost to you. Click here to read our full disclosure policy.
The Plan (and the Cement Wall Challenge)
Before building anything, we took time to really assess our unfinished basement space and how we planned to use it.
To minimize waste, each shelf was designed to be 8 feet wide—the full length of a standard board.
For shelf spacing, we measured our tallest storage totes, which are 19 inches tall and 24 inches deep, and allowed 20 inches between shelves for easy access.
We also cut a 4×8 sheet of melamine in half lengthwise, giving us a 24-inch shelf depth that perfectly fits our bins with zero material waste.
The biggest challenge was figuring out how to secure heavy-duty shelves against cement walls.
Since there were no studs to anchor into, my husband used the floor joists above to secure the side supports, creating built-in, wall-supported shelves that are sturdy, tip-resistant, and earthquake-safe.
One of the many reasons I enlisted his help in the first place!
Are you enjoying this project? Please Pin It, save it for later and share it with a friend.
Sharing is caring!

Supplies & Tools Needed
Before you started building, make sure to gather all the supplies and tools for the job.
Below is the full list of everything we used to build our shelves so you can plan your project with confidence.
Our supply list is for six – 24″ x 96″ shelves that will be secured to the floor joists.
- 3 – 3/4″x4x8 melamine board (or 3/4″ plywood)
- 21 – 2x4x8 studs
- 3″ wood screws
- drill
- circular saw
- brad nailer
- 2″ brads
If you’re new here, welcome! We’re so glad you’re here.
Let us introduce ourselves, we’re Michelle and Steph, a mom and daughter team who love to DIY and decorate our homes.
Not only are we passionate about making our homes warm, comfortable and unique, but it’s our mission to help you create that same feeling in your own home.
You’ll find ideas for repurposing, creating, decorating and making your home truly yours, while always mindful of a tight budget.
Undoubtedly we love finding ways to make your home look high-end on a small budget.
Plus you’ll also find a recipe or two as we share our family favorites with you.
We’d love it if you’d join our community of doers so you won’t miss any inspiration for your home.
We love new friends.

How to Build Basement Storage Shelves
Building basement storage shelves may sound intimidating, but this project is much simpler than it looks.
By breaking the build into easy, manageable steps, you can create sturdy, heavy-duty shelves that make the most of your space.
Below, we’ll walk you through exactly how we built our basement storage shelves so you can tackle this project with confidence in your own home.
Install Side Support Boards
To start, we installed the side support boards, which are the backbone of our L-shaped basement storage shelves.
We used three sets of two 2×4×8 boards—one set in the corner and one at each side of the shelves—spacing the boards 14 inches apart and leaving about 2 inches from the cement wall.


On the right side, we attached the side supports directly to the floor joist using an angle bracket because of the way the joists run.
On the left side, we had to use a 2×4 scrap spacer to bring the boards out far enough so our full 8-foot-wide shelves would fit perfectly.
These side supports provide the stability needed for heavy-duty shelving and ensure everything stays secure and level.
Build the Shelf Frame
Next, it was time to build the shelf frames.
For each shelf, we cut two 2×4 boards to 21 inches long—in our case, that meant cutting 12 boards for all the shelves.
We drilled two pilot holes at each end of the 2×4×8 boards and then used 3-inch screws to attach the 21-inch boards, forming a large rectangle measuring 24 by 96 inches.


Repeat this process for each shelf, and you’ll have sturdy, uniform frames ready to attach to the side supports.
Let’s stay connected! Follow us on social media!
Install Shelf Frames to Vertical Supports
With the shelf frames built, it was time to attach them to the vertical support boards.
We started by marking the placement of each shelf frame, beginning at the bottom.
On each vertical support board, we drew a line 20 inches from the floor for the first shelf.
Then we measured 24 1/4 inches up from that line and marked the placement for the next shelf, repeating for the top shelf.
These lines indicate where the bottom of each shelf frame will sit.
Next, we drilled pilot holes in each vertical support about 1 3/4 inches above the placement lines.


To install the shelves, we aligned the bottom of each frame with its line and drove screws through the pilot holes into the frame.
We found it easiest to start at the bottom shelf and work our way up, making sure each frame was level and secure before moving to the next.
To join the two shelves that meet in the corner, we secured them by driving four screws from the right shelf frame into the left shelf frame.

Add Melamine Shelves
Next, it was time to add the melamine shelves.
We ripped each 4×8 melamine board in half, giving us six 24 × 96 inch boards—perfectly matching the depth and width of our frames.
We chose melamine because it’s smooth, easy to clean, and holds up well for storage, though you could also use plywood if you prefer.

To install, we simply placed each board onto the shelf frame and secured it with 2-inch brad nails, creating a sturdy, finished surface ready to hold bins, décor, or anything else we wanted to store.
Finishing Touches
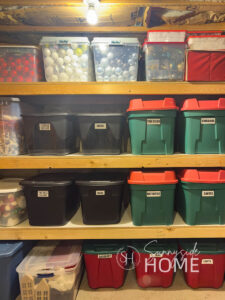
Once the shelves were in place, we added a few optional finishing touches to make the space more organized and functional.
We labeled bins and sorted them by season so everything is easy to find.
You could also paint or seal the wood if you want a cleaner look.
Here they are—our beautiful, heavy-duty storage shelves!
These small touches aren’t necessary for function, but they make using your basement storage shelves even easier and more enjoyable.
For more storage shelf ideas click here to see how Steph built them in her home.


Shop Basement Storage Solutions

More DIY Shelf Ideas
- Simple Bathroom DIY Recessed Shelf in a Wall
- Build Melamine Shelves in a Closet
- Construct Custom Built In Shelves in Wall
- Storage Room Organization Shelves
- DIY Car Display Shelves
- Build an Easy and Affordable DIY Closet Organizer
- How to Build Mudroom Built-ins
Final Thoughts
Building these heavy-duty basement storage shelves completely transformed our unfinished space.
What was once cluttered and frustrating is now organized, functional, and easy to use.
With a little planning, the right materials, and some elbow grease, you can create sturdy shelves that will last for years.
I hope this project inspires you to tackle your own basement storage challenges and finally enjoy a space that works as hard as you do.
Did you find inspiration for your home today?
Please share your storage tips and ideas with us.
We love hearing from you!
If you’re new here, WELCOME! We love having new readers and friends!
You can learn more about us here.
Let’s stay connected! Join our DIY community of doers and you won’t miss the weekly updates and more inspiration for you always on a budget.
Sharing is caring!

Thanks for stopping by Sunnyside Home. Empowering you to create a home you love!
Retailers We Love
- Anthropologie
- Birch Lane
- Crate & Barrel
- Joss and Main
- Lampsplus
- Mark & Graham
- One Kings Lane
- Pottery Barn
- Rejuvenation
- Serena & Lily
- Wayfair
- West Elm
- Williams Sonoma
- World Market
Be sure to follow us on Pinterest for even more home decor and DIY ideas.
To see what we are working on before it’s on our blog, follow us on Instagram.
You will also find our video tutorials on our YouTube channel.
What’s New . . .
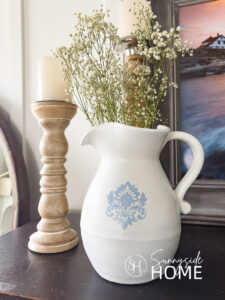
- How to Paint a Ceramic Pitcher Inspired by Pottery Barn

- How to Build Simple Basement Storage Shelves That Last
- Easy One Pot Beef and Cabbage Soup with a Kick
- Simple Valentine Heart Decor Using Vintage Linens & Lace