Adding beautiful architectural interest to your home not only adds value, but also makes your home yours. Clearly, there are many ways you can add details to your home that create character. I’ve always been drawn to styles and looks that create a sense of history, that make it feel like it’s been around for decades. Personally, I believe adding traditional beadboard paneling not only adds cottage charm to any room, but also creates a sense of history.
We have updated every space in our home except the laundry room, so this is the year! The space of the laundry room is not bad, but the finishes never reflected me or my tastes. From the florescent light fixture to the laminate and oak cabinets, it all needs to go.
My plan it not only to update the laundry room, but also create an area for jackets, coats and shoes. Actually, creating a mini mudroom within the laundry room.
You know, I’ve been a little envious ever since we built Steph’s mudroom.
Not to mention when Alex and Megan built their mudroom bench.
For phase one of this makeover, we will begin with the long wall to the right when you enter the laundry room. I feel like this is the perfect space to create hanging storage.
Adding a traditional beadboard paneled wall is really not that difficult. In fact, Steph and I were able to complete it in an afternoon. Scroll down and see our time saving tips.
To see the complete video tutorial for installing a beadboard wainscoting, click here.
Sunny Side Design is a participant in the Amazon Services LLC Associates Program, an affiliate advertising program designed to provide a means for sites to earn advertising fees by advertising and linking to Amazon.com. As an Amazon Associate, this blog earns from qualifying purchases with no additional cost to you. Click here to read our full disclosure policy.
Materials & Supplies:
You’ll find a list of materials and tools we used below.
Materials:
Tools:
Prepare the Wall for Beadboard Paneling
There are a few steps to do to prepare your wall for beadboard paneling.

- First, we removed the adjacent door casing and base board.
- Second, we made a level line for the height of the beadboard paneling. Our paneling will be a 5′ high wainscoting. By doing this I will be able to create hooks for hanging storage.
- Third, using a stud finder, we marked where the studs were located in the walls.
Adding Beadboard Panels

Pro-Tip: to make the installation easier. We had each beadboard panel cut at The Home Depot to the height we needed, 5 feet.
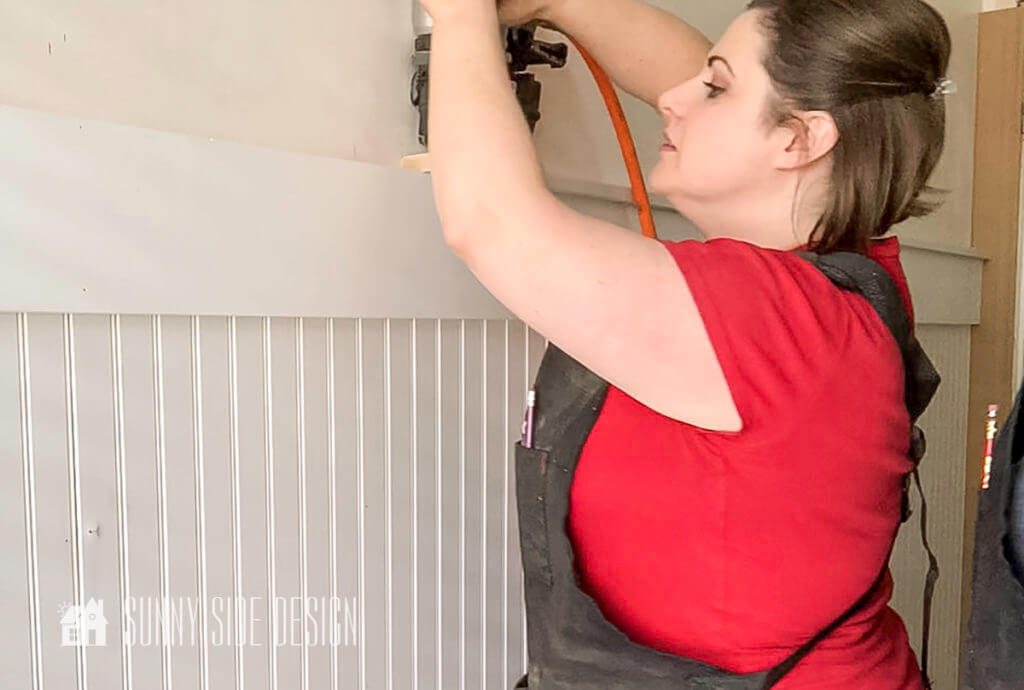
As with any paneling, you will want to attach not only with brads or nails at the studs, but also you will want to add construction adhesive.
This step is really important on the edges of the beadboard. When installing each panel you may or may not have a stud to nail into at the edge of the panel.
Therefore, it’s important to make sure you run a solid bead of construction adhesive along each side. Just to make sure that it is secured well to the wall, we added a bit of adhesive along the top and bottom and randomly along the rest of the panel.

Next, we placed the panel along our level line and secured it with brads at each stud.
Are you enjoying this project? Please Pin It, save it for later and share it with a friend.
Sharing is caring!
Beadboard Paneling Cuts


As you install your beadboard paneling, you will certainly come to outlets, or switches that will require you to make cuts.
We did have one outlet on the wall that we needed to make a cut for. I’ll be totally honest, this part made me a little nervous. As it turned out it was a lot easier than I thought.
First, we measured the distance of the outlet from the top and side of the beadboard panel. Then we marked the backside of the beadboard panel.

All my anxiety over cutting this out was unnecessary. We used a wood blade in the oscillating tool and it cut through like butter. It worked like a charm.
If you do not have access to an oscillating tool you could also drill a pilot hole and use a scroll saw to get the job done too.
If you’re new here, welcome! We’re so glad you’re here.
Let us introduce ourselves, we’re Michelle and Steph, a mom and daughter team who love to DIY and decorate our homes.
Not only are we passionate about making our homes warm, comfortable and unique, but it’s our mission to help you create that same feeling in your own home.
You’ll find ideas for repurposing, creating, decorating and making your home truly yours, while always mindful of a tight budget.
We love finding ways to make your home look high-end on a small budget.
Plus you’ll also find a recipe or two as we share our family favorites with you.
We’d love it if you’d join our community of doers so you won’t miss any inspiration for your home.
We love new friends.

Installing the Header
With our beadboard panel only covering a portion of the wall, the top edge will need some sort of edge to make it look finished.

Because I will be adding hooks for jackets and coats I wanted a substantial piece of wood to finish off the beadboard.
For this piece of wood I chose a 1″x6″ primed pine board. It was clear, with no knot holes.
We secured it to the wall at each stud with 2 nails.

The length of the wall was too long for just one board.
Therefore to create a seamless joint, we cut a 45° angle on each board. Then when installing the boards will fit tightly together.
Completing the Header
Finally, to finish off the header we attached a 1/2″ x 1 1/2″ primed MFD board.
Let’s stay connected! Follow us on social media!
Baseboard

In addition, to finish off the lower edge of the beadboard panel we install new baseboards.
In fact, this was the final room to get the new baseboards that we had installed throughout our home.
Caulk & Putty
We are now nearing the home stretch. To make everything look finished and neat, it’s time to caulk and putty.

Because these beadboard panels are not tongue and groove, there is a slight gap where each panel meets.
This is easy to conceal by running a bead of caulk at each seam.
Steph is a pro at this and I always leave this job for her.
To see Steph’s caulking tips click here.

A bead of caulk was also run at the top of the header and on the top edge of the baseboard.

To conceal all of the nails we applied Drydex nail hole filler.
Then when it’s dry, you give it a light sanding with a foam sanding block until smooth.
Paint Beadboard Paneling
Pro-Tip: Purchasing primed boards will save you time.

If your boards are not primed, you will want to prime them first. All of our boards were primed except for the baseboard.
Because of the groove of the beadboard, I decided to use our Wagner paint sprayer.
I did one coat horizontally and one coat vertically using the detail nozzle.
While I love this nozzle to get a beautiful smooth finish on furniture, it does not work as well on large areas like a wall. Once the paint had dried the beadboard panel looked blotchy.
I really wanted to create a smooth finish on the beadboard without brush marks. So I finally used a small foam roller and rolled a 3rd coat and got just the finish I wanted.
Completed Beadboard Functional Accent Wall

I’m in love this wall!
It totally changes the feel of my laundry room.

Now, if I were to turn the camera the opposite direction, it would look the same, but the right side of my room looks amazing.
Here’s a sneak peak of next week’s post. Be sure to check out this beautiful wallpaper accent wall.

Looking for more inspiration for an accent wall in your home?!
Then check out these ideas:
- How to DIY a Shiplap Wall the Easy Way
- Inexpensive Board and Batten Accent Wall
- Beautiful Board and Batten Wall with a Hidden Door
- Easy DIY Board and Batten Wall with a Twist
- How to Easily Install Picture Frame Moulding
- Easy Modern Box Moulding You Can Do—No Power Tools Required
We hope you found some inspiration for your home today.
Is this a project you’d like to add to your home?
Please share your tips and ideas with us.
We love hearing from you!
If you’re new here, WELCOME! We love having new readers and friends!
You can learn more about us here.
Let’s stay connected! Join our DIY community of doers and you won’t miss the weekly updates and more inspiration for you always on a budget.
Sharing is caring!

Thanks for stopping by Sunny Side Design. Empowering you to create a home you love!
Retailers We Love
- Anthropologie
- Birch Lane
- Crate & Barrel
- Joss and Main
- Lampsplus
- Mark & Graham
- One Kings Lane
- Pottery Barn
- Rejuvenation
- Serena & Lily
- Wayfair
- West Elm
- Williams Sonoma
- World Market
Be sure to follow us on Pinterest for even more home decor and DIY ideas.
To see what we are working on before it’s on our blog, follow us on Instagram.
You will also find our video tutorials on our YouTube channel.
- Beautiful DIY Christmas Bells Made From Recycled Materials

- 4 Simple and Unique Blue Thanksgiving Table Decor Ideas
- How to Paint a Faux Antique Brass Finish
- Make Your Home Cozy with 10 Fall Simmer Pot Recipes