Are you getting excited for spring and looking for ideas to freshen up your home? How about a simple DIY project making a wooden plant pot?
Certainly, we are looking forward to digging in the garden and longing for the spring bulbs to emerge. In fact, last week I saw the first daffodils starting to bloom in my neighborhood. Yeah!!
Spring undoubtedly brings feelings of renewal, rebirth and hope. It’s the season that I long for the most, after a lengthy winter.
Last week we had the idea of making a wooden plant pot using paint stir sticks. After a little tinkering we came up with a design we loved. Scroll on down and see how to make your own wooden plant pot using paint sticks.
This wooden plant pot would be perfect for our DIY faux tree too!
Sunny Side Design is a participant in the Amazon Services LLC Associates Program, an affiliate advertising program designed to provide a means for sites to earn advertising fees by advertising and linking to Amazon.com. As an Amazon Associate, this blog earns from qualifying purchases with no additional cost to you. Click here to read our full disclosure policy.
Supplies for a Wooden Plant Pot
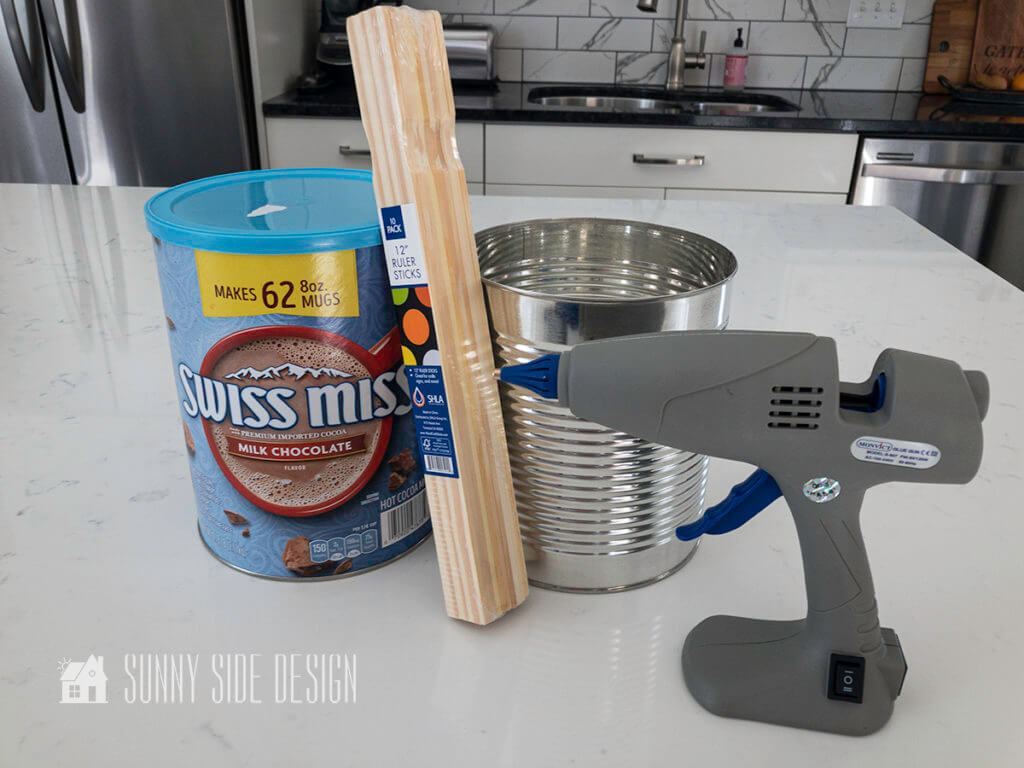
To make this wooden plant pot you will need a container that has straight sides like a hot chocolate container or large #10 can.
Additionally, you’ll need some paint stir sticks. We decided to white wash ours, so we purchased them from The Home Depot. However, if you’re painting them a solid color, you could use the free paint stir sticks that you find at the home improvement store.
Also, you will need a glue gun and paint.
As you scroll down you’ll see that we also used cardstock.
The Paint Sticks

First, we measured the circumference of the can to determine how many paint sticks we would need.
Then we laid out the paint sticks and measured how many we would need.
For our large #10 can we needed 18-19 paint stir sticks to make our wooden plant pot.
Once you’ve determined how many paint sticks you need, paint them as desired.
Prepare the Container

Next, we painted the can black with a chalk paint. As the paint sticks are glued around the can you will be able to see in-between the slats.
Therefore, if you don’t want the metal to show, you’ll want to camouflage the container.
The container we used for the first wooden plant pot was a hot chocolate container. And the surface was smooth unlike the corrugated metal can we used on our second pot.
Because of the smooth surface the paint sticks stuck to the surface beautifully.
However, on our second pot the can was corrugated and the paint sticks fell off.
Are you enjoying this project? Please Pin It, save it for later and share it with a friend.
Sharing is caring!

In spite of this, Steph came up with an easy fix, we simply covered the can with black cardstock. And it worked like a charm!
First, cut the cardstock to the height of the can, then adhere to the can with hot glue.
It seems that if your can has a smooth surface, you can simply paint the surface before adhering the paint sticks.
However, if your surface is corrugated, skip the paint and cover the container with cardstock.
Attach Paint Sticks to Container

First you’ll want to ensure that the paint sticks are evenly spaced around the can.
Place a rubber band around the can.

Then, add the paint sticks around the can and adjust so they are evenly spaced.

Then, remove one paint stick at at time, run a bead of hot glue down the center of the stick.
Next, pull back the rubber band and insert the the paint stick into position.
Finally, press the paint stick to the container until the hot glue cools.

Continue to remove one paint stick at a time, add hot glue and place into position.
If you’re new here, welcome! We’re so glad you’re here.
Let us introduce ourselves, we’re Michelle and Steph, a mom and daughter team who love to DIY and decorate our homes.
Not only are we passionate about making our homes warm, comfortable and unique, but it’s our mission to help you create that same feeling in your own home.
You’ll find ideas for repurposing, creating, decorating and making your home truly yours, while always mindful of a tight budget.
Undoubtedly we love finding ways to make your home look high-end on a small budget.
Plus you’ll also find a recipe or two as we share our family favorites with you.
We’d love it if you’d join our community of doers so you won’t miss any inspiration for your home.
We love new friends.

[mailerlite_form form_id=2]
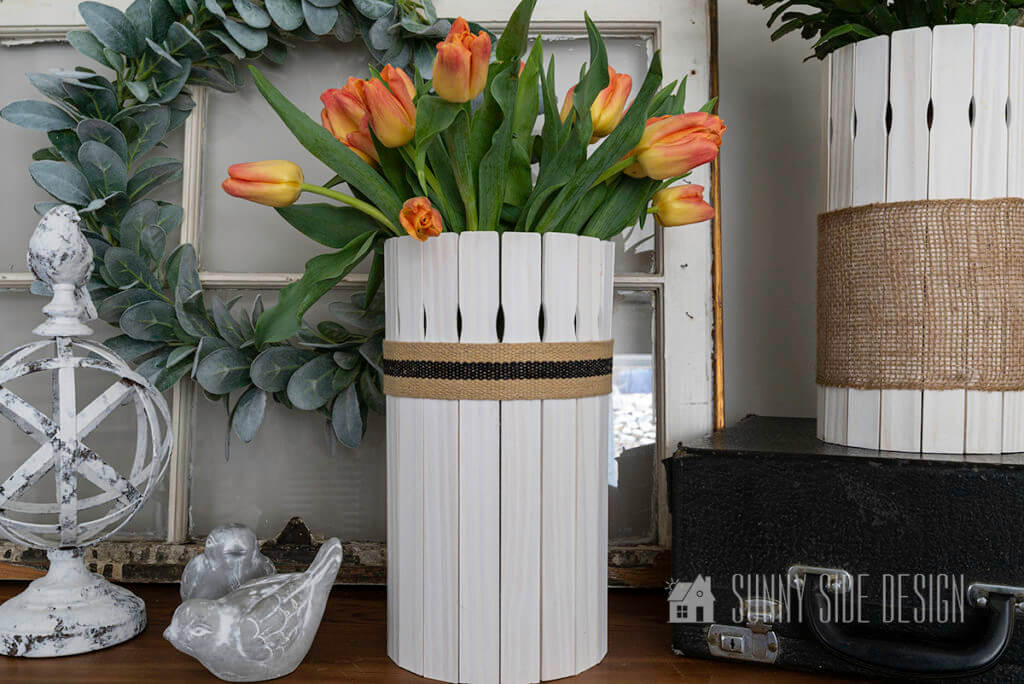
Embellish Wooden Plant Pot

Once all of the paint sticks are adhered to the can you may want to embellish it.
We chose to add a jute and black trim around this wooden plant pot.
In order to keep the trim straight, I first placed a strip of Frog tape around the pot. Then I had a straight line to follow to glue the trim around the pot.
Completed Paint Stir Stick Pots
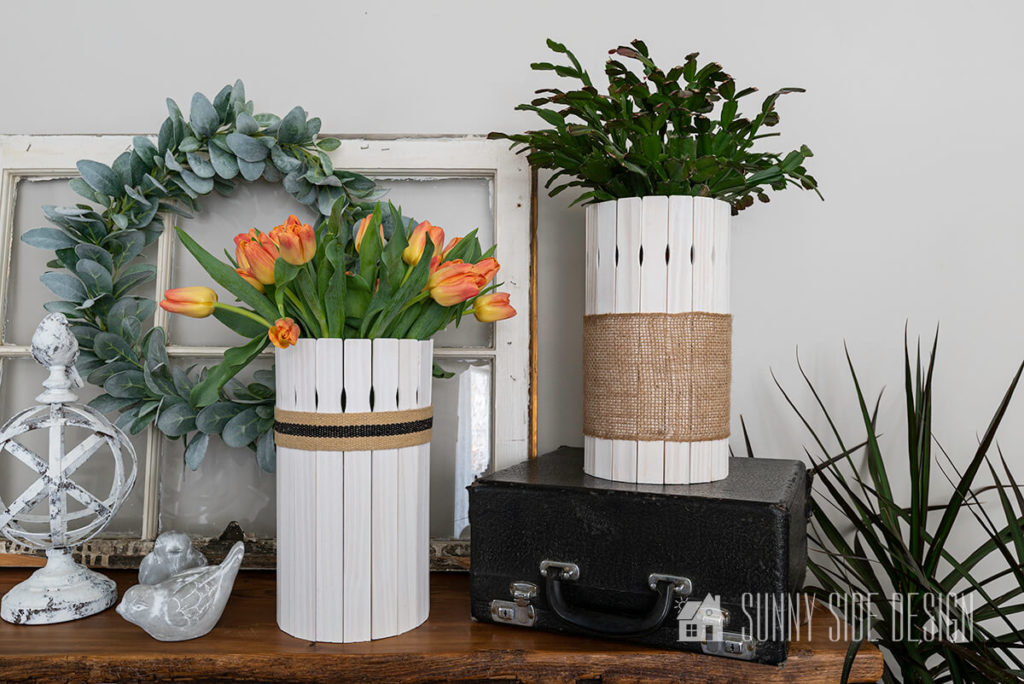
We love the way these wooden plant pots turned out! They have a farmhouse – coastal feel to them.
Not only will they work as a pot for flowers and plants, but also as a vase for spring flowers.
Don’t you love the way the tulips look in this container?

Not only are these flower pots quick and easy to make, but also they are easy on the budget. In fact, you can easily make a pot for less than $3!
You can’t beat that!
So, please tell us what you think! Is this a project you’d like to try?
Have you used paint sticks before with your own DIY projects? If so, we’d love to know what you’ve made.
Larger Variation
And for a larger variation on the wooden plant pot,

…we cut down a 5 gallon bucket, using the fence on the table saw and painted the stir sticks black.

It make a great pot for a large potted plant.
Let’s stay connected! Follow us on social media!
We hope you found some inspiration for your home today.
Please share your tips and ideas with us.
We love hearing from you!
For more DIY plant pots and vases take a look at these ideas:
- DIY Textured Vase Inspired by Pottery Barn
- How to Paint a Vase with an Aged Look
- Faux Concrete Planter with Plaster
- How to Paint a Faux Concrete Finish
If you’re new here, WELCOME! We love having new readers and friends!
You can learn more about us here.
Let’s stay connected! Join our DIY community of doers and you won’t miss the weekly updates and more inspiration for you always on a budget.
Sharing is caring!

Thanks for stopping by Sunny Side Design. Empowering you to create a home you love!
DISCLAIMER
This blog’s content is for entertainment purposes only and is not professional advice. By reading this blog and attempting to recreate a project, you assume all responsibility for any injuries or damages incurred. Read my full disclaimer here.
PHOTO USE AND CONTENT SHARING
All of the photographs you see here are the property of Sunny Side Design unless otherwise credited.
We love for others to share our work, so please feel free to use one photo with a link back to our website.
Pinning and sharing is always encouraged!
Please do not reproduce other Sunny Side Design content without permission.
Retailers We Love
- Anthropologie
- Birch Lane
- Crate & Barrel
- Joss and Main
- Lampsplus
- Mark & Graham
- One Kings Lane
- Pottery Barn
- Rejuvenation
- Serena & Lily
- Wayfair
- West Elm
- Williams Sonoma
- World Market
Be sure to follow us on Pinterest for even more home decor and DIY ideas.
To see what we are working on before it’s on our blog, follow us on Instagram.
You will also find our video tutorials on our YouTube channel.
- Simple Dollar Store Solar Lights Glow-Up

- The Best Budget-Friendly Backyard Ideas We’ve Made

- 6 Simple Easter Table Settings for a Beautiful Spring Table
- 15 Simple Decorating Ideas for Spring with Common Thrifted Items