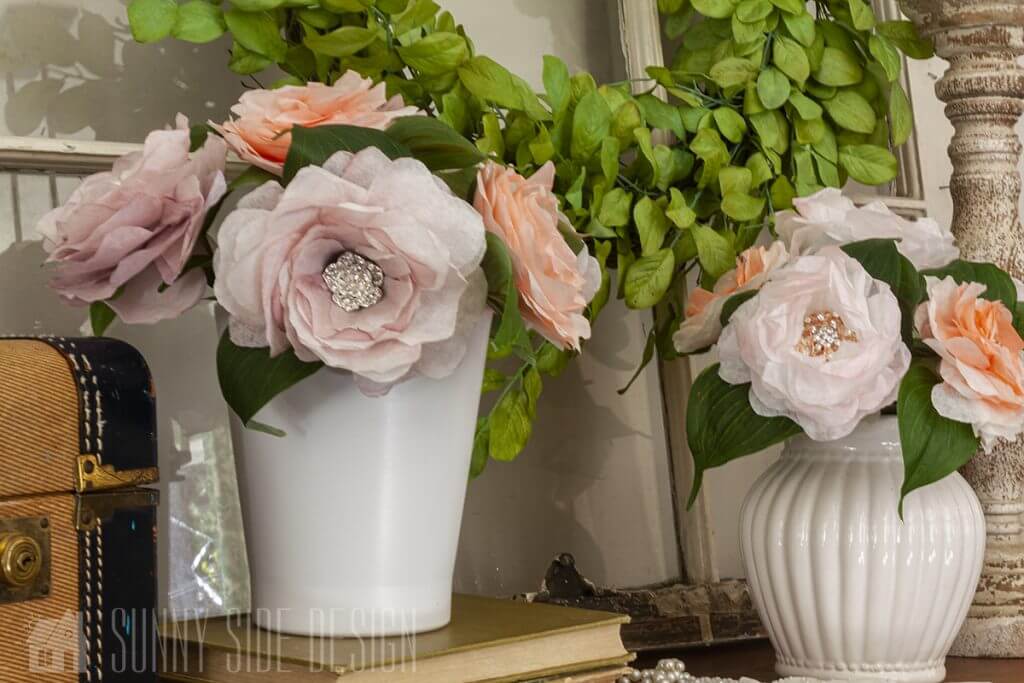
Have you seen the gorgeous coffee filter flowers all over Pinterest? They are amazing and so realistic looking. After trying this craft ourselves we knew we wanted to share our version of an Easy coffee filter flower with a little bling.
This DIY tutorial is so simple and fun to do. Not only will we share how to make the flower, but also how to watercolor the coffee filters to get amazing variations in color.
We promise you will be oohing & awing, and looking for places to display them around your home. Whether it’s on a wreath for your front door, centerpiece for your dining table, a beautiful bouquet for Mother’s Day, garland for a baby shower, or even a fun backdrop, you will be looking for ways to incorporate them. In fact, they would also be amazing for a wedding.
We have partnered with Totally Dazzled with this project. They have the most amazing Rhinestone embellishments, which are amazing for weddings. However, we have had so much fun embellishing so many items in our homes.
Sunny Side Design is a participant in the Amazon Services LLC Associates Program, an affiliate advertising program designed to provide a means for sites to earn advertising fees by advertising and linking to Amazon.com. As an Amazon Associate, this blog earns from qualifying purchases with no additional cost to you. Click here to read our full disclosure policy.
Supplies Needed
If you are more of a visual learner, we’ve created a short video tutorial . . .
1. Folds and Cuts
For each flower you will need 4 coffee filters.
Are you ready to have some fun and create? With out a doubt, creating is food for the soul. Some of our favorite times are when we are able to just play and create.
First, flatten out the coffee filters and stack all 4 together.


Next, we will make a series of folds.
First, fold the stack of filters in half. Then fold in half again.


Now at each fold, slide scissors in and cut about 2/3 of the way. Repeat at each fold.


Fold in half one more time and cut again on the fold about 2/3 of the way.
2. Form Petals


Using a pencil, sketch out the shape for the petals. You will want to make sure that it curves down on the slits that were just cut. It is similar to a heart shape only with no points. Finally, cut out the design.

Now we can open up the folds. However, leave it folded in half still.


To make the flowers look more realistic we are going to curl the edges of the petals. Roll the coffee filter petal around a pencil. Hold for several seconds and then roll the next petal. Repeat until all four petals are curled.
Are you enjoying this project? Please Pin It, save it for later and share it with a friend.
Sharing is caring!
If you’re new here, welcome! We’re so glad you’re here.
Let us introduce ourselves, we’re Michelle and Steph, a mom and daughter team who love to DIY and decorate our homes.
Not only are we passionate about making our homes warm, comfortable and unique, but it’s our mission to help you create that same feeling in your own home.
You’ll find ideas for repurposing, creating, decorating and making your home truly yours, while always mindful of a tight budget.
Undoubtedly we love finding ways to make your home look high-end on a small budget.
Plus you’ll also find a recipe or two as we share our family favorites with you.
We’d love it if you’d join our community of doers so you won’t miss any inspiration for your home.
We love new friends.
3. Form Coffee Filter Flower


Open up the coffee filters and re-stack them alternating the petals and the “V” cuts.

Fold the alternating petal coffee filters in half.


With the coffee filters folded in half, start on one end and roll it into a cone shape. We like to keep our thumb inside as we roll. This will keep it slightly open in the center.
This will allow placement for our Totally Dazzled Rhinestone embellishments. Once it’s all rolled secure the end with a little hot glue.

Now our flower is really starting to take shape. To complete the flower, start on the outer edge and fold down each petal. Continue until the entire flower is open.
4. Add Color to Coffee Filter Flowers


There are so many options for adding color to the coffee filter flowers. For this particular flower I wanted just the tips to have a hint of color, similar to a Tiffany rose.
First, I began by applying a little water to the edges of the petals of the flower. This will allow the color to bleed and soften as it is applied.
I created a soft pink paint my mixing red and white acrylic paint. The paint should be fairly thin for this technique, so we added quite a bit of water.
Next, gently tap the paint on the edges of the petals. Let dry completely.
More Techniques for Coloring Flowers
We would like to share a couple other techniques we used to color the coffee filters as well.


For the flower that is two-toned coral in the center and fading to white for the outer petals, we mixed up our acrylic paint again, keeping it very thin like a watercolor.
Fold one layer of a coffee filter in half. First, wet a paint brush and brush over the entire surface of the coffee filter.
Next, paint on the watered down acrylic paint on about 1/2 of the folded coffee folder. Notice in the photo that the color is angled across the filter.
Repeat on all 4 coffee filters.

The coffee filter flowers that are colored through, we once again folded the coffee filter 1/2 and wet it with a paint brush.
For the Lavender and Pink flowers, we brushed on color from the lower ribbed edge semi circle. Rinse the brush in water and with a wet brush pull the color towards the petal tips. We then darkened the color and painted the color semi circle.
Flip each piece over and repeat.


To speed up the drying process, we baked them in the oven at 350 for 10 minutes.
Let’s stay connected! Follow us on social media!

For all the flowers that we painted before we formed the flower, we rolled the petals after it was painted and dried. Using the same technique with a pencil.

The flowers are formed in the same way as we did the white flower. Stack the coffee filters, alternating the petals. Fold in 1/2 and roll in a cone shape and secure with hot glue. Then fold down the petals one by one to open up the flower.
5. Add Greenery

To add a green stem, we first cut off about 1/3″-1/2″ tip of the bottom of the flower. Save this triangle piece.

Place hot glue in the opening at the bottom of the flower. Add the greenery stem and pinch closed until glue cools.
If desired wrap this area with a little floral tape.
6. Add Bling

Finally it’s time to add the bling!
To provide a more stable area to glue the Rhinestone embellishment, we took that triangle piece we cut off from the bottom and used hot glue to attach it in the center of the flower, point down.
Now add a little more hot glue and adhere the Totally Dazzled Rhinestone embellishment.

Ta Da! Aren’t these flowers amazing! They look so realistic and we love the addition of the bling. These Rhinestone embellishments are inexpensive and add that touch of glam.
You probably already have most of these supplies in your home right now and the rhinestone embellishments are easily ordered online. They ship quickly from California.

This will make such a lovely gift for Mother’s Day! I know it’s something I would love to receive. We can’t wait to share these beautiful bouquets.

Are you ready to create with these beautiful rhinestone brooches?
Do you have other ideas of ways you can use these beautiful embellishments in your home?
We would love to hear your ideas, just leave us a comment below!
More Flower Ideas
- How to Make Peonies Last Longer with 7 Simple Tricks
- How to Easily Dye Sola Wood Flowers
- Easily Add Beauty to Your Home with a DIY Flower Arrangement
- How to Make a Simple Sunflower Arrangement
More DIY home decor projects to try:
- Easy Fiber Wall Art a West Elm Dupe
- How to Make a Topiary Tree That Looks Real
- Guide to Free Printable Wall Art Online
- Simple and Stylish Cane Tray
- Pottery Barn Color Block Vase Dupe
- Easy Pedestal Tray from Thrift Store Finds
- Paint a Vase with an Aged Look
- Simple Painted Lamp Base
- Make a Beautiful Faux Tree
- Pottery Barn Brooks Cross Bar Hurricane Dupe
- Faux Concrete Planter with Plaster
- Quick and Easy DIY Mirror Frame
- Update a Vintage Lampshade
- Decorating a Pillow with Paint
- How To Resize A Canvas
- Easy Embellished Lampshades
We hope you found some inspiration for your home today.
Please share your tips and ideas with us.
We love hearing from you!
If you’re new here, WELCOME! We love having new readers and friends!
You can learn more about us here.
Let’s stay connected! Join our DIY community of doers and you won’t miss the weekly updates and more inspiration for you always on a budget.
Sharing is caring!

Thanks for stopping by Sunnyside Home. Empowering you to create a home you love!
Retailers We Love
- Anthropologie
- Birch Lane
- Crate & Barrel
- Joss and Main
- Lampsplus
- Mark & Graham
- One Kings Lane
- Pottery Barn
- Rejuvenation
- Serena & Lily
- Wayfair
- West Elm
- Williams Sonoma
- World Market
Be sure to follow us on Pinterest for even more home decor and DIY ideas.
To see what we are working on before it’s on our blog, follow us on Instagram.
You will also find our video tutorials on our YouTube channel.
- Creating a Cozy Outdoor Living Room with Thrifted Finds

- The Best ‘Berry in Love’ Bridal Shower Ideas
- Paint an Old World Texture Finish on a Vase
- Easy Strawberry Chicken Salad with Lime Maple Balsamic Vinaigrette