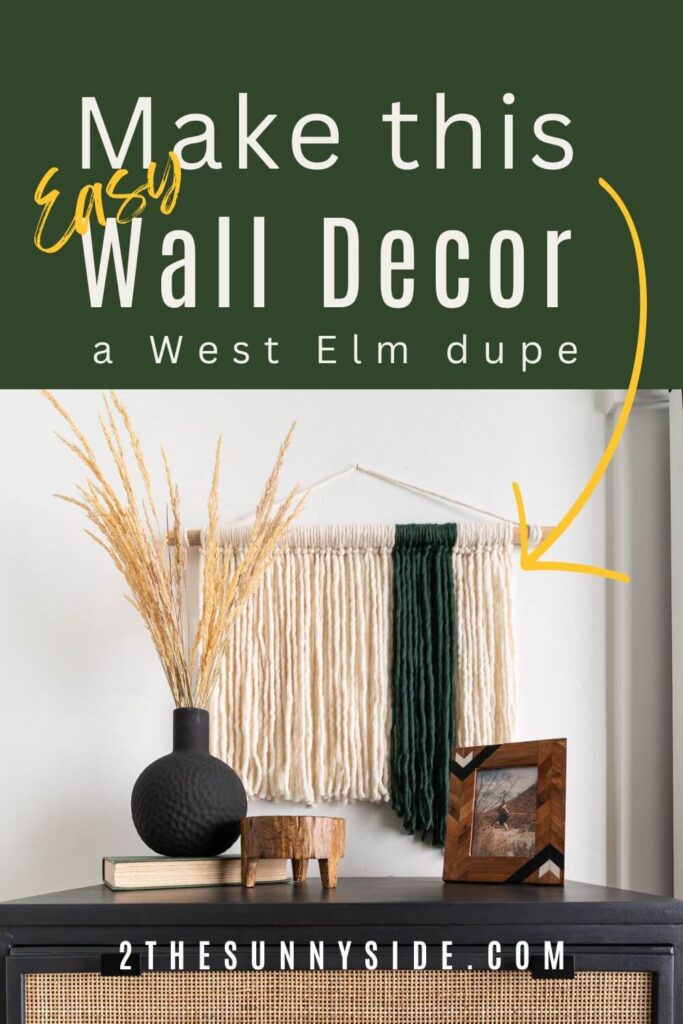
Using simple materials like yarn and a dowel or stick, you can create a stunning fiber wall art, that’s beautiful in the bedroom, living or any room.
As you know, we love a good dupe!
Finding a way to DIY our own home decor or wall art with inspiration from Pottery Barn, Anthropologie or West Elm is so satisfying and easy on the budget.
In fact, if you were to take a look through photos on our phones, you’d find quite a few ideas we’d love to recreate.
The need to create or recreate is just in our blood.
While browsing on West Elm’s website several weeks ago I came across the Raffal Estudio green moving wall hanging and I though it would be perfect for Gavin’s room.
But I’m not willing to spend $260 for art or decor for his room.
Do you know how often teens and change their minds about things?
I’m excited to share this easy DIY with you that I believe will enhance your living room, bedroom, or any space in your home.
This simple yarn wall art decor is perfect for adding a handmade, personal touch to your home.
Let’s dive into this simple and fun home decor project and get crafting!
Sunny Side Design is a participant in the Amazon Services LLC Associates Program, an affiliate advertising program designed to provide a means for sites to earn advertising fees by advertising and linking to Amazon.com. As an Amazon Associate, this blog earns from qualifying purchases with no additional cost to you. Click here to read our full disclosure policy.
Supplies
This project only requires a few supplies to make this pretty wall art.
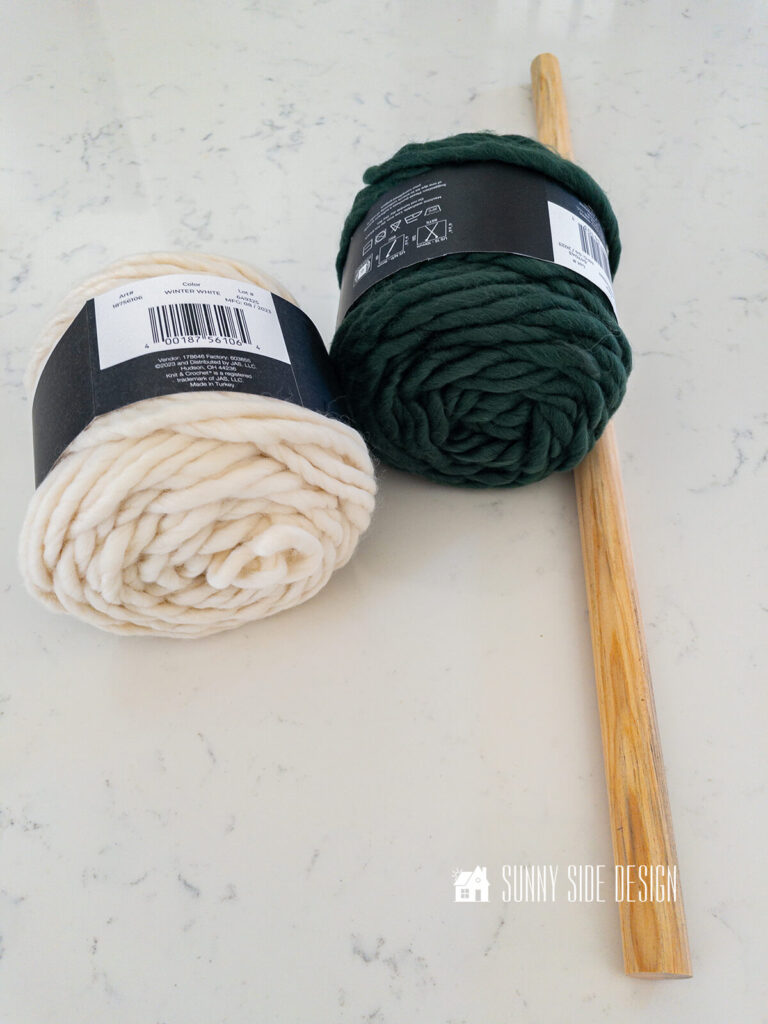
You’ll need a dowel or stick about 1″ in diameter, yarn or fibers of your choice, scissors and we found a quilting ruler and rotary cutter helpful for trimming.
I wanted to keep this looking as natural as possible, so I avoided synthetic yarns and found a super chunky wool blend yarn at Joann.
Of course the beauty of creating your own fiber wall art, is you can customize it to the size and colors you’d like.
Measure your Space
Before you begin your DIY fiber wall art project, you’ll want to measure your space to ensure your creation fits perfectly.
Our inspiration piece is 27″ wide and 31″ high.
I plan to hang my wall art above the dresser, so mine will be a few inches shorter at 24″ and 27″ wide, the same as the West Elm piece.
Are you enjoying this project? Please Pin It, save it for later and share it with a friend.
Sharing is caring!
Prepare Dowel
The first step is to cut your dowel or stick to your desired length.
I cut mine to 27″ and used my miter saw to do this, but you may also use a handsaw.
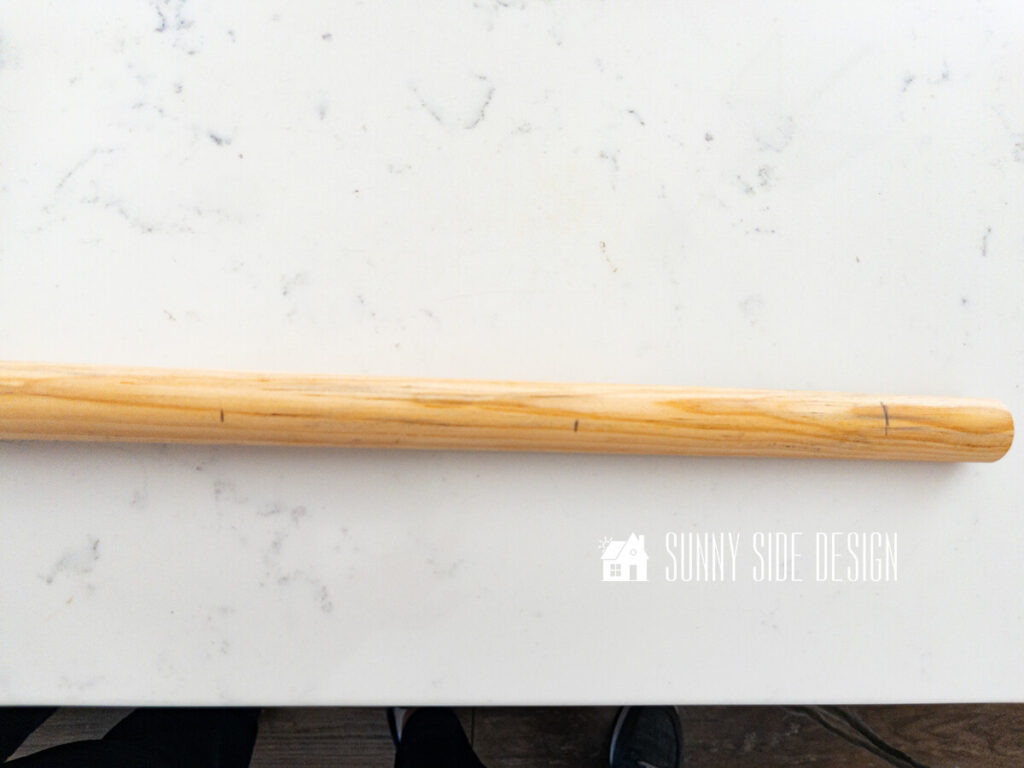
Next you’ll want to mark your dowel for the placement of the contrasting yarn.
As I looked at the inspiration piece, it looked to me like the green section was about 1/5 of the width on the dowel.
So I first began by marking a 2″ section on each side of the dowel that will be left open, then I marked over 5″ from the right side of the dowel, and then another 5″ mark.
This will help keep the piece balanced.
If you’re new here, welcome! We’re so glad you’re here.
Let us introduce ourselves, we’re Michelle and Steph, a mom and daughter team who love to DIY and decorate our homes.
Not only are we passionate about making our homes warm, comfortable and unique, but it’s our mission to help you create that same feeling in your own home.
You’ll find ideas for repurposing, creating, decorating and making your home truly yours, while always mindful of a tight budget.
Undoubtedly we love finding ways to make your home look high-end on a small budget.
Plus you’ll also find a recipe or two as we share our family favorites with you.
We’d love it if you’d join our community of doers so you won’t miss any inspiration for your home.
We love new friends.

Cut Yarn
It’s now time for the fun part to create your DIY fiber wall art.
Each length of yarn will be double the length of your finished design and allow an extra 7″ to go around the dowel.
So, I cut my green yarn to 55″ and the winter white yarn to 50″ in length.
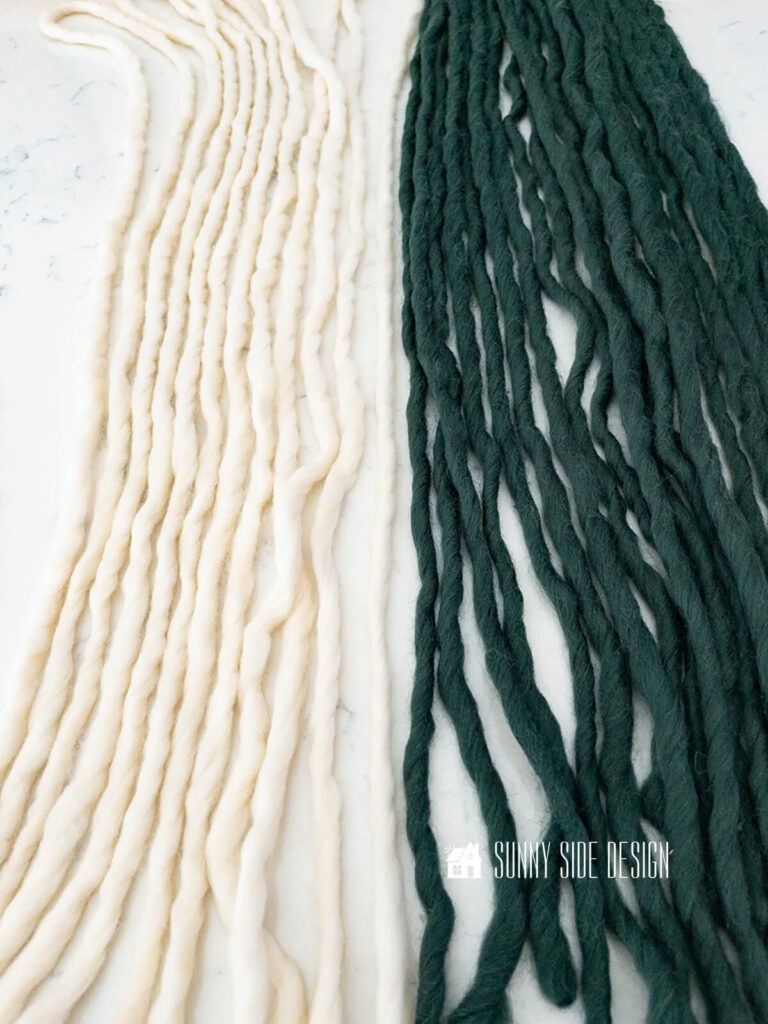
I found that a quilting ruler was a quick and easy way to measure my length.
I needed 10 lengths of the green yarn and around 50 of the winter white yarn.
Let’s stay connected! Follow us on social media!
Loop Yarn on Dowel
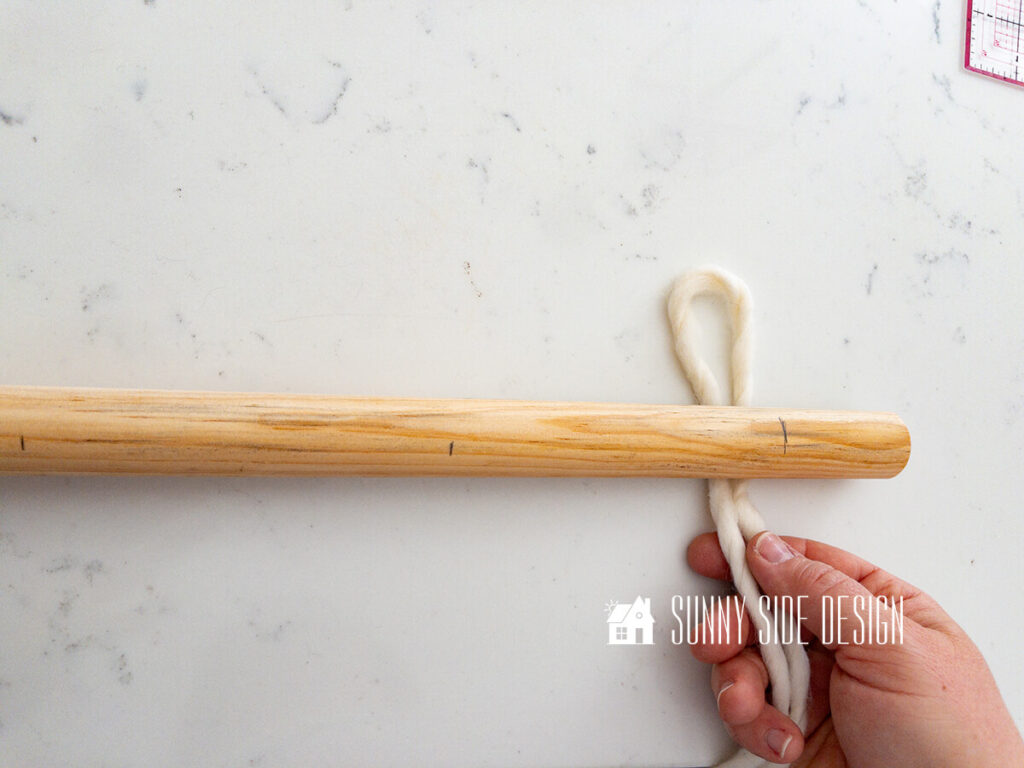
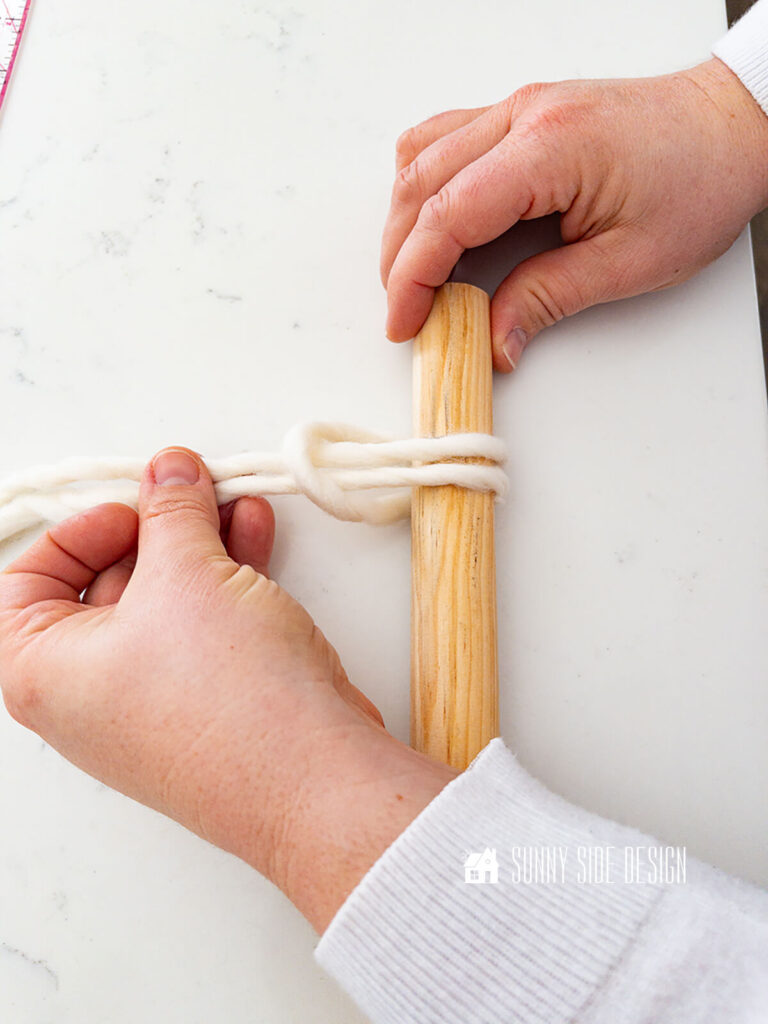
To make the loop around the dowel, I first fold the yarn in half and placed it under the dowel.
Place this loop over the dowel and bring the two loose ends of the yarn through the loop, pulling them tight to secure the yarn to the dowel.
This is called a larks head knot, or a cow hitch knot.
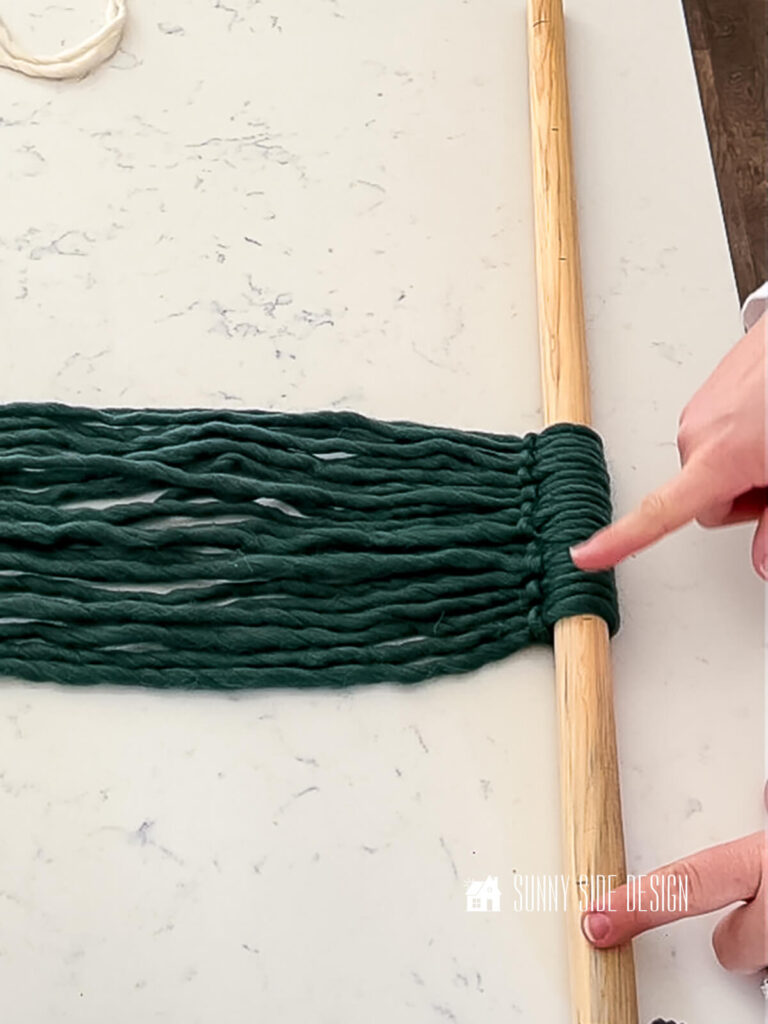
I found it best to start with the green yarn first, this way I would have a good estimate of how many lengths of yarn I’d need for the winter white color.
With the chunky yarn I used, it took 10 strands of the green yarn.
And a little more than 50 lengths of the winter white yarn.
This part goes super quick!
I decided to set a timer to see how long it would take and would you believe it was just under 12 minutes.
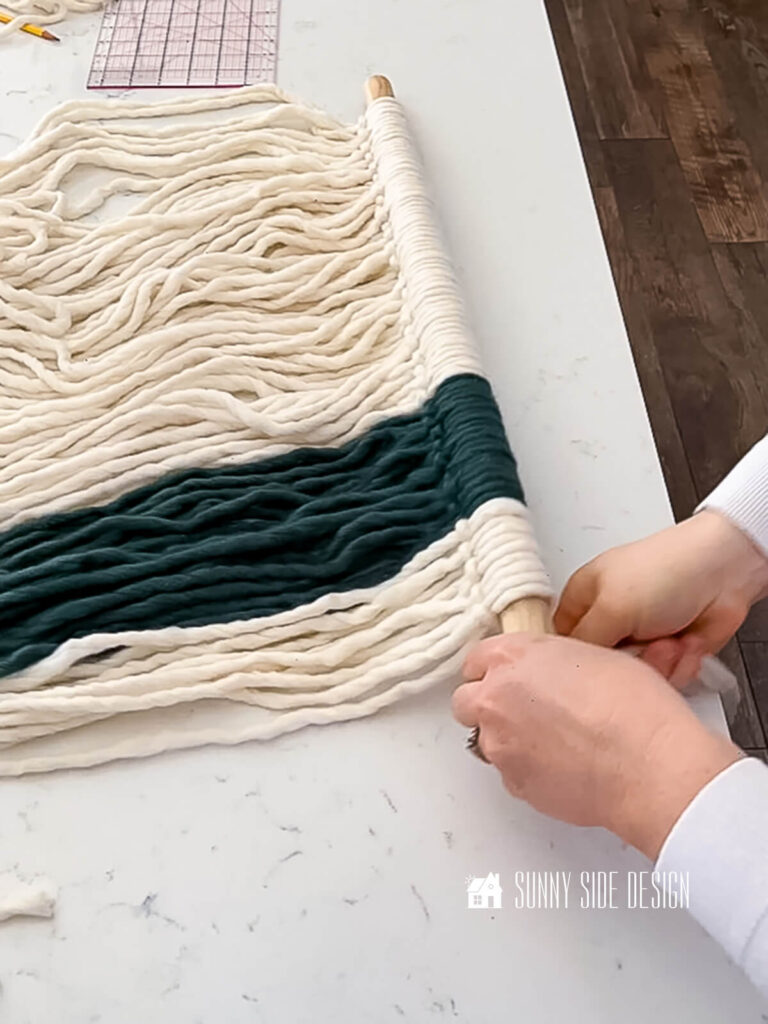
Trim Yarn
Trimming the yarn is the final step in completing your fiber wall art.
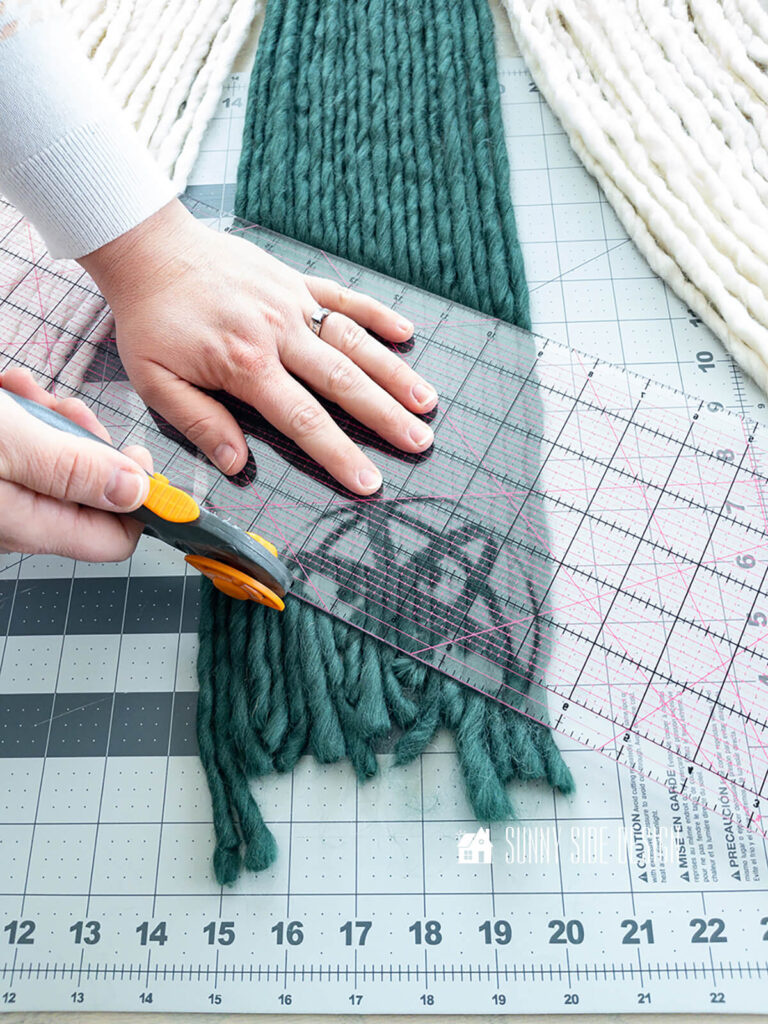
Once again I found my quilting tools helpful in trimming the yarn.
First place the yarn wall art on a cutting mat, smoothing out the yarn.
You’ll want to make sure that all your pieces are straight.
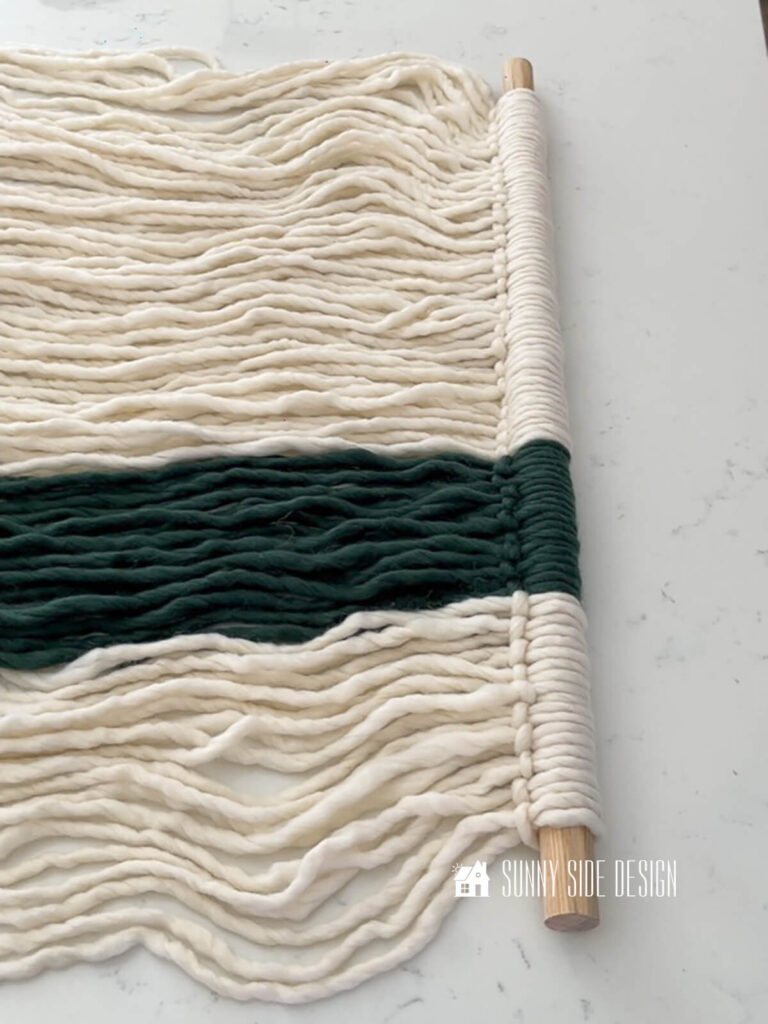
Place the quilting ruler over the green section of the yarn at an angle and cut with a rotary cutter.
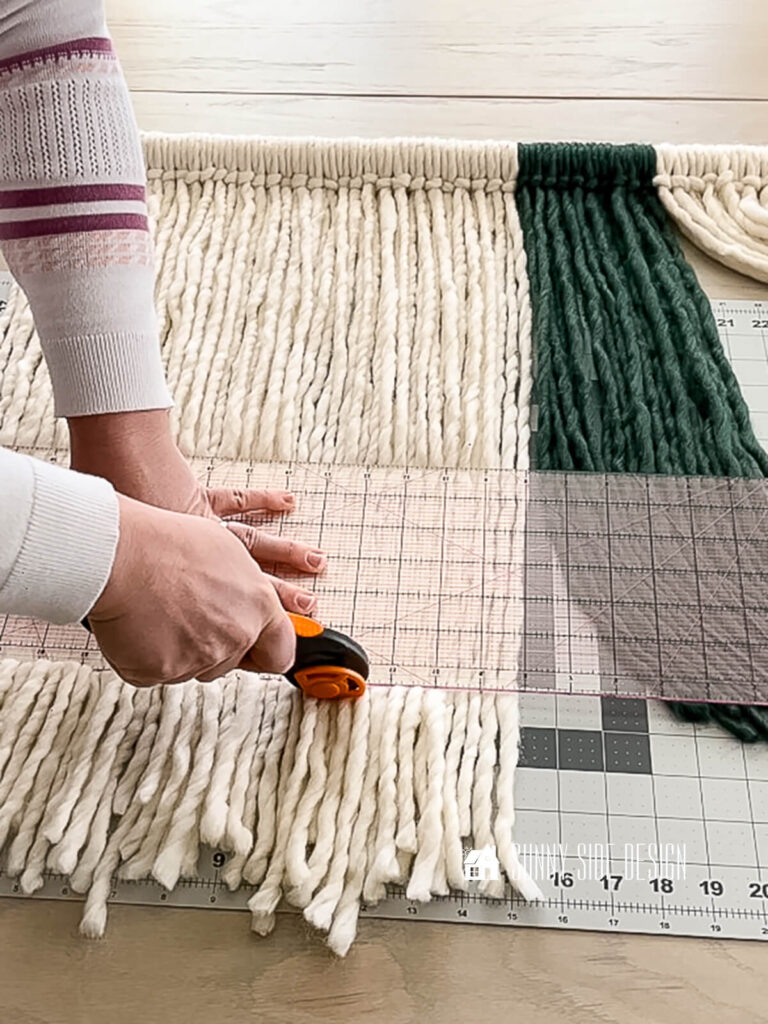
Next push the green or contrasting yarn section off to the side, align the ruler and trim the winter white section.
Cut the white sections about 1″ shorter than the shortest side of green section.
Repeat on the right side of the fiber wall art.
If you don’t have a rotary cutter, no worries.
Tape down your fibers to keep them aligned and trim with scissors.
Attach Hanger
Attaching a yarn hanger to your dowel is the final touch that will allow you to display your fiber wall art beautifully.

To create the hanger, cut a length of yarn or a coordinating cord that will be sturdy enough to support the weight of your wall hanging.
Fold it in half and tie a secure knot at the ends to form a loop.
You may want to place a dab of glue to secure the yarn hanger in place and prevent it from sliding.
Once attached, your wall art is ready to be displayed, adding a beautiful, handmade and stylish piece to your room.
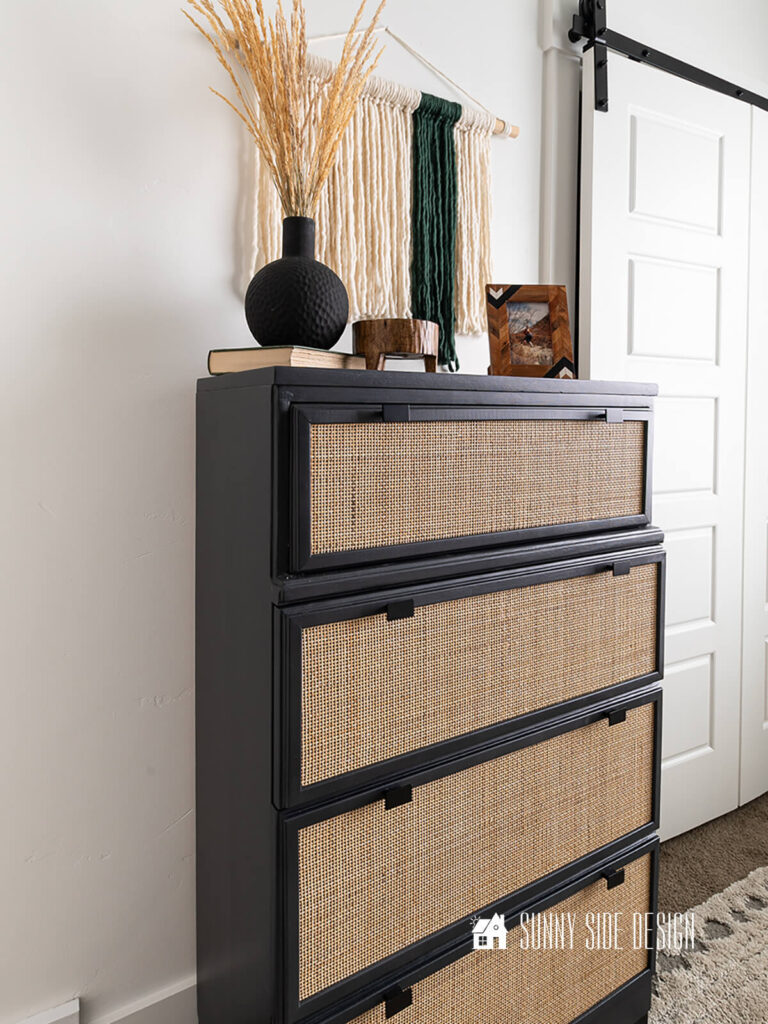
Don’t you love the way this wall art decor turned out!
And it’s fitting that our wall hanging dupe is hung over our West Elm cane dresser dupe.
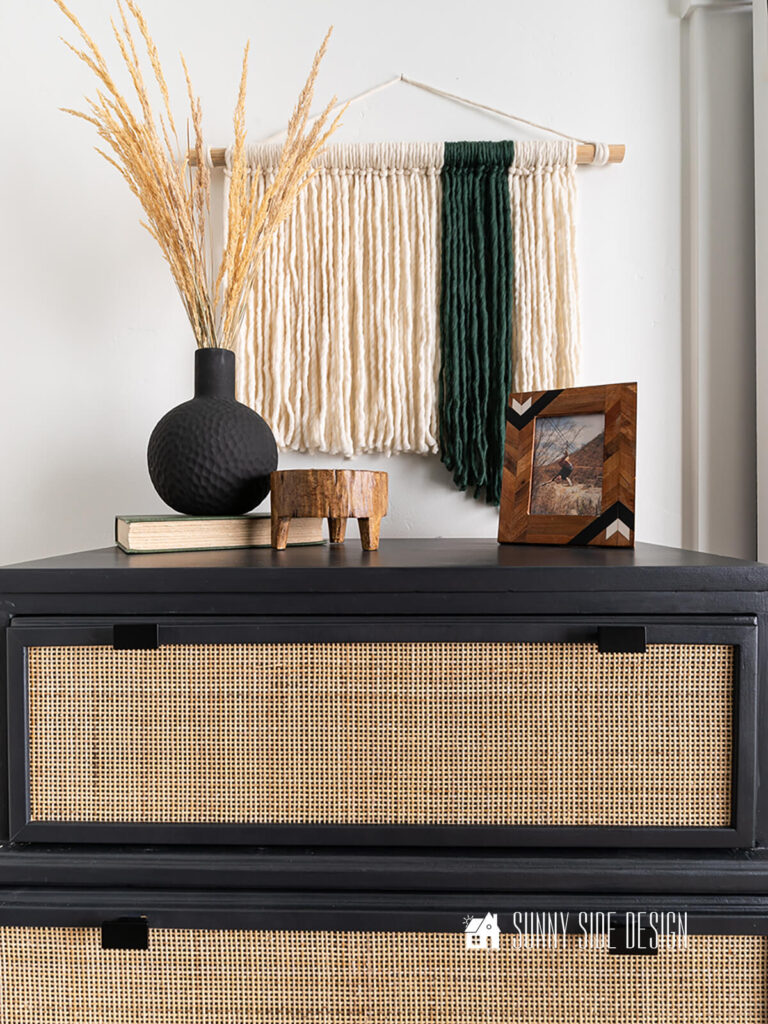
This project not only provides a stunning textural element, but also brings a sense of accomplishment and personal style to your room.
By following these simple steps, you too can craft a piece that rivals high-end designs without the hefty price tag.
More DIY home decor projects to try:
- How to Make a Topiary Tree That Looks Real
- Guide to Free Printable Wall Art Online
- Simple and Stylish Cane Tray
- Pottery Barn Color Block Vase Dupe
- Easy Pedestal Tray from Thrift Store Finds
- Paint a Vase with an Aged Look
- Simple Painted Lamp Base
- Make a Beautiful Faux Tree
- Pottery Barn Brooks Cross Bar Hurricane Dupe
- Faux Concrete Planter with Plaster
- Quick and Easy DIY Mirror Frame
- Update a Vintage Lampshade
- Decorating a Pillow with Paint
- Easy Coffee Filter Flowers with Bling
- How To Resize A Canvas
- Easy Embellished Lampshades
Shop Fiber Wall Art

If you would like beautiful and textural wall art for your home, but don’t want to DIY it, take a look at these pieces.
We hope you found some inspiration for your home today.
Please share your tips and ideas with us.
We love hearing from you!
If you’re new here, WELCOME! We love having new readers and friends!
You can learn more about us here.
Let’s stay connected! Join our DIY community of doers and you won’t miss the weekly updates and more inspiration for you always on a budget.
Sharing is caring!
Thanks for stopping by Sunny Side Design. Empowering you to create a home you love!
PHOTO USE AND CONTENT SHARING
All of the photographs you see here are the property of Sunny Side Design unless otherwise credited.
We love for others to share our work, so please feel free to use one photo with a link back to our website.
Pinning and sharing is always encouraged!
Please do not reproduce other Sunny Side Design content without permission.
Retailers We Love
- Anthropologie
- Birch Lane
- Crate & Barrel
- Joss and Main
- Lampsplus
- Mark & Graham
- One Kings Lane
- Pottery Barn
- Rejuvenation
- Serena & Lily
- Wayfair
- West Elm
- Williams Sonoma
- World Market
Be sure to follow us on Pinterest for even more home decor and DIY ideas.
To see what we are working on before it’s on our blog, follow us on Instagram.
You will also find our video tutorials on our YouTube channel.
- 4 Simple and Unique Blue Thanksgiving Table Decor Ideas

- How to Paint a Faux Antique Brass Finish
- Make Your Home Cozy with 10 Fall Simmer Pot Recipes
- Simple and Healthy Pumpkin Spice Granola Recipe


Stephanie, this is absolutely incredible. I have been attempting to get my husband to support me in investing in our kitchen. I want to hire a professional cabinet refinishing service but my husband claims it is not in the budget. I like the decorations you made so much that I have asked my husband if I can buy the material and do this in our home. He said YES. I can’t wait to get started.
Thanks Jane for your kindness. Good luck our your fiber wall art. Please let us know how it turns out, we’d love to hear.
You nailed it, Steph!
Aww, thank you Cyndi! You just made my day! Have a great one.