Are you looking for a statement piece for your home, but don’t want to deal with the hassle of caring for a real plant?
Look no further than creating your own faux tree!
Not only do faux trees require minimal maintenance, they also allow you to customize the size and style to fit your space.
While I love the beauty and vibe that real plants add to any room, I also knew in this basement office it would not be practical.
So the solution is a faux tree.
While there are many options for purchasing faux trees, however if you’d like to customize it for your space or save a little money, making your own tree is the way to go!
In fact, I only spent $30 to make my faux tree.
Keep reading for a step-by-step guide on how to make your own DIY faux tree.
One Room Challenge To-Do List
Welcome to week 5 of the One Room Challenge!
While I’d hoped to have the moulding all installed in our office this week.
But due to shipping delays we are still waiting for it to arrive.
Keep your fingers crossed that it arrives this week!
But with a long list of projects still to do, we did map out our moulding design in the room and get the base moulding installed for the built-in bookshelves.
Plus we made our DIY faux tree.
Let’s take a look at what still needs to be finished in the next couple of weeks.
Paint room – 2 coatsBuild lower cabinets for built-insBuild shelvesInstall cabinetsBuild window seatInstall shelvesInstall moulding for built-insPaint built-insInstall laminate floor- Install door casing and baseboards
- Paint door casings and baseboards
Build cabinet doors and drawersPaint cabinet doors and drawersCrown moulding- Install picture frame moulding
- Caulk, putty and paint picture frame and crown moulding
Refinish and modify desk- I
nstall hardware on built-ins - Paint doors
- Paint window frame
- Window sill
- Install sconce
- Library lights
DIY faux tree- Art on wall
- Style bookshelves
- Roman shade
- Window seat cushion
Be sure to follow us on Instagram for behind the scenes progress and updates!
If you’re new here, WELCOME! You can learn more about us here.
As a reminder you can easily navigate through each week of this dark and mood home office project.
Week 1 | Week 2 | Week 3 | Week 4 | Week 5 you’re here | Week 6 | Week 7 | Week 8
And for more ideas and inspiration head on over to see all of the amazing room makeovers on the One Room Challenge blog.

DIY Faux Tree Supplies
Here’s a complete list of the supplies we used.
You may already have a few of the supplies on hand.
The only product I needed to purchase were the ficus leaves.
In fact, I had cement leftover from another project and had a plastic nursery pot.
So really this is an inexpensive project to make.
Select a Sturdy Base for Faux Tree

First you’ll want to select a base for your faux tree, such as a large branch from a tree.
I went out in my yard and selected a branch and pruned it a bit to fit my space.
Next, you’ll want to secure your tree branch in a pot.
We are using an old pot from the nursery.
Because it has drainage holes, they’ll need to be covered so the cement doesn’t seep out.
You can use duct tape for this or cover the holes with a paper plate.
I ended up covering the drainage holes by trimming down a paper plate to fit inside the bottom of my pot.

Place your tree trunk into your pot and stabilize it with some scrap wood that is secured together with screws.
Then mix up the cement in an old bucket and fill in the cement around the tree trunk.
If you don’t have cement you can also use plaster to secure the trunk.
Let the cement cure overnight before moving your faux tree.
Sharing is caring!
Shape and Add Leaves

You may find it easier to shape and add the leaves to your faux tree by placing it in its final location.
Then you’re able to shape it to fit your space.
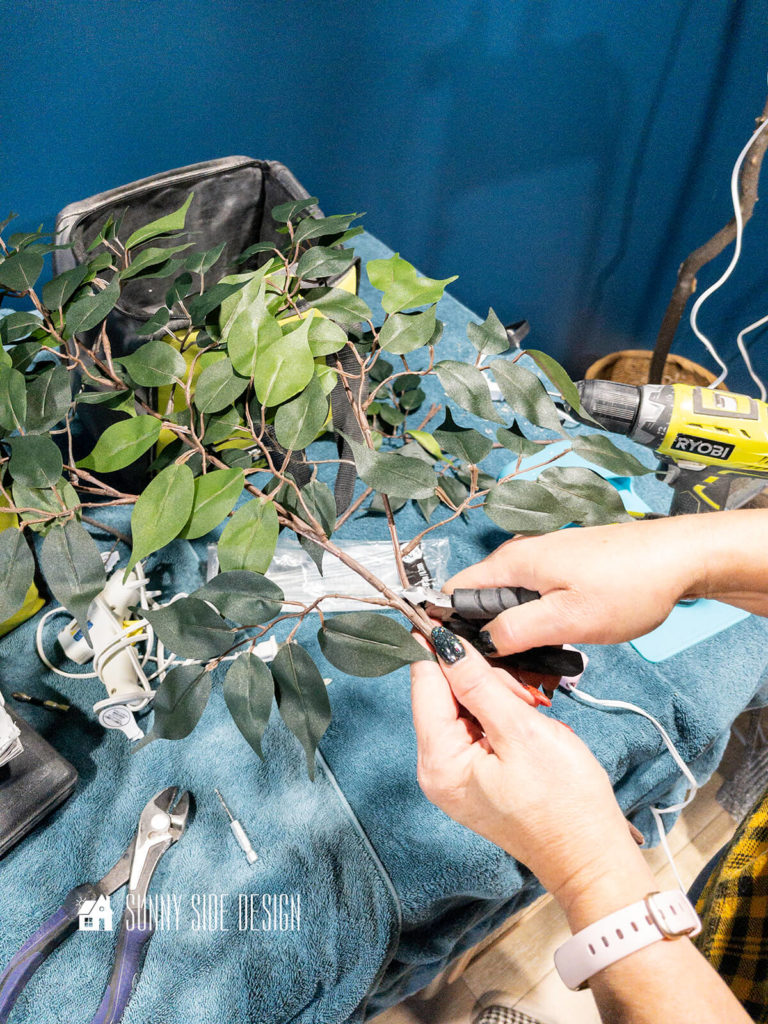
First, we began by cutting apart 5-6 of our Ficus leaf branches into 3 pieces.
We used the smaller branches that we cut apart to add to the outer branches of our faux tree.
Working from the outer tips of our tree and layering in branches towards the center.
I didn’t want a tree that was too full, I wanted it to be more organic in shape.

To add a leaf branch to the tree, we found it easier to use first a smaller drill bit to make our initial hole in the tree.
Then we used a larger drill bit to enlarge the hole and angle the hole as well.
If you look at a natural tree, all of the branches come off the trunk in a “V” shape and forming an angle.

But we found it very difficult to drill into the tree branch at an angle.
So we began each hole by drilling straight into the branch.
Then we switched to a larger bit and were able to angle the hole for the branch.
If you’re new here, welcome! We’re so glad you’re here.
Let us introduce ourselves, we’re Michelle and Steph, a mom and daughter team who love to DIY and decorate our homes.
Not only are we passionate about making our homes warm, comfortable and unique, but it’s our mission to help you create that same feeling in your own home.
You’ll find ideas for repurposing, creating, decorating and making your home truly yours, while always mindful of a tight budget.
Undoubtedly we love finding ways to make your home look high-end on a small budget.
Plus you’ll also find a recipe or two as we share our family favorites with you.
We’d love it if you’d join our community of doers so you won’t miss any inspiration for your home.
We love new friends.

[mailerlite_form form_id=2]
Secure Stem
Once the hole was drilled, we did a dry fit.
Then apply hot glue either to the leaf stem itself or in the drilled hole.
And finally place the leaf stem into the holes.
As I said before, we began on the outer branches and worked our way towards the center of the tree.

You’ll want to step back and take a look at the shape of the tree from a distance occasionally to see how it looks.
Let’s stay connected! Follow us on social media!
Once the outer branches were in place we then took full leaf stem branches and placed them in the tree trunk.
Once you’re happy with the shape of the tree, place it in a pretty container with some Spanish moss.
This is really a fast project.
In fact, it only took an hour to drill and place all of our leaf stems into our faux tree.
Tips
Here are some tips:
- Drill straight into the branch to get the initial hole drilled.
- Place larger drill bit in hole and angle the hole.
- You don’t need to cover every branch with a leaf and leave a few bare branches.
- I think it makes it look more realistic if there are some bare branches.
- Frequently stand back and look at the overall shape of the tree you’re forming.
Realistic DIY Faux Tree

Sharing is caring!
So if you’re in the market for a beautiful statement piece for your home and don’t want to deal with the hassle of caring for a real plant, look no further than creating your own faux tree!
Not only do they require minimal maintenance, but they also allow you to customize size and style to fit your desired aesthetic.
Are you ready to get started?
More DIY home decor projects to try:
- Easy Fiber Wall Art a West Elm Dupe
- How to Make a Topiary Tree That Looks Real
- Guide to Free Printable Wall Art Online
- Simple and Stylish Cane Tray
- Pottery Barn Color Block Vase Dupe
- Easy Pedestal Tray from Thrift Store Finds
- Paint a Vase with an Aged Look
- Simple Painted Lamp Base
- Pottery Barn Brooks Cross Bar Hurricane Dupe
- Faux Concrete Planter with Plaster
- Quick and Easy DIY Mirror Frame
- Update a Vintage Lampshade
- Decorating a Pillow with Paint
- Easy Coffee Filter Flowers with Bling
- How To Resize A Canvas
- Easy Embellished Lampshades
We hope you found a little inspiration here today.
Please share your thoughts and questions with us.
We’d love to hear from you!
If you’re new here, WELCOME! We love having new readers and friends!
You can learn more about us here.
Let’s stay connected!
Subscribe to our free newsletter so you don’t miss any inspiration for your home.
Please PIN and save for later, and share with your friends!
Sharing helps grow our following!
Thanks for stopping by Sunnyside Home. Empowering you to create a home you love.
Shop This Look

Shop DIY Faux Tree Supplies

Retailers We Love
- Anthropologie
- Birch Lane
- Crate & Barrel
- Joss and Main
- Lampsplus
- Mark & Graham
- One Kings Lane
- Pottery Barn
- Rejuvenation
- Serena & Lily
- Wayfair
- West Elm
- Williams Sonoma
- World Market
Latest on the blog
- 10 Easy DIY Fall Decor Crafts You’ll Love

- Simple and Pretty Decorating Ideas with Scalloped Decor

- 25 Easy Ways to Decorate with Blue and White
- Creating a Cozy Outdoor Living Room with Thrifted Finds




Be sure to follow us on Pinterest for even more home decor and DIY ideas.
To see what we are working on before it’s on our blog, follow us on Instagram.
You will also find our video tutorials on our YouTube channel.