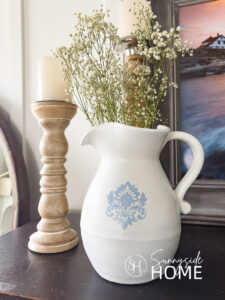
This simple DIY painted pitcher takes a forgotten thrift store find and transforms it with spray paint and a stencil into modern cottage home decor inspired by Pottery Barn.
Lately, I’ve been in full-on purge mode—digging through bins of decor I haven’t used in years and sorting out what still has potential with a little reimagining.
That’s when I came across an orange ceramic pitcher I thrifted several years ago and never quite knew what to do with.
Originally, I planned to give it an aged, textured finish like we’ve done on other vases, but that project never happened.
Then I spotted a beautiful pitcher with a chambray blue motif at Pottery Barn and felt inspired to try recreating the look using spray paint and a stencil—and I’m so glad I did.
The result is a painted ceramic pitcher that fits perfectly with my modern coastal decor while still keeping a charming cottage feel, which my mom loves.
Best of all, this simple DIY home decor project requires very little hands-on time.
Take a look at how we transformed this thrifted find into something I truly love.
Sunnyside home is a participant in the Amazon Services LLC Associates Program, an affiliate advertising program designed to provide a means for sites to earn advertising fees by advertising and linking to Amazon.com. As an Amazon Associate, this blog earns from qualifying purchases with no additional cost to you. Click here to read our full disclosure policy.
Why We Love This Project
We find so much joy in taking a discarded piece and giving it new life.
Often, the color of a thrifted piece can make it feel dated or heavy—like this pitcher, whose bright orange color just didn’t fit with my home.
When choosing a ceramic pitcher to paint, look for pieces without chips and that will give you a smooth finish.
My pitcher had a distinctive ridge and texture along the lower third, and at first I wondered if it would work, but as you’ll see, it actually adds character and charm once painted.
The best part?
This is an easy beginner project with a high-end look.
I snagged the pitcher for just $2 and spent about $8 on supplies, making it a simple, affordable way to refresh your home decor.

Are you enjoying this project? Please Pin It, save it for later and share it with a friend.
Sharing is caring!

Supplies Needed
Before diving in, gather everything you’ll need to turn a thrifted ceramic piece into a beautiful painted masterpiece.
This project uses simple supplies you can easily find, and most of them you may already have on hand.
Having everything ready before you start makes the process quick, smooth, and stress-free.
Here’s what you’ll need:
- Thrifted pitcher or vase
- Spray paint
- Stencil
- Blue paint
- Cosmetic sponge
- Top coat
- Drop cloth
- Turntable
- Gloves
If you’re new here, welcome! We’re so glad you’re here.
Let us introduce ourselves, we’re Michelle and Steph, a mom and daughter team who love to DIY and decorate our homes.
Not only are we passionate about making our homes warm, comfortable and unique, but it’s our mission to help you create that same feeling in your own home.
You’ll find ideas for repurposing, creating, decorating and making your home truly yours, while always mindful of a tight budget.
Undoubtedly we love finding ways to make your home look high-end on a small budget.
Plus you’ll also find a recipe or two as we share our family favorites with you.
We’d love it if you’d join our community of doers so you won’t miss any inspiration for your home.
We love new friends.

Prep the Surface
Prepping your ceramic pitcher or vase is an important step for achieving a smooth, long-lasting finish.
Start by thoroughly cleaning your piece to remove any dust, dirt, or residue that could prevent the paint from properly adhering.
I like to use Dawn dish soap because it’s a great degreaser—just wash, rinse well, and let it dry completely.
If you’re concerned about adhesion, you can lightly sand the surface or apply a primer after cleaning to help the spray paint stick.
Finally, tape off any areas you want to remain the original color or finish.
Taking a few extra minutes to prep makes all the difference and helps ensure your painted piece looks polished and professional.
Paint Ceramic Pitcher
When it’s time to paint your ceramic pitcher or vase, a little setup goes a long way.
Start by spreading out a drop cloth to catch any overspray, and if you have one, place your piece on a turntable or old lazy Susan.
I love this hack because it allows you to spin the piece as you paint instead of walking around it to check coverage.

Apply light coats of spray paint, keeping the can about 12 inches from the surface.
Two to three light coats are best to avoid drips and create an even finish.
Always check the recommended drying time on your paint—mine was dry to the touch in about an hour and needed two hours between coats.
Two coats gave me full coverage.
One important note: make sure your paint and topcoat are compatible.
Because it was too cold to paint outside, I grabbed a low-odor spray paint and didn’t realize it was water-based while my sealer was oil-based.
It caused a bit of frustration along the way, but thankfully everything worked out in the end.
Spray Painting Ceramic: Quick Tips
- Always use light, even coats—heavy coats cause drips
- Keep the spray can about 12 inches from the surface
- Rotate your piece using a lazy Susan or turntable
- Allow proper drying time between coats
- Check that your paint and sealer are compatible (water-based vs oil-based)
- Stop and let it dry if you see drips—don’t try to fix them wet
Let’s stay connected! Follow us on social media!
Stencil the Design
For the stencil design, we love using our Silhouette machine to create custom stencils for DIY projects because it allows us to easily size the design to fit each piece.
If you don’t have a Silhouette or Cricut, screen-printing stencils are a great option—they have a slightly tacky surface that helps prevent paint bleed.
You can mask off any parts of the stencil you don’t want to use, then adhere it to your ceramic pitcher or vase.


To apply a vinyl stencil, place a piece of transfer vinyl over the design so all the small details transfer properly.
Use a smoothing tool or even a credit card to press it firmly onto the surface, then remove the transfer vinyl.
We centered our design on both the front and back of the pitcher.
To avoid paint bleed, use very little paint and build the color slowly.

I found the perfect chambray blue paint at Hobby Lobby, dabbed a small amount onto a palette, and used a cosmetic sponge to gently apply the paint over the stencil.


Once you’re happy with the coverage, carefully remove the stencil, use a picker tool to remove any remaining vinyl, and allow the paint to cure fully.
Apply Top Coat
Once your paint has fully dried, it’s time to seal the finish.
Always follow the recommended drying time on your paint—I let mine cure for about two hours before applying the topcoat.
When choosing a sealer for painted ceramics, it’s important to select one that’s compatible with your spray paint.

As I mentioned earlier, I didn’t realize my paint was water-based while my topcoat was oil-based, and that mismatch caused a bit of panic.
I chose a satin finish because I wanted a soft sheen similar to my Pottery Barn inspiration, though a high-gloss finish would also be beautiful depending on the look you’re going for.

Right after applying the topcoat, the paint began to bubble, and I immediately ran upstairs to show my mom photos—she knew right away it was a product incompatibility.
Thankfully, I didn’t touch the pitcher and let it sit for a full 24 hours.
The bubbling settled, leaving behind a subtle vintage texture that I absolutely love!

Allow your pitcher to fully cure before styling or using it.
As Bob Ross says, “We don’t make mistakes, just happy little accidents,” and this dated orange ugly duckling truly transformed into a beautiful swan.

What do you think?
Can you believe the transformation?!
Not it’s a beautiful piece of home decor that I will enjoy for years to come.
I honestly wasn’t sure about the texture at first, but it turned out so good—I love it!

Style and Enjoy
Now comes the fun part—styling and enjoying your DIY painted pitcher!
This piece works beautifully in both modern coastal and cottage-inspired spaces and feels right at home styled on a shelf, coffee table, or sideboard.

You can also use it as a vase for fresh or faux stems to really show off the design.
I love how this once-forgotten thrifted piece now adds charm, texture, and personality to our home—and it’s a reminder that a little paint can truly transform something ordinary into something special.
Shop Decorative Pitchers

More DIY Home Decor Ideas
- Make a Topiary Tree That Looks Real
- Easy Fiber Wall Art a West Elm Dupe
- The Best Guide to Free Printable Wall Art Online
- Make a Simple and Stylish Cane Tray
- Easy Pedestal Serving Tray from Thrift Store Finds
- Make a Pottery Barn Color Block Vase Dupe
- Paint a Vase with an Aged Look
- Simple Painted Lamp Base
- How to Paint a Faux Antique Brass Finish
- Make a Beautiful Faux Tree That Looks Real
- Easy Lamp Makeover with Spray Paint and White Wax
- How to Update a Laundry Room Light Fixture
- Easily Add Beauty to Your Home with a DIY Flower Arrangement
- Make a DIY Textured Vase Inspired by Pottery Barn
- Quick and Easy DIY Mirror Frame
- Easy French Country Chandelier with Boho Flair
- How to Update a Vintage Lampshade
- Decorating a Pillow with Paint
- Easy Coffee Filter Flowers with Bling
- How To Resize A Canvas
- Easy Embellished Lampshades
- How To DIY Your Own Bay Window Curtain Rod
- DIY Blanket Ladder
Final thoughts
This DIY painted pitcher is an easy, budget-friendly way to update thrift store ceramics with paint and create beautiful home decor with a high-end look.
Painting a ceramic pitcher is a simple beginner project that works perfectly with modern cottage and coastal styles.

Can you envision this project in your home?
If you try this thrift store makeover, leave a comment below and let us know how it turned out—and don’t forget to save this idea to Pinterest for later inspiration!
Did you find inspiration for your home today?
Please share your tips and ideas with us.
We love hearing from you!
If you’re new here, WELCOME! We love having new readers and friends!
You can learn more about us here.
Let’s stay connected! Join our DIY community of doers and you won’t miss the weekly updates and more inspiration for you always on a budget.
Sharing is caring!

Thanks for stopping by Sunnyside Home. Empowering you to create a home you love!
Retailers We Love
- Anthropologie
- Birch Lane
- Crate & Barrel
- Joss and Main
- Lampsplus
- Mark & Graham
- One Kings Lane
- Pottery Barn
- Rejuvenation
- Serena & Lily
- Wayfair
- West Elm
- Williams Sonoma
- World Market
Be sure to follow us on Pinterest for even more home decor and DIY ideas.
To see what we are working on before it’s on our blog, follow us on Instagram.
You will also find our video tutorials on our YouTube channel.
What’s New . . .
- How to Paint a Ceramic Pitcher Inspired by Pottery Barn

- How to Build Simple Basement Storage Shelves That Last
- Easy One Pot Beef and Cabbage Soup with a Kick
- Simple Valentine Heart Decor Using Vintage Linens & Lace