In this guide, we’ll share expert tips and techniques to help you paint furniture like a pro. From choosing the right materials to mastering the art of a flawless finish, you’ll learn everything you need to know to transform your pieces into stunning works of art.
Would you like to learn how to paint furniture or thrift store finds like a pro?
Are you wondering what is the best method to use?
Or does the thought of painting furniture seem overwhelming?
No need to worry!
We’ve been painting furniture for years and would love to share our tips and tricks. We will share how to paint furniture and get professional results.
As you may already know, we love to frequent thrift stores, vintage and flea markets in search of a pieces we can transform.
It’s what we LOVE to do!
There is real satisfaction taking a worn, dilapidated and outdated piece of furniture and transforming it into something beautiful.
A piece that will be treasured for years to come.
Here’s how to paint furniture and get a professional-looking finish that will hold up through years of use.
Sunny Side Design is a participant in the Amazon Services LLC Associates Program, an affiliate advertising program designed to provide a means for sites to earn advertising fees by advertising and linking to Amazon.com. As an Amazon Associate, this blog earns from qualifying purchases with no additional cost to you. Click here to read our full disclosure policy.
Use the Right Tools
Use the right tools!
It’s definitely best to invest in a few quality pieces. A good quality paint brush makes all the difference.
Several weeks ago, I decided on a whim one night to paint the lower portion of my coffee table.
It was late and I discovered that my good paint brush was a Steph’s house.
Well, I just wanted to get it done so, I used an old brush that was not the best quality and it shows.
Once I was finished and the lighting was better, I realized that I need to do quite a bit of sanding to level out the brush marks.
Lesson learned, ALWAYS use a good quality brush.
It’s important to keep them in good shape as well.
Always wash them immediately after use with warm water, dish soap and a brush cleaning comb.
Hang them to dry, with the bristles hanging down.
This will help keep the shape of the brush and will ensure that your brush will last a long time.
Using an old brush with the bristles frayed or where there is dried paint in the ferrule will not give you good results.
Our favorite brush is the Purdy angle nylon/polyester brush.

Are you enjoying this post? Please Pin It, save it for later and share it with a friend.
Sharing is caring!
Prep the Surface

Taking the time to prep the piece of furniture is just as important as using a good quality brush.
The first step in preparing the furniture is to clean it.
Most thrifted furniture pieces are a little grimy.
Depending on the piece you may want to use a degreaser like TSP.
Next fill in holes and imperfections in the furniture with wood filler or spackle, then sand until smooth.
I usually like to give my pieces a light sanding before painting.
Sanding is like a swear word to some people, but often it needs to be done to ensure that you will get professional results when painting furniture.
There are paints that say that no sanding is required, but often I will still sand.
If the furniture piece you would like to paint is raw wood you will need to apply a primer. A good quality bonding primer can also be used on glossy surfaces.
We like to use Zinnser Cover Stain Primer. It bonds to surfaces without the need to sand. It is an oil based primer, so it does have an odor, but will feel it’s superior to other primers.
Primers not only bond to old surfaces, but they also block stains.
If there are knot holes in the wood, tannins can be released and it will discolor your paint surface.
Primer also creates a great surface for your paint to bind to as well. In our option, it’s always best to primer.
Take the time to remove the hardware.
It just looks sloppy if you get paint on handles, knobs or hinges.
If you find that the hardware already has paint on it, see our tip on how to easily remove dried paint from hardware.
Elevate Furniture on Blocks

When painting furniture place blocks of wood or cans of food to raise your piece of furniture off the floor.
This will ensure that your paint coverage is completely thorough.
If you’re new here, welcome! We’re so glad you’re here.
Let us introduce ourselves, we’re Michelle and Steph, a mom and daughter team who love to DIY and decorate our homes.
Not only are we passionate about making our homes warm, comfortable and unique, but it’s our mission to help you create that same feeling in your own home.
You’ll find ideas for repurposing, creating, decorating and making your home truly yours, while always mindful of a tight budget.
Undoubtedly we love finding ways to make your home look high-end on a small budget.
Plus you’ll also find a recipe or two as we share our family favorites with you.
We’d love it if you’d join our community of doers so you won’t miss any inspiration for your home.
We love new friends.

Have Good Lighting
Be sure to work in an area with good lighting.
Nothing is worse than painting furniture to find that you missed runs and it has dried or that the paint coverage was not as good as you thought.
If you are working in an area that is not well lit, bring in additional lights.
You will be glad you did!
(Steph wore a headlamp while painting the legs of her dining table.
It’s a great hands free option and will always direct the light where you’re looking.)
Thin Your Paint
Thinning the paint can help reduce brush marks. If you are using a latex paint, it can be thinned with a little water.
Oil-based Alkyd paint will need to be thinned with mineral spirits or paint thinner.
Floetrol is a paint additive that fortifies acrylic/latex paints. It does thin the paint a bit, but it helps eliminate brushstrokes and will help to produce beautiful results. You will need to watch for drips, but it helps level out the paint.
I was concerned about brushstrokes on my fireplace mantle, and so I used Floetrol and I was very pleased with the results.
Let’s stay connected! Follow us on social media!
Use Good Brush Technique
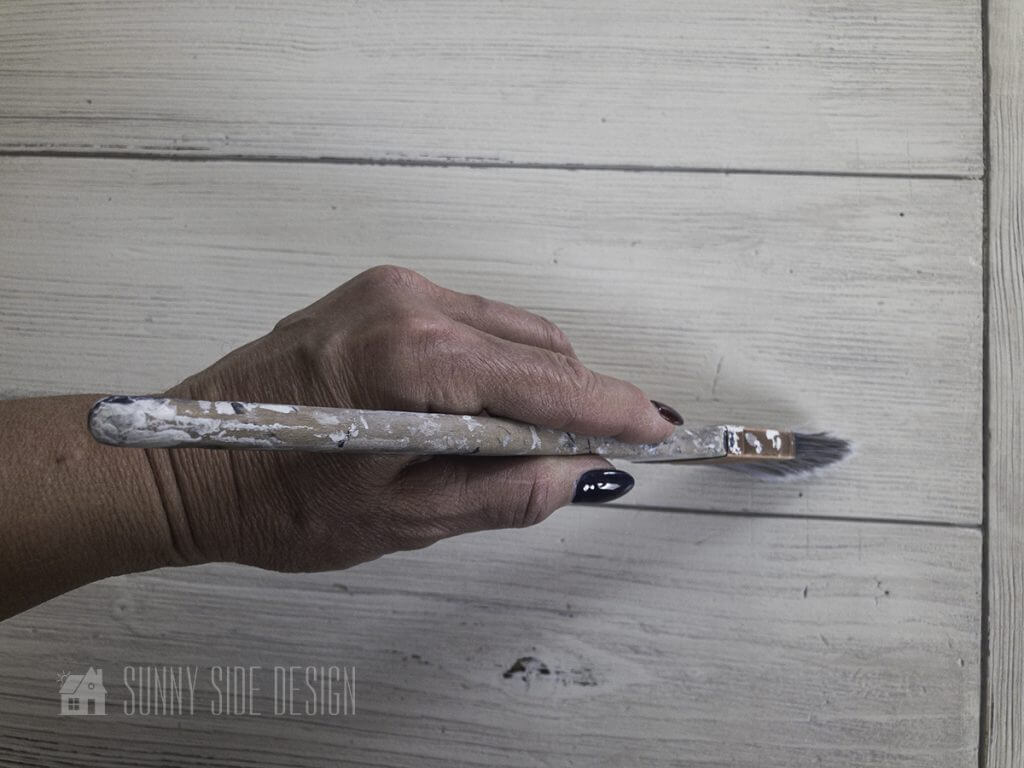


You will want to hold your paint brush like you would a pencil.
Load your brush with no more than about an inch of paint on the bristles.
Then pat the brush against opposite sides of the pail.
With that amount of paint on the brush, you’ll be able to cover more surface before you need to reload
When cutting in the paint on furniture turn the brush and Fan the bristles so you’re using the tip of the taper to spread the paint in a straight line.
When painting larger surfaces you can apply the paint with the brush more flat to get more coverage.
Paint in the same direction as the grain the wood.
This is especially important when working with an open wood grain, such as oak.
Brushing against the grain will create texture as the paint reacts to natural texture of the wood.
If you are painting a piece with a more shallow grain wood or laminate.
Keep all your brushstrokes in one direction, top to bottom, or side to side.
This will ensure an even finish.
Use a Roller Where You Can
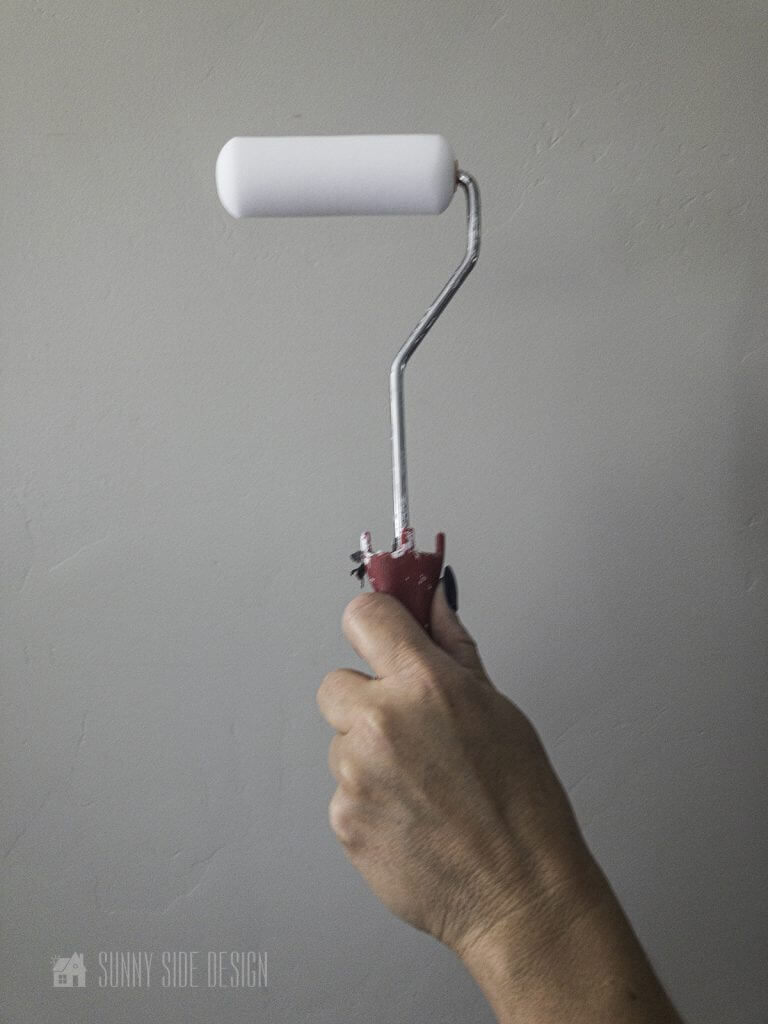
Another tip to speed up the process is to use a high density foam roller. Not only is it a quicker method to apply the paint, but you will almost entirely eliminate brushstrokes.
Use the Right Paint for the Job
There are so many paint choices available today.
Depending on the look and piece of furniture or the amount of use your furniture will get will determine the type of paint to use.
A few weeks ago we wrote a post on Painting Furniture | Different Types of Paint & When to Use Them.
For more information on paint selection check out this post.
We are big fans of The Home Depot. They carry the paint we love as well as have great customer service.
Sand Lightly Between Coats

Yes, I’m going to use that word again, sand!
It is important to do a light sanding between coats, even with chalk paint.
It will level out any imperfection before the next coat is applied.
It’s also important to do a light sanding on the primer coat before the first layer of paint is applied.
Apply a Protective Finish

A protective topcoat will ensure that your piece of furniture will last a long time.
Do you really need a topcoat or sealer?
Well, that depends on the paint you used.
If you used a chalk paint or milk paint you must use some sort of protective finish.
We generally use a wax over chalk or milk paint. However, for a more durable finish a polyurethane can also be used.
To prevent the topcoat from yellowing use a water based polyurethane. Varathane Triple Thick Polyurethane is our favorite.
It doesn’t yellow and creates an extremely durable finish.
If the painted furniture piece is a darker color an oil-based polyurethane can be used.
Our favorite oil-based polyurethane is Minwax Wipe On Poly.
Satin, semi-gloss or gloss finish latex or oil-based paints do not require a topcoat.
On the other hand, if the paint used has a flat or eggshell finish, applying a topcoat is a good idea.
You can still keep that matte finish by applying a matte topcoat.
Take Your Time
One last tip I’d like to share, is don’t rush, take your time and enjoy the process.
I find that if I’m in a rush, it shows!
Don’t rush this process, plan on a couple of days to complete your project.
This will ensure that your piece will be beautiful, something to treasure for years to come.
That was a lot of information!
Do you feel confident to tackle painting furniture now?
Are you ready to paint a masterpiece?
If so let us know how it turns out! We’d love to know!
Love to reimagine furniture? Then take a look at even more makeover ideas:
- Simple Dresser Refresh
- $5 Hutch Top Repurposed to an Attractive French Inspired Cabinet
- Re-image Thrift Store Furniture into a Tool Chest Dresser
- DIY Floating Nightstand
- DIY Round Coffee Table
- Easy Chalk Painted China Cabinet
- Painting Furniture the Easy Way with a Wagner Sprayer
- Paint Furniture with Professional Results
- Transform Twin Beds into a Daybed
- How to Refinish Furniture with a Raw Wood Look
- Beautiful Wood Dining Table
- How to Use SaltWash for a Worn and Weathered Finish
- How to Apply Paint that Looks like Stain: Rift Sawn Oak
- Easy Chalk Paint Coffee Table Makeover
- How to Glaze to get a Coastal Look
We hope you found some inspiration for your home today.
Please share your tips and ideas with us.
We love hearing from you!
If you’re new here, WELCOME! We love having new readers and friends!
You can learn more about us here.
Let’s stay connected! Join our DIY community of doers and you won’t miss the weekly updates and more inspiration for you always on a budget.
Sharing is caring!

Thanks for stopping by Sunny Side Design. Empowering you to create a home you love!
Disclaimer
This blog’s content is for entertainment purposes only and is not professional advice. By reading this blog and attempting to recreate a project, you assume all responsibility for any injuries or damages incurred. Read my full disclaimer here.
PHOTO USE AND CONTENT SHARING
All of the photographs you see here are the property of Sunny Side Design unless otherwise credited.
We love for others to share our work, so please feel free to use one photo with a link back to our website.
Pinning and sharing is always encouraged!
Please do not reproduce other Sunny Side Design content without permission.
Retailers We Love
- Anthropologie
- Birch Lane
- Crate & Barrel
- Joss and Main
- Lampsplus
- Mark & Graham
- One Kings Lane
- Pottery Barn
- Rejuvenation
- Serena & Lily
- Wayfair
- West Elm
- Williams Sonoma
- World Market
Be sure to follow us on Pinterest for even more home decor and DIY ideas.
To see what we are working on before it’s on our blog, follow us on Instagram.
You will also find our video tutorials on our YouTube channel.
- Easy Last Minute Neighbor Christmas Gifts with PrintableTag

- Simple Ideas to Decorate for Christmas Indoors
- How to Make Simple Frosted Pinecone Christmas Ornaments
- How to Make a Christmas Tree Collar with Dollar Tree Tiles