After months of planning, hard work, and a few unexpected surprises, we’re excited to share our home renovation. From outdated fixtures and drab interiors to modern finishes and stylish designs, we’ve poured our hearts into every detail.
Steph and I have been sharing projects from our homes for the past 2 years. It’s clear to see that most of our readers are looking for ways to improve their homes on a budget. Of course, we love to share DIY projects that can help you achieve that, including our home renovation.
While Steph’s home was a new build, she has incorporated a lot of fun ideas into her home. Overall making it reflect the personality of her and her family.
On the other hand, Steve and I bought a dated 90’s fixer upper and have spent the last couple of years renovating our home. Clearly, we enjoy working together creating a space we love, while increasing the value of our home.
Today I’d like to take you on a tour of our home. Not only will you see each room before and after we’ve renovated, but also we will share tips for doing it on a budget.
And in a couple of weeks Steph will take you on a before and after tour of her home. You’ll see how she took basic builder finishes and created a custom looking home.
Sunny Side Design is a participant in the Amazon Services LLC Associates Program, an affiliate advertising program designed to provide a means for sites to earn advertising fees by advertising and linking to Amazon.com. As an Amazon Associate, this blog earns from qualifying purchases with no additional cost to you. Click here to read our full disclosure policy.
Home Renovation on a Budget
Unquestionably, a home renovation is a major undertaking. Not only with the scope of work, but also it a major financial investment.
According to Home Advisor a home renovation for a 2500 sq. ft. home can range between $15,000-$200,000, depending on the type of renovation.
Clearly, that’s a lot of money, and making your dollar go further is what we love to do.
When we purchased our home we carefully planned out each area, making a list of priorities as well as how far our budget would go.
Before your home renovation do your homework. . .

First, you’ll want to do your homework, checking prices on flooring, paint, etc. We knew that our home renovation would require a major kitchen remodel.
In fact, we planned on relocating the kitchen to the far end of the house. With this in mind, we carefully planned out how much of our budget the kitchen would take.
I realized that the majority of our budget would go towards the kitchen. With this in mind, there had to be some give and take. For example, I knew that we would need new cabinetry.
So, I decided to look for used appliances on the Marketplace. Not only was I able to find good quality pieces, but I also saved hundreds of dollars.
Don’t think that you’ll always get the best price from your local home improvement box store. I initially priced out my cabinets from the home improvement store and found a local cabinet builder was much less expensive with a better quality cabinet.
DIY what you can . . .

Doing as much of the labor yourself will definitely save you thousands and thousands of dollars.
Luckily we like to get our hands dirty and tackle home improvement projects. However, be prepared to ask for help, or hire out jobs that you are not comfortable with.
Enlist friends and family with “work parties.” Not only is it a great way to get a big job done, but also it makes the job a lot more fun.
Our Home Renovation Before and Afters
Creating a master retreat . . .

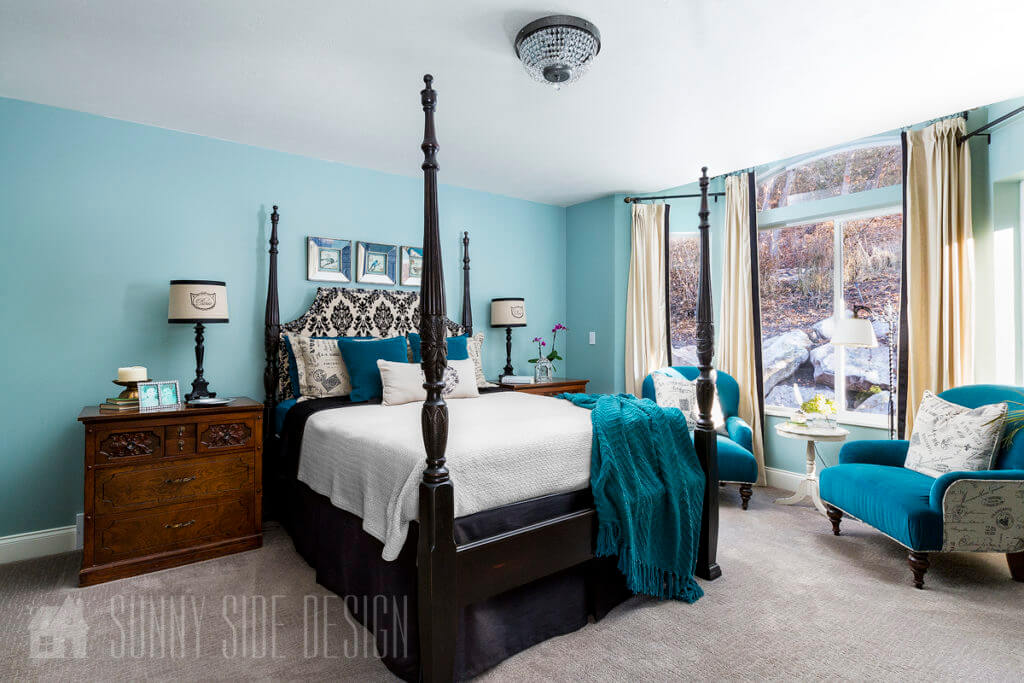
I admit it, I’m a neat freak! Because we were going to live in our home during the renovation I needed a place where I could retreat to, someplace away from the mess, where I could relax.
With this in mind, before we actually moved in, we painted the walls and installed new flooring in the master bedroom. This made a long renovation doable for me.
All of the furnishing we brought with us from our old home. Other DIY tutorials for this room are :
Master bathroom home renovation . . .

After living with this stark and dated for four years, we finally decided to give this master bathroom a mini makeover.
With big plans to make this bathroom more functional and improve the layout, it would be a few more years before that would fit into the plans.
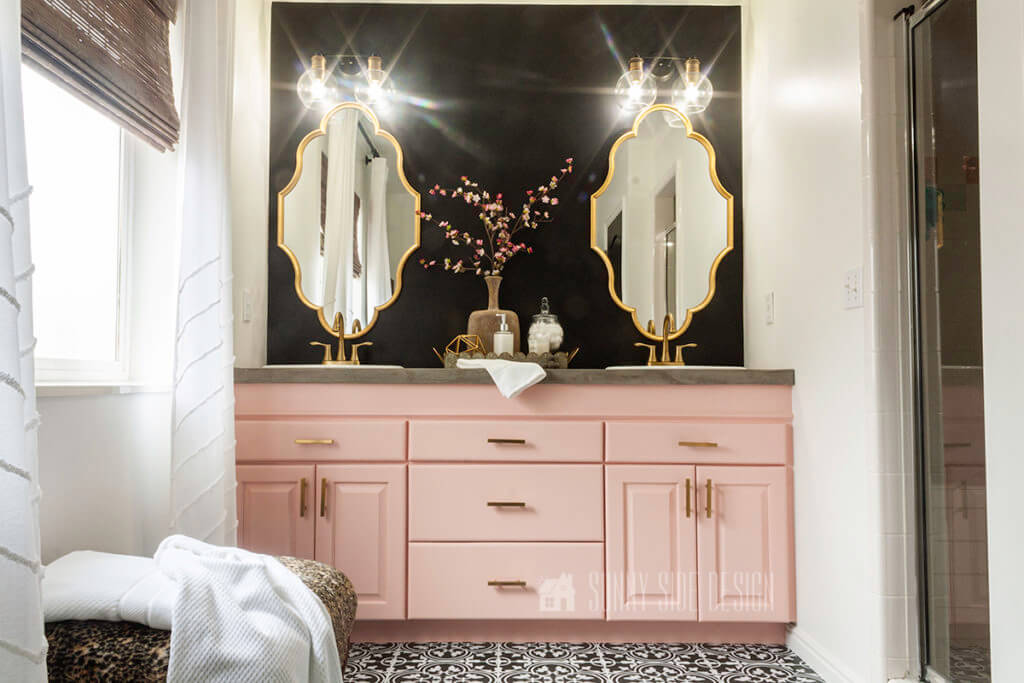
With some paint, tile floor makeover with decals and a bit of sweat, we created a space that more up to date.
Now it feels a little bit more luxurious and I’m not embarrassed to leave the door open.

It took another four years before we had the ambition, money and time to give this master bathroom a full remodel.
The layout was reworked to allow a soaker tub into the space and filled the bathroom with luxurious finishes.
This modern cottage bathroom has me written all over it!
Check out the secrets to a stunning modern cottage master bathroom remodel.

Are you enjoying this project? Please Pin It, save it for later and share it with a friend.
Sharing is caring!
Kitchen renovation . . .

The original layout of the kitchen was small and lack storage and counter space. Therefore, creating a new floor plan for the main living area was a must.
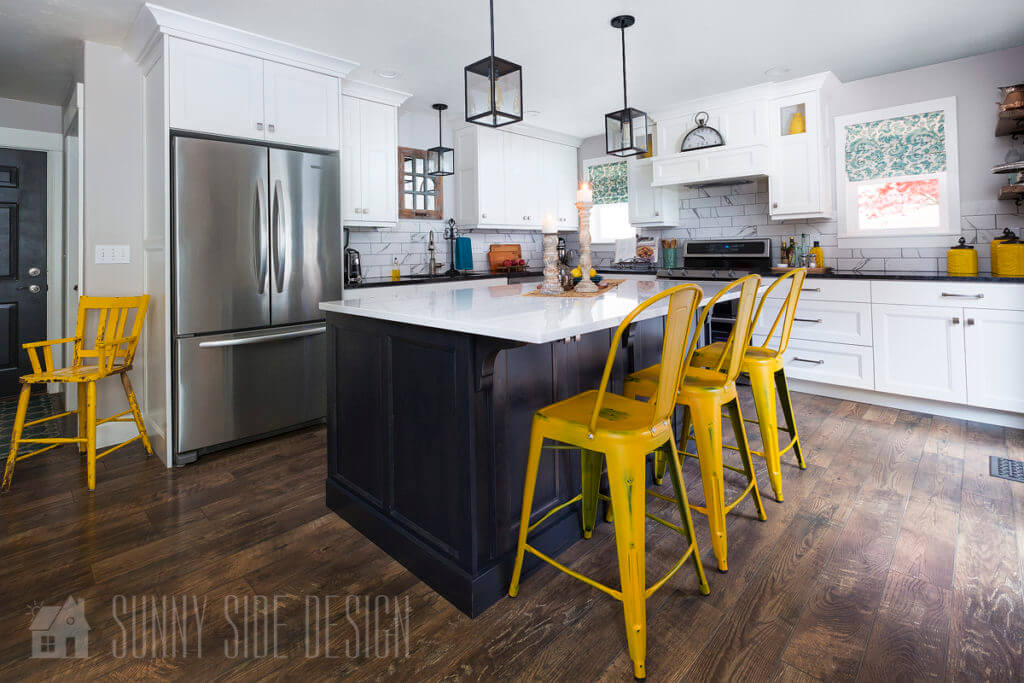
In order to create a larger kitchen we opted to relocate it at the far end of the house. As a result, I was able to more than double the cabinets and counter space from the original kitchen. In addition, I was able to create a large island that is perfect for entertaining.

Home renovation | open concept living area . . .

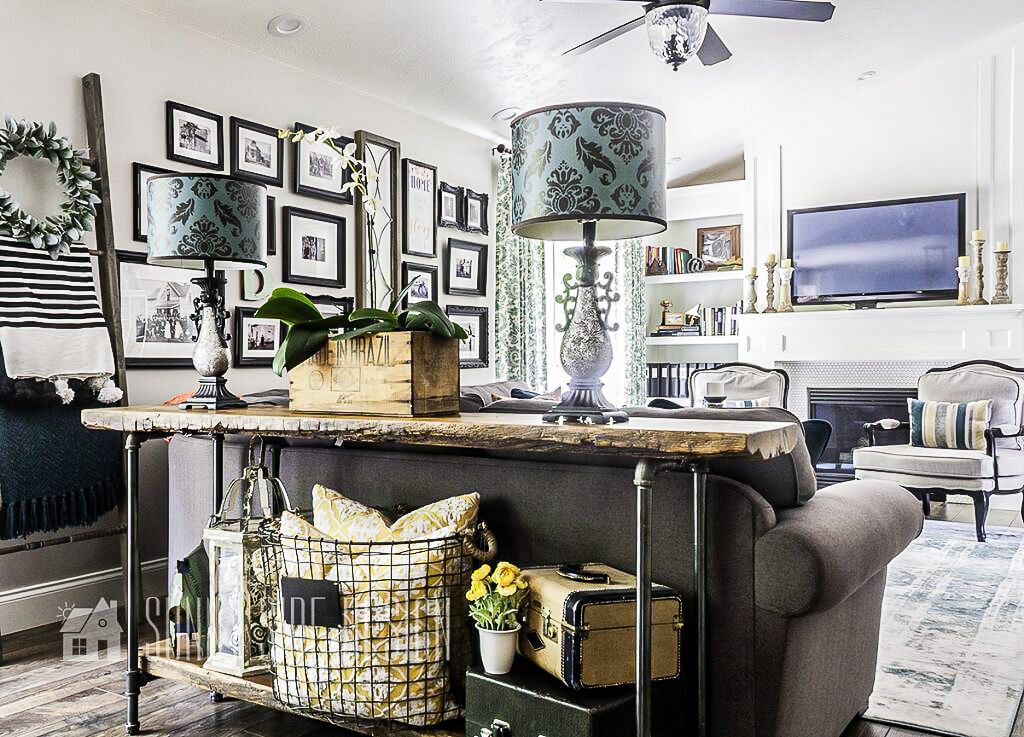
In order to create this open concept family room, we took down the wall that separated the original kitchen and formal dining, created one large room.
At the far end which was once the formal dining, we installed a gas fireplace and built in bookshelves. Resulting in a room that’s large enough for our extended family, yet still is cozy and inviting. The room features a gallery wall of old family homes and the bookshelves display family mementos.
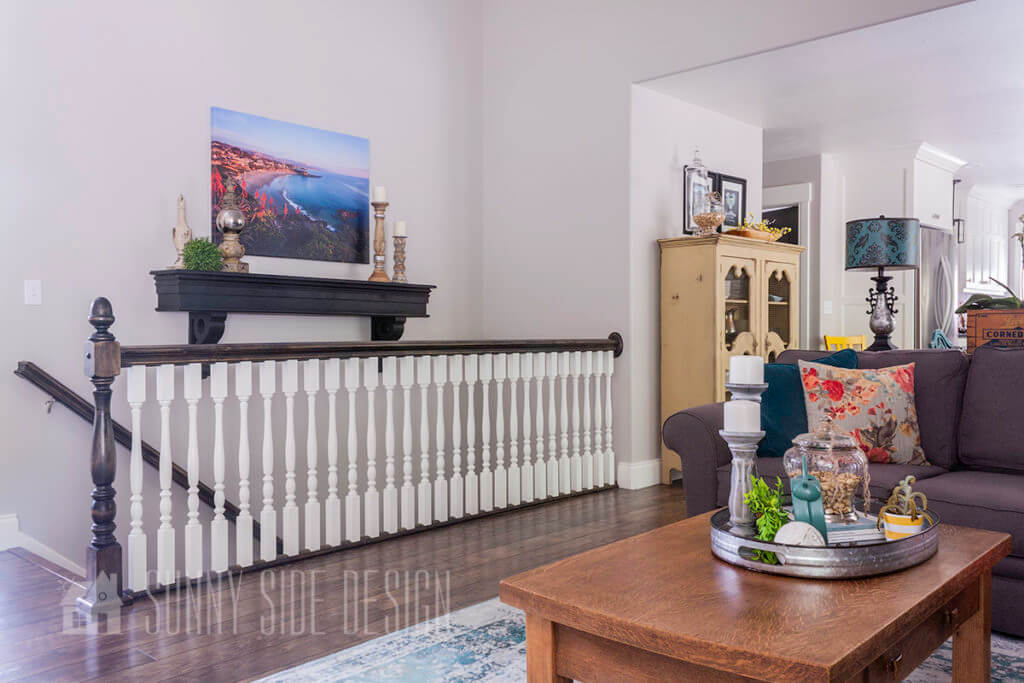
At this time the budget did not allow me to replace the dated railing. Therefore, I refinished the railing and painted the spindles.
If you’re new here, welcome! We’re so glad you’re here.
Let us introduce ourselves, we’re Michelle and Steph, a mom and daughter team who love to DIY and decorate our homes.
Not only are we passionate about making our homes warm, comfortable and unique, but it’s our mission to help you create that same feeling in your own home.
You’ll find ideas for repurposing, creating, decorating and making your home truly yours, while always mindful of a tight budget.
Undoubtedly we love finding ways to make your home look high-end on a small budget.
Plus you’ll also find a recipe or two as we share our family favorites with you.
We’d love it if you’d join our community of doers so you won’t miss any inspiration for your home.
We love new friends.

[mailerlite_form form_id=2]
Living room . . .


Overall this home felt cold and sterile when we moved in. Clearly, there was an over abundance of white tile and green carpet!
However, what this house did have was large windows that flooded the house with beautiful light.
One of the major projects was removing all of the white tile. I’m sure we have more than 1000 sq. ft that we removed.
The living room received new paint, flooring and window coverings, which we did ourselves. Really a quick and easy update for this room.
A couple of projects that we did hire out included a painter to paint the ceilings and a drywaller.
The entryway . . .

In the entryway we got rid of the ledge and moved the coat closet around to the hallway. This created a wall where I could place my bookcase.
In addition to paint and flooring we also updated the chandelier.
Let’s stay connected! Follow us on social media!
Guest bedroom . . .

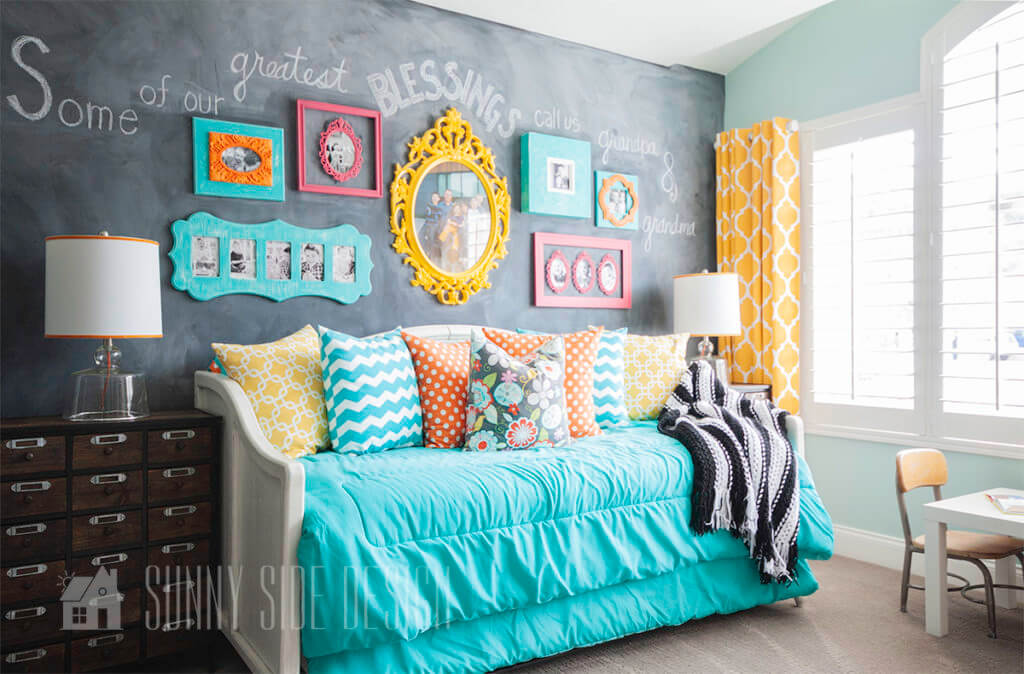
Not only does this room serve as a guest room for my favorite guests, my grandkids, but it’s also a place for them to play. It’s bright, cheerful and is a happy place to be.
There are toys, games, crafting supplies, dress up clothes and a fun chalkboard wall.
Once again this room just required paint, flooring and window coverings.
One major change we made throughout the house for our renovation was painting all of the doors a dark charcoal grey. Behr, Peppery. I think it adds a bit of sophistication to our home.

Office – craft room . . .

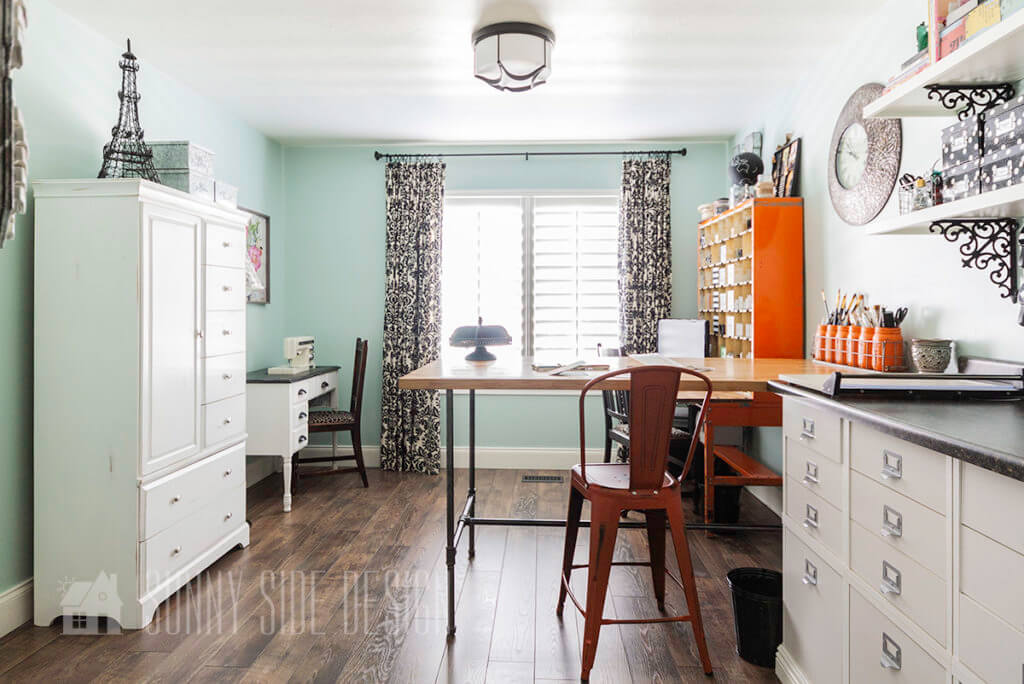
In my opinion, this home was very much a “grandma house.” Lace curtains on the windows along with plush green carpeting.
However, with a fresh color palate, new flooring and window covering, each room was transformed during our home renovation.
I find the office – craft room a very inspiring place to work.
One major item that we added throughout the house was new moldings. We opted for 6″ baseboards along with new door casing.
While it is a bit of work to replace the all of the moldings, the overall cost was very minimal.
I believe we paid less than $500 to replace all of the molding in the entire house. It’s a great way to update the look of your home.
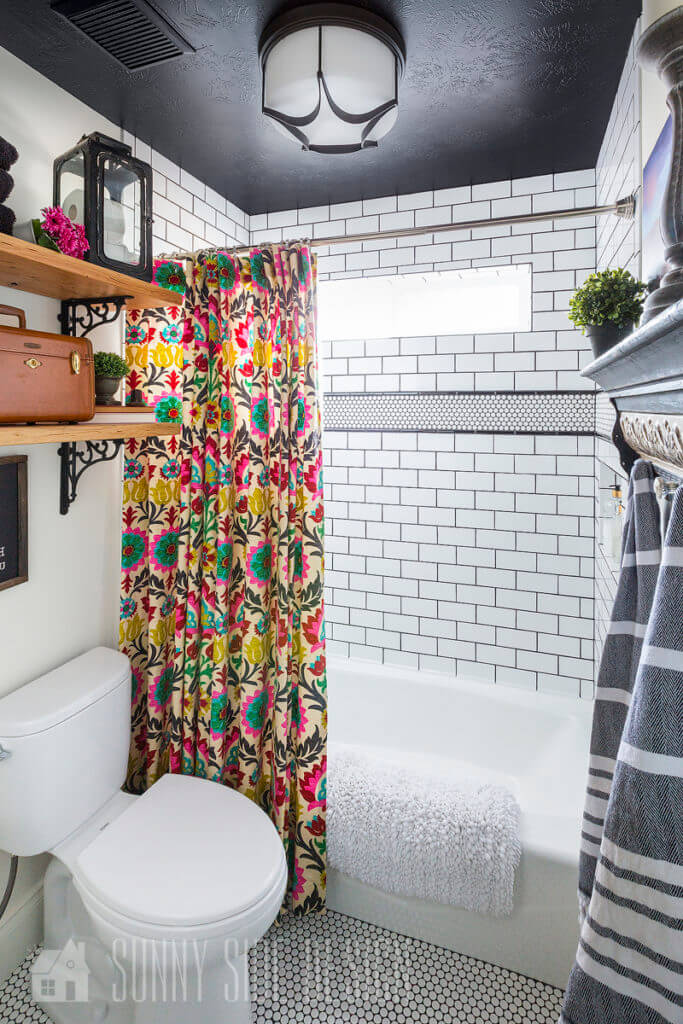
Guest bathroom . . .


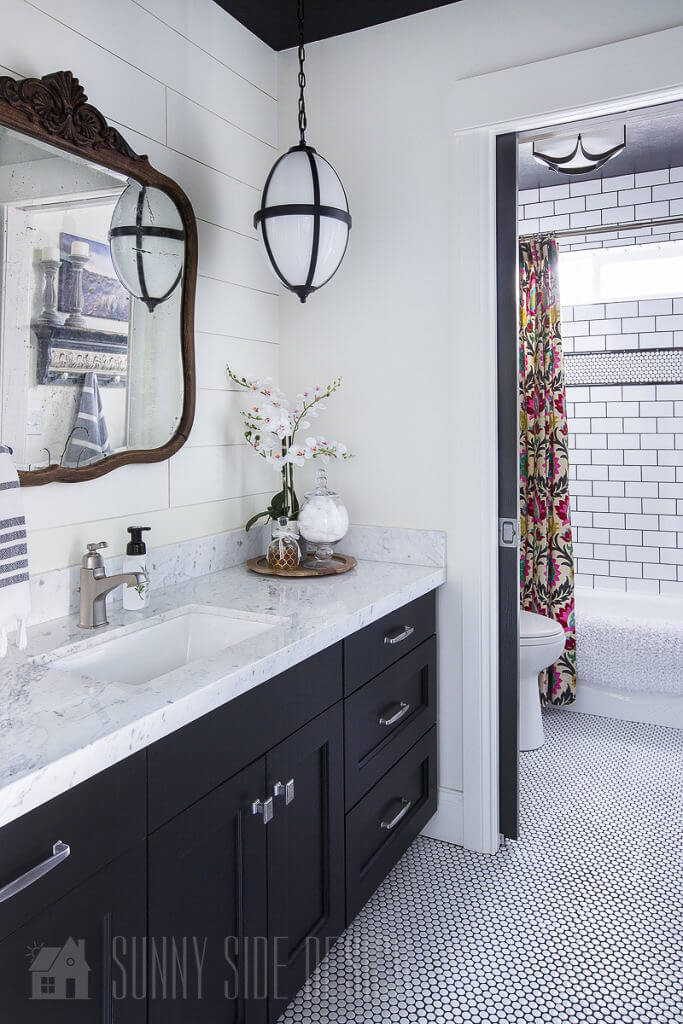
As it happens, when we got around to remodeling this bathroom, the funds were low. However, I believe I created a timeless bathroom with some unexpected elements on a small budget.
For instance, I chose a basic white subway tile and added a black boarder along with a penny tile.
Not only did this create a designer look, but it was very affordable. We installed the all of the tile ourselves, which took about a week, but it saved us thousands of dollars in the long run.
Likewise, to save on the vanity, I kept the vanity base and had new doors and drawers. And the marble countertop was also a remnant.
Exterior Home Renovations
Creating curb appeal . . .


Just as the inside of our home felt cold and sterile, the exterior needed a little loving too.
The first areas we addressed was to cleaning up the flower beds and creating some curb appeal. In fact, we enlarged them added more visual interest with new shrubs and perennials.
Personally, I’m not a fan of the brick color of my home. If it was just my choice, I would have done a lime wash or a German smear on the brick. I had even thought of taking off the brick and replacing if with stone. But my hubby did not like that idea!
Therefore, we chose to paint the exterior of the house making the brick look better.
For the stucco pop out, I used the same charcoal gray paint that I used inside on my doors, Behr, Peppery. Then on the main stucco area I used Behr, Sculptors Clay.
To add a little pop of color for the front door, withBehr paint’s Dragonfly. Learn how to paint a front door like a pro.

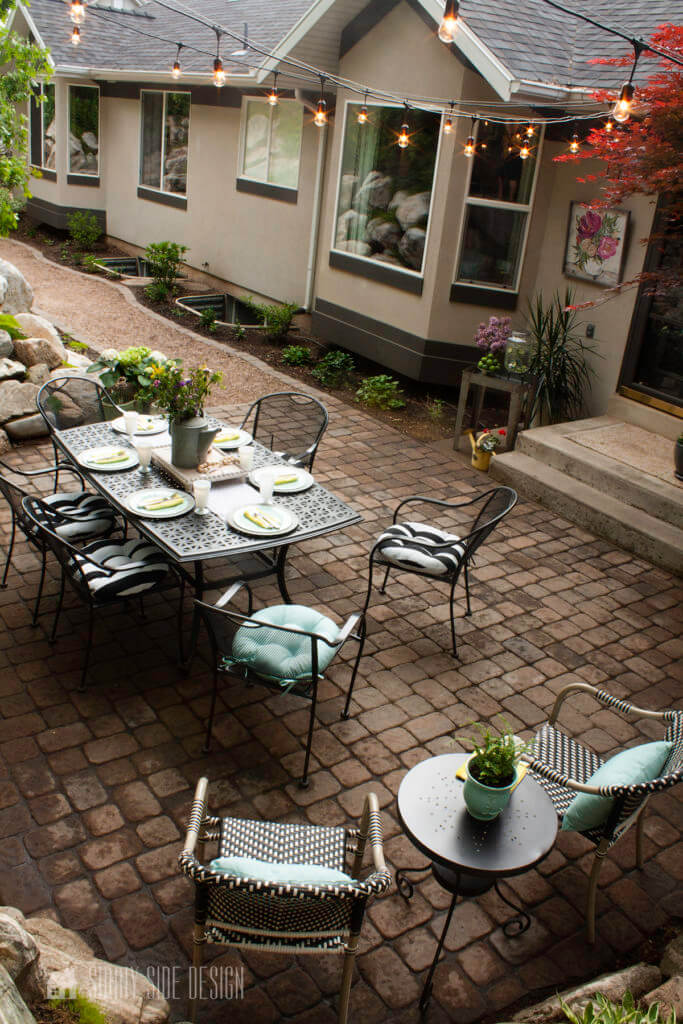
Creating an outdoor living area . . .

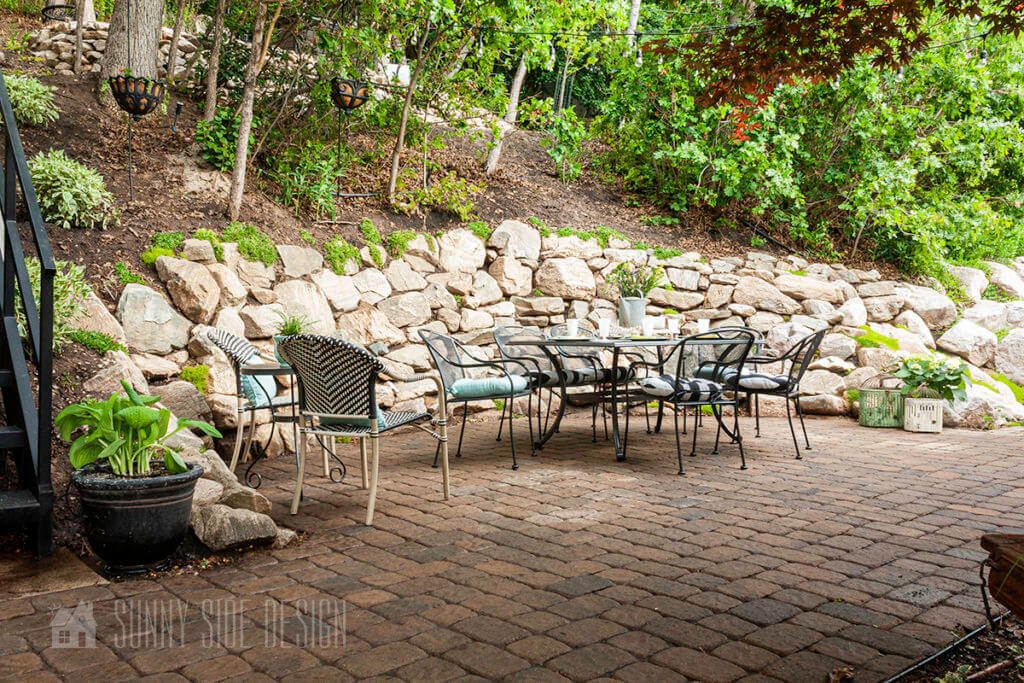
Actually, the possibilities of this backyard is the reason we bought this house. Our home is located on a secluded wooded lot that was largely left in it’s natural state.
Clearly, we could see the possibilities of what it could become and we were sold.
We have worked on this backyard little by little carving out a dining area and installing a paver patio. While, further up the hill we created a seating area with a fire pit.
There are also areas for the grandkids to run and play, including a zipline.
It’s the perfect outdoor living space, a place to relax and unwind at the end of the day.
Shop Michelle’s Home

Final Thoughts
We hope you’ve enjoyed this tour of our home renovation and perhaps found some inspiration for improving your own home on a budget.
Are you planning a home renovation project? We’d love to hear about it, so please share below. We’re always looking for new and creative ideas!
We love hearing from you!
If you’re new here, WELCOME! We love having new readers and friends!
You can learn more about us here.
Let’s stay connected! Join our DIY community of doers and you won’t miss the weekly updates and more inspiration for you always on a budget.
Sharing is caring!

Thanks for stopping by Sunny Side Design. Empowering you to create a home you love!
DISCLAIMER
This blog’s content is for entertainment purposes only and is not professional advice. By reading this blog and attempting to recreate a project, you assume all responsibility for any injuries or damages incurred. Read my full disclaimer here.
PHOTO USE AND CONTENT SHARING
All of the photographs you see here are the property of Sunny Side Design unless otherwise credited.
We love for others to share our work, so please feel free to use one photo with a link back to our website.
Pinning and sharing is always encouraged!
Please do not reproduce other Sunny Side Design content without permission.
Retailers We Love
- Anthropologie
- Birch Lane
- Crate & Barrel
- Joss and Main
- Lampsplus
- Mark & Graham
- One Kings Lane
- Pottery Barn
- Rejuvenation
- Serena & Lily
- Wayfair
- West Elm
- Williams Sonoma
- World Market
Be sure to follow us on Pinterest for even more home decor and DIY ideas.
To see what we are working on before it’s on our blog, follow us on Instagram.
You will also find our video tutorials on our YouTube channel.
- Easy 4th of July Door Decor You Can Make in Minutes

- 35 Easy Decorating Ideas for Summer to Welcome the Season
- Fourth of July Decorating Ideas You’ll Love This Summer
- Simple and Creative Planter Container Ideas from Thrifted Finds