
Welcome to Stephanie’s Home Tour!
Several years ago we outgrew our cozy starter home and decided to build a new one with a more spacious and functional floor plan.
We opted to build a rambler since our first home was a multi-level and we were up and down those stairs what seamed to be a million times a day.
The challenge was finding the right floor plan to fit our needs.

We finally agreed on the Torino floor plan by Ivory Homes.
This plan features 4 bedrooms and 2 ½ baths on the main level.
We are thrilled that each of our kiddos have their own rooms.
The plan also features a large open area for the kitchen, dining and living room which is perfect for entertaining.
Since we are such DIY junkies, we opted to use builders grade items throughout many spaces in our home, knowing they would get an overhaul at some point.
This also allowed us to upgrade some structural items we knew would benefit our home in the long run such as the 3rd car garage and 9’ ceilings in the basement.
With my hubby’s Construction Management Degree and my love for Interior Design, we both had a blast during the entire building process!
Please join us for our home tour.
The Entryway
Welcome to our entryway!
Eleven years ago, Dan was asked to go on a business trip to London…needless to say I HAD to find a way to go with him!
We’d also been fortunate to travel to Europe 5 years prior and toured the Netherlands and parts of Germany.
When I came across this vintage Bombay Dresser in a Home Consignment shop, I had to have it.
I pooled all of my birthday money together and brought my new treasure home.
We were also able to celebrate our 10th Anniversary while in London.
As a memento from our getaway I decided to paint the dresser with the Union Jack/British flag.
The entryway features our travel wall with some of our most fond memories from our travels together as a family.
This is also a great conversation piece when visitors come.
It’s always fun to reminisce about fun experiences and share them with family and friends.

And recently I got the bug to update my entry with a navy blue and cane cabinet and style it with my favorite coastal accents.
For those of you wondering…NO I didn’t ditch the bombay dresser! I just relocated it behind our sofa.
And you know how we creative types are? I’m brewing up some additional changes to make in the entryway this year!
Mudroom

One of the perks of building your own home is being able to get things done how you want them.
Our mudroom is directly off the garage entry.
The only thing in the space in the floor plan was a small bench.
We simply had the bench deleted from the floor plan so the space was empty.
This allowed us to custom build a bench and cubbies that fills the space perfectly, and looks as though it’s a custom upgrade from our builder.
Click here for the details of our mudroom build.
Living Room

The coastal theme continues in the living room with relaxing blue stripes and a sisal rug.
To save money building our home we had the fireplace roughed in and installed the fireplace ourselves.
We also built our own fireplace surround and created a faux beam mantle with vintage corbels.
I love having a fireplace in my home, it creates a focal point and creates architectural interest!
Dining Area
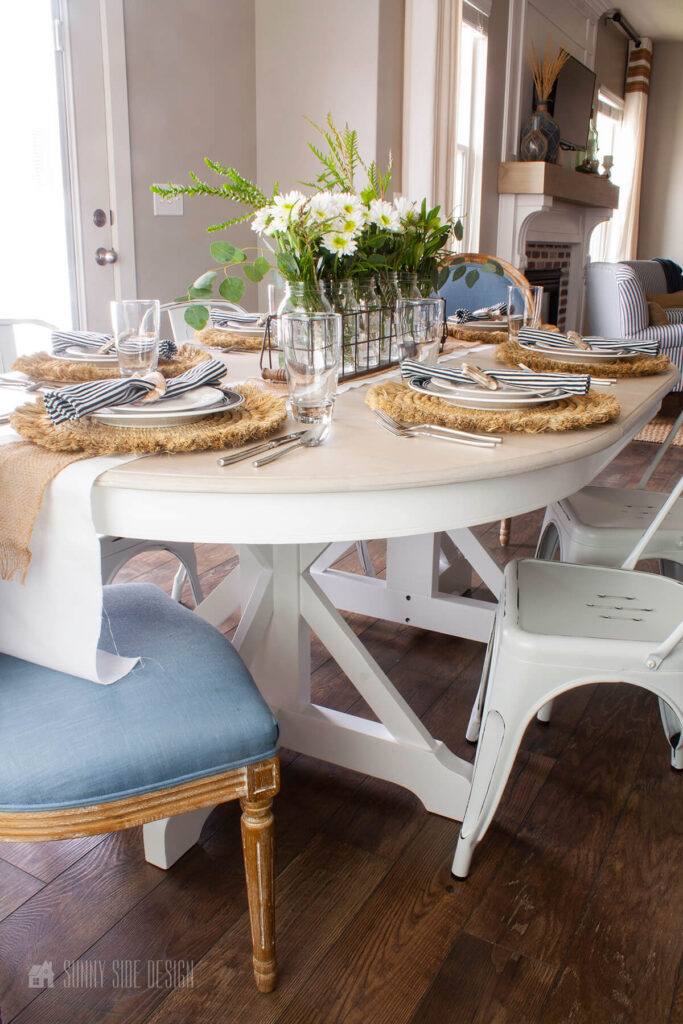
Just off our living room in the great room is our dining area, with an oak table I found for free on the side of the street.
Now it didn’t always look like this, but with a little elbow grease it’s perfect in my coastal inspired home.
Click here for more details.
Master Bedroom

Next is my sanctuary, the master bedroom.
We created a navy board and batten wall for a little modern coastal style and painted the remaining walls white.
This bedroom is full of DIY projects from giving an old pine bed a RH finish to an aged SaltWash finish on a console table.
Click here for more details on my master bedroom.
Kids Bedroom #1
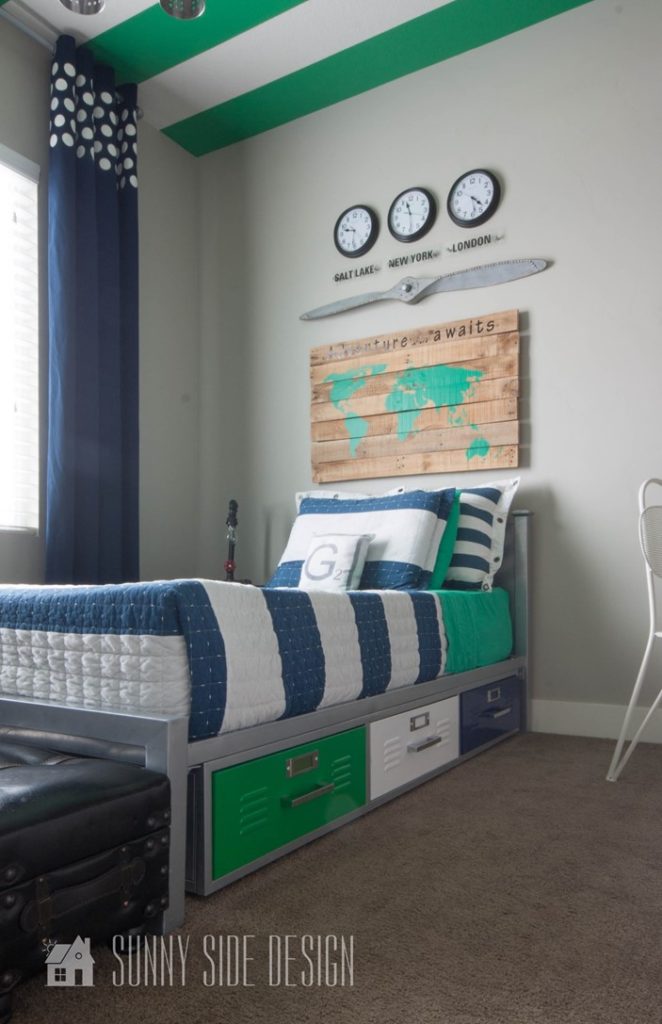
We now enter our oldest son, Gavin’s room.
Having his own room in this house meant no more sharing with his baby brother.
I let him pick out the color scheme, then I went to town creating the theme for his space constantly bouncing ideas off my Mom.
Clearly it’s a fun and cool industrial travel vibe.
For more details on this bedroom, click here.
Another way we saved money was to have the builder paint the entire house white.
Then my angel Mom and I added personality to the rooms by adding color to the walls in the entire house the week prior to moving in!
It was a big task to say the least, but this way I was able to get the 2-tone paint throughout the house (at a fraction of the cost) and use multiple colors in different spaces.
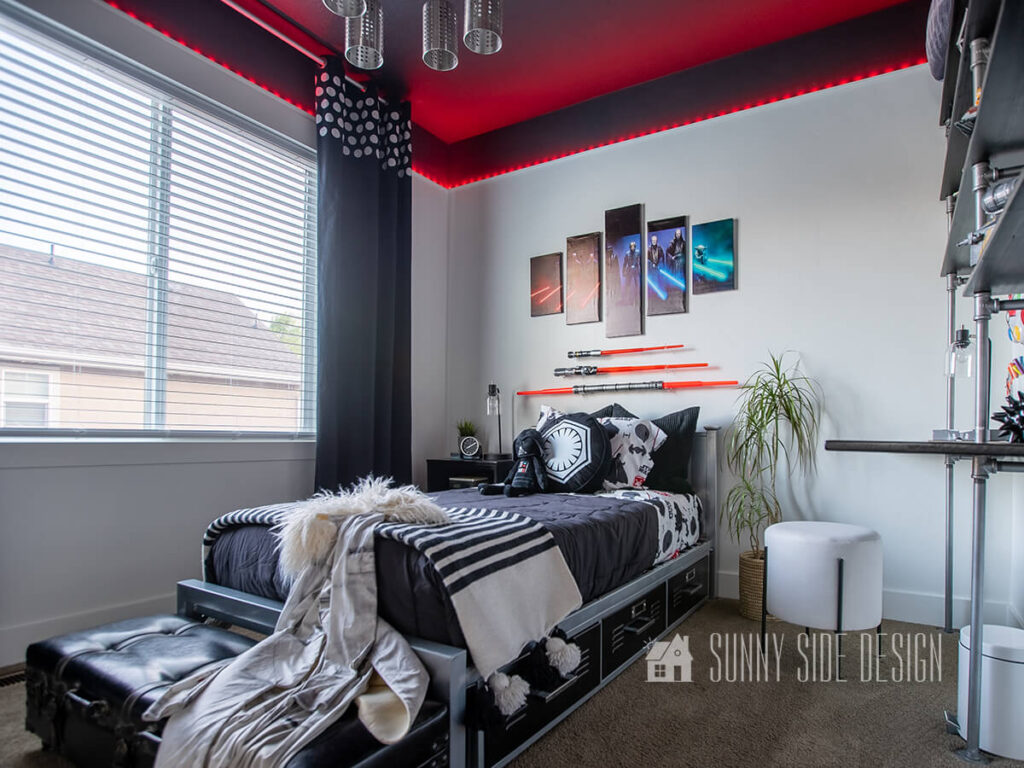
After several years, my boys decided to switch bedrooms and Aiden really wanted a Star Wars bedroom.
We gave it to him, but with a neutral backdrop, so when he changes his style the base of the room will remain the same!
Can you believe this is the same room? It’s crazy what a little makeover can do for a space!
Click here for more details on how we gave this room a makeover for less than $500.
Kids Bedroom #2
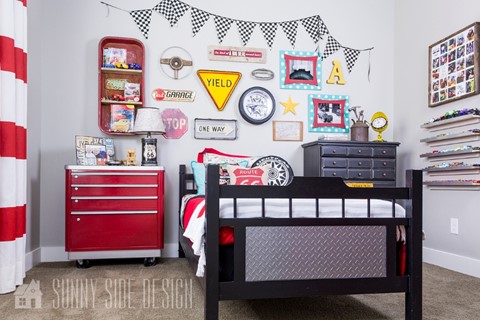
Fasten your seat belts as we enter the ultimate car lover room!
Our Aiden eats, sleeps and breathes cars! (until he decided he was too old for cars and now it’s all about Star Wars.)
This space is finished complete with a lateral filing cabinet turned to tool chest dresser, wall display and storage for all of his favorite cars, photo gallery of many of his Great to Great-Great Grandpas with their old cars…not to mention a cherished picture of his Great-Great Grandpa racing in a real Hudson Hornet!
This boy is in Heaven!
Click here for more details on this car themed bedroom.

When the boys decided to switch rooms, Gavin wanted a more sophisticated and grown up room.
He once again chose the color palette for the room with a bold green accent wall.
Then we added a board and batten wall with a twist that makes this small bedroom feel larger.
This room is quickly becoming my favorite, because the green color he chose is so relaxing!
Who knew I could love green too?!
This room is full of DIY projects to keep this room on budget, click here for the details.
Kids Bedroom #3
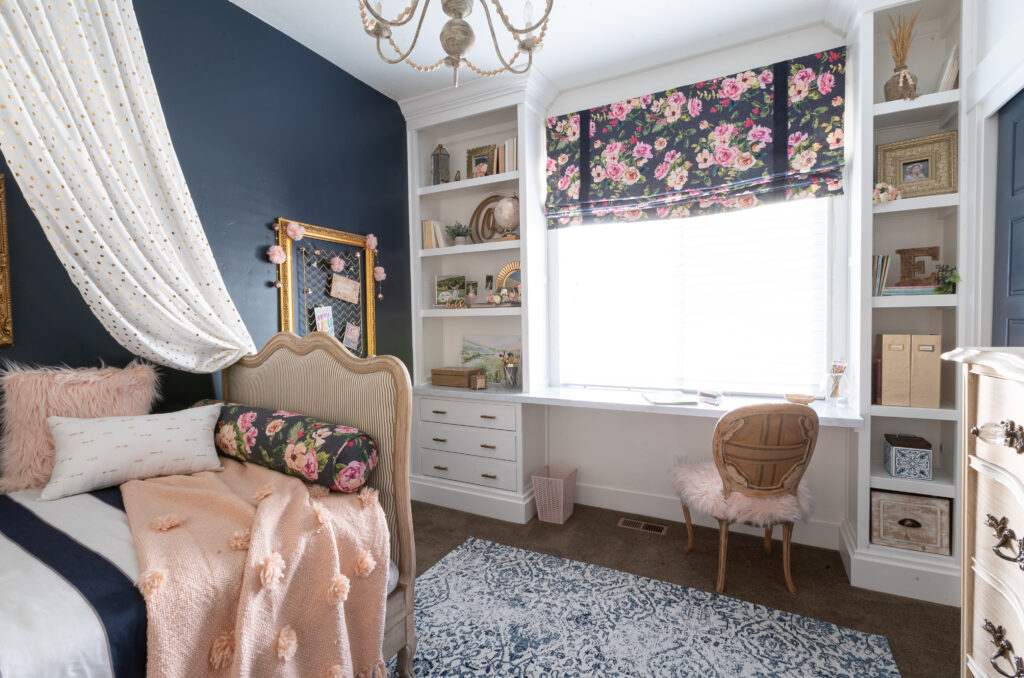
And finally the last bedroom is for our “little miss”, Ellie.
Once again she chose the color pallet for the room with a dark navy accent wall and hints of blush.
One of my favorite elements in the bedroom is the built-in storage and desk.
She’s a little budding artist and has so many supplies and this was the perfect solution for her small bedroom.
Click here for more details and DIY projects for this sweet girls bedroom.
Basement Family Room

Now on to the family room, which is everyone’s favorite room!
Once again to save money building and decorating this room almost all the elements are DIY projects.
We learned how to build cabinets and built the entertainment center wall and wet bar area, poured an epoxy countertop, sewed a box cushion for the reading nook and installed the flooring.
Click here for more details on our family room.
Basement Bathroom
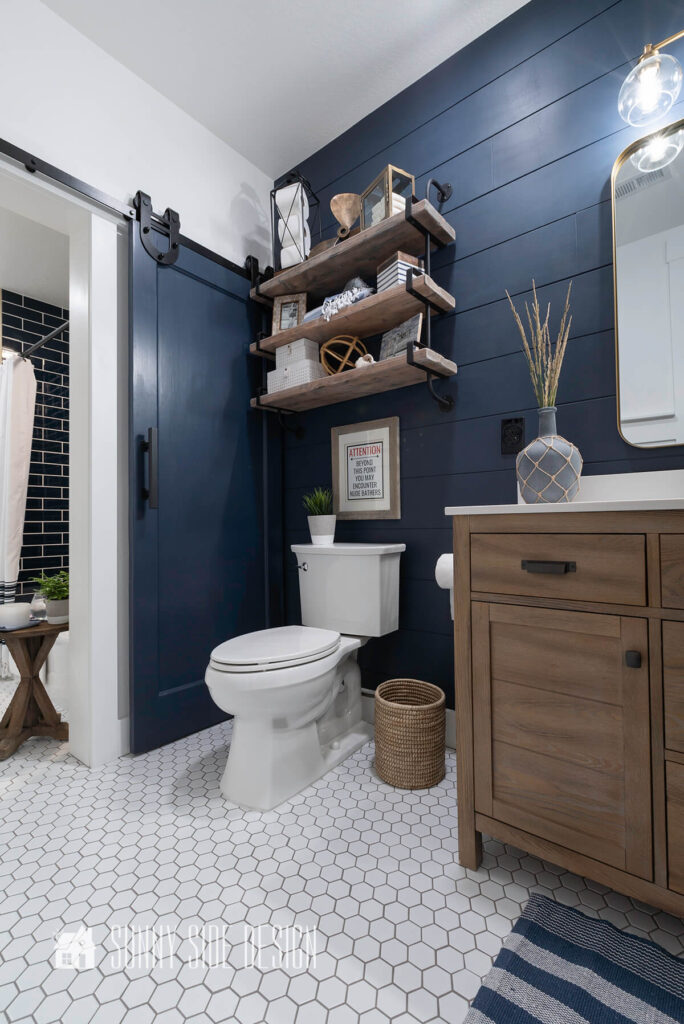
This is the best bathroom in the house!
From the navy shiplap wall to the blue subway tile, I love every element in this bathroom!
I can’t wait to get my hands on the other 3 bathrooms in this house and give them a little modern coastal style.
For more details on this modern coastal jack and jill bathroom, click here.
Home Gym
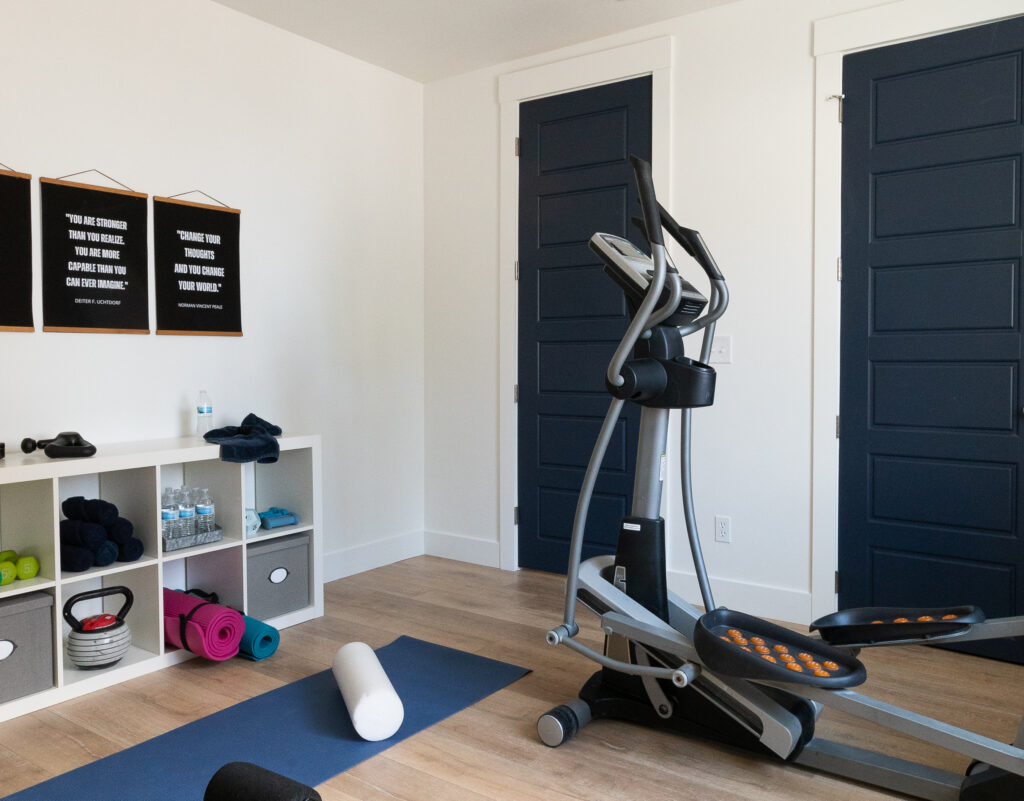
Off the family room we’ve created a home gym.
I wanted a clean fresh look in here and simply painted the wall a fresh white, painted the doors my favorite navy, BM Hale Navy and installed the laminate floor.
Office/Craft Room

The last room in the basement is our office/craft room.
This room has wide plank shiplap walls and is designed with several workstations.
There’s an island in the center of the room with power for crafting, a sewing station, a desk area for the computer and a second work station with computer for the kids.
One thing we included in this room is a large walk-in closet to store all of my craft supplies.
Thank you for joining me on my home tour!
I hope you’ve enjoyed touring my modern coastal home, the only thing that would be better is if it had a waterfront view! A little hard to do when you live in the desert! But I can dream.
Please drop us a comment if you have any questions about my home, we love hearing from you!
Click here to see my mom’s home tour.
And for more home style inspiration, click here and see a few of our clients homes.
If you’re new here, WELCOME! We love having new readers and friends!
You can learn more about us here.
Let’s stay connected! Join our DIY community of doers and you won’t miss the weekly updates and more inspiration for you always on a budget.
Sharing is caring!